1997 NISSAN FRONTIER seats
[x] Cancel search: seatsPage 28 of 204
2Pre-driving checks and adjustments
Key .........................................................................2-2
Door locks ..............................................................2-2
Power door lock (if so equipped) ...........................2-3
Hood release ..........................................................2-4
Glove box lock (if so equipped) .............................2-4
Fuel filler cap ..........................................................2-5
Tailgate latch ..........................................................2-5
Tie down hooks ......................................................2-7
Front separate seats ..............................................2-8
Seat adjustment .....................................................2-8
Head restraints .....................................................2-11
Tilting front separate seat ....................................2-11
Bench seat ...........................................................2-12
Seat adjustment ...................................................2-12
Tilting bench seat .................................................2-12
Jump seat .............................................................2-13
Supplemental restraint system (supplemental
air bag system).....................................................2-14
Supplemental air bag system...............................2-15
Warning labels......................................................2-17
Supplemental air bag warning light......................2-17Seat belts .............................................................2-19
Precautions on seat belt usage ...........................2-19
Child safety...........................................................2-20
3-point type with retractor ....................................2-21
2-point type without retractor (center of bench
seat and jump seats)............................................2-23
Seat belt extenders ..............................................2-24
Seat belt maintenance .........................................2-24
Child restraints for infants and small children......2-24
Installation on front passenger seat (3-point
type with retractor) ...............................................2-26
Installation in center of bench seat (2-point
type without retractor) ..........................................2-27
Top strap child restraint .......................................2-28
Tilting steering wheel (if so equipped) .................2-29
Outside mirror remote control
(if so equipped) ....................................................2-30
Outside mirrors .....................................................2-30
Inside mirror .........................................................2-31
Vanity mirror (if so equipped)...............................2-31
ZX
Page 33 of 204
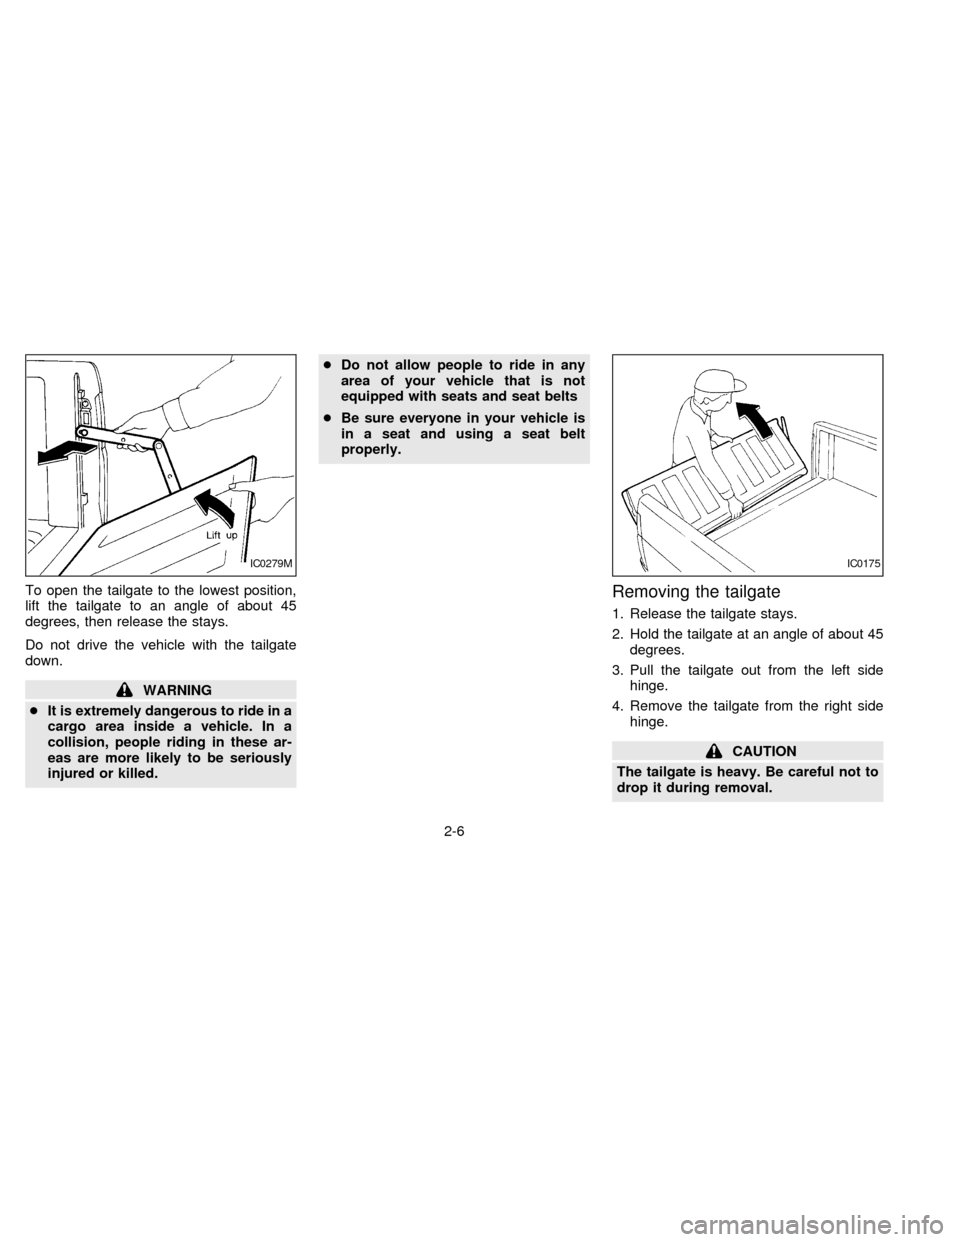
To open the tailgate to the lowest position,
lift the tailgate to an angle of about 45
degrees, then release the stays.
Do not drive the vehicle with the tailgate
down.
WARNING
cIt is extremely dangerous to ride in a
cargo area inside a vehicle. In a
collision, people riding in these ar-
eas are more likely to be seriously
injured or killed.cDo not allow people to ride in any
area of your vehicle that is not
equipped with seats and seat belts
cBe sure everyone in your vehicle is
in a seat and using a seat belt
properly.
Removing the tailgate
1. Release the tailgate stays.
2. Hold the tailgate at an angle of about 45
degrees.
3. Pull the tailgate out from the left side
hinge.
4. Remove the tailgate from the right side
hinge.
CAUTION
The tailgate is heavy. Be careful not to
drop it during removal.
IC0279MIC0175
2-6
ZX
Page 35 of 204
SEAT ADJUSTMENT
WARNING
cDo not adjust the driver's seat while
driving. The seat may move sud-
denly and could cause loss of con-
trol of the vehicle.
c
After adjustment, gently rock in the
seat to make sure it is securely locked.
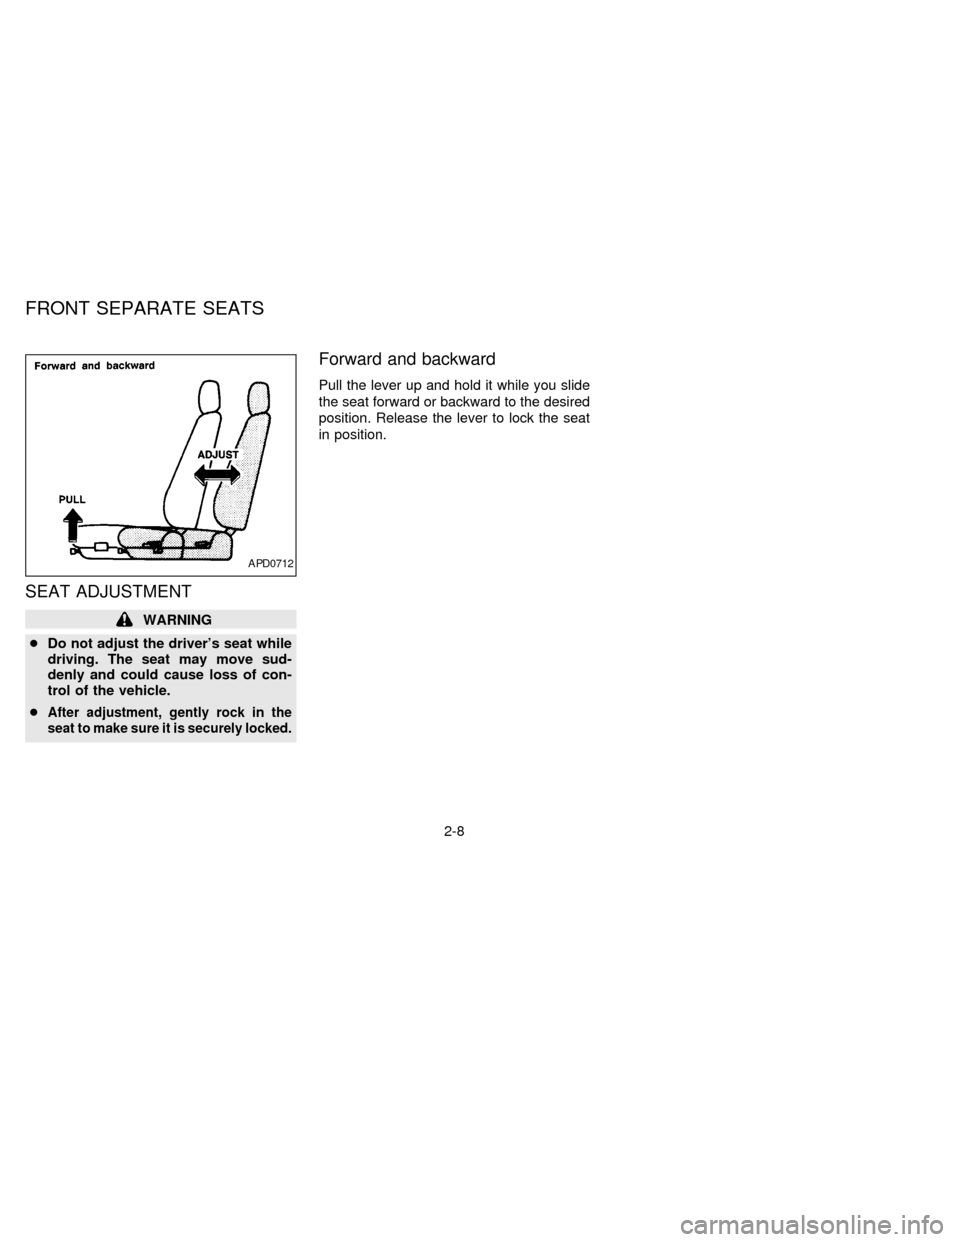
Forward and backward
Pull the lever up and hold it while you slide
the seat forward or backward to the desired
position. Release the lever to lock the seat
in position.
APD0712
FRONT SEPARATE SEATS
2-8
ZX
Page 38 of 204
HEAD RESTRAINTS
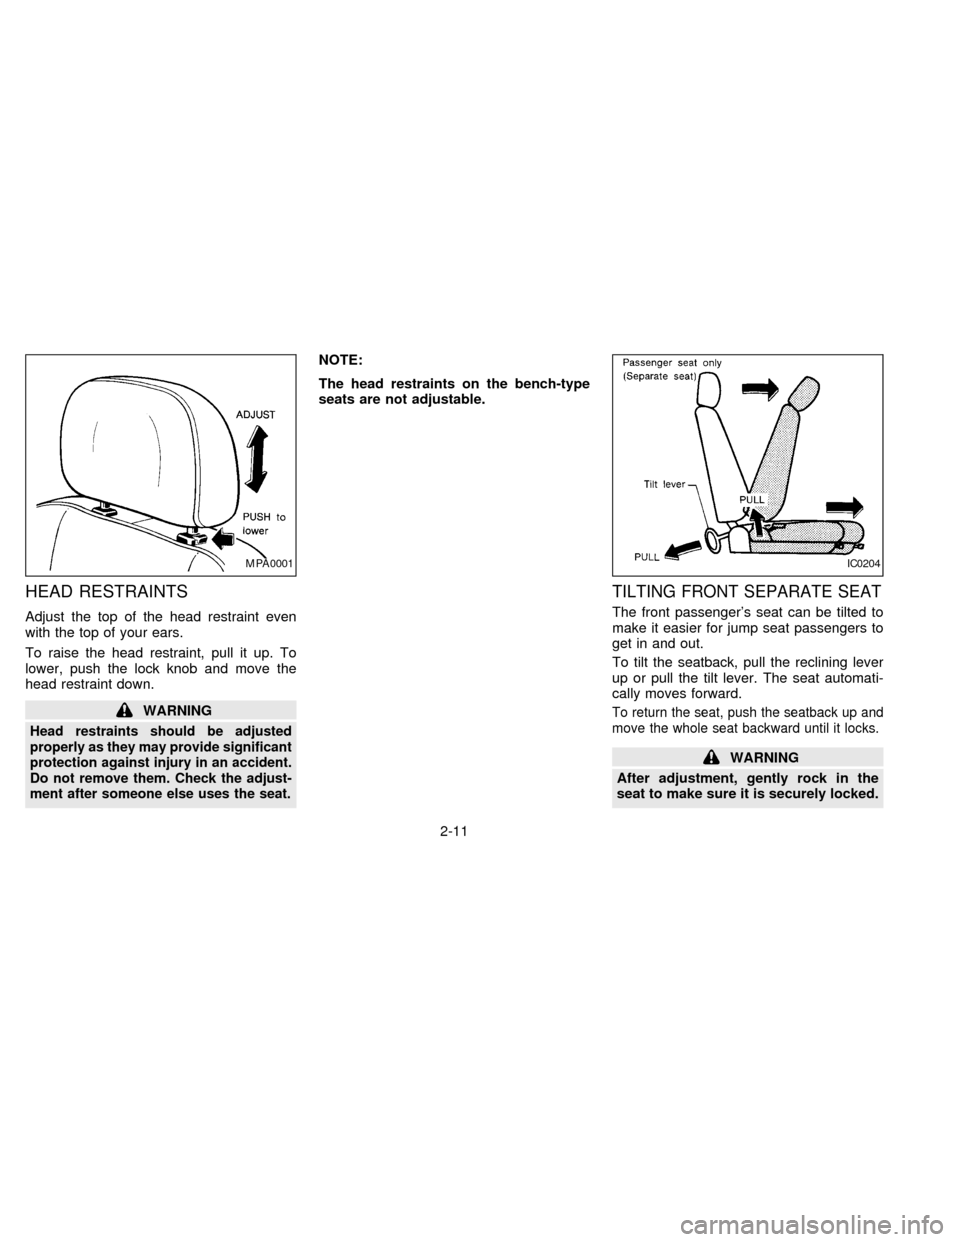
Adjust the top of the head restraint even
with the top of your ears.
To raise the head restraint, pull it up. To
lower, push the lock knob and move the
head restraint down.
WARNING
Head restraints should be adjusted
properly as they may provide significant
protection against injury in an accident.
Do not remove them. Check the adjust-
ment after someone else uses the seat.
NOTE:
The head restraints on the bench-type
seats are not adjustable.
TILTING FRONT SEPARATE SEAT
The front passenger's seat can be tilted to
make it easier for jump seat passengers to
get in and out.
To tilt the seatback, pull the reclining lever
up or pull the tilt lever. The seat automati-
cally moves forward.
To return the seat, push the seatback up and
move the whole seat backward until it locks.
WARNING
After adjustment, gently rock in the
seat to make sure it is securely locked.
MPA0001IC0204
2-11
ZX
Page 40 of 204
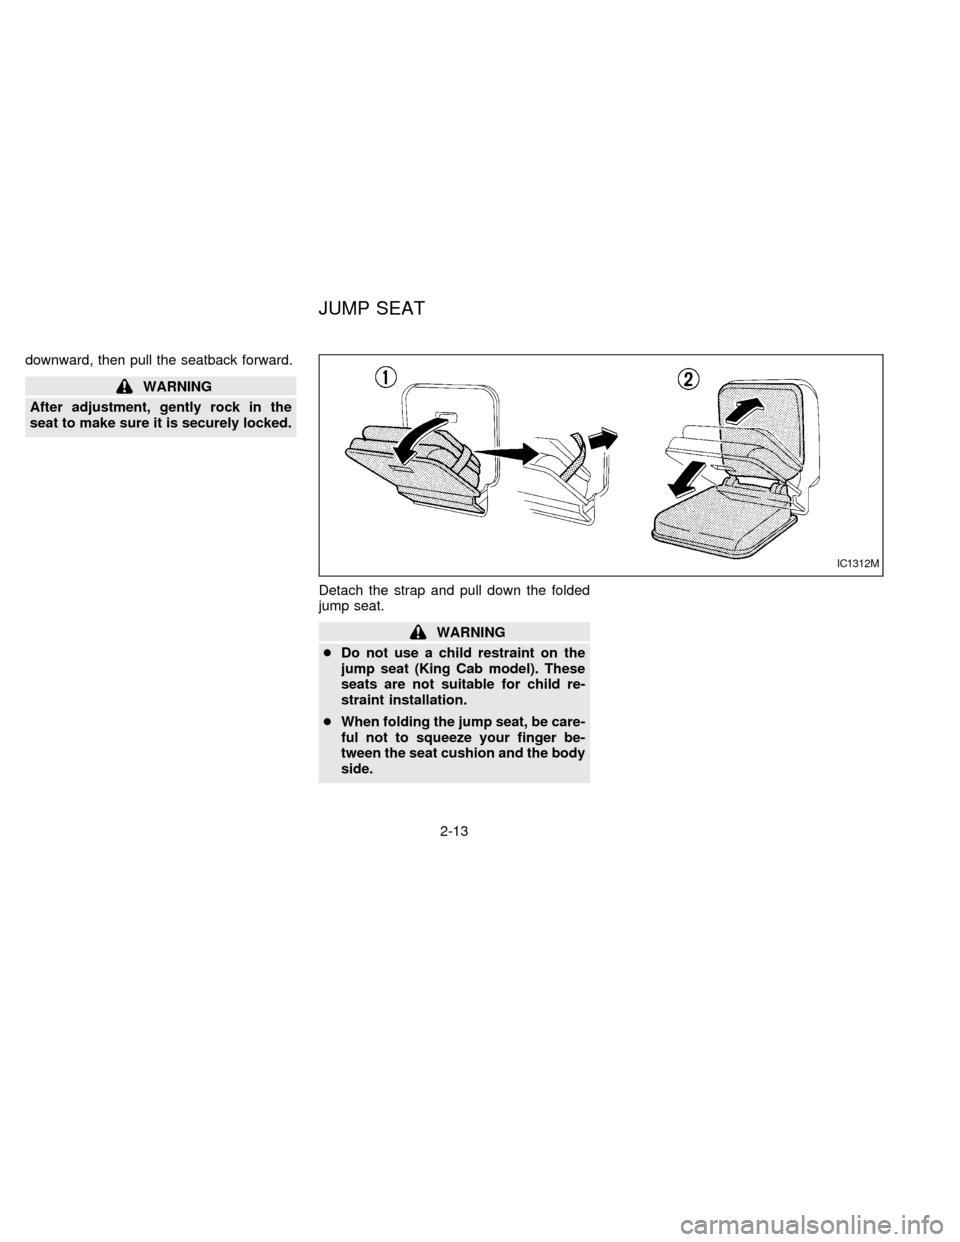
downward, then pull the seatback forward.
WARNING
After adjustment, gently rock in the
seat to make sure it is securely locked.
Detach the strap and pull down the folded
jump seat.
WARNING
cDo not use a child restraint on the
jump seat (King Cab model). These
seats are not suitable for child re-
straint installation.
cWhen folding the jump seat, be care-
ful not to squeeze your finger be-
tween the seat cushion and the body
side.
IC1312M
JUMP SEAT
2-13
ZX
Page 47 of 204
cDo not wear the belt inside out or
twisted. Doing so may reduce its
effectiveness.
cDo not allow more than one person
to use the same belt.
cNever carry more people in the ve-
hicle than there are seat belts.
c
Never allow anyone to ride in the
cargo area or in a slide-in camper or
other type cargo area cover while the
vehicle is in motion. These areas do
not contain seat belts. It is not de-
signed for passengers. They could be
injured in sudden braking or collision.
cIf the seat belt warning lamp glows
continuously while the ignition is
turned ON with all doors closed and
all seat belts fastened, it may indi-
cate a malfunction in the system.
Have the system checked by your
NISSAN dealer.
cAll seat belt assemblies including
retractors and attaching hardware
should be inspected after any colli-
sion at your NISSAN dealer. NISSAN
recommends that all seat belt as-
semblies in use during a collision bereplaced unless the collision was
minor and the belts show no damage
and continue to operate properly.
Seat belt assemblies not in use dur-
ing a collision should also be in-
spected and replaced if either dam-
age or improper operation is noted.
CHILD SAFETY
Children need adults to help protect them.
WARNING
cDo not install a child restraint in the
jump seats (King Cab model). These
seats are not suitable for child re-
straint installation.
c
Infants and children need special pro-
tection. The vehicle's seat belts may
not fit them properly. The shoulder
belt may come too close to the face or
neck. The lap belt may not fit over
their small hip bones. In an accident
an improperly fitting seat belt could
cause serious or fatal injury. Always
use appropriate child restraints.
All U.S. states and provinces of Canada
require the use of approved child restraints
for infants and small children. (See ``Childrestraints for infants and small children''
later in this section for more information.)
In addition, there are many types of child
restraints available for larger children which
should be used for maximum protection.
Infant or small child
NISSAN recommends that infants or small
children be seated in child restraints that
comply with Federal Motor Vehicle Safety
Standards or Canadian Motor Vehicle
Safety Standards. You should choose a
child restraint which fits your vehicle and
always follow the manufacturer's instruc-
tions for installation and use.
Children
Children who are too large for child re-
straints should be seated and restrained by
the seat belts which are provided.
If the child's seating position has a shoulder
belt that fits close to the face or neck, the
use of a booster seat (commercially avail-
able) may help overcome this. The booster
seat should raise the child so the shoulder
belt is properly positioned across the top,
middle portion of the shoulder and the lap
belt is low on the hips. The booster seat
should fit the vehicle seat and have a label
2-20
ZX
Page 50 of 204
2-POINT TYPE WITHOUT
RETRACTOR (Center of bench
seat and jump seats)
On bench seat equipped models, the center
seat belt buckle and tongue are identified by
the CENTER mark. The center seat belt
tongue can be fastened only into the center
seat belt buckle.
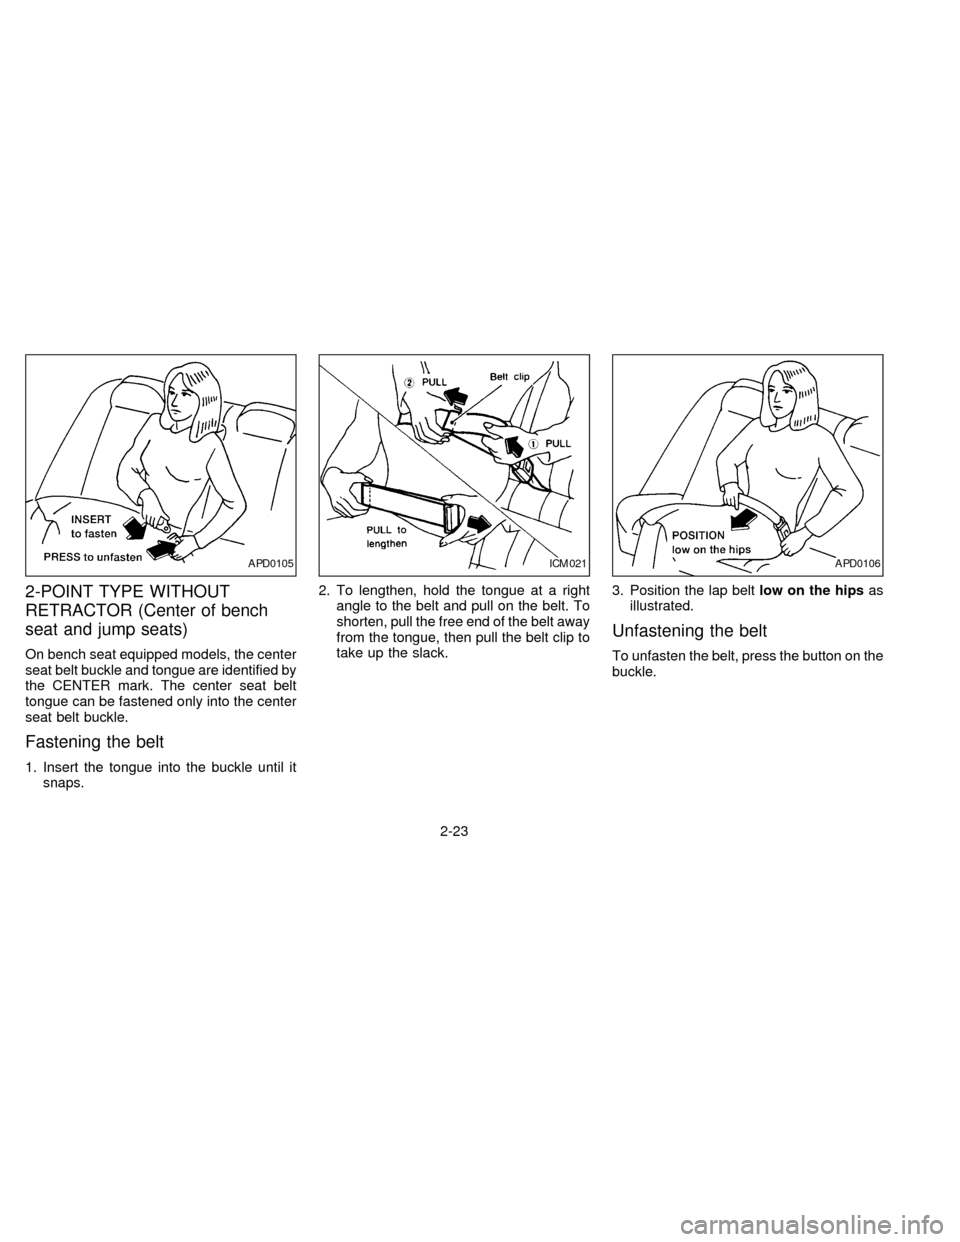
Fastening the belt
1. Insert the tongue into the buckle until it
snaps.2. To lengthen, hold the tongue at a right
angle to the belt and pull on the belt. To
shorten, pull the free end of the belt away
from the tongue, then pull the belt clip to
take up the slack.3. Position the lap beltlow on the hipsas
illustrated.
Unfastening the belt
To unfasten the belt, press the button on the
buckle.
APD0105ICM021APD0106
2-23
ZX
Page 52 of 204
cAn improperly installed child re-
straint could lead to serious injury or
death in an accident.
In general, child restraints are designed to
be installed with a lap belt or the lap portion
of a 3-point type seat belt. Child restraints
specially designed for infants and small
children are offered by several manufactur-
ers. When selecting any child restraint,
keep the following points in mind:
1) Choose only a restraint with a label cer-
tifying that it complies with Federal Motor
Vehicle Safety Standard 213 or Cana-
dian Motor Vehicle Safety Standard 213.
2) Check the child restraint in your vehicle
to be sure it is compatible with the vehi-
cle's seat and seat belt system. Choose
a child restraint that meets the guidelines
of the Society of Automotive Engineers
recommended practice J1819 for child
restraint installation.
3) If the child restraint is compatible with
your vehicle, place your child in the child
restraint and check the various adjust-
ments to be sure the child restraint is
compatible with your child. Always follow
all of the recommended procedures.All U.S. states and provinces of Canada
require that infants and small children be
restrained in an approved child restraint
at all times while the vehicle is being
operated.
WARNING
cDo not install a child restraint in the
jump seats (King Cab model). These
seats are not suitable for child re-
straint installation.
cImproper use of a child restraint can
result in increased injuries for both
the infant or child and other occu-
pants in the vehicle.
cFollow all of the child restraint
manufacturer's instructions for in-
stallation and use. When purchasing
a child restraint, be sure to select
one which will fit your child and
vehicle as it may not be possible to
properly install some types of child
restraints in your vehicle.
cIf the child restraint is not anchored
properly, the risk of a child being
injured in a collision or a sudden
stop greatly increases.cAdjustable seatbacks should be po-
sitioned to fit the child restraint, but
as upright as possible.
c
After attaching the child restraint,
test it before you place the child in it.
Tilt it from side to side. Try to tug it
forward and check to see if the belt
holds the restraint in place. If the
restraint is not secure, tighten the
belt as necessary, or put the restraint
in another seat and test it again.
cFor a front facing child restraint,
check to make sure the shoulder belt
does not go in front of the child's
face or neck. If it does, put the shoul-
der belt behind the child restraint.
cWhen your child restraint is not in
use, keep it secured with a seat belt
to prevent it from being thrown
around in case of a sudden stop or
accident.
CAUTION
Remember that a child restraint left in a
closed vehicle can become very hot.
Check the seating surface and buckles
before placing your child in the child
restraint.
2-25
ZX