1997 NISSAN FRONTIER glove box
[x] Cancel search: glove boxPage 28 of 204

2Pre-driving checks and adjustments
Key .........................................................................2-2
Door locks ..............................................................2-2
Power door lock (if so equipped) ...........................2-3
Hood release ..........................................................2-4
Glove box lock (if so equipped) .............................2-4
Fuel filler cap ..........................................................2-5
Tailgate latch ..........................................................2-5
Tie down hooks ......................................................2-7
Front separate seats ..............................................2-8
Seat adjustment .....................................................2-8
Head restraints .....................................................2-11
Tilting front separate seat ....................................2-11
Bench seat ...........................................................2-12
Seat adjustment ...................................................2-12
Tilting bench seat .................................................2-12
Jump seat .............................................................2-13
Supplemental restraint system (supplemental
air bag system).....................................................2-14
Supplemental air bag system...............................2-15
Warning labels......................................................2-17
Supplemental air bag warning light......................2-17Seat belts .............................................................2-19
Precautions on seat belt usage ...........................2-19
Child safety...........................................................2-20
3-point type with retractor ....................................2-21
2-point type without retractor (center of bench
seat and jump seats)............................................2-23
Seat belt extenders ..............................................2-24
Seat belt maintenance .........................................2-24
Child restraints for infants and small children......2-24
Installation on front passenger seat (3-point
type with retractor) ...............................................2-26
Installation in center of bench seat (2-point
type without retractor) ..........................................2-27
Top strap child restraint .......................................2-28
Tilting steering wheel (if so equipped) .................2-29
Outside mirror remote control
(if so equipped) ....................................................2-30
Outside mirrors .....................................................2-30
Inside mirror .........................................................2-31
Vanity mirror (if so equipped)...............................2-31
ZX
Page 31 of 204
WARNING
cMake sure the hood is completely
closed and latched before driving.
Failure to do so could cause the
hood to fly open and result in an
accident.
cIf you see steam or smoke coming
from the engine compartment, to
avoid injury do not open the hood.
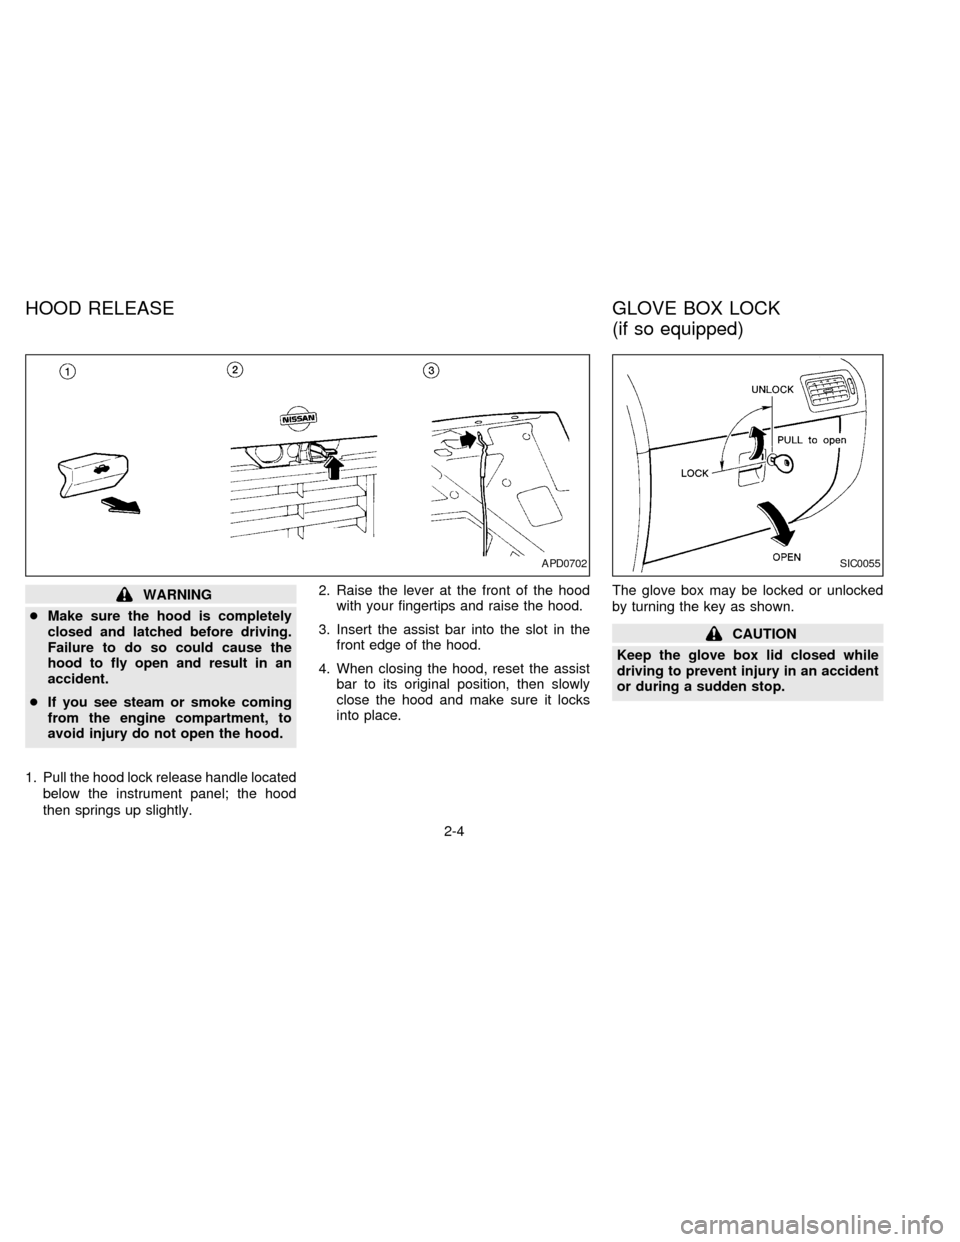
1. Pull the hood lock release handle located
below the instrument panel; the hood
then springs up slightly.2. Raise the lever at the front of the hood
with your fingertips and raise the hood.
3. Insert the assist bar into the slot in the
front edge of the hood.
4. When closing the hood, reset the assist
bar to its original position, then slowly
close the hood and make sure it locks
into place.The glove box may be locked or unlocked
by turning the key as shown.
CAUTION
Keep the glove box lid closed while
driving to prevent injury in an accident
or during a sudden stop.
APD0702SIC0055
HOOD RELEASE GLOVE BOX LOCK
(if so equipped)
2-4
ZX
Page 104 of 204
Tire inflation pressure
Periodically check the pressure in all tires,
including the spare, with a gauge. Adjust to
the specified pressure if necessary. Tire
pressures are shown on the tire placard
affixed to the glove box.
Tire chain
Tire chains must be installed only on the
rear wheels and not on the front wheels.
Do not drive with tire chains on paved roads
which are clear of snow. Driving with chains
in such conditions can cause damage to the
various mechanisms of the vehicle due to
some overstress. When driving on clear
paved roads, be sure to change to 2WD.
WARNING
cDo not park the vehicle over flam-
mable materials such as dry grass,
waste paper or rags. They may ignite
and cause a fire.
c
The transfer control lever
must be in the 2H, 4H or 4L position
and the parking brake set to prevent
the vehicle from rolling.
cNever place the transfer control le-
ver in the N position. Otherwise, the
vehicle could roll unexpectedly evenif the manual transmission is in gear or
the automatic transmission is in the P
position. This could result in serious
personal injury or property damage.
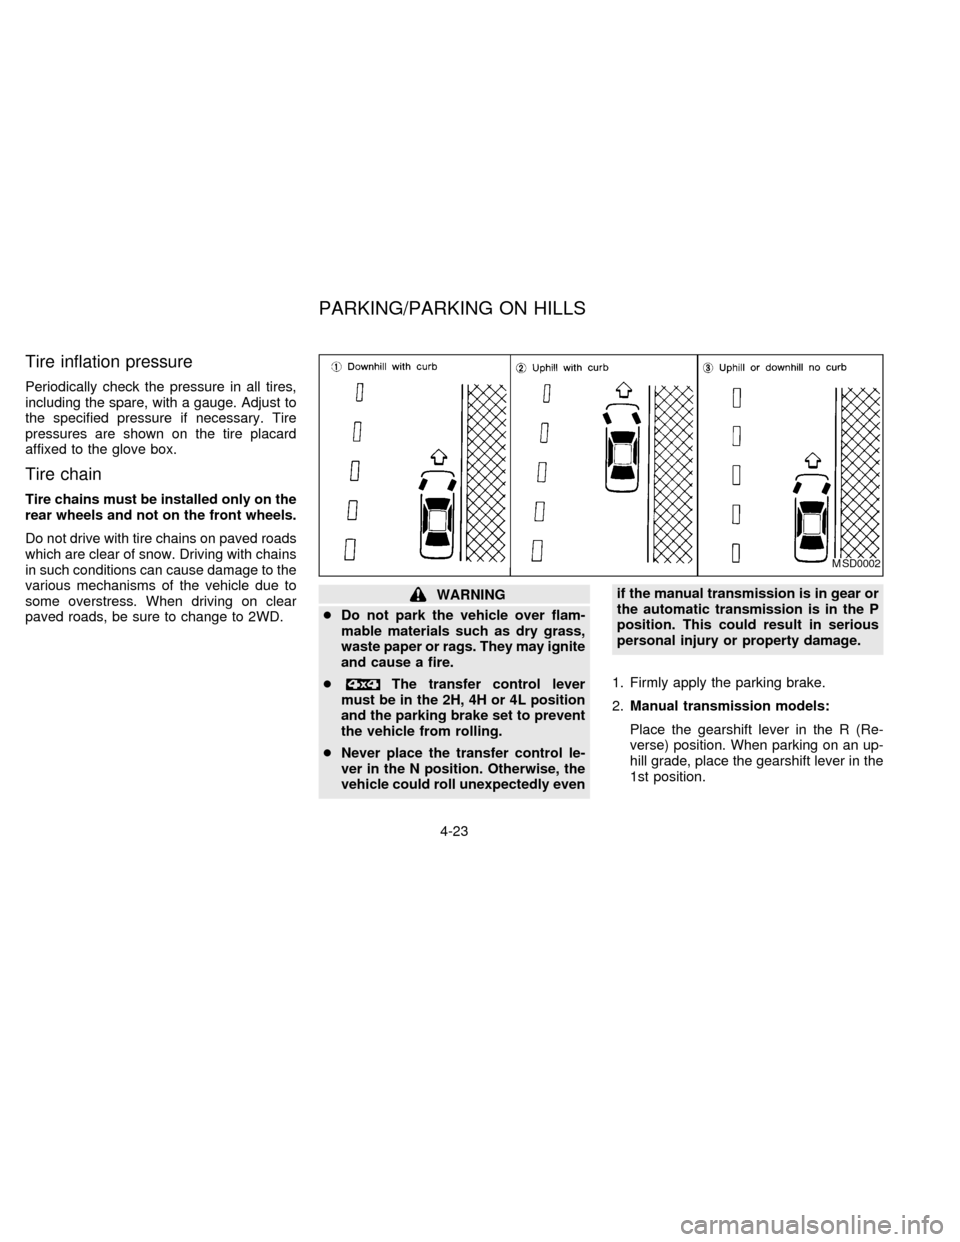
1. Firmly apply the parking brake.
2.Manual transmission models:
Place the gearshift lever in the R (Re-
verse) position. When parking on an up-
hill grade, place the gearshift lever in the
1st position.
MSD0002
PARKING/PARKING ON HILLS
4-23
ZX
Page 116 of 204
Installing wheel
The spare tire is designed for emergency
use. See specific instructions under the
heading ``Wheels and tires'' in the ``Do-
it-yourself operations'' section.
1. Clean any mud or dirt from the surface
between the wheel and hub.
2. Carefully put the spare tire on and tighten
the wheel nuts finger tight.
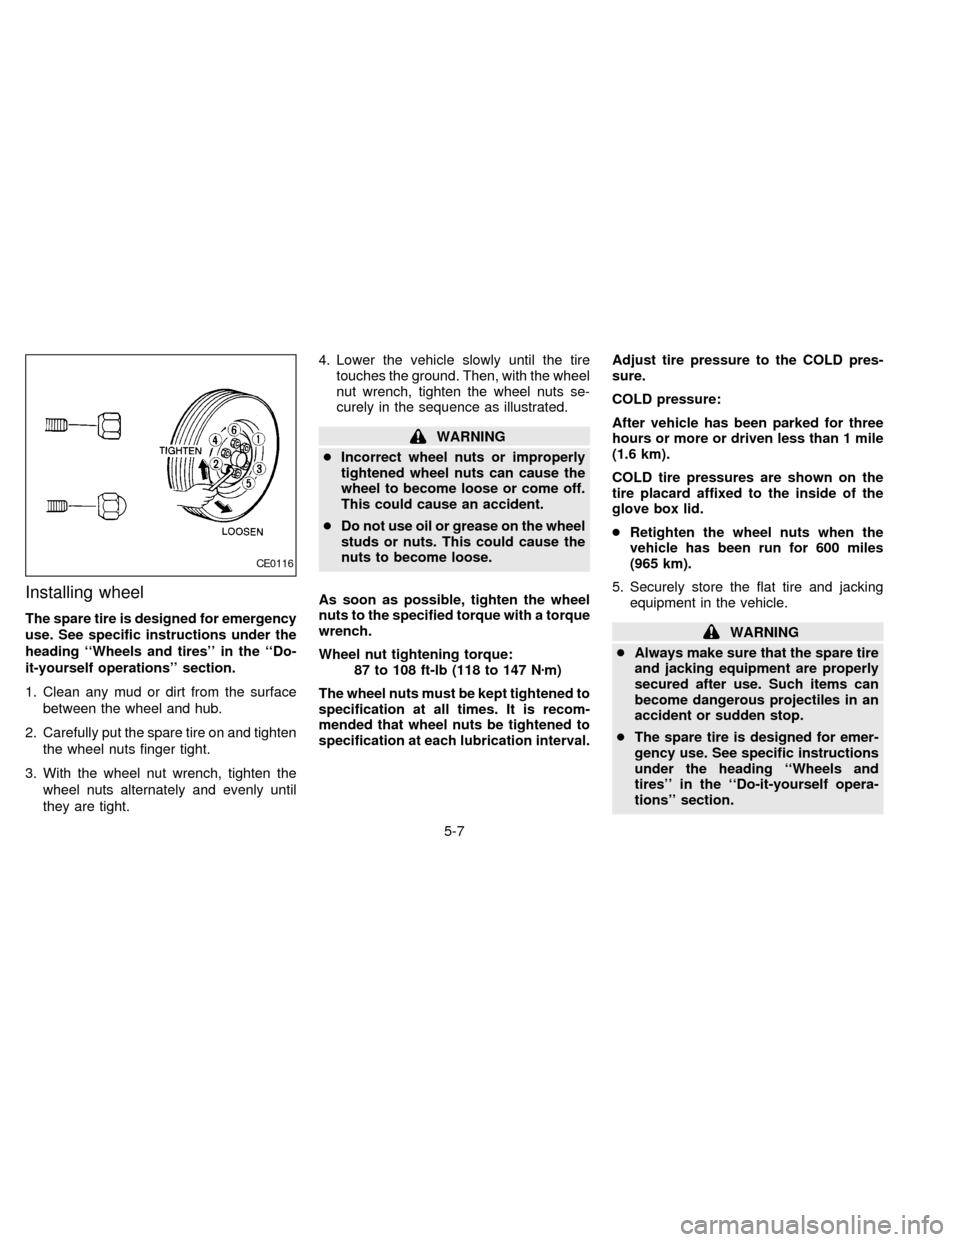
3. With the wheel nut wrench, tighten the
wheel nuts alternately and evenly until
they are tight.4. Lower the vehicle slowly until the tire
touches the ground. Then, with the wheel
nut wrench, tighten the wheel nuts se-
curely in the sequence as illustrated.
WARNING
cIncorrect wheel nuts or improperly
tightened wheel nuts can cause the
wheel to become loose or come off.
This could cause an accident.
cDo not use oil or grease on the wheel
studs or nuts. This could cause the
nuts to become loose.
As soon as possible, tighten the wheel
nuts to the specified torque with a torque
wrench.
Wheel nut tightening torque:
87 to 108 ft-lb (118 to 147 Nzm)
The wheel nuts must be kept tightened to
specification at all times. It is recom-
mended that wheel nuts be tightened to
specification at each lubrication interval.Adjust tire pressure to the COLD pres-
sure.
COLD pressure:
After vehicle has been parked for three
hours or more or driven less than 1 mile
(1.6 km).
COLD tire pressures are shown on the
tire placard affixed to the inside of the
glove box lid.
cRetighten the wheel nuts when the
vehicle has been run for 600 miles
(965 km).
5. Securely store the flat tire and jacking
equipment in the vehicle.
WARNING
cAlways make sure that the spare tire
and jacking equipment are properly
secured after use. Such items can
become dangerous projectiles in an
accident or sudden stop.
cThe spare tire is designed for emer-
gency use. See specific instructions
under the heading ``Wheels and
tires'' in the ``Do-it-yourself opera-
tions'' section.
CE0116
5-7
ZX
Page 154 of 204
If you have a flat tire, see the ``In case of
emergency'' section.
Maximum inflation pressure
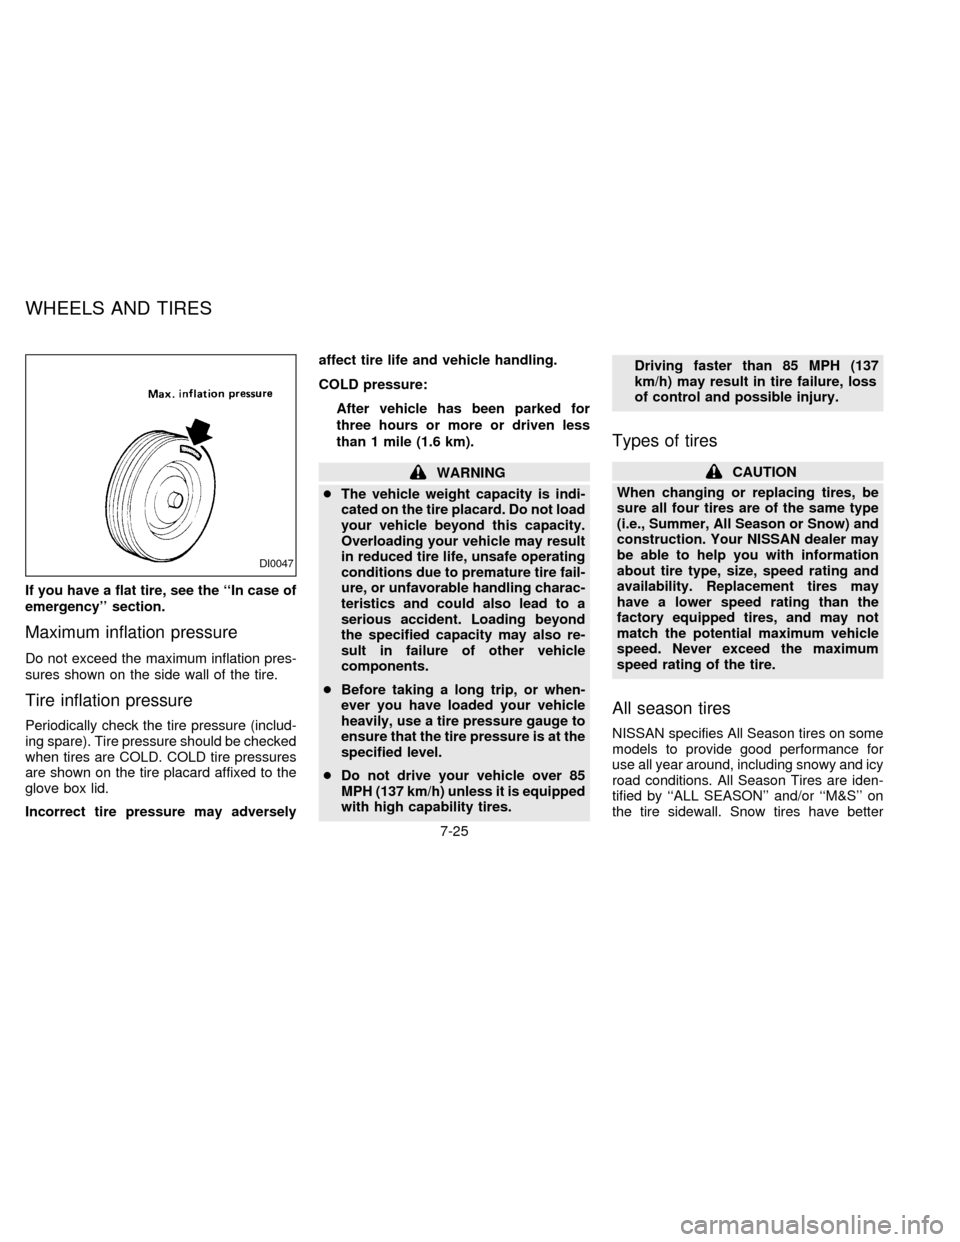
Do not exceed the maximum inflation pres-
sures shown on the side wall of the tire.
Tire inflation pressure
Periodically check the tire pressure (includ-
ing spare). Tire pressure should be checked
when tires are COLD. COLD tire pressures
are shown on the tire placard affixed to the
glove box lid.
Incorrect tire pressure may adverselyaffect tire life and vehicle handling.
COLD pressure:
After vehicle has been parked for
three hours or more or driven less
than 1 mile (1.6 km).
WARNING
cThe vehicle weight capacity is indi-
cated on the tire placard. Do not load
your vehicle beyond this capacity.
Overloading your vehicle may result
in reduced tire life, unsafe operating
conditions due to premature tire fail-
ure, or unfavorable handling charac-
teristics and could also lead to a
serious accident. Loading beyond
the specified capacity may also re-
sult in failure of other vehicle
components.
cBefore taking a long trip, or when-
ever you have loaded your vehicle
heavily, use a tire pressure gauge to
ensure that the tire pressure is at the
specified level.
cDo not drive your vehicle over 85
MPH (137 km/h) unless it is equipped
with high capability tires.Driving faster than 85 MPH (137
km/h) may result in tire failure, loss
of control and possible injury.
Types of tires
CAUTION
When changing or replacing tires, be
sure all four tires are of the same type
(i.e., Summer, All Season or Snow) and
construction. Your NISSAN dealer may
be able to help you with information
about tire type, size, speed rating and
availability. Replacement tires may
have a lower speed rating than the
factory equipped tires, and may not
match the potential maximum vehicle
speed. Never exceed the maximum
speed rating of the tire.
All season tires
NISSAN specifies All Season tires on some
models to provide good performance for
use all year around, including snowy and icy
road conditions. All Season Tires are iden-
tified by ``ALL SEASON'' and/or ``M&S'' on
the tire sidewall. Snow tires have better
DI0047
WHEELS AND TIRES
7-25
ZX
Page 185 of 204

EMISSION CONTROL
INFORMATION LABEL
The emission control information label is
attached as shown.
TIRE PLACARD
The cold tire pressure is shown on the tire
placard affixed to the inside of the glove
box.
AIR CONDITIONER
SPECIFICATION LABEL
The label is affixed to the firewall as shown.
CA0022STI0016TI1083
9-14
ZX
Page 192 of 204
Trailer hitch
Check the towing capacity of your bumper
hitch or receiver-type frame mounted hitch.
Choose a proper hitch for your vehicle and
trailer. Make sure the trailer hitch is securely
attached to the vehicle to help avoid per-
sonal injury or property damage due to
sway caused by crosswinds, rough road
surfaces or passing trucks.
CAUTION
cSpecial hitches which include frame
reinforcements are required for tow-
ing above 2,000 lb (907 kg). Suitable
genuine NISSAN hitches for pickup
trucks are available at your NISSAN
dealer.
cDo not use axle-mounted hitches.
cDo not modify the vehicle exhaust
system, brake system, etc. when the
hitch is installed.
cTo reduce the possibility of addi-
tional damage if your vehicle is
struck from the rear, where practical,
remove the hitch when not in use.
Remove receiver when not in use.After the hitch is removed, seal the
bolt holes to prevent exhaust fumes,
water or dust from entering the pas-
senger compartment.
cCheck regularly to make sure that all
trailer hitch mounting bolts are se-
curely fastened.Tire pressures
cWhen towing a trailer, inflate the vehicle
tires to the recommended cold tire pres-
sure indicated on the tire placard (affixed
to the glove box lid).
cTrailer tire condition, size, load rating and
proper inflation pressure should be in
accordance with the trailer and tire
manufacturers' specifications.
Safety chain
Always use a suitable chain between your
vehicle and the trailer. The chain should be
crossed and should be attached to the hitch,
not to the vehicle bumper or axle. Be sure to
leave enough slack in the chain to permit
turning corners.
Trailer lights
Trailer lights should comply with Federal
and/or local regulations. For assistance in
hooking up trailer lights, contact your autho-
rized NISSAN dealer.
Trailer brakes
If your trailer is equipped with a braking
system, make sure it conforms to Federal
and/or local regulations and that it is prop-
erly installed.
WARNING
Never connect a trailer brake system
directly to the vehicle brake system.
Pre-towing tips
cBe certain your vehicle maintains a level
position when a loaded and/or unloaded
trailer is hitched. Do not drive the vehicle
if it has an abnormal nose-up or nose-
down condition; check for improper
tongue load, overload, worn suspension
or other possible causes of either condi-
tion.
cAlways secure items in the trailer to
9-21
ZX
Page 199 of 204

D
Daytime running light system (Canada
only) ........................................................... 1-10
Dimensions and weights............................ 9-11
Door locks .................................................... 2-2
Drive belts .................................................. 7-14
Driving
Auto-lock free-running hubs ................. 4-16
Cold weather driving............................. 4-27
Driving with automatic transmission ....... 4-6
Driving with manual transmission ........... 4-9
Driving your 4-wheel drive safely ......... 4-21
Manual-lock free-running hubs ............. 4-19
Precautions when starting and
driving ..................................................... 4-2
E
Economy - fuel........................................... 4-14
Emission control information label............. 9-14
Emission control system warranty ............. 9-24
Engine
Before starting the engine ...................... 4-6
Capacities and recommended fuel/
lubricants ................................................ 9-2
Changing engine coolant........................ 7-5
Changing engine oil................................ 7-7
Changing engine oil filter........................ 7-9
Checking engine coolant level ............... 7-4
Checking engine oil level ....................... 7-6Engine compartment check locations .... 7-3
Engine coolant temperature gauge ........ 1-4
Engine cooling system ........................... 7-4
Engine oil ................................................ 7-6
Engine oil and oil filter
recommendation ..................................... 9-6
Engine oil pressure warning light ........... 1-8
Engine oil viscosity ................................. 9-7
Engine serial number ........................... 9-13
Engine specifications .............................. 9-9
Starting the engine ............................... 4-10
Exhaust gas (Carbon monoxide) ................. 4-2
F
Flashers (See hazard warning flasher
switch) ........................................................ 1-12
Flat tire ......................................................... 5-2
Floor mat positioning aid ............................. 6-4
Fluid
Automatic transmission fluid (ATF) ........ 7-9
Brake fluid ..................................... 7-11, 9-3
Capacities and recommended fuel/
lubricants ................................................ 9-2
Clutch fluid ............................................ 7-11
Engine coolant ........................................ 7-4
Engine oil ................................................ 7-6
Power steering fluid .............................. 7-11
Window washer fluid ............................ 7-12
F.M.V.S.S. certification label ..................... 9-13
Front seats
Bench.................................................... 2-12Separate ................................................. 2-8
Fuel
Capacities and recommended fuel/
lubricants ................................................ 9-2
Fuel economy ....................................... 4-14
Fuel filler cap .......................................... 2-5
Fuel gauge.............................................. 1-4
Fuel octane rating................................... 9-5
Fuel recommendation ............................. 9-4
Fuses ......................................................... 7-21
G
Gauge
Engine coolant temperature gauge ........ 1-4
Fuel gauge.............................................. 1-4
Odometer ................................................ 1-3
Speedometer .......................................... 1-3
Tachometer............................................. 1-3
Trip odometer ......................................... 1-3
General maintenance .................................. 8-2
Glove box lock ............................................. 2-4
H
Hazard warning flasher switch .................. 1-12
Head restraints .......................................... 2-11
Headlight and turn signal switch ............... 1-10
Headlights .................................................. 7-21
Heater
Heater and air conditioner controls ........ 3-3
10-2
ZX