1997 NISSAN ALTIMA ECU
[x] Cancel search: ECUPage 61 of 203
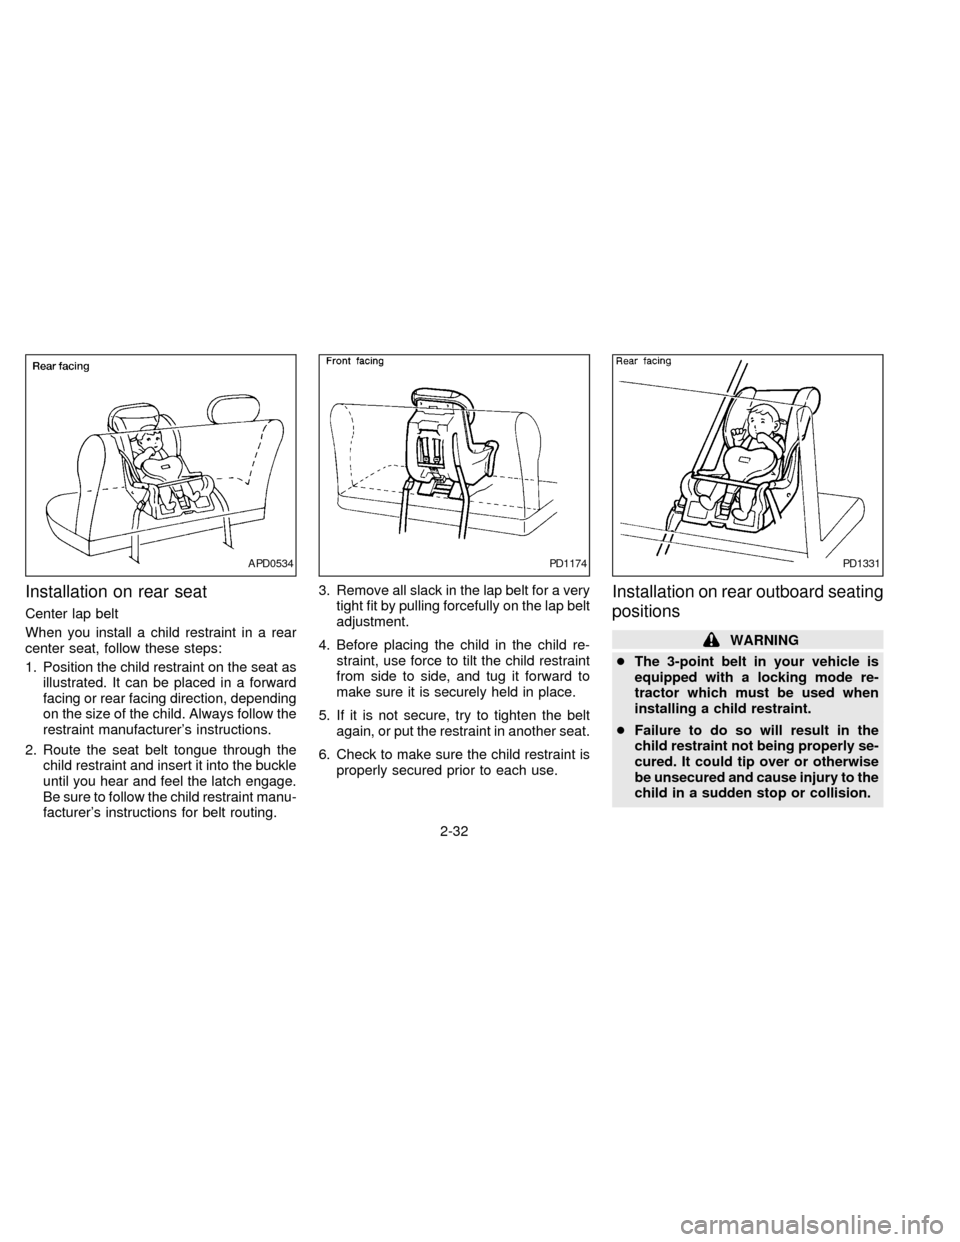
Installation on rear seat
Center lap belt
When you install a child restraint in a rear
center seat, follow these steps:
1. Position the child restraint on the seat as
illustrated. It can be placed in a forward
facing or rear facing direction, depending
on the size of the child. Always follow the
restraint manufacturer's instructions.
2. Route the seat belt tongue through the
child restraint and insert it into the buckle
until you hear and feel the latch engage.
Be sure to follow the child restraint manu-
facturer's instructions for belt routing.3. Remove all slack in the lap belt for a very
tight fit by pulling forcefully on the lap belt
adjustment.
4. Before placing the child in the child re-
straint, use force to tilt the child restraint
from side to side, and tug it forward to
make sure it is securely held in place.
5. If it is not secure, try to tighten the belt
again, or put the restraint in another seat.
6. Check to make sure the child restraint is
properly secured prior to each use.
Installation on rear outboard seating
positions
WARNING
cThe 3-point belt in your vehicle is
equipped with a locking mode re-
tractor which must be used when
installing a child restraint.
cFailure to do so will result in the
child restraint not being properly se-
cured. It could tip over or otherwise
be unsecured and cause injury to the
child in a sudden stop or collision.
APD0534PD1174PD1331
2-32
ZX
Page 62 of 203

When you install a child restraint in a rear
outboard seat, follow these steps:
1. Position the child restraint on the seat. It
can be placed in a forward facing or rear
facing direction, depending on the size of
the child. Always follow the restraint
manufacturer's instructions.
2. Route the seat belt tongue through the
child restraint and insert it into the buckle
until you hear and feel the latch engage.
Be sure to follow the child restraint manu-
facturer's instructions for belt routing.
3. Pull on the shoulder belt until all of the
belt is fully extended and a click is heard.
At this time, the belt retractor is in the
automatic locking mode (child restraint
mode). It reverts back to emergency
locking mode when the belt is fully re-
tracted.
4. Allow the belt to retract. A clicking sound
is heard as the belt retracts. This indi-
cates that the retractor is in the automatic
locking mode. Pull up on the belt to
remove any slack in the belt.5. Before placing the child in the child re-
straint, use force to tilt the child restraint
from side to side, and tug it forward to
make sure it is securely held in place.
6. Check that the retractor is in the auto-
matic locking mode by trying to pull more
belt out of the retractor. If you cannot pull
any more belt webbing out of the retrac-
tor, the belt is in the automatic locking
mode.
7. Check to make sure the child restraint is
properly secured prior to each use. If the
belt is not locked, repeat steps 3 through
6.After the child restraint is removed and the
seat belt is allowed to wind back into the
retractor, the automatic locking mode (child
restraint mode) is canceled; the seat belt
may be used as normal and only locks
during a sudden stop or impact.
PD1332
2-33
ZX
Page 63 of 203
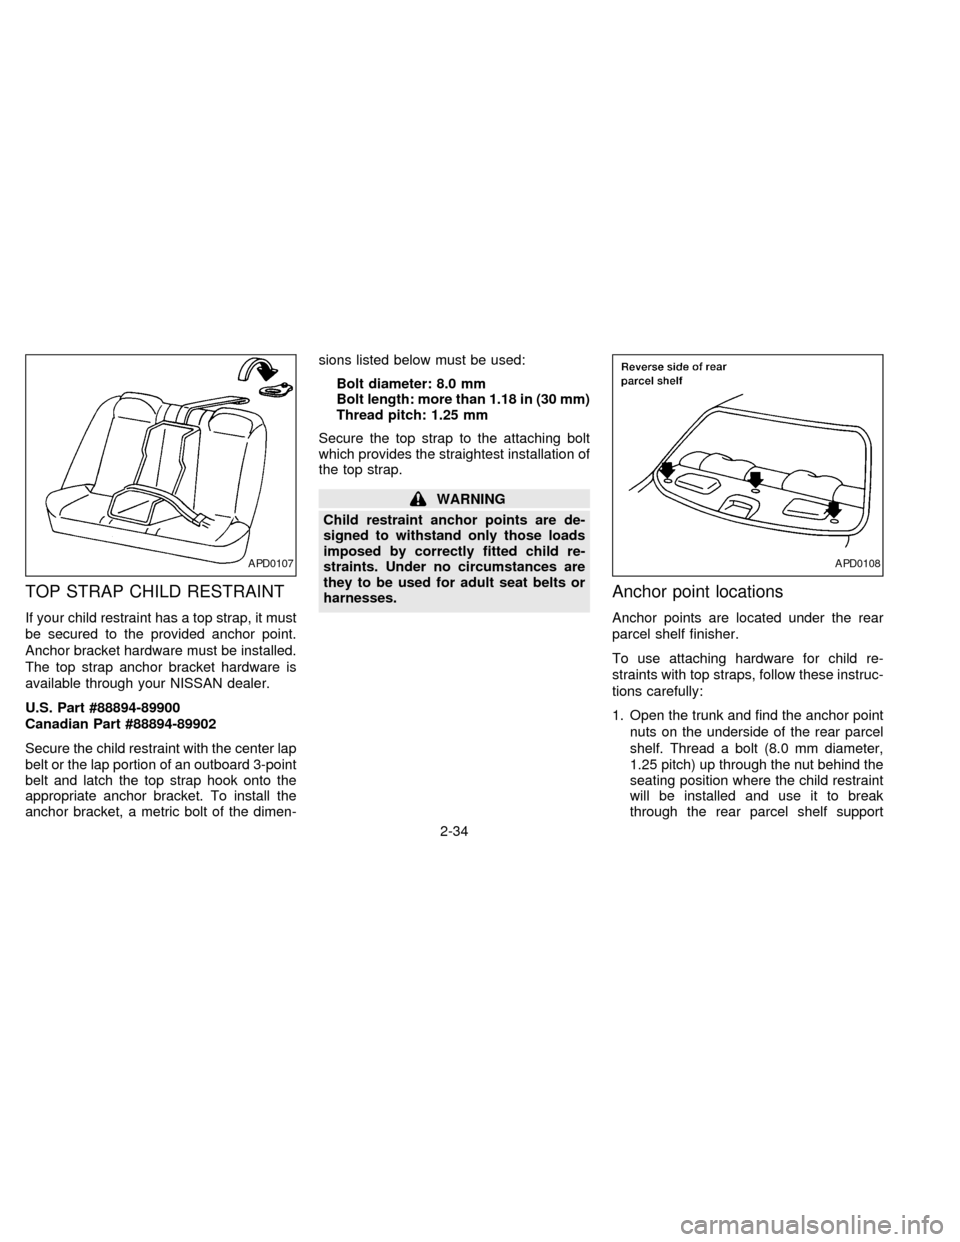
TOP STRAP CHILD RESTRAINT
If your child restraint has a top strap, it must
be secured to the provided anchor point.
Anchor bracket hardware must be installed.
The top strap anchor bracket hardware is
available through your NISSAN dealer.
U.S. Part #88894-89900
Canadian Part #88894-89902
Secure the child restraint with the center lap
belt or the lap portion of an outboard 3-point
belt and latch the top strap hook onto the
appropriate anchor bracket. To install the
anchor bracket, a metric bolt of the dimen-sions listed below must be used:
Bolt diameter: 8.0 mm
Bolt length: more than 1.18 in (30 mm)
Thread pitch: 1.25 mm
Secure the top strap to the attaching bolt
which provides the straightest installation of
the top strap.
WARNING
Child restraint anchor points are de-
signed to withstand only those loads
imposed by correctly fitted child re-
straints. Under no circumstances are
they to be used for adult seat belts or
harnesses.
Anchor point locations
Anchor points are located under the rear
parcel shelf finisher.
To use attaching hardware for child re-
straints with top straps, follow these instruc-
tions carefully:
1. Open the trunk and find the anchor point
nuts on the underside of the rear parcel
shelf. Thread a bolt (8.0 mm diameter,
1.25 pitch) up through the nut behind the
seating position where the child restraint
will be installed and use it to break
through the rear parcel shelf support
APD0107APD0108
2-34
ZX
Page 64 of 203
material. There are pre-cut circles at
each anchor point location that should
break away from the shelf support mate-
rial when pressure is applied to them.
Remove the bolt after you feel the pre-cut
circle separate from the shelf support
material.
2. Cut a small slit through the parcel shelf
fabric at the anchor point location. Reach
through the fabric with a tool such as a
pair of needle-nose pliers and remove
the pre-cut circle in the parcel shelf sup-
port material.
3. Install the bolt through the top strap hook
and into the anchor point nut.
4. Be sure to follow all of the instructions
that accompany the top strap attaching
hardware.
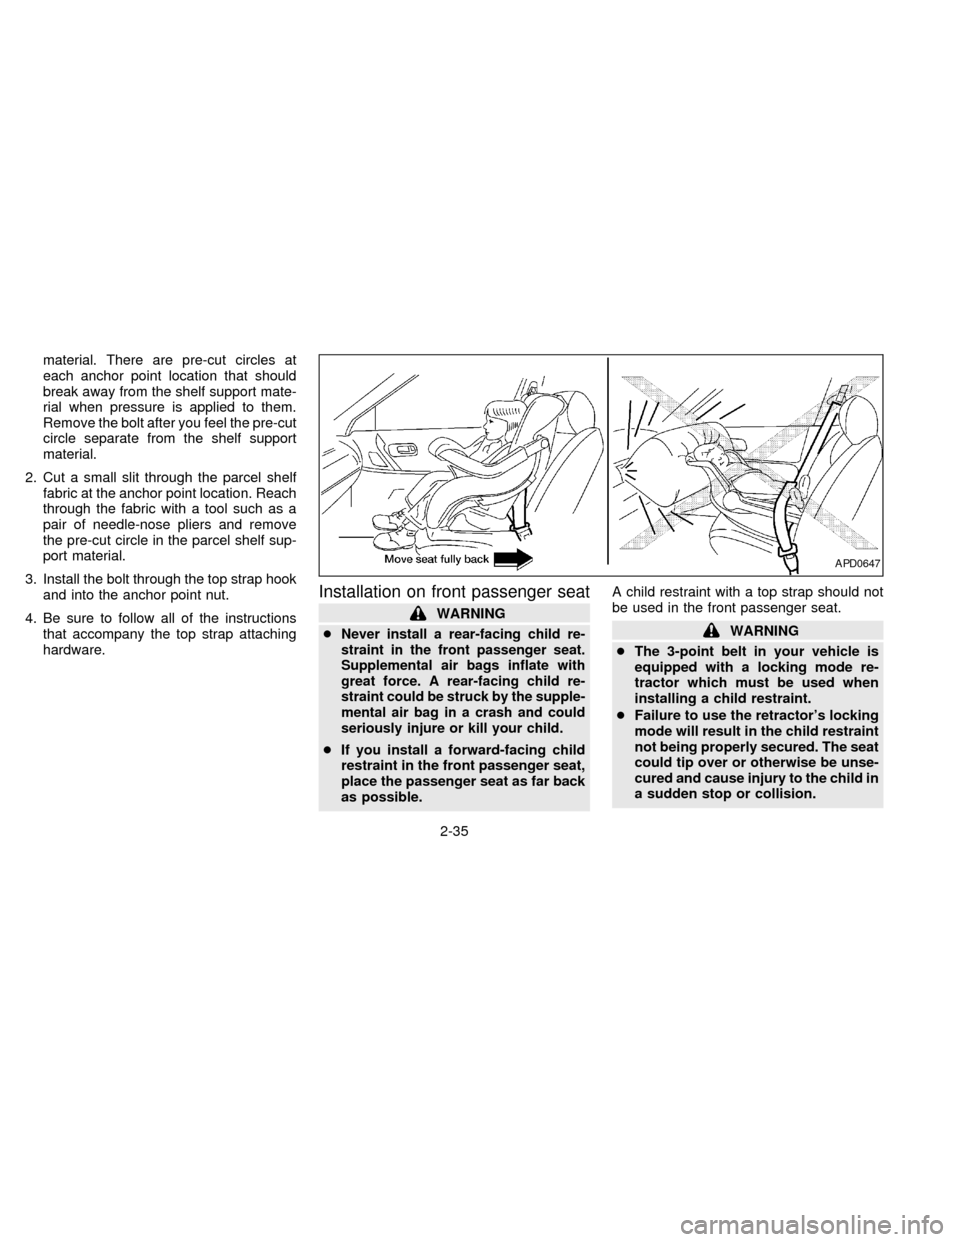
Installation on front passenger seat
WARNING
c
Never install a rear-facing child re-
straint in the front passenger seat.
Supplemental air bags inflate with
great force. A rear-facing child re-
straint could be struck by the supple-
mental air bag in a crash and could
seriously injure or kill your child.
cIf you install a forward-facing child
restraint in the front passenger seat,
place the passenger seat as far back
as possible.A child restraint with a top strap should not
be used in the front passenger seat.
WARNING
cThe 3-point belt in your vehicle is
equipped with a locking mode re-
tractor which must be used when
installing a child restraint.
cFailure to use the retractor's locking
mode will result in the child restraint
not being properly secured. The seat
could tip over or otherwise be unse-
cured and cause injury to the child in
a sudden stop or collision.
APD0647
2-35
ZX
Page 65 of 203

When you install a child restraint in the front
seat, follow these steps:
1. Position the child restraint on the front
passenger seat.It should be placed in
a forward-facing direction only.Move
the seat as far back from the instrument
panel as possible. Always follow the child
restraint manufacturer's instructions.
Child restraints for infants must be
used in the rear-facing direction and
therefore must not be used in the front
seat.
2. Route the seat belt tongue through the
child restraint and insert it into the buckle
until you hear and feel the latch engage.Be sure to follow the child restraint manu-
facturer's instructions for belt routing.
3. Pull on the shoulder belt until all of the
belt is fully extended and a click is heard.
At this time, the belt retractor is in the
automatic locking mode (child restraint
mode). It reverts back to emergency
locking mode when the belt is fully re-
tracted.
4. Allow the belt to retract. A clicking sound
is heard as the belt retracts. This indi-
cates that the retractor is in the automatic
locking mode. Pull up on the belt to
remove any slack in the belt.5. Before placing the child in the child re-
straint, use force to tilt the child restraint
from side to side, and tug it forward to
make sure it is securely held in place.
6. Check that the retractor is in the auto-
matic locking mode by trying to pull more
belt out of the retractor. If you cannot pull
any more belt webbing out of the retrac-
tor, the belt is in the automatic locking
mode.
7. Check to make sure the child restraint is
properly secured prior to each use. If the
lap belt is not locked, repeat steps 3
through 6.
After the child restraint is removed and the
seat belt is allowed to wind back into the
retractor, the automatic locking mode (child
restraint mode) is canceled; the seat belt
may be used as normal and only locks
during a sudden stop or impact.
PD1336
2-36
ZX
Page 111 of 203
before operating the vehicle. See ``Chang-
ing engine coolant'' in the ``Do-it-yourself
operations'' section.
Tire equipment
1. SUMMER tires have a tread designed to
provide superior performance on dry
pavement. However, the performance of
these tires will be substantially reduced
in snowy and icy conditions. If you oper-
ate your vehicle on snowy or icy roads,
NISSAN recommends the use of MUD &
SNOW or ALL SEASON tires on all four
wheels. Please consult your NISSAN
dealer for the tire type, size, speed rating
and availability information.
2. For additional traction on icy roads, stud-
ded tires may be used. However, some
provinces and states prohibit their use.
Check local, state and provincial laws
before installing studded tires.
Skid and traction capabilities of studded
snow tires, on wet or dry surfaces, may
be poorer than that of non-studded snow
tires.3. Tire chains may be used if desired. Make
sure they are the proper size for the tires
on your vehicle and are installed accord-
ing to the chain manufacturer's sugges-
tions.
Use of tire chains may be prohibited accord-
ing to location. Check the local laws before
installing tire chains. When installing tire
chains, make sure they are the proper size
for the tires on your vehicle and are installed
according to the chain manufacturer's sug-
gestions.Use only SAE Class ``S'' chains.
Other types may damage your vehicle. Use
chain tensioners when recommended by
the tire chain manufacturer to ensure a tight
fit. Loose end links of the tire chain must be
secured or removed to prevent the possibil-
ity of whipping action damage to the fenders
or underbody. If possible, avoid fully loading
your vehicle when using tire chains. In ad-
dition, drive at a reduced speed. Otherwise,
your vehicle may be damaged and/or ve-
hicle handling and performance may be
adversely affected.
Never install tire chains on T-type spare
tires. Do not use tire chains on dry roads.
Special winter equipment
It is recommended that the following items
be carried in the vehicle during winter:
1. A scraper and stiff-bristled brush to re-
move ice and snow from the windows
and wiper blades.
2. A sturdy, flat board to be placed under
the jack to give it firm support.
3. A shovel to dig the vehicle out of snow-
drifts.
4. Extra window washer fluid to refill the
reservoir tank.
Driving on snow or ice
WARNING
cWet ice (32ÉF, 0ÉC and freezing rain),
very cold snow or ice can be slick
and very hard to drive on. The ve-
hicle will have a lot less traction or
``grip'' under these conditions. Try to
avoid driving on wet ice until the
road is salted or sanded.
cWhatever the condition, drive with
caution. Accelerate and slow down
with care. If accelerating or down-
4-19
ZX
Page 114 of 203
If you have a flat tire, follow the instructions
below:
Stopping the vehicle
1. Safely move the vehicle off of the road
and away from traffic.
2. Turn on the hazard warning flashers.
3. Park on a level surface and apply the
parking brake. Shift the manual transmis-
sion into Reverse (R), or the automatic
transmission into P (Park).
4. Turn off the engine.
5. Raise the hood to warn other traffic, and
to signal professional road assistance
personnel that you need assistance.
6. Have all passengers get out of the ve-
hicle and stand in a safe place, away
from traffic and clear of the vehicle
WARNING
cMake sure that the parking brake is
securely applied and the manual
transmission is shifted into Reverse
(R), or the automatic transmission
into P (Park).cNever change tires when the vehicle
is on a slope, ice or slippery areas.
This is hazardous.
cNever change tires if oncoming traf-
fic is close to your vehicle. Wait for
professional road assistance.
Getting the spare tire and tools
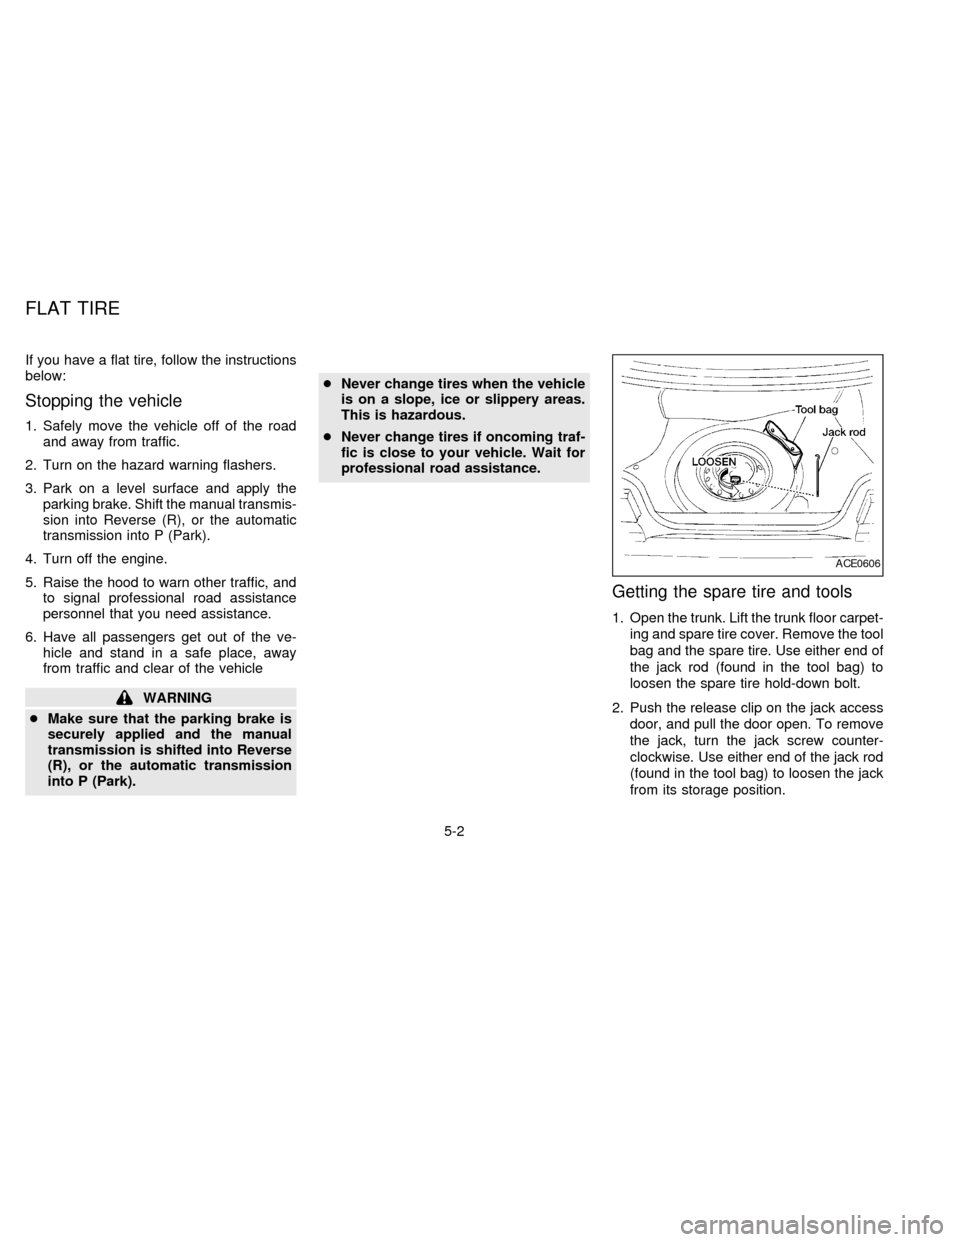
1. Open the trunk. Lift the trunk floor carpet-
ing and spare tire cover. Remove the tool
bag and the spare tire. Use either end of
the jack rod (found in the tool bag) to
loosen the spare tire hold-down bolt.
2. Push the release clip on the jack access
door, and pull the door open. To remove
the jack, turn the jack screw counter-
clockwise. Use either end of the jack rod
(found in the tool bag) to loosen the jack
from its storage position.
ACE0606
FLAT TIRE
5-2
ZX
Page 117 of 203
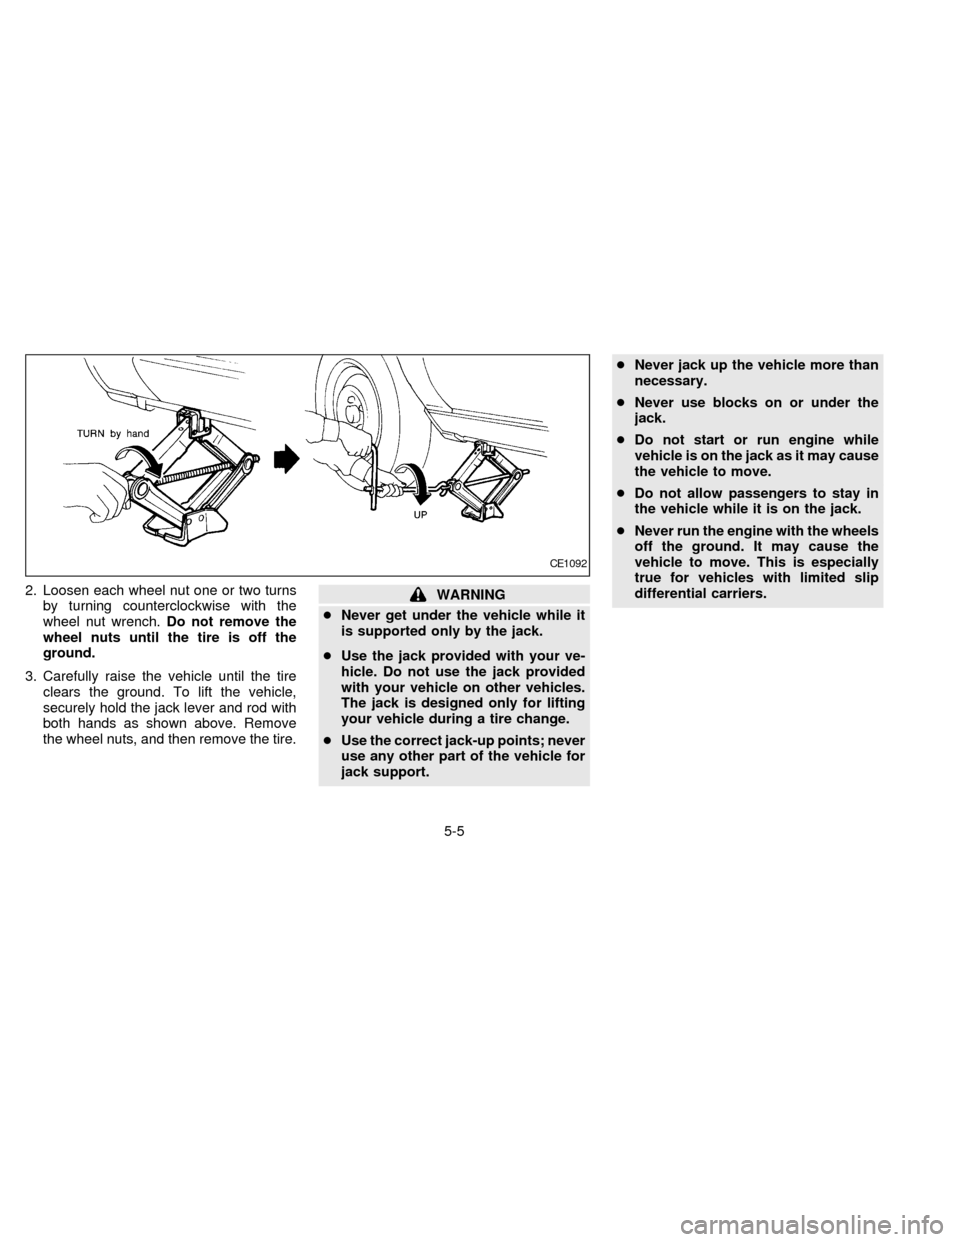
2. Loosen each wheel nut one or two turns
by turning counterclockwise with the
wheel nut wrench.Do not remove the
wheel nuts until the tire is off the
ground.
3. Carefully raise the vehicle until the tire
clears the ground. To lift the vehicle,
securely hold the jack lever and rod with
both hands as shown above. Remove
the wheel nuts, and then remove the tire.WARNING
cNever get under the vehicle while it
is supported only by the jack.
cUse the jack provided with your ve-
hicle. Do not use the jack provided
with your vehicle on other vehicles.
The jack is designed only for lifting
your vehicle during a tire change.
cUse the correct jack-up points; never
use any other part of the vehicle for
jack support.cNever jack up the vehicle more than
necessary.
cNever use blocks on or under the
jack.
cDo not start or run engine while
vehicle is on the jack as it may cause
the vehicle to move.
cDo not allow passengers to stay in
the vehicle while it is on the jack.
cNever run the engine with the wheels
off the ground. It may cause the
vehicle to move. This is especially
true for vehicles with limited slip
differential carriers.
CE1092
5-5
ZX