1997 NISSAN ALTIMA warning
[x] Cancel search: warningPage 159 of 203
If you have a flat tire, see the ``In case of
emergency'' section.
Maximum inflation pressure
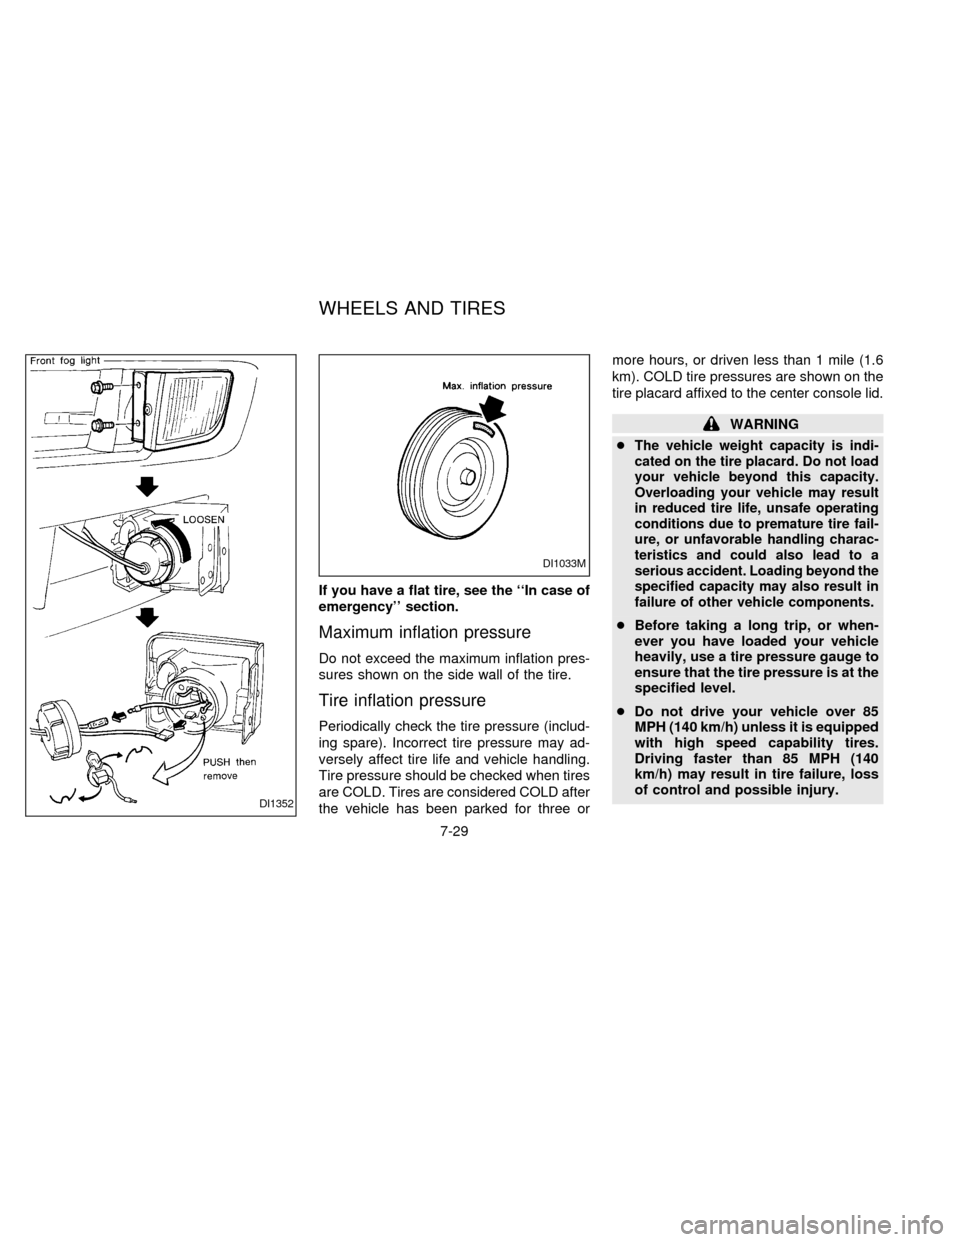
Do not exceed the maximum inflation pres-
sures shown on the side wall of the tire.
Tire inflation pressure
Periodically check the tire pressure (includ-
ing spare). Incorrect tire pressure may ad-
versely affect tire life and vehicle handling.
Tire pressure should be checked when tires
are COLD. Tires are considered COLD after
the vehicle has been parked for three ormore hours, or driven less than 1 mile (1.6
km). COLD tire pressures are shown on the
tire placard affixed to the center console lid.
WARNING
c
The vehicle weight capacity is indi-
cated on the tire placard. Do not load
your vehicle beyond this capacity.
Overloading your vehicle may result
in reduced tire life, unsafe operating
conditions due to premature tire fail-
ure, or unfavorable handling charac-
teristics and could also lead to a
serious accident. Loading beyond the
specified capacity may also result in
failure of other vehicle components.
cBefore taking a long trip, or when-
ever you have loaded your vehicle
heavily, use a tire pressure gauge to
ensure that the tire pressure is at the
specified level.
cDo not drive your vehicle over 85
MPH (140 km/h) unless it is equipped
with high speed capability tires.
Driving faster than 85 MPH (140
km/h) may result in tire failure, loss
of control and possible injury.
DI1352
DI1033M
WHEELS AND TIRES
7-29
ZX
Page 161 of 203
Tire rotation
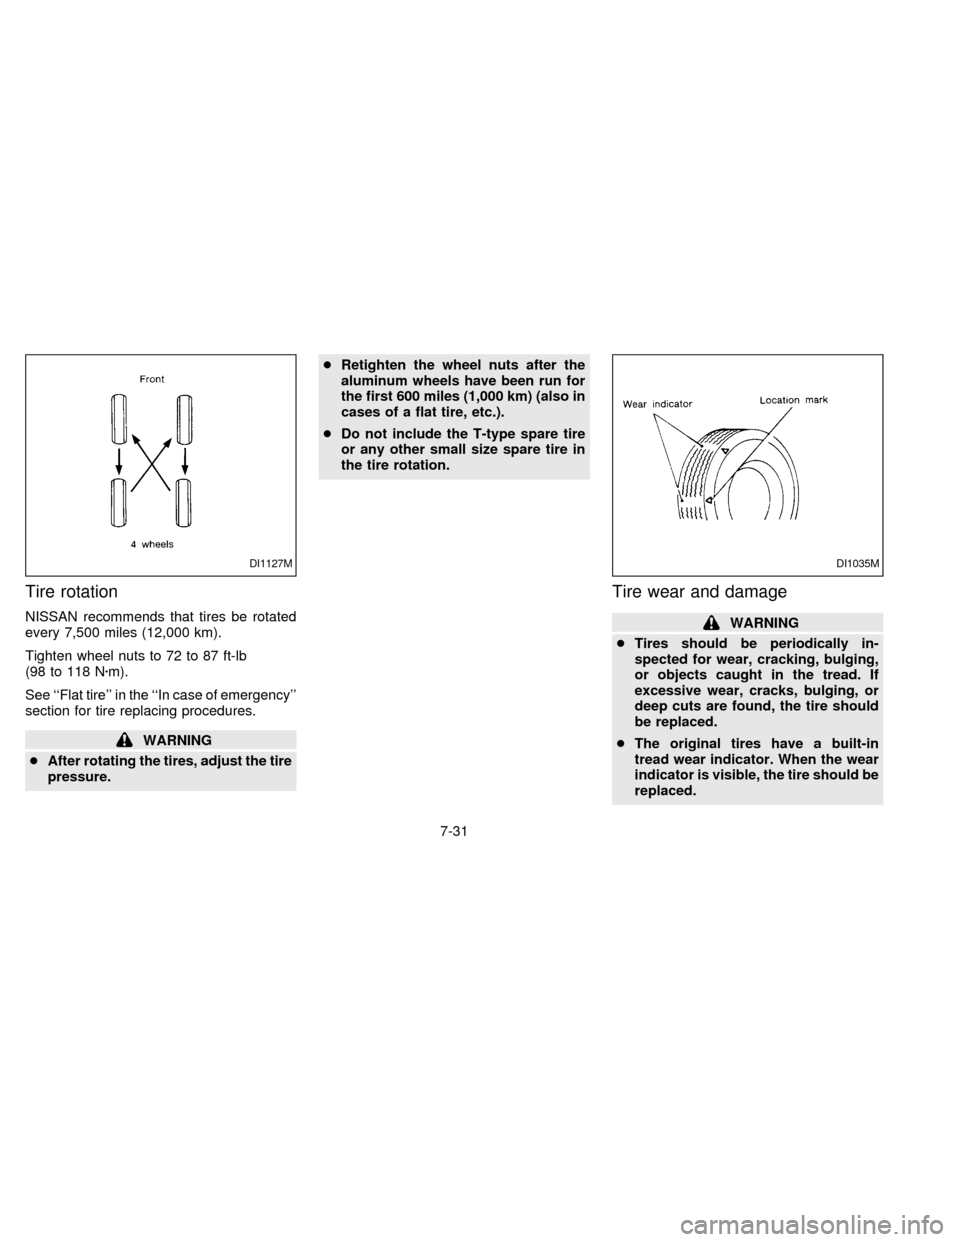
NISSAN recommends that tires be rotated
every 7,500 miles (12,000 km).
Tighten wheel nuts to 72 to 87 ft-lb
(98 to 118 Nzm).
See ``Flat tire'' in the ``In case of emergency''
section for tire replacing procedures.
WARNING
cAfter rotating the tires, adjust the tire
pressure.cRetighten the wheel nuts after the
aluminum wheels have been run for
the first 600 miles (1,000 km) (also in
cases of a flat tire, etc.).
cDo not include the T-type spare tire
or any other small size spare tire in
the tire rotation.
Tire wear and damage
WARNING
cTires should be periodically in-
spected for wear, cracking, bulging,
or objects caught in the tread. If
excessive wear, cracks, bulging, or
deep cuts are found, the tire should
be replaced.
cThe original tires have a built-in
tread wear indicator. When the wear
indicator is visible, the tire should be
replaced.
DI1127MDI1035M
7-31
ZX
Page 162 of 203
cImproper service for a T-type spare
tire may result in serious personal
injury. If it is necessary to repair the
T-type spare tire, contact your NIS-
SAN dealer.Changing tires and wheels
When replacing a tire, use the same size,
speed rating and load carrying capacity as
originally equipped. Recommended types
and sizes are shown in ``Wheels and tires''
in the ``Technical and consumer informa-
tion'' section.
WARNING
c
The use of tires other than those
recommended or the mixed use of
tires of different brands, construction
(bias, bias-belted or radial), or tread
patterns can adversely affect the ride,
braking, handling, ground clearance,
body-to-tire clearance, tire chain
clearance, speedometer calibration,
headlight aim and bumper height.
Some of these effects may lead to
accidents and could result in serious
personal injury.
cIf the wheels are changed for any
reason, always replace with wheels
which have the same offset dimen-
sion. Wheels of a different offset
could cause early tire wear, possiblydegraded vehicle handling charac-
teristics and/or interference with the
brake discs/ drums. Such interfer-
ence can lead to decreased braking
efficiency and/or early brake
pad/shoe wear.
c
Do not install a deformed wheel or
tire even if it has been repaired. Such
wheels or tires could have structural
damage and could fail without warn-
ing.
Wheel balance
Unbalanced wheels may affect vehicle han-
dling and tire life. Even with regular use,
wheels can get out of balance. Therefore,
they should be balanced as required.
Wheel balance service should be per-
formed with the wheels off the vehicle. Spin
balancing the front wheels on the vehicle
could lead to transmission damage.
Care of wheels
cWash the wheels when washing the ve-
hicle to maintain their appearance.
cClean the inner side of the wheels when
7-32
ZX
Page 167 of 203

Tire rotation*Ð Tires should be rotated
every 7,500 miles (12,000 km).
Wheel alignment and balanceÐIfthe
vehicle should pull to either side while driv-
ing on a straight and level road, or if you
detect uneven or abnormal tire wear, there
may be a need for wheel alignment.
If the steering wheel or seat vibrates at
normal highway speeds, wheel balancing
may be needed.
Windshield wiper blades*Ð Check for
cracks or wear if they do not wipe properly.
Doors and engine hoodÐ Check that all
doors and the engine hood operate prop-
erly. Also ensure all latches lock securely.
Lubricate hinges, latches, rollers and links if
necessary. Make sure the secondary latch
keeps the hood from opening when the
primary latch is released.
When driving in areas using road salt or
other corrosive materials, check lubrication
frequently.
Lights*Ð Make sure the headlights, stop
lights, tail lights, turn signal lights, and other
lights are all operating properly and installed
securely. Also check headlight aim.INSIDE THE VEHICLE
The maintenance items listed here should
be checked on a regular basis, such as
when performing periodic maintenance,
cleaning the vehicle, etc.
Warning lights and chimesÐ Make sure
all warning lights and buzzers/chimes are
operating properly.
Windshield wiper and washer*Ð Check
that the wipers and washer operate properly
and that the wipers do not streak.
Windshield defrosterÐ Check that the air
comes out of the defroster outlets properly
and in sufficient quantity when operating the
heater or air conditioner.
Steering wheelÐ Check for changes in
the steering conditions, such as excessive
freeplay, hard steering or strange noises.
SeatsÐ Check seat position controls such
as seat adjusters, seatback recliner, etc. to
ensure they operate smoothly and all
latches lock securely in every position.
Check that the head restraints move up and
down smoothly and the locks (if so
equipped) hold securely in all latched posi-
tions.Seat beltsÐ Check that all parts of the seat
belt system (for example, buckles, anchors,
adjusters and retractors) operate properly
and smoothly, and are installed securely.
Check the belt webbing for cuts, fraying,
wear or damage.
Accelerator pedalÐ Check the pedal for
smooth operation and make sure the pedal
does not catch or require uneven effort.
Keep the floor mats away from the pedal.
Clutch pedal*Ð Make sure the pedal
operates smoothly and check that it has the
proper free travel.
BrakesÐ Check that the brakes do not pull
the vehicle to one side when applied.
Brake pedal*Ð Check the pedal for
smooth operation and make sure it has the
proper distance under it when depressed
fully. Check the brake booster function. Be
certain to keep floor mats away from the
pedal.
Parking brake*Ð Check that the lever has
the proper travel and confirm that your
vehicle is held securely on a fairly steep hill
with only the parking brake applied.
8-3
ZX
Page 168 of 203

Automatic transmission ``Park'' mecha-
nismÐ On a fairly steep hill check that your
vehicle is held securely with the gearshift
lever in the P position without applying any
brakes.
UNDER THE HOOD AND
VEHICLE
The maintenance items listed here should
be checked periodically, such as each time
you check the engine oil or refuel.
Additional information on the items
marked with ª*º can be found in the
ªDo-It-Yourself operationsº section.
Windshield washer fluid*Ð Check that
there is adequate fluid in the tank.
Engine coolant level*Ð Check the cool-
ant level when the engine is cold.
Radiator and hosesÐ Check the front of
the radiator and clean off any dirt, insects,
leaves, etc., that may have accumulated.
Make sure the hoses have no cracks, de-
formation, rot or loose connections.
Brake and clutch fluid levels*Ð Make
sure that the brake and clutch fluid level is
between the MAX and MIN lines on the
reservoir.Battery*Ð Check the fluid level in each
cell. It should be between the MAX and MIN
lines.
Engine drive belts*Ð Make sure that no
belt is frayed, worn, cracked or oily.
Engine oil level*Ð Check the level after
parking the vehicle on a level spot and
turning off the engine. Wait a few minutes
for the oil to drain back into the oil pan.
Power steering fluid level* and linesÐ
Check the level when the fluid is cold and
the engine is turned off. Check the lines for
proper attachment, leaks, cracks, etc.
Automatic transmission fluid level*Ð
Check the level after putting the shift lever in
P with the engine idling.
Exhaust systemÐ Make sure there are no
cracks, holes, loose joints or supports. If the
sound of the exhaust seems unusual or
there is a smell of exhaust fumes, immedi-
ately have the exhaust system inspected by
a qualified individual. (See the carbon mon-
oxide warning in the ``Starting and driving''
section.)
UnderbodyÐ The underbody is frequently
exposed to corrosive substances such asthose used on icy roads or to control dust. It
is very important to remove these sub-
stances, otherwise rust forms on the floor
pan, frame, fuel lines and around the ex-
haust system. At the end of winter, the
underbody should be thoroughly flushed
with plain water, being careful to clean
those areas where mud and dirt may accu-
mulate. See the ``Appearance and interior
care'' section for additional information.
Fluid leaksÐ Check under the vehicle for
fuel, oil, water or other fluid leaks after the
vehicle has been parked for a while. Water
dripping from the air conditioner after use is
normal. If you should notice any leaks or if
gasoline fumes are evident, check for the
cause and have it corrected immediately.
8-4
ZX
Page 189 of 203
WARNING
cIt is extremely dangerous to ride in a
cargo area inside of a vehicle. In a
collision, people riding in these ar-
eas are more likely to be seriously
injured or killed.
cDo not allow people to ride in any
area of your vehicle that is not
equipped with seats and seat belts.
c
Be sure everyone in your vehicle is in
a seat and using a seat belt properly.
Terms
It is important to familiarize yourself with the
following terms before loading your vehicle:
cCurb Weight (actual weight of your ve-
hicle) - vehicle weight including: standard
and optional equipment, fluids, emer-
gency tools, and spare tire assembly.
This weightdoes notinclude passen-
gers and cargo.
cGVW (Gross Vehicle Weight) - curb
weight plus the combined weight of pas-
sengers and cargo.
cGVWR (Gross Vehicle Weight Rating) -maximum total weight (load) limit speci-
fied for the vehicle.
cGAWR (Gross Axle Weight Rating) -
maximum weight (load) limit specified for
the front or rear axle.
Determining Vehicle Load Capacity
The load capacity of this vehicle is determined
by weight, not by available cargo space. For
example, a luggage rack, bike carrier, cartop
carrier or similar equipment does not increase
load carrying capacity of your vehicle.
To determine vehicle load capacity:
Vehicle weight can be determined by using
a commercial-grade scale, found at places
such as a truck stop, gravel quarry, grain
elevator, or a scrap metal recycling facility.
1)
Determine the curb weight of your vehicle.
2) Compare the curb weight amount to the
GVWR specified for your vehicle to de-
termine how much more weight your
vehicle can carry.
3) After loading (cargo and passengers),
re-weigh your vehicle to determine if
either GVWR or GAWR for your vehicle
is exceeded. If GVWR is exceeded, re-
move cargo as necessary. If either thefront or rear GAWR is exceeded, shift the
load or remove cargo as necessary.
Loading Tips
cThe GVW must not exceed GVWR or
GAWR as specified on the FMVSS Cer-
tification Label.
cDo not load the front and rear axle to the
GAWR. Doing so will exceed the GVWR.
WARNING
c
Properly secure all cargo to help pre-
vent it from sliding or shifting. Do not
place cargo higher than the seat-
backs. In a sudden stop or collision,
unsecured cargo could cause per-
sonal injury.
cDo not load your vehicle any heavier
than the GVWR or the maximum
front and rear GAWRs. If you do,
parts on your vehicle can break, or it
can change the way your vehicle
handles. This could result in loss of
control and cause personal injury.
cOverloading can shorten the life of
your vehicle. Failures caused by
overloading are not covered by your
warranty.
VEHICLE LOADING
INFORMATION
9-14
ZX
Page 190 of 203
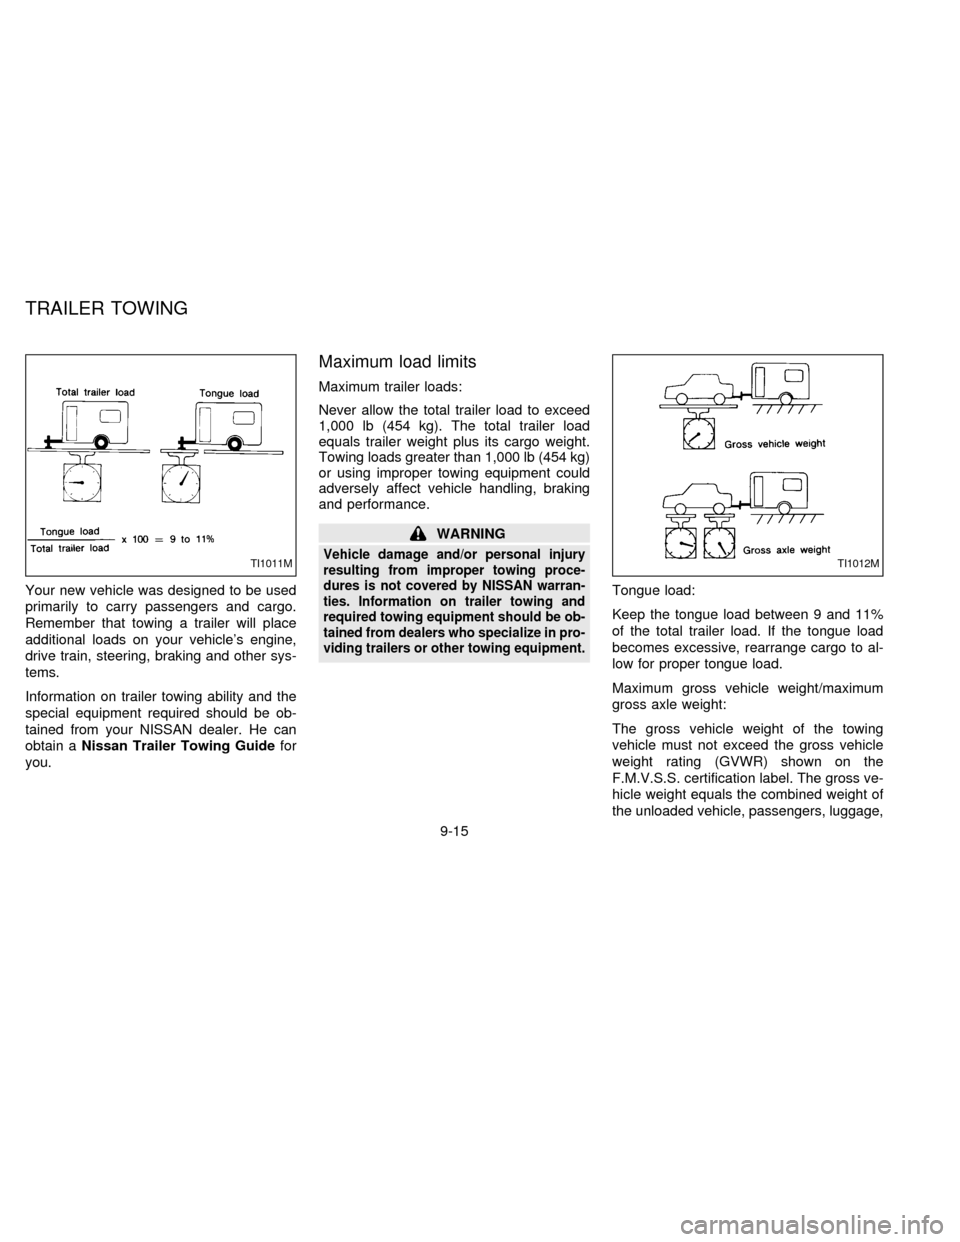
Your new vehicle was designed to be used
primarily to carry passengers and cargo.
Remember that towing a trailer will place
additional loads on your vehicle's engine,
drive train, steering, braking and other sys-
tems.
Information on trailer towing ability and the
special equipment required should be ob-
tained from your NISSAN dealer. He can
obtain aNissan Trailer Towing Guidefor
you.
Maximum load limits
Maximum trailer loads:
Never allow the total trailer load to exceed
1,000 lb (454 kg). The total trailer load
equals trailer weight plus its cargo weight.
Towing loads greater than 1,000 lb (454 kg)
or using improper towing equipment could
adversely affect vehicle handling, braking
and performance.
WARNING
Vehicle damage and/or personal injury
resulting from improper towing proce-
dures is not covered by NISSAN warran-
ties. Information on trailer towing and
required towing equipment should be ob-
tained from dealers who specialize in pro-
viding trailers or other towing equipment.
Tongue load:
Keep the tongue load between 9 and 11%
of the total trailer load. If the tongue load
becomes excessive, rearrange cargo to al-
low for proper tongue load.
Maximum gross vehicle weight/maximum
gross axle weight:
The gross vehicle weight of the towing
vehicle must not exceed the gross vehicle
weight rating (GVWR) shown on the
F.M.V.S.S. certification label. The gross ve-
hicle weight equals the combined weight of
the unloaded vehicle, passengers, luggage,
TI1011MTI1012M
TRAILER TOWING
9-15
ZX
Page 191 of 203
hitch, trailer tongue load and any other
optional equipment. In addition, front or rear
gross axle weight must not exceed the
gross axle weight rating (GAWR) shown on
the F.M.V.S.S. certification label.
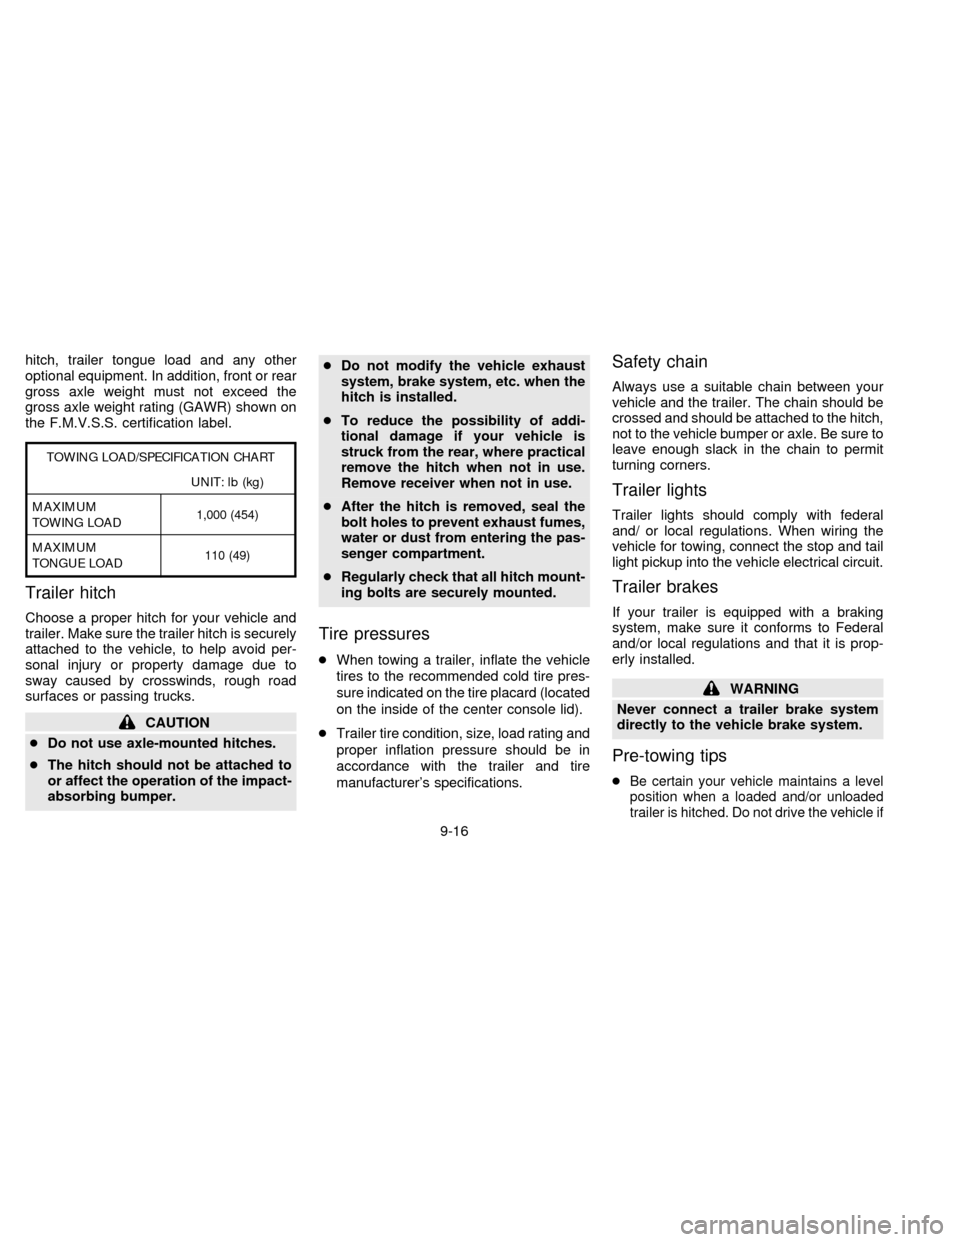
TOWING LOAD/SPECIFICATION CHART
UNIT: lb (kg)
MAXIMUM
TOWING LOAD1,000 (454)
MAXIMUM
TONGUE LOAD110 (49)
Trailer hitch
Choose a proper hitch for your vehicle and
trailer. Make sure the trailer hitch is securely
attached to the vehicle, to help avoid per-
sonal injury or property damage due to
sway caused by crosswinds, rough road
surfaces or passing trucks.
CAUTION
cDo not use axle-mounted hitches.
cThe hitch should not be attached to
or affect the operation of the impact-
absorbing bumper.cDo not modify the vehicle exhaust
system, brake system, etc. when the
hitch is installed.
cTo reduce the possibility of addi-
tional damage if your vehicle is
struck from the rear, where practical
remove the hitch when not in use.
Remove receiver when not in use.
cAfter the hitch is removed, seal the
bolt holes to prevent exhaust fumes,
water or dust from entering the pas-
senger compartment.
cRegularly check that all hitch mount-
ing bolts are securely mounted.
Tire pressures
cWhen towing a trailer, inflate the vehicle
tires to the recommended cold tire pres-
sure indicated on the tire placard (located
on the inside of the center console lid).
cTrailer tire condition, size, load rating and
proper inflation pressure should be in
accordance with the trailer and tire
manufacturer's specifications.
Safety chain
Always use a suitable chain between your
vehicle and the trailer. The chain should be
crossed and should be attached to the hitch,
not to the vehicle bumper or axle. Be sure to
leave enough slack in the chain to permit
turning corners.
Trailer lights
Trailer lights should comply with federal
and/ or local regulations. When wiring the
vehicle for towing, connect the stop and tail
light pickup into the vehicle electrical circuit.
Trailer brakes
If your trailer is equipped with a braking
system, make sure it conforms to Federal
and/or local regulations and that it is prop-
erly installed.
WARNING
Never connect a trailer brake system
directly to the vehicle brake system.
Pre-towing tips
cBe certain your vehicle maintains a level
position when a loaded and/or unloaded
trailer is hitched. Do not drive the vehicle if
9-16
ZX