1997 NISSAN ALTIMA warning
[x] Cancel search: warningPage 121 of 203
CAUTION
cAutomatic transmission models can-
not be push started. This may cause
transmission damage.
cThree way catalyst equipped models
should not be started by pushing
since the three way catalyst may be
damaged.
cNever try to start the vehicle by tow-
ing it; when the engine starts, the
forward surge could cause the ve-
hicle to collide with the tow vehicle.If your vehicle is overheating (indicated by
an extremely high temperature gauge read-
ing), or if you feel a lack of engine power,
detect abnormal noise, etc., take the follow-
ing steps:
WARNING
cDo not continue to drive if your ve-
hicle overheats. Doing so could
cause a vehicle fire.
cTo avoid the danger of being
scalded, never remove the radiator
cap while the engine is still hot.
When the radiator cap is removed,
pressurized hot water will spurt out,
possibly causing serious injury.
cDo not open the hood if steam is
coming out.
1. Move the vehicle safely off the road,
apply the parking brake and move the
shift lever to Neutral (automatic transmis-
sion to P).
Do not stop the engine.
2. Turn off the air conditioner. Open all the
windows, move the heater or air condi-
tioner temperature control to maximum
hot and fan control to high speed.3. If engine overheating is caused by climb-
ing a long hill on a hot day, run the engine
at a fast idle (approximately 1,500 rpm)
until the temperature gauge indication
returns to normal.
4. Get out of the vehicle. Look and listen for
steam or coolant escaping from the ra-
diator before opening the hood. Wait until
no steam or coolant can be seen before
proceeding.
5. Open the engine hood.
WARNING
If steam or water is coming from the
engine, stand clear to prevent getting
burned.
6. Visually check drive belts for damage or
looseness. Also check if the cooling fan
is running. The radiator hoses and radia-
tor should not leak water. If coolant is
leaking, the water pump belt is missing or
loose, or the cooling fan does not run,
stop the engine.
PUSH STARTING IF YOUR VEHICLE
OVERHEATS
5-9
ZX
Page 122 of 203
WARNING
Be careful not to allow your hands, hair,
jewelry or clothing to come into contact
with, or to get caught in, the running
fan, belts, or fan motor.
The fan motor can start at any time
when the coolant temperature is high.
7. After the engine cools down, check the
coolant level in the reservoir tank with the
engine running. Add coolant to the res-
ervoir tank if necessary. Have your ve-
hicle repaired at the nearest NISSAN
dealer.When towing your vehicle, all State (Provin-
cial in Canada) and local regulations for
towing must be followed. Incorrect towing
equipment could damage your vehicle. Tow-
ing instructions are available from your NIS-
SAN dealer. Local service operators will gen-
erally be familiar with the applicable laws and
procedures for towing. To assure proper
towing and to prevent accidental damage to
your vehicle, NISSAN recommends that you
have a service operator tow your vehicle. It is
advisable to have the service operator care-
fully read the following precautions:
WARNING
cNever ride in a vehicle that is being
towed.
cNever get under your vehicle after it
has been lifted by a tow truck.
CAUTION
cWhen towing, make sure that the
transmission, axles, steering system
and powertrain are in working con-
dition. If any unit is damaged, dollies
must be used.
cWhen towing with the front wheels
on the ground:Turn the ignition key to the OFF
position and secure the steering
wheel in a straight-ahead position
with a rope or similar device. Never
place the ignition key in the LOCK
position. This will result in damage
to the steering lock mechanism.
Move the gearshift lever to the Neu-
tral (N position).
On automatic transmission models,
to move the shift lever to the Neutral
position, turn the ignition key to the
ACC position. After moving the shift
lever to the Neutral position, be sure
to turn the ignition key to the OFF
position.
c
When towing with the rear wheels on
the ground, release the parking brake.
On automatic transmission models,
to move the shift lever to the Neutral
position, turn the ignition key to the
ACC position. After moving the shift
lever to the Neutral position, be sure
to turn the ignition key to the OFF
position.
cAttach safety chains for all towing.
TOW TRUCK TOWING
5-10
ZX
Page 124 of 203
cTow chains or cables must be attached
only to the main structual members of the
vehicle.
cPulling devices should be routed so they
do not touch any part of the suspension,
steering, brake or cooling systems.
cAlways pull the cable straight out from
the front or rear of the vehicle. Never pull
on the vehicle at an angle.
cPulling devices such as ropes or canvas
straps are not recommended for use in
vehicle towing or recovery.
cStand clear of a stuck vehicle.
WARNING
Do not spin your tires at high speed.
This could cause them to explode and
result in serious injury. Parts of your
vehicle could also overheat and be
damaged.
VEHICLE RECOVERY (Freeing
a stuck vehicle)
5-12
ZX
Page 129 of 203
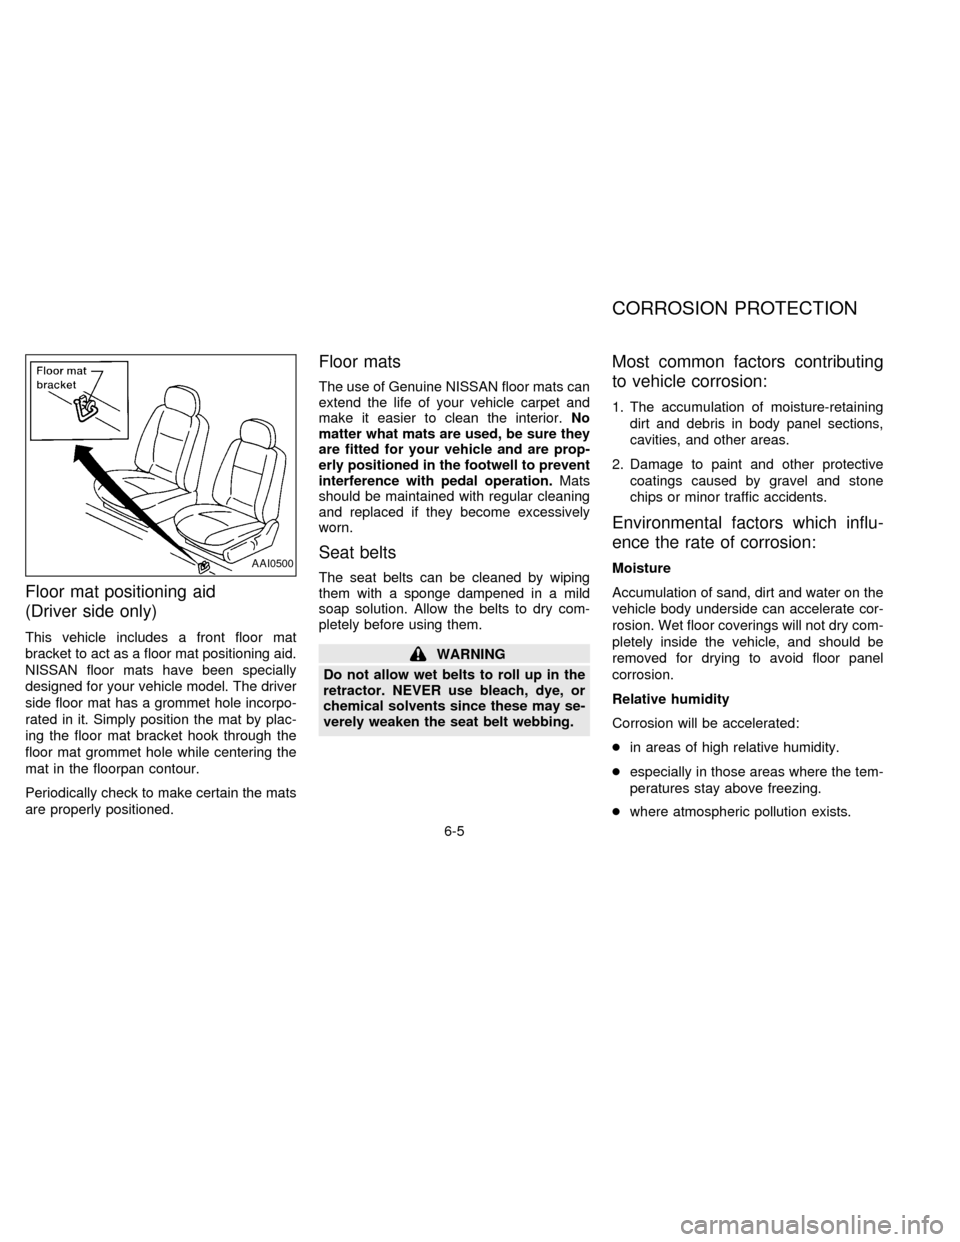
Floor mat positioning aid
(Driver side only)
This vehicle includes a front floor mat
bracket to act as a floor mat positioning aid.
NISSAN floor mats have been specially
designed for your vehicle model. The driver
side floor mat has a grommet hole incorpo-
rated in it. Simply position the mat by plac-
ing the floor mat bracket hook through the
floor mat grommet hole while centering the
mat in the floorpan contour.
Periodically check to make certain the mats
are properly positioned.
Floor mats
The use of Genuine NISSAN floor mats can
extend the life of your vehicle carpet and
make it easier to clean the interior.No
matter what mats are used, be sure they
are fitted for your vehicle and are prop-
erly positioned in the footwell to prevent
interference with pedal operation.Mats
should be maintained with regular cleaning
and replaced if they become excessively
worn.
Seat belts
The seat belts can be cleaned by wiping
them with a sponge dampened in a mild
soap solution. Allow the belts to dry com-
pletely before using them.
WARNING
Do not allow wet belts to roll up in the
retractor. NEVER use bleach, dye, or
chemical solvents since these may se-
verely weaken the seat belt webbing.
Most common factors contributing
to vehicle corrosion:
1. The accumulation of moisture-retaining
dirt and debris in body panel sections,
cavities, and other areas.
2. Damage to paint and other protective
coatings caused by gravel and stone
chips or minor traffic accidents.
Environmental factors which influ-
ence the rate of corrosion:
Moisture
Accumulation of sand, dirt and water on the
vehicle body underside can accelerate cor-
rosion. Wet floor coverings will not dry com-
pletely inside the vehicle, and should be
removed for drying to avoid floor panel
corrosion.
Relative humidity
Corrosion will be accelerated:
cin areas of high relative humidity.
cespecially in those areas where the tem-
peratures stay above freezing.
cwhere atmospheric pollution exists.AAI0500
CORROSION PROTECTION
6-5
ZX
Page 132 of 203
When performing any inspection or mainte-
nance work on your vehicle, always take
care to prevent serious accidental injury to
yourself or damage to the vehicle. The
following are general precautions which
should be closely observed.
WARNING
cPark the vehicle on a level surface,
apply the parking brake securely and
block the wheels to prevent the ve-
hicle from moving. For a manual
transmission, move the shift lever to
Neutral. For an automatic transmis-
sion, move the shift lever to P (Park).
cBe sure the ignition key is OFF when
performing any parts replacement or
repairs.
cYour vehicle is equipped with an
automatic engine cooling fan. It may
come on at any time without warn-
ing, even if the ignition key is in the
OFF position and the engine is not
running. To avoid injury, always dis-
connect the negative battery cable
before working near the fan.cIf you must work with the engine
running, keep your hands, clothing,
hair and tools away from moving
fans, belts and any other moving
parts.
cIt is advisable to remove ties and any
jewelry, such as rings, watches, etc.
before working on your vehicle.
cIf you must run the engine in an
enclosed space such as a garage, be
sure there is proper ventilation for
exhaust gases.
cNever get under the vehicle while it
is supported only by a jack. If it is
necessary to work under the vehicle,
support it with safety stands.
cKeep smoking materials, flame and
sparks away from fuel and the
battery.
cOn gasoline engine models with the
Multiport Fuel Injection (MFI) sys-
tem, the fuel filter or fuel lines
should be serviced by a NISSAN
dealer because the fuel lines are
under high pressure even when the
engine is off.
CAUTION
cDo not work under the hood while
the engine is hot. Turn off the engine
and wait until it cools down.
cNever connect or disconnect either
the battery or any transistorized
component connector while the igni-
tion is ON.
cNever leave the engine or the auto-
matic transmission related compo-
nent harness connector discon-
nected while the ignition is on.
c
Avoid contact with used engine oil.
Improperly disposed motor oil and/or
other vehicle fluids can hurt the en-
vironment. Always conform to local
regulations for disposal of vehicle
fluid.
This ``Do-it-yourself operations'' section
gives instructions regarding only those
items which are relatively easy for an owner
to perform.
You should be aware that incomplete or
improper servicing may result in operating
difficulties or excessive emissions, and
could affect your warranty coverage.If in
doubt about any servicing, have it done
by your NISSAN dealer.
MAINTENANCE
PRECAUTIONS
7-2
ZX
Page 134 of 203
The engine cooling system is filled at the
factory with a high-quality, year-round, anti-
freeze coolant solution. The anti-freeze so-
lution contains rust and corrosion inhibitors,
therefore additional cooling system addi-
tives are not necessary.
CAUTION
When adding or replacing coolant, be
sure to use only an ethylene glycol
anti-freeze with the proper mixture ratio
of 50% anti-freeze and 50% distilled
water. The use of other types of coolant
solutions may damage your cooling
system.
Outside temperature
down toAnti-
freezeDistilled
water
ÉC ÉF
þ35 þ30 50% 50%
WARNING
cNever remove the radiator cap when
the engine is hot. Wait until the en-
gine and radiator cool down. Serious
burns could be caused by high pres-
sure fluid escaping from the radia-
tor. See precautions in ``If your ve-
hicle overheats,'' found in the ``In
case of emergency'' section.
cThe radiator is equipped with a pres-
sure cap. Use a genuine NISSAN cap
or its equivalent when replacement
is required.
CHECKING ENGINE COOLANT
LEVEL
With coolant reservoir
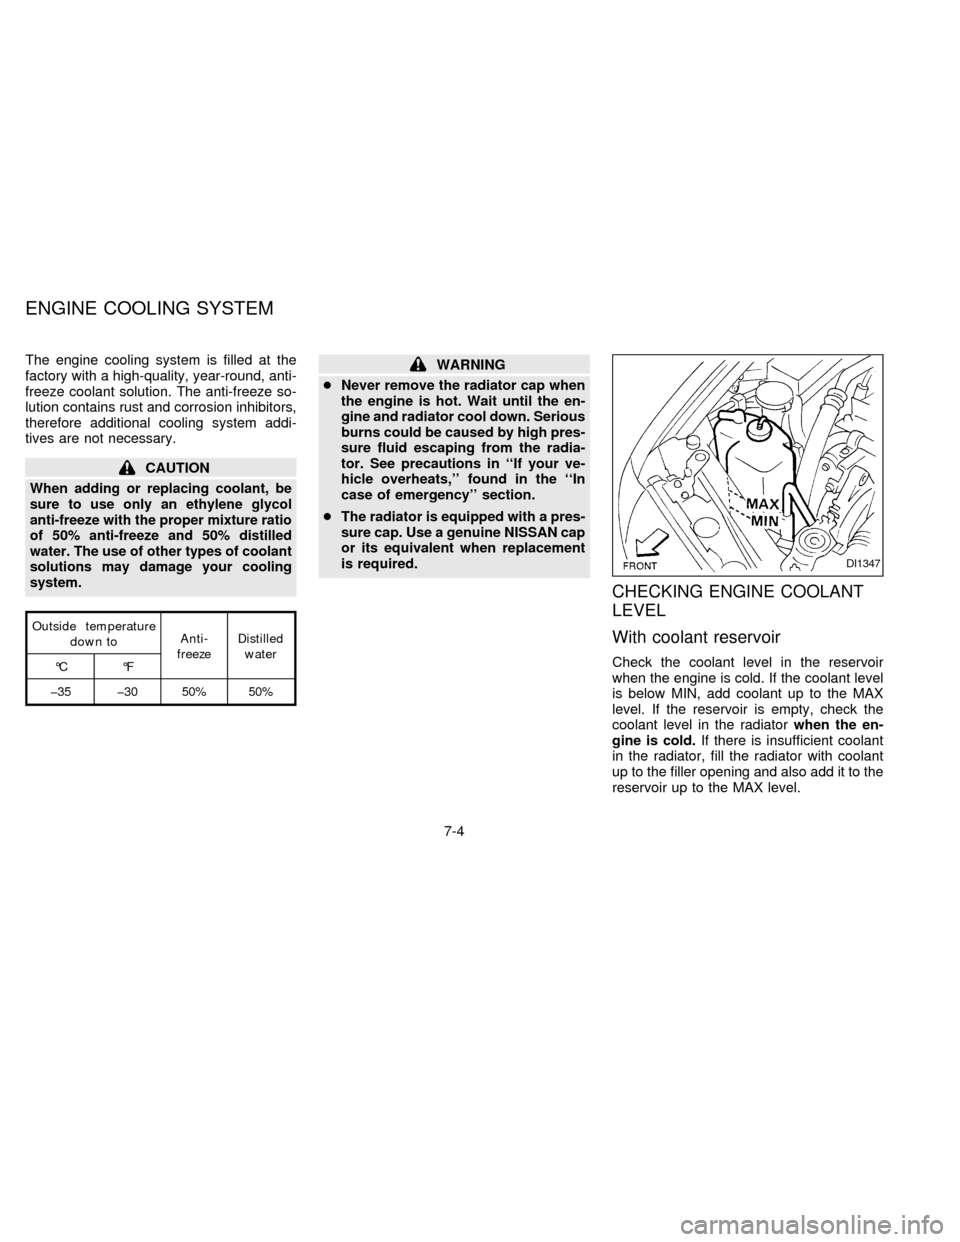
Check the coolant level in the reservoir
when the engine is cold. If the coolant level
is below MIN, add coolant up to the MAX
level. If the reservoir is empty, check the
coolant level in the radiatorwhen the en-
gine is cold.If there is insufficient coolant
in the radiator, fill the radiator with coolant
up to the filler opening and also add it to the
reservoir up to the MAX level.
DI1347
ENGINE COOLING SYSTEM
7-4
ZX
Page 135 of 203
If the cooling system frequently requires
coolant, have it checked by your NISSAN
dealer.
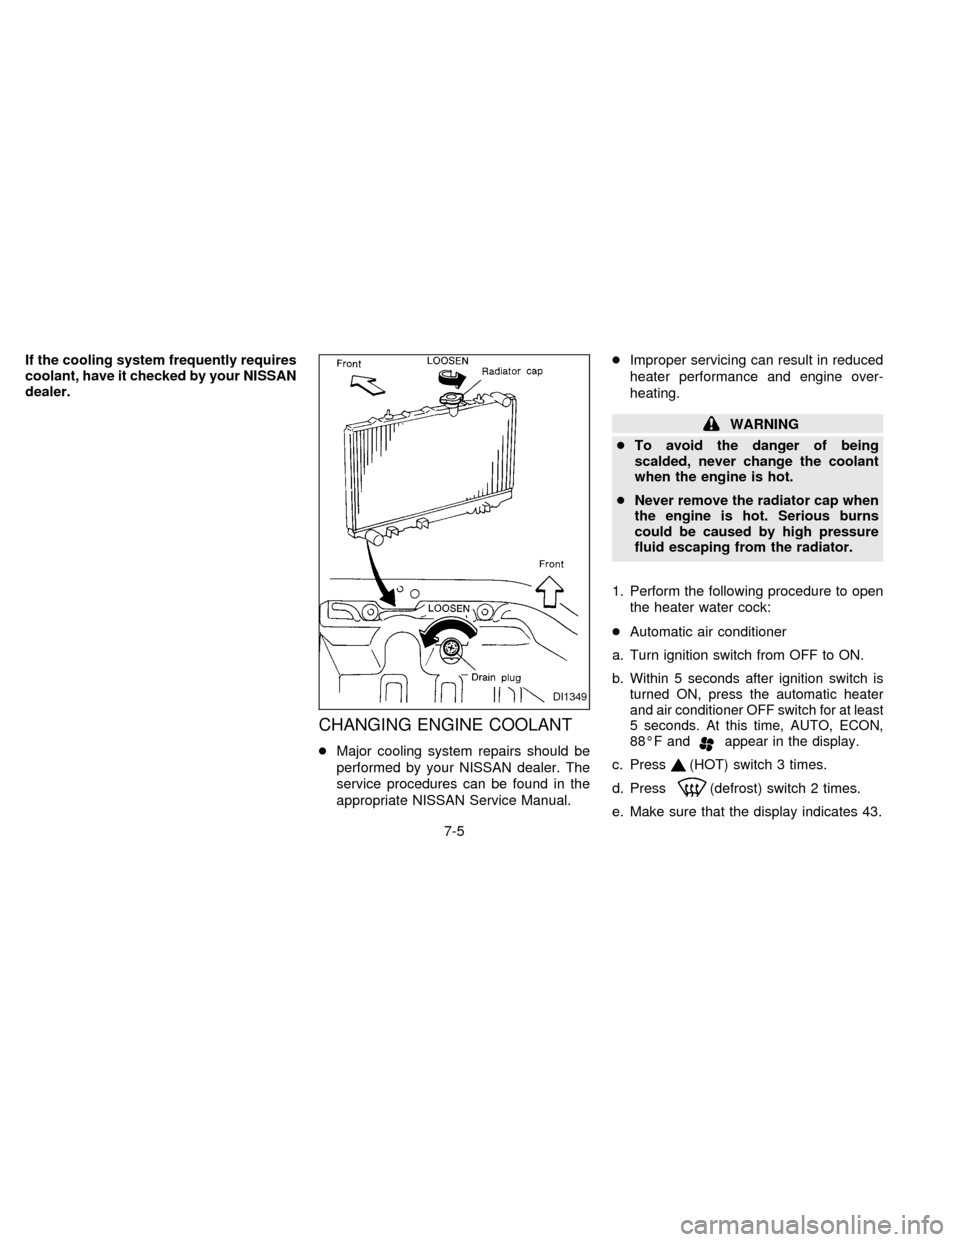
CHANGING ENGINE COOLANT
cMajor cooling system repairs should be
performed by your NISSAN dealer. The
service procedures can be found in the
appropriate NISSAN Service Manual.cImproper servicing can result in reduced
heater performance and engine over-
heating.
WARNING
cTo avoid the danger of being
scalded, never change the coolant
when the engine is hot.
cNever remove the radiator cap when
the engine is hot. Serious burns
could be caused by high pressure
fluid escaping from the radiator.
1. Perform the following procedure to open
the heater water cock:
cAutomatic air conditioner
a. Turn ignition switch from OFF to ON.
b.
Within 5 seconds after ignition switch is
turned ON, press the automatic heater
and air conditioner OFF switch for at least
5 seconds. At this time, AUTO, ECON,
88ÉF and
appear in the display.
c. Press(HOT) switch 3 times.
d. Press
(defrost) switch 2 times.
e. Make sure that the display indicates 43.
DI1349
7-5
ZX
Page 138 of 203
CHANGING ENGINE OIL
1. Park the vehicle on a level surface and
apply the parking brake.
2. Run the engine until it reaches operating
temperature, then turn it off.
3. Place a large drain pan under the drain
plug.
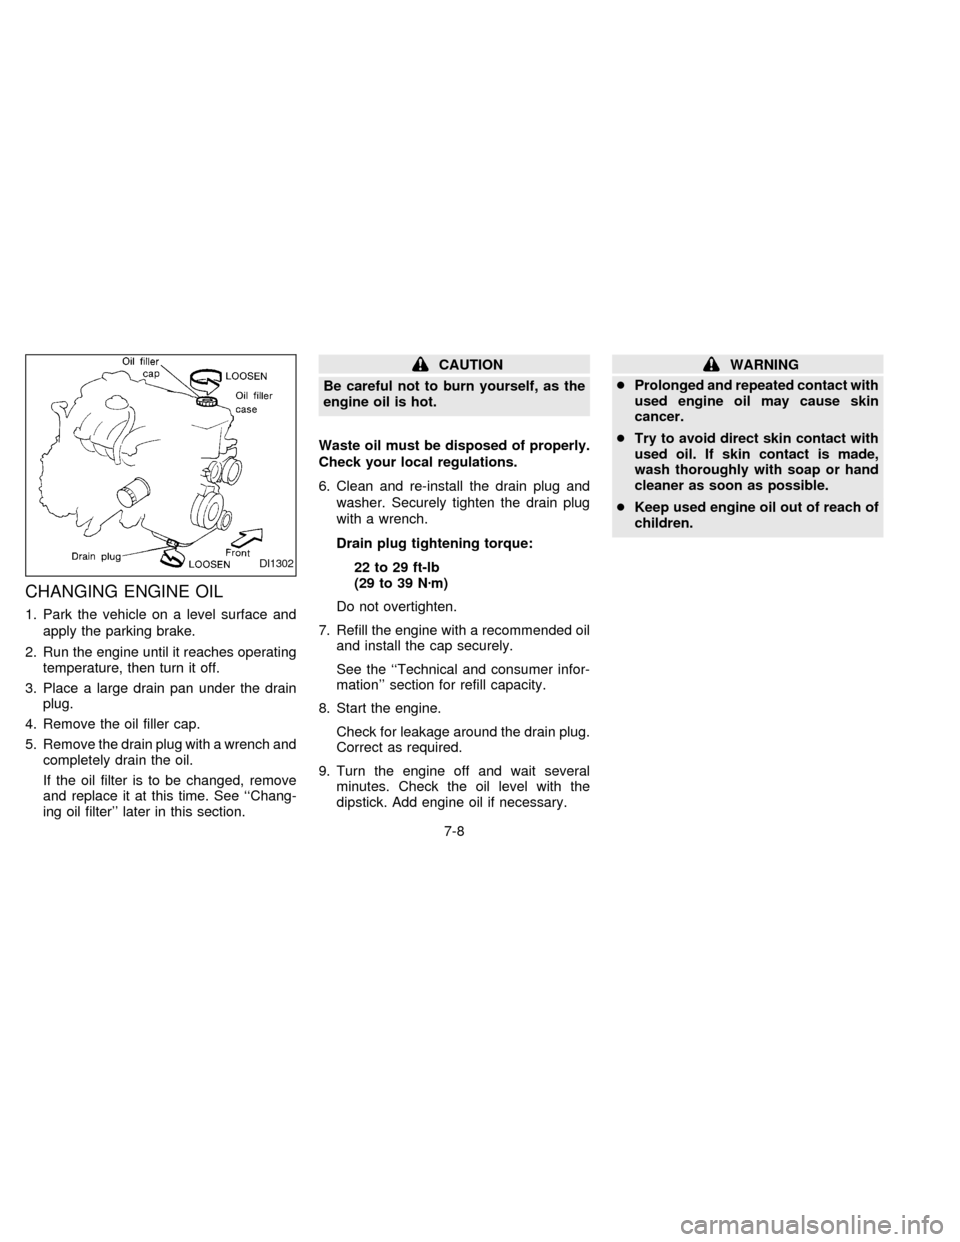
4. Remove the oil filler cap.
5. Remove the drain plug with a wrench and
completely drain the oil.
If the oil filter is to be changed, remove
and replace it at this time. See ``Chang-
ing oil filter'' later in this section.
CAUTION
Be careful not to burn yourself, as the
engine oil is hot.
Waste oil must be disposed of properly.
Check your local regulations.
6. Clean and re-install the drain plug and
washer. Securely tighten the drain plug
with a wrench.
Drain plug tightening torque:
22 to 29 ft-lb
(29 to 39 Nzm)
Do not overtighten.
7. Refill the engine with a recommended oil
and install the cap securely.
See the ``Technical and consumer infor-
mation'' section for refill capacity.
8. Start the engine.
Check for leakage around the drain plug.
Correct as required.
9. Turn the engine off and wait several
minutes. Check the oil level with the
dipstick. Add engine oil if necessary.WARNING
cProlonged and repeated contact with
used engine oil may cause skin
cancer.
cTry to avoid direct skin contact with
used oil. If skin contact is made,
wash thoroughly with soap or hand
cleaner as soon as possible.
cKeep used engine oil out of reach of
children.
DI1302
7-8
ZX