1997 MERCEDES-BENZ ML500 ABS
[x] Cancel search: ABSPage 3489 of 4133
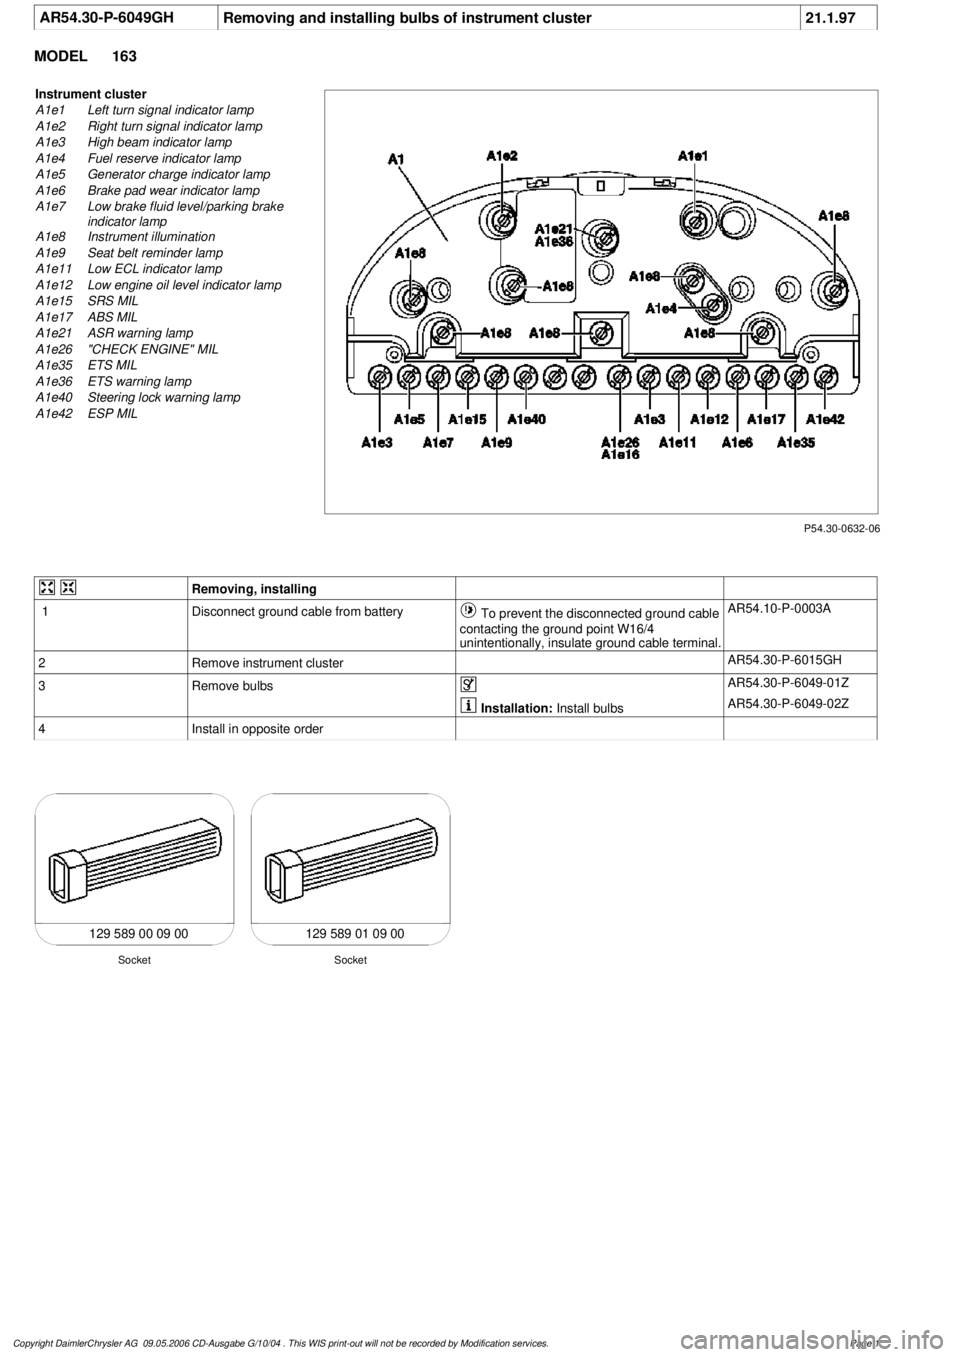
AR54.30-P-6049GH
Removing and installing bulbs of instrument cluster
21.1.97
MODEL
163
P54.30-0632-06
Instrument cluster
A1e1
Left turn signal indicator lamp
A1e2
Right turn signal indicator lamp
A1e3
High beam indicator lamp
A1e4
Fuel reserve indicator lamp
A1e5
Generator charge indicator lamp
A1e6
Brake pad wear indicator lamp
A1e7
Low brake fluid level/parking brake
indicator lamp
A1e8
Instrument illumination
A1e9
Seat belt reminder lamp
A1e11
Low ECL indicator lamp
A1e12
Low engine oil level indicator lamp
A1e15
SRS MIL
A1e17
ABS MIL
A1e21
ASR warning lamp
A1e26
"CHECK ENGINE" MIL
A1e35
ETS MIL
A1e36
ETS warning lamp
A1e40
Steering lock warning lamp
A1e42
ESP MIL
Removing, installing
1
Disconnect ground cable from battery
To prevent the disconnected ground cable
contacting the ground point W16/4
unintentionally, insulate ground cable terminal.
AR54.10-P-0003A
2
Remove instrument cluster
AR54.30-P-6015GH
3
Remove bulbs
AR54.30-P-6049-01Z
Installation:
Install bulbs
AR54.30-P-6049-02Z
4
Install in opposite order
129 589 00 09 00 129 589 01 09 00
Socket
Socket
Copyright DaimlerChrysler AG 09.05.2006 CD-Ausgabe G/10/04 . This WIS print-out will not be recorde
d by Modification services.
Page 1
Page 3496 of 4133

AD54.30-P-5000GH
Instrument cluster (IC) diagnosis troubleshooting
10.4.97
MODEL
163
Connection and use of test equipment
AD00.00-P-1000AZ
Instrument cluster diagnosis, previous
knowledge
AD54.30-P-2000GH
Explanatory notes on diagnosis
troubleshooting chart IC
AD54.30-P-5000-01GH
Display instruments controlled via CAN
troubleshooting chart IC
AD54.30-P-5000-02A
Display instruments controlled directly,
troubleshooting chart IC
AD54.30-P-5000-03A
Troubleshooting
Complaint
Possible cause
Notes
Remedy/Test step
Instrument cluster (A1) completely inoperative
Voltage supply, instrument cluster (A1)
AD54.30-P-6000-01GH
Malfunction indicator lamps or indicator lamps
inoperative
Voltage supply, instrument cluster (A1)
AD54.30-P-6000-01GH
HHT and instrument cluster cannot
communicate
Cables, instrument cluster (A1)
AD54.30-P-6000-02GH
Low brake fluid level/parking brake indicator
lamp, brake pad wear indicator lamp, ABS
MIL, malfunction indicator lamp (ETS, ASR,
ESP) come on together and speedometer
remains on lower stop.
Traction system control module (N47)
AD42.35-P-1001BZ
RPM counter, engine coolant gauge remain
on the lower stop and the low engine oil level
indicator lamp comes on.
Injection system control module (N3)
AD07.61-P-1000AZ
Low brake fluid level/parking brake indicator
lamp, brake pad wear indicator lamp, low
engine oil level indicator lamp, ABS MIL,
malfunction indicator lamp (ETS, ASR, ESP)
come on together and RPM counter, engine
coolant gauge and speedometer remain on
lower stop.
CAN faulty
AD54.30-P-6000-04GH
AD54.30-P-6000-05GH
Steering lock warning lamp (A1e40) is
continuously illuminated or is inoperative.
Cables,
steering lock switch (S97/1)
AD54.30-P-6000-06GH
Coolant level indicator disrupted
Cables,
Coolant level indicator electronic switch (S41)
Model 163 as of 3.98
AD54.30-P-6000-42GH
Copyright DaimlerChrysler AG 05.06.2006 CD-Ausgabe G/10/04 . This WIS print-out will not be recorde
d by Modification services.
Page 1
Page 3525 of 4133
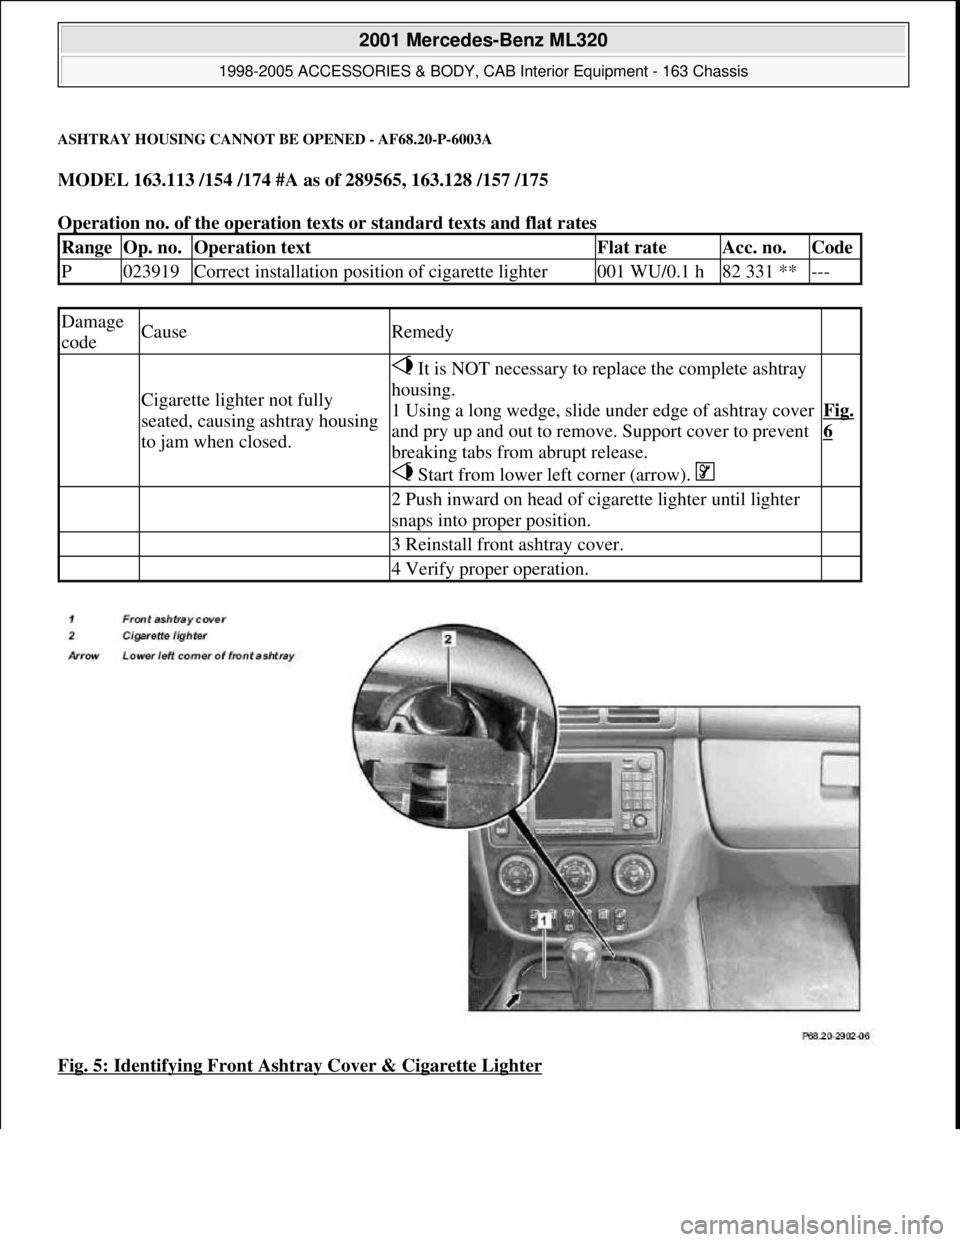
ASHTRAY HOUSING CANNOT BE OPENED - AF68.20-P-6003A
MODEL 163.113 /154 /174 #A as of 289565, 163.128 /157 /175
Operation no. of the operation texts or standard texts and flat rates
Fig. 5: Identifying Front Ashtray Cover & Cigarette Lighter
RangeOp. no.Operation textFlat rateAcc. no.Code
P023919Correct installation position of cigarette lighter001 WU/0.1 h82 331 **---
Damage
codeCauseRemedy
Cigarette lighter not fully
seated, causing ashtray housing
to jam when closed.
It is NOT necessary to replace the complete ashtray
housing.
1 Using a long wedge, slide under edge of ashtray cover
and pry up and out to remove. Support cover to prevent
breaking tabs from abrupt release.
Start from lower left corner (arrow).
Fig.
6
2 Push inward on head of cigarette lighter until lighter
snaps into proper position.
3 Reinstall front ashtray cover.
4 Verify proper operation.
2001 Mercedes-Benz ML320
1998-2005 ACCESSORIES & BODY, CAB Interior Equipment - 163 Chassis
me
Saturday, October 02, 2010 3:35:21 PMPage 7 © 2006 Mitchell Repair Information Company, LLC.
Page 3558 of 4133
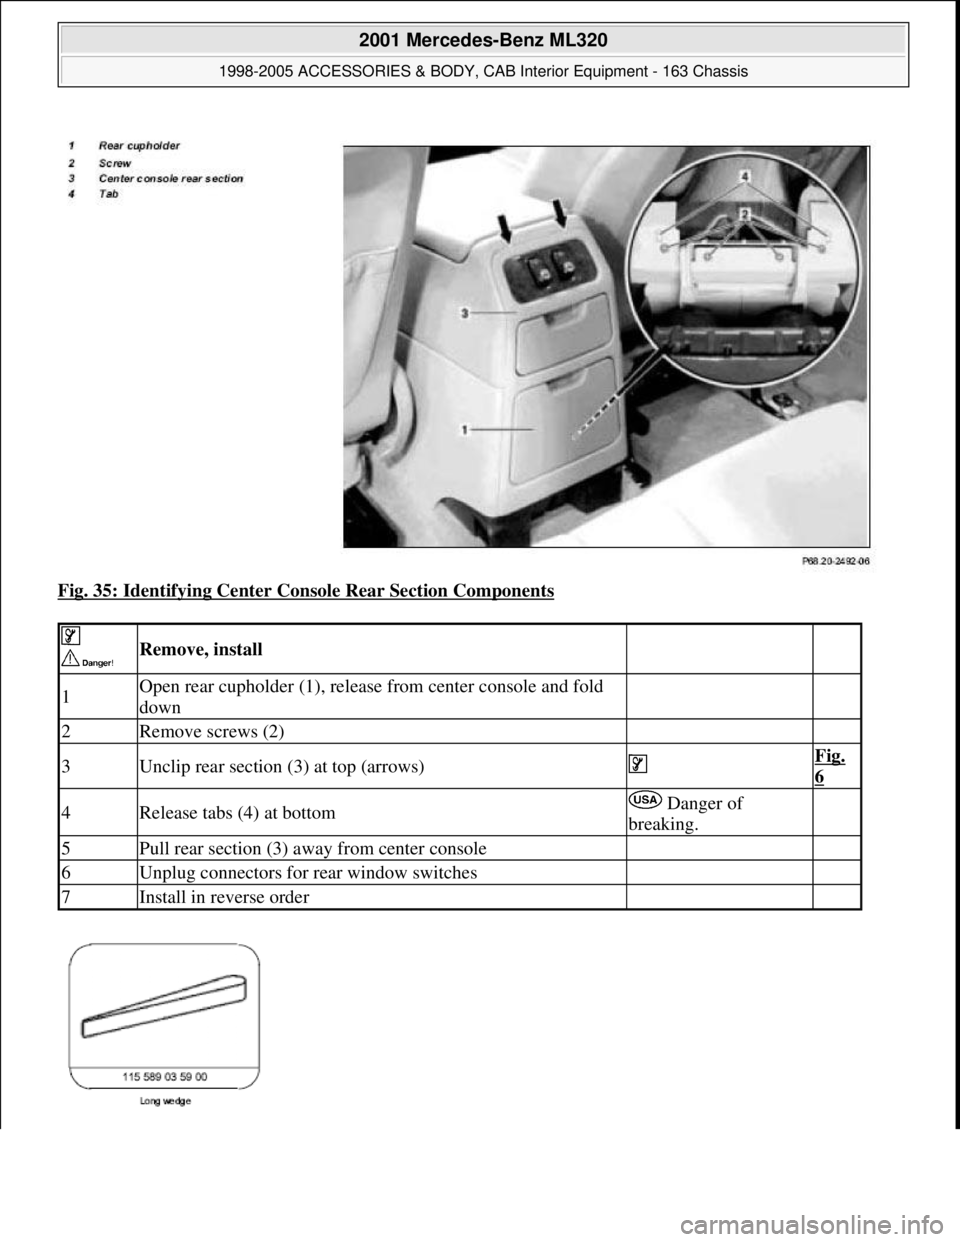
Fig. 35: Identifying Center Console Rear Section Components
Remove, install
1Open rear cupholder (1), release from center console and fold
down
2Remove screws (2)
3Unclip rear section (3) at top (arrows) Fig.
6
4Release tabs (4) at bottom Danger of
breaking.
5Pull rear section (3) away from center console
6Unplug connectors for rear window switches
7Install in reverse order
2001 Mercedes-Benz ML320
1998-2005 ACCESSORIES & BODY, CAB Interior Equipment - 163 Chassis
me
Saturday, October 02, 2010 3:35:22 PMPage 40 © 2006 Mitchell Repair Information Company, LLC.
Page 3583 of 4133
5Remove roof frame handles at
rear
on each side, simultaneously press handle upward
and pull out
As of 01.09.01:With integrated coat hook. Open
cover and unscrew screws.
6.1Remove roof frame handles in
load compartment
Only with 3rd row of seats, Code 847 Up to
31.08.01: Open covers for handles, press clip for
handle down on each side, simultaneously press
handle upward and pull out.
As of 01.09.01: Open cover and unscrew screws.
Installation: only up to 31.8.01 and only with
3rd row of seats, Code 847:
Prepare headliner for installing handlesAR68.30-P-
4300-01GH
Fabricate template for
installing handles in headliner WF58.50-P-
6830-02GH
7.1Remove rear dome lamp As of 01.09.01: Open plastic cover, then
unscrew screws
8Disconnect connectors from
dome lamps in rear
9.1Remove coat hanger hook (3)
in roof frame Up to 31.08.01: Open covers of coat hooks,
press both clips together and press coat hooks
upward, simultaneously pull out coat hooks.
10Remove cover for mounting
points of cargo net (4)Up to 31.08.01: open cover and remove screws.
As of 01.09.01: unclip covers at sides
11
Remove mount (5) on roof
frame for mounting third seat
row Open covers for screws and unscrew both
screws. Press clips together, simultaneously press
mount upward and pull out.
12.1Remove shock absorber (12) Only from 01.09.99 to 31.08.01
13Clip in rear interior lamp
(E15/3) AR82.20-P-
0113GH
14
Remove sun visors with
illuminated mirror (E14/1 on
left and E14/2 right)
AR68.60-P-
5480GH
15Remove paneling on B-pillar AR68.30-P-
4700GH
16Remove rear roof frame
paneling AR68.30-P-
4470GH
17Remove paneling on C-pillar AR68.30-P-
4490GH
18Remove rubber door seals
19.1
Pull off edge guard on
headliner in sliding / pop-up
roof cutout (6) Only with electric glass sliding/tilting roof, Code
414a.
Pull plastic clip (7) out of
2001 Mercedes-Benz ML320
1998-2005 ACCESSORIES & BODY, CAB Interior Equipment - 163 Chassis
me
Saturday, October 02, 2010 3:35:22 PMPage 65 © 2006 Mitchell Repair Information Company, LLC.
Page 3593 of 4133
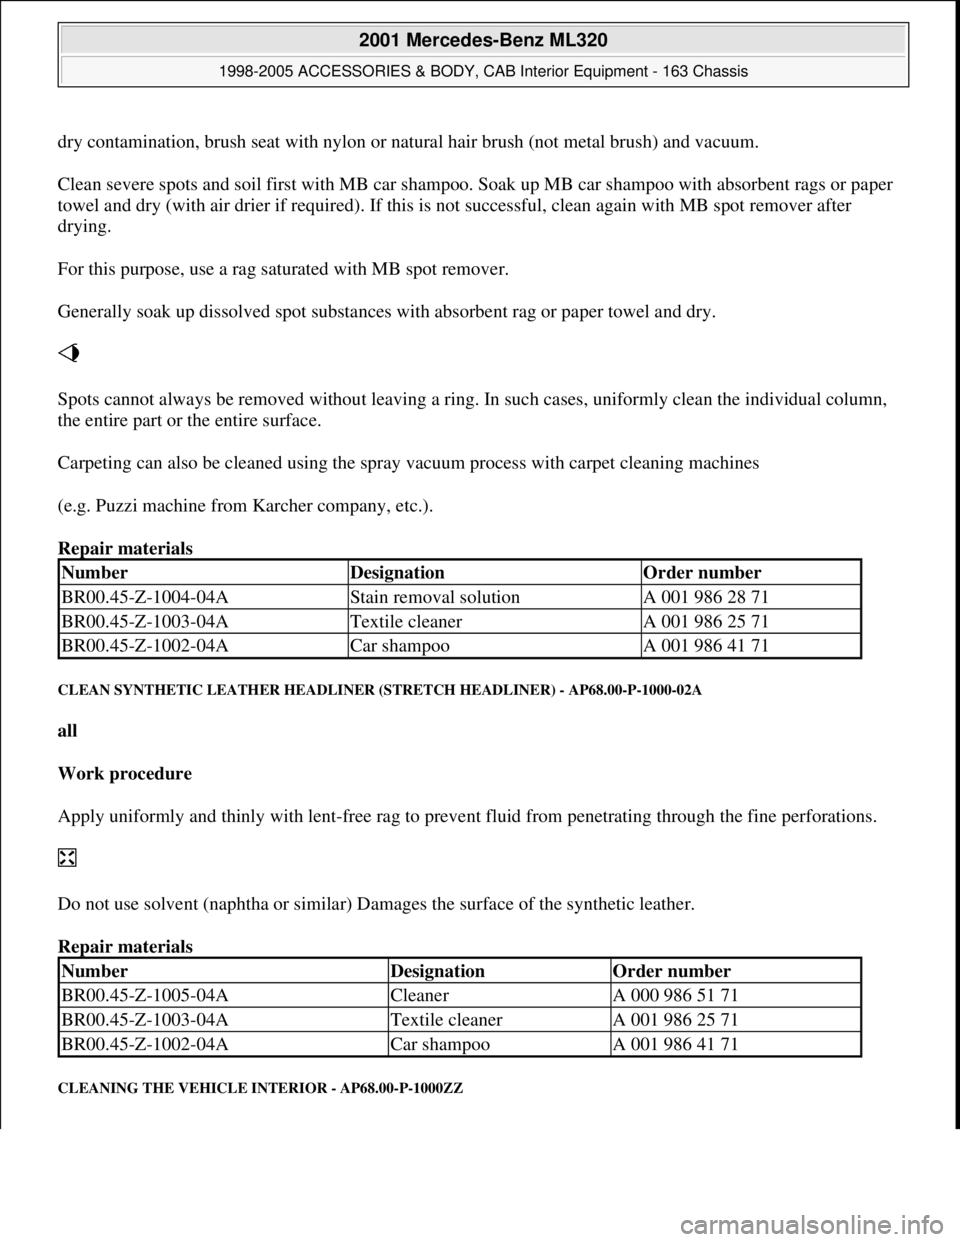
dry contamination, brush seat with nylon or natural hair brush (not metal brush) and vacuum.
Clean severe spots and soil first with MB car shampoo. Soak up MB car shampoo with absorbent rags or paper
towel and dry (with air drier if required). If this is not successful, clean again with MB spot remover after
drying.
For this purpose, use a rag saturated with MB spot remover.
Generally soak up dissolved spot substances with absorbent rag or paper towel and dry.
Spots cannot always be removed without leaving a ring. In such cases, uniformly clean the individual column,
the entire part or the entire surface.
Carpeting can also be cleaned using the spray vacuum process with carpet cleaning machines
(e.g. Puzzi machine from Karcher company, etc.).
Repair materials
CLEAN SYNTHETIC LEATHER HEADLINER (STRETCH HEADLINER) - AP68.00-P-1000-02A
all
Work procedure
Apply uniformly and thinly with lent-free rag to prevent fluid from penetrating through the fine perforations.
Do not use solvent (naphtha or similar) Damages the surface of the synthetic leather.
Repair materials
CLEANING THE VEHICLE INTERIOR - AP68.00-P-1000ZZ
NumberDesignationOrder number
BR00.45-Z-1004-04AStain removal solutionA 001 986 28 71
BR00.45-Z-1003-04ATextile cleanerA 001 986 25 71
BR00.45-Z-1002-04ACar shampooA 001 986 41 71
NumberDesignationOrder number
BR00.45-Z-1005-04ACleanerA 000 986 51 71
BR00.45-Z-1003-04ATextile cleanerA 001 986 25 71
BR00.45-Z-1002-04ACar shampooA 001 986 41 71
2001 Mercedes-Benz ML320
1998-2005 ACCESSORIES & BODY, CAB Interior Equipment - 163 Chassis
me
Saturday, October 02, 2010 3:35:22 PMPage 75 © 2006 Mitchell Repair Information Company, LLC.
Page 3598 of 4133
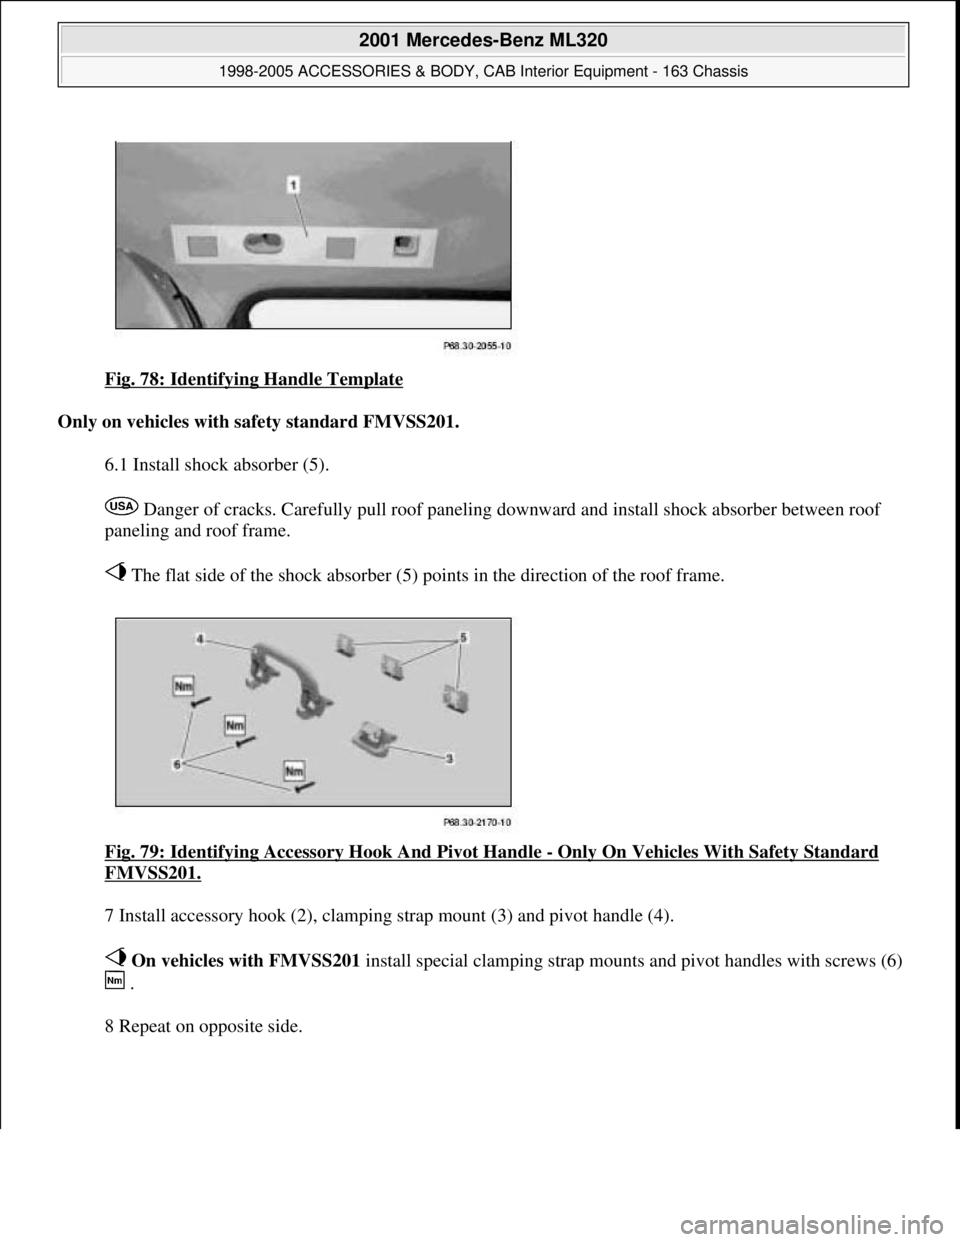
Fig. 78: Identifying Handle Template
Only on vehicles with safety standard FMVSS201.
6.1 Install shock absorber (5).
Danger of cracks. Carefully pull roof paneling downward and install shock absorber between roof
paneling and roof frame.
The flat side of the shock absorber (5) points in the direction of the roof frame.
Fig. 79: Identifying Accessory Hook And Pivot Handle
- Only On Vehicles With Safety Standard
FMVSS201.
7 Install accessory hook (2), clamping strap mount (3) and pivot handle (4).
On vehicles with FMVSS201 install special clamping strap mounts and pivot handles with screws (6)
.
8 Repeat on opposite side.
2001 Mercedes-Benz ML320
1998-2005 ACCESSORIES & BODY, CAB Interior Equipment - 163 Chassis
me
Saturday, October 02, 2010 3:35:22 PMPage 80 © 2006 Mitchell Repair Information Company, LLC.
Page 3614 of 4133
T 1617 LACKFARBE VAEGERKETGELB
P 162 AGGREGAT OHNE OEL
T 1623 LACKFARBE HELLELFENBEIN MB 1623
T 1625 LACKFARBE STRASSENGELB MB 1625
P 163 HA-MONTIERT W203RL SA
T 1633 LACKFARBE PASTAGELB MB 1633
P 163E ERSATZTEIL - SONDERAUSFUEHRUNG
P 163G GROSSVERSUCH
P 163K KUNDENWUNSCH
P 163S UNVERCODETE-SONDERAUSFUEHRUNG
P 163Z ZWISCHENAUSFUEHRUNG KEINE GESCHWINDIGKEITSBEGRENZ.
P 164 MOTOR OHNE GETRIEBE, MIT OEL, MIT A-SCHW.
T 1640 LACKFARBE BEIGE MB 1640
T 1641 LACKFARBE HONIGGELB MB 1641
T 1642 LACKFARBE CHROMGELB MB 1642
T 1647 LACKFARBE MAISGELB MB 1647
P 165 HINTERACHSGETRIEBE/ABWICKLUNG DCSA
T 1656 LACKFARBE ELFENBEIN MB 1656
T 1657 LACKFARBE ZITRONENGELB MB 1657
P 166 VW-MOTOR
T 1660 LACKFARBE SANDGELB MB 1660
T 1661 LACKFARBE GOLDGELB (AEHNLICH RAL 1004) MB 1661
T 1666 LACKFARBE CONTI-GELB MB 1666
T 1669 LACKFARBE GRUENBEIGE MB 1669
P 167 SONDERBEDARF MIT GETRIEBE
T 1672 LACKFARBE EPPLE-SANDGELB MB 1672
P 168 CKD ZERLEGT
T 1680 LACKFARBE HELIOSGELB MB 1680
P 168D FEDERN NACH EDV-PROGRAMM
P 168G GROSSVERSUCH
P 168S UNVERCODETE SONDERAUSFUEHRUNGEN
P 168V VERSUCHSSTUECKLISTE
P 168Z ZWISCHENAUSFUEHRUNG
P 169P PRO.TYP C209 PTT2 2 (WAGEN 14-32)
P 170 MOTORABTRIEB VORN
P 170D FEDERN NACH EDV-PROGRAMM
P 170G GROSSVERSUCH
P 170K KUNDENWUNSCH
P 170P WAHLPAKET
P 170S UNVERCODETE SONDERAUSFUEHRUNGEN
P 170V VERSUCHSSTUECKLISTE
P 170Z ZWISCHENAUSFUEHRUNG
P 171 CKD-WEGFALLTEILE FUER GRIECHENLAND
P 171P PRO.TYP C209-205 (M112 E32)
P 172 KRAFTSTOFFVORWAERMUNG
P 172P PRO.TYP C209-206 (M113 E43)
P 173 WARNLEUCHTE FUER OELSTAND MOTOR 111.978
P 173P PRO.TYP C209-207 (M113 E43)
P 174 KONSERVIERUNG
P 174P PRO.TYP C209-212 (M271 E18DEML)
P 175 DAEMPFERFILTER MIT WARTUNGSANZEIGE
P 175P PRO.TYP C209-220 (M112 E26)
P 176 GASMOTOR FUER SPRINTER
P 176P PRO.TYP C209-221 (M112 E26)
P 177 UNGEREGELTER KAELTEKOMPRESSOR
P 177P PRO.TYP C209-222 (M113 E50)
P 178 LICHTMASCHINE 14V 150A
P 178P PRO.TYP C209-223 (M271 E18DEML)
P 179 MOTOR SCHADSTOFFARM STUFE II
P 179P PRO.TYP C209-224 (M112 E26)
P 180 MOTOR EURO II/B
P 180P PRO.TYP C209-225 (M113 E50)
P 181 KRAFTSTOFFILTER MIT WASSERABSCHEIDER
P 181P PRO.TYP C209-226 (M112 E32)
P 182 WANDLER MIT ABWEICHENDER KENNLINIE