1997 MERCEDES-BENZ ML500 airbag
[x] Cancel search: airbagPage 3825 of 4133
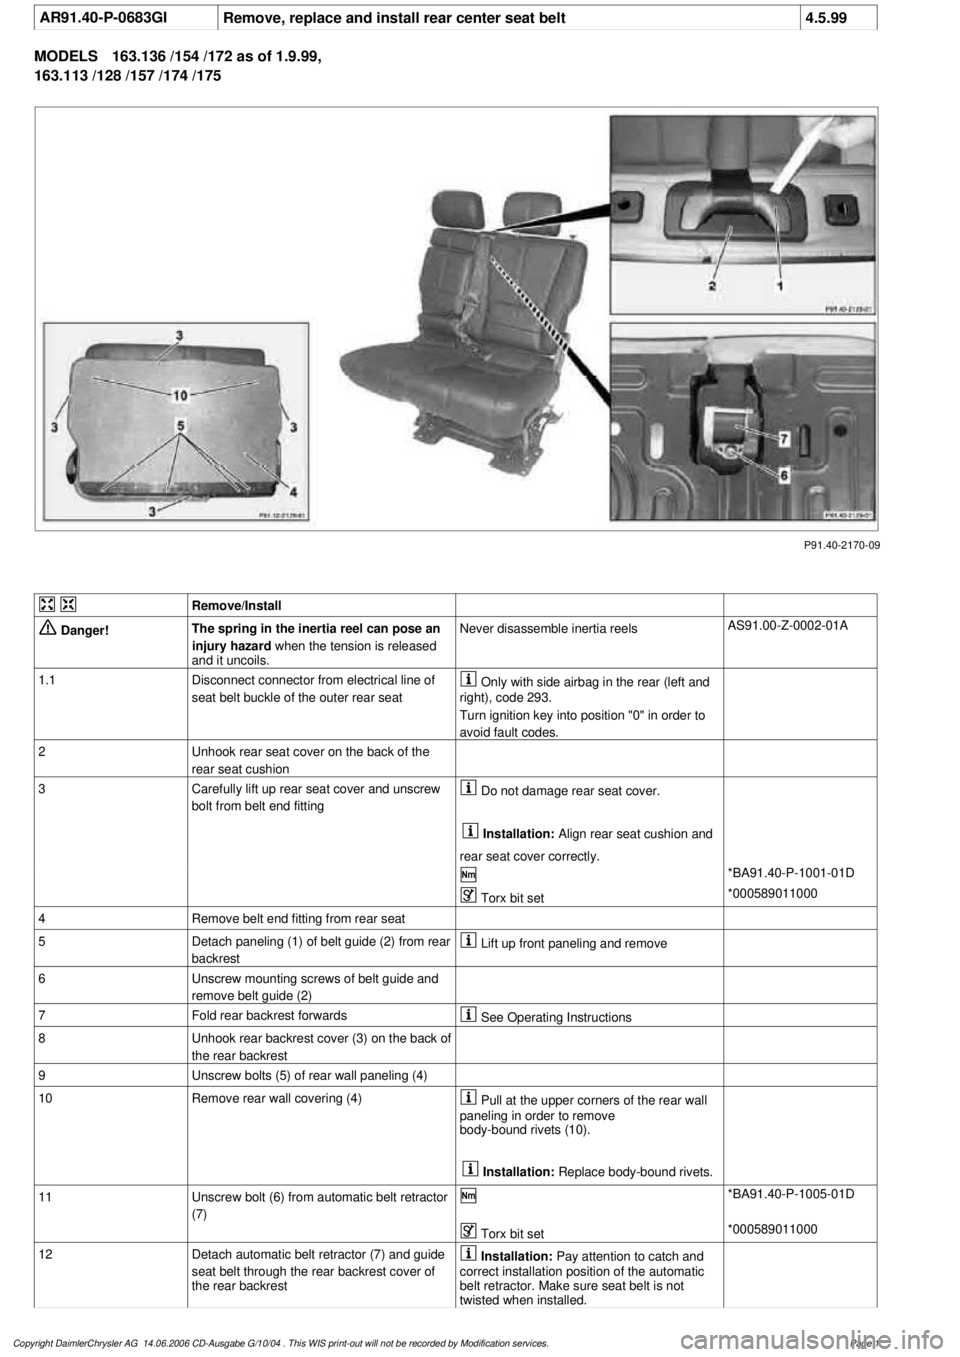
AR91.40-P-0683GI
Remove, replace and install rear center seat belt
4.5.99
MODELS
163.136 /154 /172 as of 1.9.99,
163.113 /128 /157 /174 /175
P91.40-2170-09
Remove/Install
Danger!
The spring in the inertia reel can pose an
injury hazard
when the tension is released
and it uncoils.
Never disassemble inertia reels
AS91.00-Z-0002-01A
1.1
Disconnect connector from electrical line of
seat belt buckle of the outer rear seat
Only with side airbag in the rear (left and
right), code 293.
Turn ignition key into position "0" in order to
avoid fault codes.
2
Unhook rear seat cover on the back of the
rear seat cushion
3
Carefully lift up rear seat cover and unscrew
bolt from belt end fitting
Do not damage rear seat cover.
Installation:
Align rear seat cushion and
rear seat cover correctly.
*BA91.40-P-1001-01D
Torx bit set
*000589011000
4
Remove belt end fitting from rear seat
5
Detach paneling (1) of belt guide (2) from rear
backrest
Lift up front paneling and remove
6
Unscrew mounting screws of belt guide and
remove belt guide (2)
7
Fold rear backrest forwards
See Operating Instructions
8
Unhook rear backrest cover (3) on the back of
the rear backrest
9
Unscrew bolts (5) of rear wall paneling (4)
10
Remove rear wall covering (4)
Pull at the upper corners of the rear wall
paneling in order to remove
body-bound rivets (10).
Installation:
Replace body-bound rivets.
11
Unscrew bolt (6) from automatic belt retractor
(7)
*BA91.40-P-1005-01D
Torx bit set
*000589011000
12
Detach automatic belt retractor (7) and guide
seat belt through the rear backrest cover of
the rear backrest
Installation:
Pay attention to catch and
correct installation position of the automatic
belt retractor. Make sure seat belt is not
twisted when installed.
Copyright DaimlerChrysler AG 14.06.2006 CD-Ausgabe G/10/04 . This WIS print-out will not be recorde
d by Modification services.
Page 1
Page 3833 of 4133

SI91.60-P-0002A
Service information on immobilization of a passenger-side airbag where a
rearward mounted (reboard) child seat is fitted
17.3.99
MODEL
124, 126, 129, 140, 163, 168, 170, 202, 203, 208, 210, 215, 220, 463
Modification notes
18.11.00
Supersedes Service Information SI91.60-P-0002A dated
15.11.00
Remove the SI SI91.60-P-0002A from your file
It is recommended to place the child seat in the rear area if
possible.
If, in exceptional cases, the owner wishes a rearward mounted child
seat to be expressly attached on the front passenger seat, the front
passenger airbag should be immobilized.
As a general rule, there is no approval for immobilizing the front
passenger airbag on models fitted with ACSR, which is visible from
the "airbag OFF" indicator light in the center console. On such
models, an MB child seat with ACSR should be used for safety and
cost reasons.
-----------------------------------------------------------------------------------------
On models fitted with seat belt force limiter, it is essential for
safety reasons to
D
program the front passenger ETR to "NO".
D
unplug the connector at the front passenger ETR.
No provision is made for immobilizing the seat occupied
recognition, the automatic child seat recognition (ACSR), as well as
the side airbag and window airbag.
In the event that it is necessary to immobilize the seat occupied
recognition and automatic child seat recognition (ACSR), for example
if a Recaro seat is installed, this can be carried out in exceptional
cases after agreement has been obtained from GSP/SPS, tel. 07031
/ 90 - 81815.
-----------------------------------------------------------------------------------------
After immobilizing the front passenger airbag or additionally the
ETR, it is essential to
D
have the customer sign the confirmation after immobilization.
D
affix a sticker at a clearly visible point in the area of the front
passenger airbag.
D
affix a sticker in the Owner's Manual, in the section Airbag.
Carry out the remaining procedure as stated below.
-----------------------------------------------------------------------------------------
Deactivation can be reversed at any time.
Immobilization and re-activation must be entered in the
vehicle documents!
The vehicle should be presented in such a case to a technical
inspection center (DEKRA, TÜV). The completed confirmation
should be submitted to the vehicle registration authorities for
entry.
-----------------------------------------------------------------------------------------
Perform version coding / procedure
Model
Version
Coding with HHT
2)
or STAR Diagnosis tool (DAS)
Unplug
connector of
passenger side
airbag
3)
Unplug
connector of
passenger side
emergency
tensioning
retractor
Insert
replacement resistor
3)
Passenger-side
airbag
NO
Passenger side
emergency
tensioning
retractor NO
124
All
--X-X
126
All
--X-X
129
up to 06/93
--X-X
129
as of 07/93 without ACSR
X-X--
140
up to 06/93
--X-X
140
as of 07/93 without ACSR
X-X--
140
as of 07/93 with ACSR
1)
-----
163
up to VIN 145263
--X-X
163
as of VIN 145264
-----
168
All
-----
170
without ACSR
XXXX-
170
with ACSR
1)
-----
202
without seat belt force limiter
X-X--
202
as of 06/97
4)
XXXX-
202
with ACSR
1)
-----
203
All
-----
208
All
-----
210
without ACSR
XXXX-
210
with ACSR
1)
-----
215
All
-----
220
All
-----
Copyright DaimlerChrysler AG 14.06.2006 CD-Ausgabe G/10/04 . This WIS print-out will not be recorde
d by Modification services.
Page 1
Page 3834 of 4133

463
All
-----
1)
Recognition: existing "airbag Off" warning light in center
console.
2)
With HHT functions menu point 5 Coding Reboard child seat. If
only the passenger side airbag is de-activated, then program
menu point Vehicle equipment.
3)
Depending on model and version, unplug one or two
connectors at the passenger side airbag and insert the
corresponding replacement resistors.
4)
Without ACSR, with seat belt force limiter.
Immobilizing passenger side airbag certificate
Model 124, 126, 129, 140, 163 up to VIN
145263, 170, 202, 210
Have customer sign certificate after
immobilization
OF91.60-P-1000-01A
Cancel immobilization
D
To re-activate the passenger side airbag remove the ignition
resistor at the cable.
D
Fit together connector at passenger side airbag.
D
Fit together connector at passenger side ETR (on models fitted
with seat belt force limiter).
D
Use HHT or STAR Diagnosis tool (DAS) to re-program
passenger side airbag and passenger side ETR in the SRS
control module to "YES".
D
Remove sticker on passenger side airbag and render invalid in
Owner's Manual.
D
Complete re-activation on certificate after immobilization.
D
If re-activated, delete de-activation in vehicle documents.
Parts ordering notes
Part no.
Designation
Quantity
140 868 00 50
Ignition resistor (replacement resistor)
as required
140 817 15 20
Sticker (without seat belt force limiter)
2
210 817 20 20
Sticker (with seat belt force limiter)
2
Copyright DaimlerChrysler AG 14.06.2006 CD-Ausgabe G/10/04 . This WIS print-out will not be recorde
d by Modification services.
Page 2
Page 3868 of 4133
111.946 up to 31.5.98,
111.943,
111.973 up to 31.5.97,
111.920,
111.921 up to 31.8.98,
111.941,
111.942 up to 31.8.98,
111.944 up to 31.5.98,
111.945 up to 31.8.98, 111.974,
111.947/970, 112.942 up to 31.5.98,
119, 120 up to 31.5.97,
668.940/941,611.960/961
with CODE (440a) Cruise control
with CODE (443a) Cruise control and electrically adjustable steering column (codes 400 and 441)
with CODE (446) Cruise control, electrically adjustable steering column and airbag (440, 441 and 442)
ENGINE 104, 111, 112, 113, 119, 120, 137, 613.960, 628.960 (except, 112.96, 113.99) with CODE (494a)
USA version
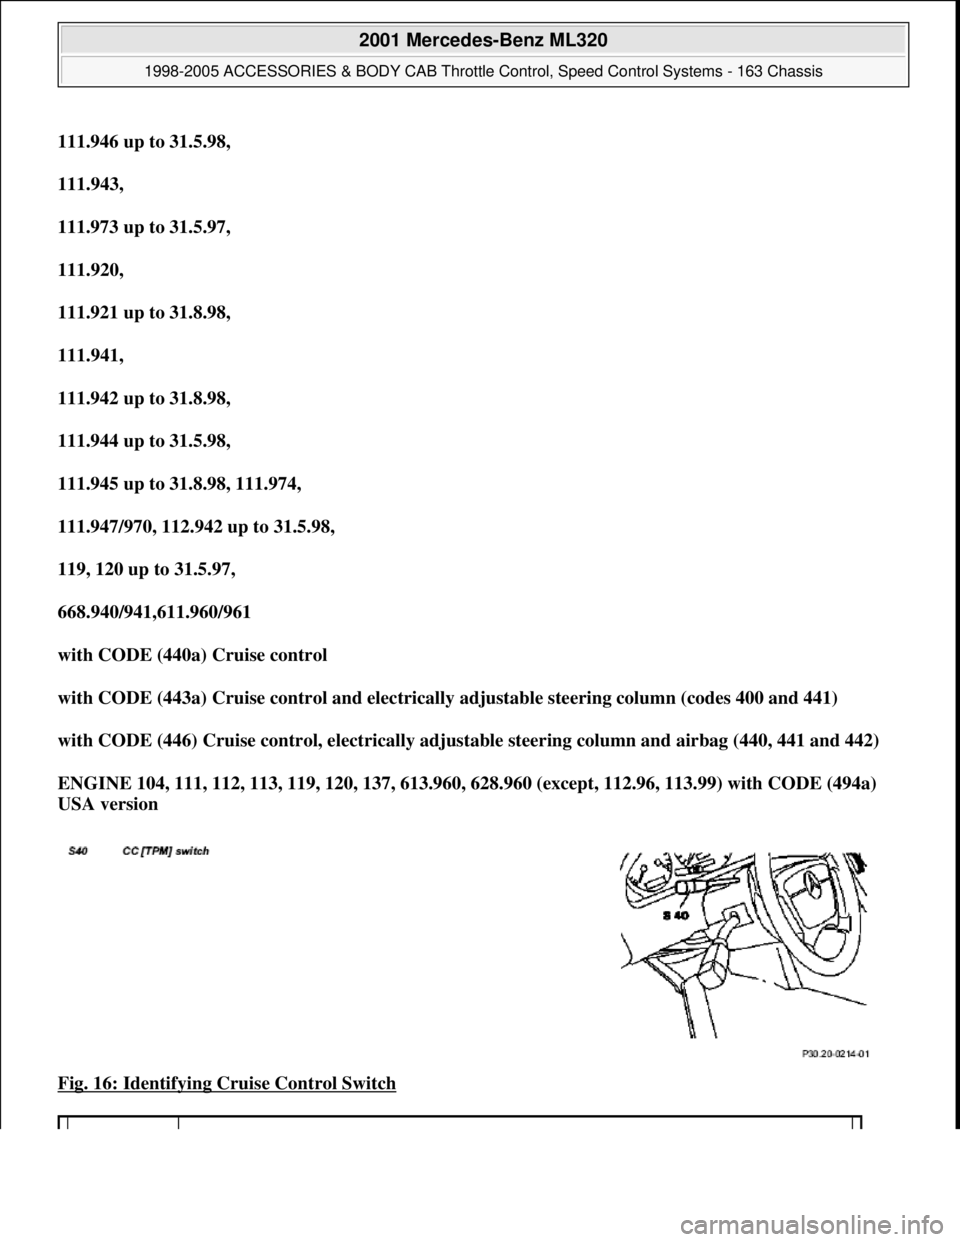
Fig. 16: Identifying Cruise Control Switch
2001 Mercedes-Benz ML320
1998-2005 ACCESSORIES & BODY CAB Throttle Control, Speed Control Systems - 163 Chassis
me
Saturday, October 02, 2010 3:36:27 PMPage 28 © 2006 Mitchell Repair Information Company, LLC.
Page 3896 of 4133
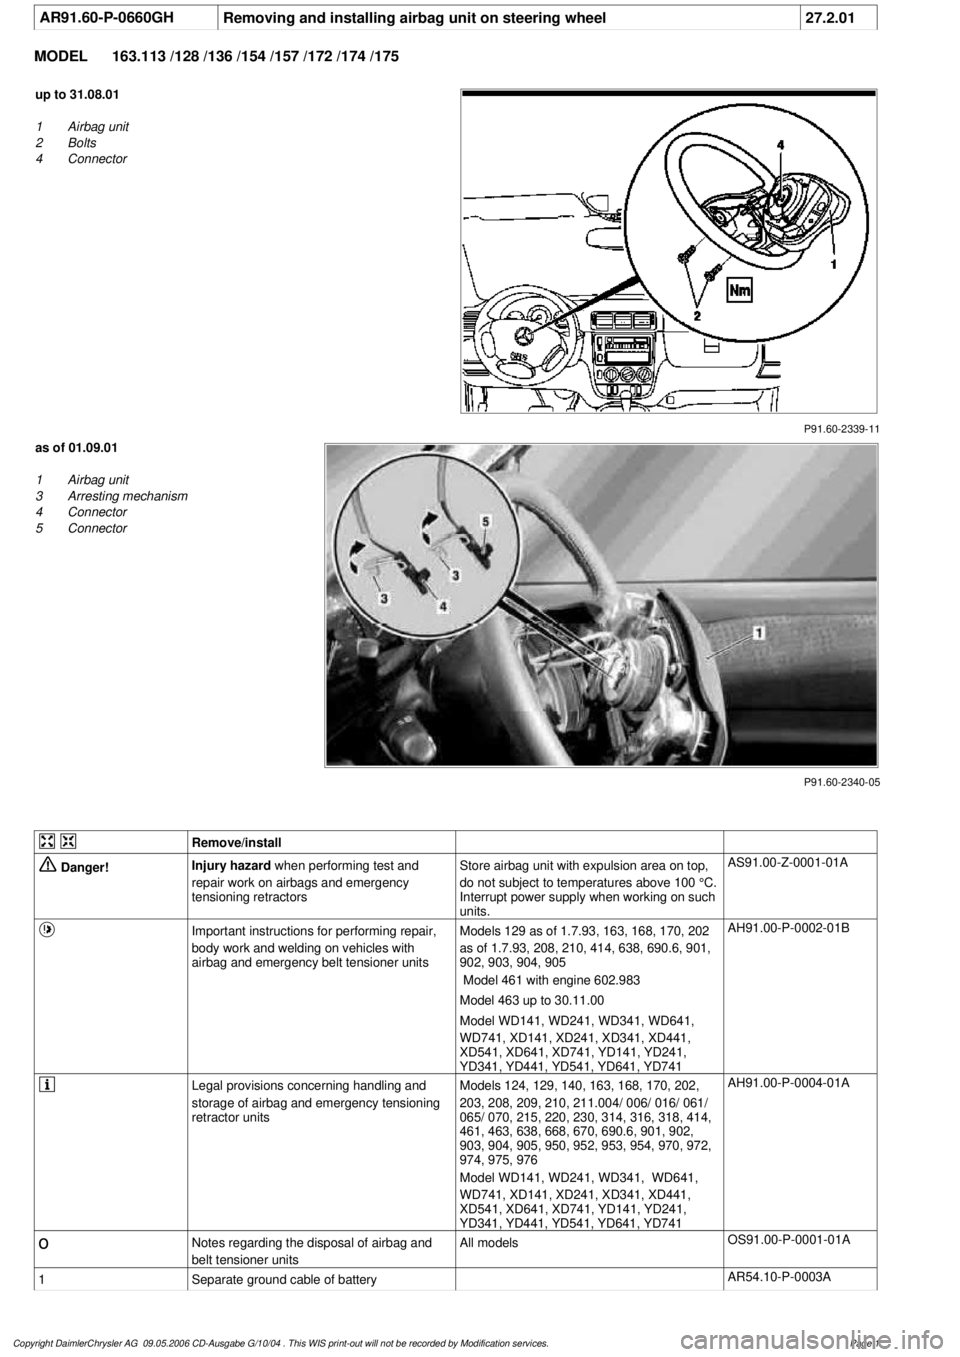
AR91.60-P-0660GH
Removing and installing airbag unit on steering wheel
27.2.01
MODEL
163.113 /128 /136 /154 /157 /172 /174 /175
P91.60-2339-11
up to 31.08.01
1
Airbag unit
2
Bolts
4
Connector
P91.60-2340-05
as of 01.09.01
1
Airbag unit
3
Arresting mechanism
4
Connector
5
Connector
Remove/install
Danger!
Injury hazard
when performing test and
repair work on airbags and emergency
tensioning retractorsStore airbag unit with expulsion area on top,
do not subject to temperatures above 100 °C.
Interrupt power supply when working on such
units.
AS91.00-Z-0001-01A
Important instructions for performing repair,
body work and welding on vehicles with
airbag and emergency belt tensioner units
Models 129 as of 1.7.93, 163, 168, 170, 202
as of 1.7.93, 208, 210, 414, 638, 690.6, 901,
902, 903, 904, 905
Model 461 with engine 602.983
Model 463 up to 30.11.00
Model WD141, WD241, WD341, WD641,
WD741, XD141, XD241, XD341, XD441,
XD541, XD641, XD741, YD141, YD241,
YD341, YD441, YD541, YD641, YD741
AH91.00-P-0002-01B
Legal provisions concerning handling and
storage of airbag and emergency tensioning
retractor units
Models 124, 129, 140, 163, 168, 170, 202,
203, 208, 209, 210, 211.004/ 006/ 016/ 061/
065/ 070, 215, 220, 230, 314, 316, 318, 414,
461, 463, 638, 668, 670, 690.6, 901, 902,
903, 904, 905, 950, 952, 953, 954, 970, 972,
974, 975, 976
Model WD141, WD241, WD341, WD641,
WD741, XD141, XD241, XD341, XD441,
XD541, XD641, XD741, YD141, YD241,
YD341, YD441, YD541, YD641, YD741
AH91.00-P-0004-01A
o
Notes regarding the disposal of airbag and
belt tensioner units
All models
OS91.00-P-0001-01A
1
Separate ground cable of battery
AR54.10-P-0003A
Copyright DaimlerChrysler AG 09.05.2006 CD-Ausgabe G/10/04 . This WIS print-out will not be recorde
d by Modification services.
Page 1
Page 3897 of 4133
2
Remove screws (2)
Starting from the straight-ahead position,
turn steering wheel by 90 to obtain better
access to the bolts.
*BA91.60-P-1001-01A
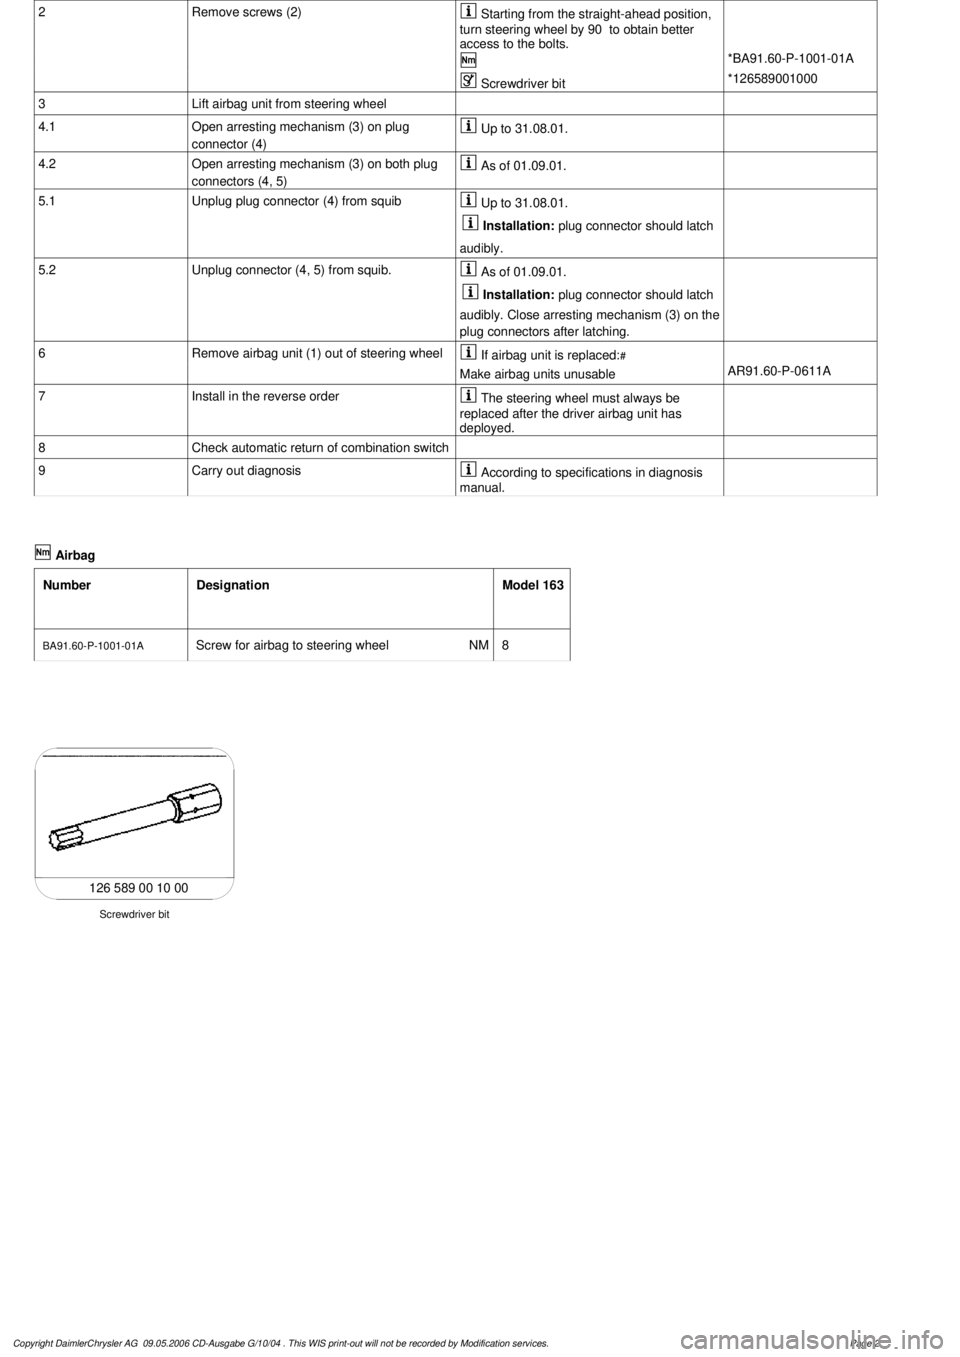
Screwdriver bit
*126589001000
3
Lift airbag unit from steering wheel
4.1
Open arresting mechanism (3) on plug
connector (4)
Up to 31.08.01.
4.2
Open arresting mechanism (3) on both plug
connectors (4, 5)
As of 01.09.01.
5.1
Unplug plug connector (4) from squib
Up to 31.08.01.
Installation:
plug connector should latch
audibly.
5.2
Unplug connector (4, 5) from squib.
As of 01.09.01.
Installation:
plug connector should latch
audibly. Close arresting mechanism (3) on the
plug connectors after latching.
6
Remove airbag unit (1) out of steering wheel
If airbag unit is replaced:
#
Make airbag units unusable
AR91.60-P-0611A
7
Install in the reverse order
The steering wheel must always be
replaced after the driver airbag unit has
deployed.
8
Check automatic return of combination switch
9
Carry out diagnosis
According to specifications in diagnosis
manual.
Airbag
Number
Designation
Model 163
BA91.60-P-1001-01A
Screw for airbag to steering wheel
NM
8
126 589 00 10 00
Screwdriver bit
Copyright DaimlerChrysler AG 09.05.2006 CD-Ausgabe G/10/04 . This WIS print-out will not be recorde
d by Modification services.
Page 2
Page 3898 of 4133
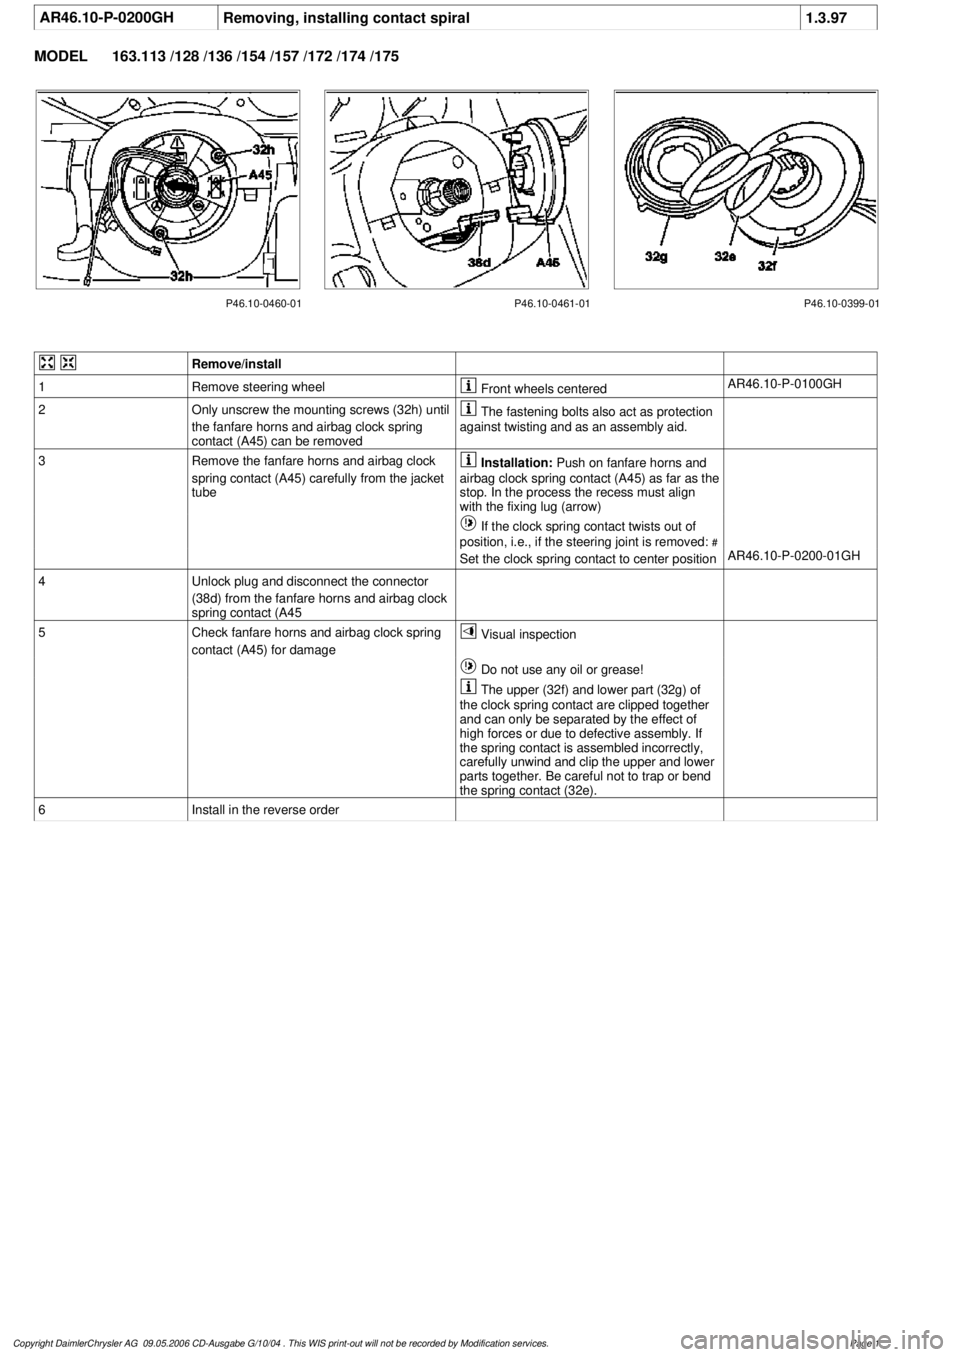
AR46.10-P-0200GH
Removing, installing contact spiral
1.3.97
MODEL
163.113 /128 /136 /154 /157 /172 /174 /175
P46.10-0460-01 P46.10-0461-01 P46.10-0399-01
Remove/install
1
Remove steering wheel
Front wheels centered
AR46.10-P-0100GH
2
Only unscrew the mounting screws (32h) until
the fanfare horns and airbag clock spring
contact (A45) can be removed
The fastening bolts also act as protection
against twisting and as an assembly aid.
3
Remove the fanfare horns and airbag clock
spring contact (A45) carefully from the jacket
tube
Installation:
Push on fanfare horns and
airbag clock spring contact (A45) as far as the
stop. In the process the recess must align
with the fixing lug (arrow)
If the clock spring contact twists out of
position, i.e., if the steering joint is removed:
#
Set the clock spring contact to center position
AR46.10-P-0200-01GH
4
Unlock plug and disconnect the connector
(38d) from the fanfare horns and airbag clock
spring contact (A45
5
Check fanfare horns and airbag clock spring
contact (A45) for damage
Visual inspection
Do not use any oil or grease!
The upper (32f) and lower part (32g) of
the clock spring contact are clipped together
and can only be separated by the effect of
high forces or due to defective assembly. If
the spring contact is assembled incorrectly,
carefully unwind and clip the upper and lower
parts together. Be careful not to trap or bend
the spring contact (32e).
6
Install in the reverse order
Copyright DaimlerChrysler AG 09.05.2006 CD-Ausgabe G/10/04 . This WIS print-out will not be recorde
d by Modification services.
Page 1
Page 3899 of 4133
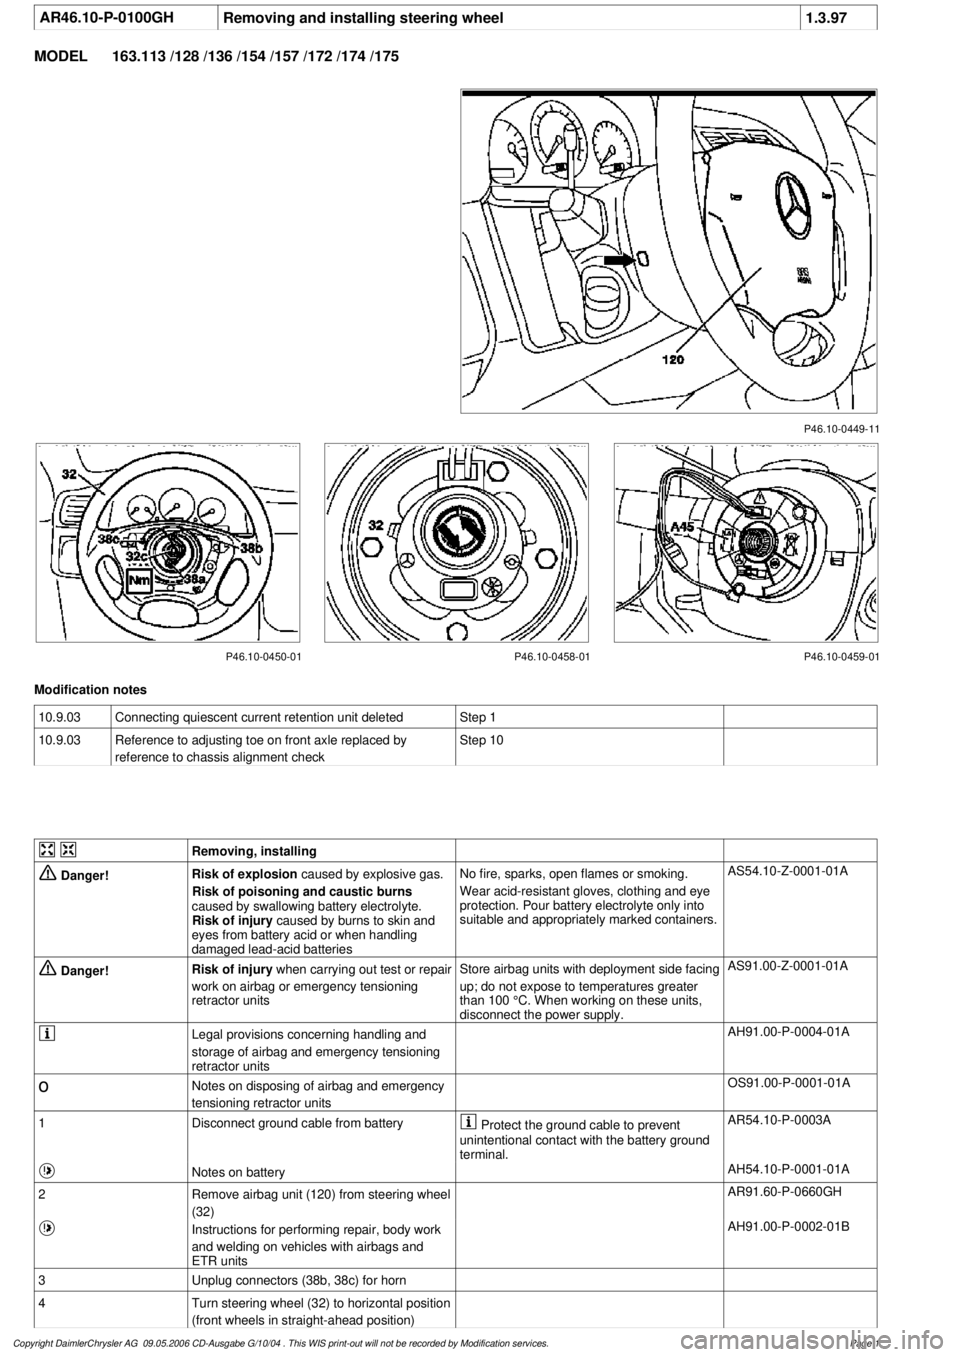
AR46.10-P-0100GHRemoving and installing steering wheel
1.3.97
MODEL
163.113 /128 /136 /154 /157 /172 /174 /175
P46.10-0449-11
P46.10-0450-01 P46.10-0458-01 P46.10-0459-01
Modification notes
10.9.03
Connecting quiescent current retention unit deleted
Step 1
10.9.03
Reference to adjusting toe on front axle replaced by
reference to chassis alignment check
Step 10
Removing, installing
Danger!
Risk of explosion
caused by explosive gas.
Risk of poisoning and caustic burns
caused by swallowing battery electrolyte.
Risk of injury
caused by burns to skin and
eyes from battery acid or when handling
damaged lead-acid batteries
No fire, sparks, open flames or smoking.
Wear acid-resistant gloves, clothing and eye
protection. Pour battery electrolyte only into
suitable and appropriately marked containers.
AS54.10-Z-0001-01A
Danger!
Risk of injury
when carrying out test or repair
work on airbag or emergency tensioning
retractor units
Store airbag units with deployment side facing
up; do not expose to temperatures greater
than 100 °C. When working on these units,
disconnect the power supply.
AS91.00-Z-0001-01A
Legal provisions concerning handling and
storage of airbag and emergency tensioning
retractor units
AH91.00-P-0004-01A
o
Notes on disposing of airbag and emergency
tensioning retractor units
OS91.00-P-0001-01A
1
Disconnect ground cable from battery
Protect the ground cable to prevent
unintentional contact with the battery ground
terminal.
AR54.10-P-0003A
Notes on battery
AH54.10-P-0001-01A
2
Remove airbag unit (120) from steering wheel
(32)
AR91.60-P-0660GH
Instructions for performing repair, body work
and welding on vehicles with airbags and
ETR units
AH91.00-P-0002-01B
3
Unplug connectors (38b, 38c) for horn
4
Turn steering wheel (32) to horizontal position
(front wheels in straight-ahead position)
Copyright DaimlerChrysler AG 09.05.2006 CD-Ausgabe G/10/04 . This WIS print-out will not be recorde
d by Modification services.
Page 1