Page 906 of 4133
 up
and unfold backrest until it locks into
place.
�
Check for se")
102 Controls in detailSeatsResetting rear seat�
Pull down on seat bench until it locks
into place.
�
Pull lock button1 (
�page 100) up
and unfold backrest until it locks into
place.
�
Check for secure locking by pulling and
pushing on the backrest.
The red backrest lock indicator at lock
button1 (
�page 100) is not visible in
the locked position.
�
Move the rear and front seats in de-
sired position.
�
Pull up and adjust head restraint
(�page 36).
Third row seats*Folding down single seat
1Head restraint
2Hook
3Tensioner
4Hook and loop velcro strip
�
Remove cargo floor plate
(�page 162).
�
Remove head restraint1 from seat
cushion.
�
Lift tensioner3 upward to a horizon-
tal position to release tension of the
belt.
�
Disengage hook2 while holding onto
the seat firmly with one hand.
Warning!
G
For your protection, drive only with properly
positioned head restraints.
Adjust head restraint so that head restraint
supports the back of the head at eye level.
This will reduce the potential for injury to the
head and neck in the event of an accident or
similar situation.
Failure to assure that seats are locked into
place could result in an increased chance of
injury in an accident.
Never place hands under seat or near any
moving parts while a seat is being adjusted.
Page 907 of 4133
 on underside of
seat.
5Backrest release
6Seat release
�
Fold seat down until it locks securely in
place.
The re")
103 Controls in detailSeats
�
Attach belt at hook and loop velcro
strip4 (
�page 102) on underside of
seat.
5Backrest release
6Seat release
�
Fold seat down until it locks securely in
place.
The red marking on the seat release6
should not be visible.
�
Store cargo floor plates inside the
backrest (
�page 162).
�
Pull backrest release5 and unfold
backrest until it locks securely in place.
�
Install head restraint1 in backrest
(�page 102).
Storing single seat
�
Remove head restraint from backrest
(�page 102).
�
Pull backrest release5 and fold back-
rest forward until it locks securely in
place.
�
Remove cargo floor plates from the
backrest.
�
Pull seat release6 (
�page 103) and
fold seat up.
�
Disengage belt and engage hook2
(�page 102) in ceiling mount.
�
Pull on free end of belt until tight.
�
Install head restraint in openings
provided in seat cushion.
�
Install cargo floor plates (
�page 162).
Warning!
G
After folding the seats up, manually place
the lap belt portion of the seat belt behind
the seat (arrow). Otherwise, the lap belt may
be subject to damage and could rip.
Page 908 of 4133
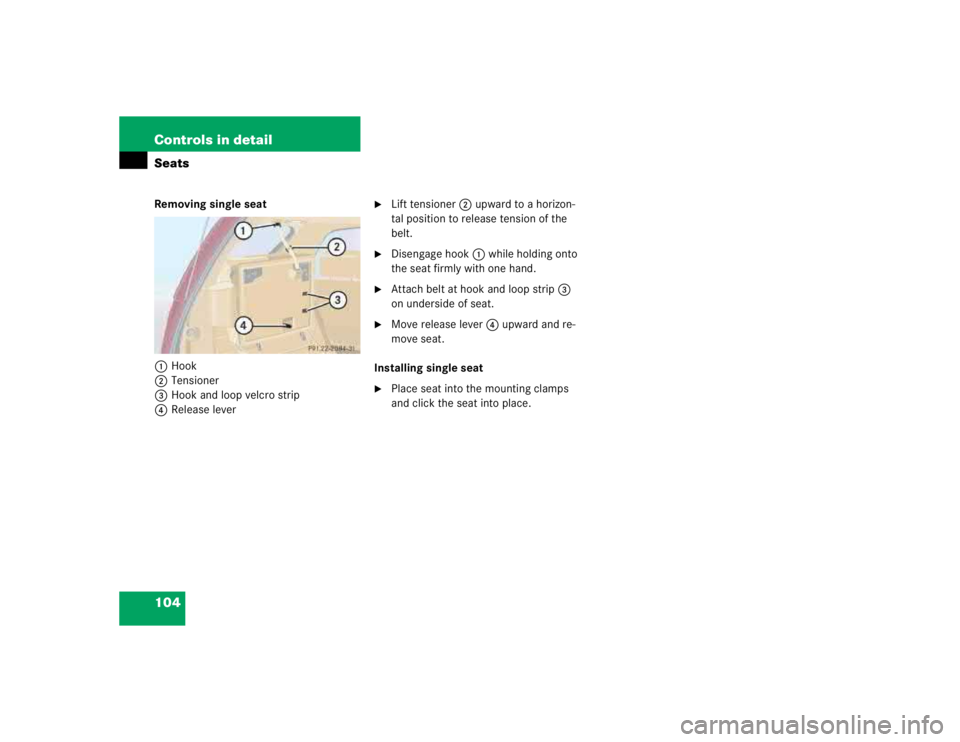
104 Controls in detailSeatsRemoving single seat
1Hook
2Tensioner
3Hook and loop velcro strip
4Release lever
�
Lift tensioner2 upward to a horizon-
tal position to release tension of the
belt.
�
Disengage hook1 while holding onto
the seat firmly with one hand.
�
Attach belt at hook and loop strip3
on underside of seat.
�
Move release lever4 upward and re-
move seat.
Installing single seat
�
Place seat into the mounting clamps
and click the seat into place.
Page 910 of 4133
.
�
Press button2.
The passenger-side exterior rear view
mirror is selected.")
106 Controls in detailMemory function*Storing parking position�
Stop the vehicle.
�
Switch on ignition (if not already on).
�
Press button2.
The passenger-side exterior rear view
mirror is selected.
�
Adjust the exterior rear view mirror
with button3 so that you see the rear
wheel and the road curb.
�
Press memory button2 (
�page 105).
�
Within three seconds, press bottom of
adjustment button3.
The parking position is stored if the
mirror does not move.
Storing positions in memory�
Adjust the seat (
�page 37) and exteri-
or rear view mirrors (�page 40) to the
desired position.
�
Push memory button2 (
�page 105).
�
Release memory button and press one
of the position buttons1 within three
seconds.
All the settings are stored at the select-
ed position.
Recalling positions from memory�
Press and hold one of the position
buttons1 until seat and rear view mir-
rors have fully moved to the stored po-
sitions.
iIf the mirror does move, repeat the
above steps. After the setting is stored
you can move the mirror again.
The selected position will be stored rel-
ative to the position button1
(�page 105) pressed.
!Do not operate the power seats using
the memory button if the seat backrest
is in an excessively reclined position.
Doing so could cause damage to front
or rear seats.iReleasing the button immediately
stops movement to the stored posi-
tions.
Page 962 of 4133
158 Controls in detailLoadingFor additional safety when transporting
cargo while the rear seats are unoccupied,
fasten the outer seat belts crosswise into
the opposite side buckles.Cargo tie-down rings
The cargo area is provided with four
tie-down rings. Additional two rings are lo-
cated at the rear of front seats.
Cargo tie-down ring
Carefully secure cargo by applying even
load on all rings with rope of sufficient
strength to hold down the cargo.
iThe cargo area is the preferred place to
carry objects. The enlarged cargo area
should only be used for items which do
not fit in the cargo area alone.
iWhile the partition net* (
�page 159)
will help protect you from smaller ob-
jects, it cannot prevent the movement
of large, heavier objects into the pas-
senger area in an accident. Such items
must be properly secured using the
cargo tie-down rings in the cargo area
floor.
Page 963 of 4133

159 Controls in detail
Loading
Hooks
Four hooks located on the rear compart-
ment trim panels, two on each side.HooksUse the hooks to secure light weight items.
The maximum permissible weight per hook
is 9 lbs (4 kg).
Partition net*Use of the partition net is a particularly im-
portant safety factor when the vehicle is
loaded higher than the top of the seat
backrests with smaller objects.
The partition net can be installed behind
the backrests of the front or rear seats.
Engaging partition net
1Holder
2Mounting hookWarning!
G
Always lock backrest in its upright position
when rear seat bench is occupied by pas-
sengers, or cargo is being carried behind the
seat bench.
To help avoid personal injury from smaller
objects flying in the occupant area during a
collision or sudden maneuver, always use
partition net when transporting cargo.
The partition net cannot prevent the move-
ment of large, heavier objects into the pas-
senger area in an accident. Such items must
be properly secured using the cargo
tie-down rings in the cargo area floor
(�page 158).
Passenger use of seats behind installed par-
tition net is restricted because of the foot-
well being taken up by the net.
Page 964 of 4133
160 Controls in detailLoading�
One after the other, press the two
mounting hooks2 inward against the
spring pressure and turn them.
The mounting hooks are locked in this
position and you can move the net into
position more easily.
�
Turn one of the mounting hooks2 in
the opposite direction.
The spring pressure will push it out.
�
Engage mounting hook2 in
holder1.
�
Turn the other mounting hook and en-
gage it in the opposite holder.
�
Push both mounting hooks2 forward
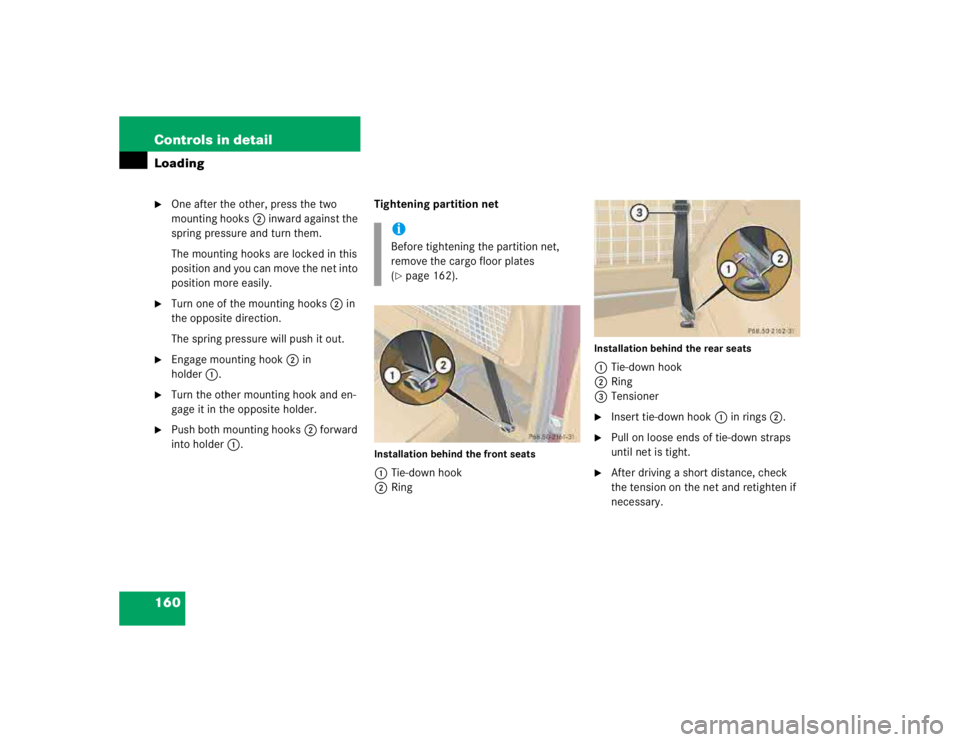
into holder1.Tightening partition net
Installation behind the front seats1Tie-down hook
2Ring
Installation behind the rear seats1Tie-down hook
2Ring
3Tensioner�
Insert tie-down hook1 in rings2.
�
Pull on loose ends of tie-down straps
until net is tight.
�
After driving a short distance, check
the tension on the net and retighten if
necessary.
iBefore tightening the partition net,
remove the cargo floor plates
(�page 162).
Page 965 of 4133
161 Controls in detail
Loading
Removing partition net�
Lift tensioner3 upward to a horizon-
tal position to release tensioning of the
strap.
�
Disengage tie-down hooks1 from
rings2.
�
Remove mounting hooks2
(�page 159) from holder1
(�page 159).
�
Roll up and close the partition net.
�
Store partition net behind rear seat
bench.
Cargo area cover blind*
1Handle
2Holder
Closing blind�
Pull blind on handle1 across the car-
go area.
�
Guide blind into holders2.Opening blind
�
Disengage blind and guide retraction
by its handle.
Removing blind
3Button
4Mounting sleeve
�
Roll the blind up.
�
Push mounting sleeve4 inward
against spring pressure until it engag-
es.
�
Remove blind from mounts.
Warning!
G
Passenger use of third row seats with cargo
area cover blind installed is restricted.