Page 725 of 4133
258
Towing
Te ch n ica l
data
Instruments
and controls Operation Driving
Instrument
cluster display Practical hints
Car care Index
To be certain to avoid additional damage to the vehicle
powertrain, however you should d o the following:
• With damage to front axle, raise front axle. Remove
flexible drive shaft between rear axle and transfer
case
• With damage to rear axle, raise rear axle and tow
vehicle with wheel lift or dolly placed under front
wheels.
• With damage to transfer case, remove flexible drive
shafts to the drive axles.
Note:
Always install new self-locking nuts when reinstalling
the flexible drive shaft. Caution!
If the vehicle is towed with the front axle raised, the
engine must be shut off (key in steering lock position 1).
Otherwise, the 4-ETS+ may become engaged which may
cause loss of towing control. Switch off the tow-away
alarm (see page 36) as well as the ESP (see page 207).
Note:
To signal turns while being towed with hazard warning
flasher in use, turn key in steering lock to position 2
and activate combination switch for left or right turn
signal in usual manner. Now deactivate the hazard
warning flasher, only the selected turn signal will
operate. Upon canceling the turn signal, the hazard
warning flasher must be activated again.
Wa r n i n g !
With the engine not running, there is no power
assistance for the braking and steering systems. In
this case, it is important to keep in mind that a
considerably higher degree of effort is necessary to
brake and steer the vehicle.
Page 744 of 4133

277
Contents - Vehicle care
Te ch n ica l
data
Instruments
and controls Operation Driving
Instrument
cluster display Practical hints
Car care Index
Vehicle careCleaning and care
of the vehicle .............................278
Power washer ..............................279
Tar stains .....................................279
Paintwork, painted body
components .................................279
Engine cleaning ..........................280
Vehicle washing .........................280
Ornamental moldings ................280
Headlamps, taillamps,
turn signal lenses ......................280 Window cleaning ....................... 281
Wiper blades .............................. 281
Light alloy wheels ..................... 281
Instrument cluster ..................... 281
Steering wheel and
gear selector lever ..................... 281
Cup holder .................................. 282
Seat belts ..................................... 282
Headliner .................................... 282
Upholstery .................................. 282
Hard plastic trim items ............. 282
Plastic and rubber parts ........... 282
Page 753 of 4133
286
Technical data
Te ch n ica l
data
Instruments
and controls Operation Driving
Instrument
cluster display Practical hints Car care Index
Layout of poly-V-belt drive 1 Automatic belt tensioner
2 Crankshaft
3 Air conditioner compressor
4 Coolant pump
5 Generator (alternator)
6 Idler pulley
7 Power steering pump
For dimensions of the poly-V-belt, see technical data.
Page 759 of 4133

292
Fuels, coolants, lubricants etc. - capacities
Te ch n ica l
data
Instruments
and controls Operation Driving
Instrument
cluster display Practical hints Car care Index
Fuels, coolants, lubricants etc. – capacities
Vehicle components and their respective lubricants must match. Therefore use only brands tested and recommended
by us. Please refer to the Factory Approved Service Products pamphlet, or inquire at your Mercedes-Benz Light Truck
Center.
Fuels, coolants, lubricants etc. Model Capacity
Engine with oil filter
(recommended engine oils) ML 320 / ML 430
ML 55 AMG 8.5 US qt (8.0 l)
8.0 US qt (7.5 l)
Automatic transmission
(automatic transmission fluid) 9.0 US qt (8.5 l)
Transfer case
(Dexron 3 or Dexron 2E) 1. 6 U S q t (1. 5 l )
Rear axle
(Hypoid gear oil SAE 90, 85 W 90) 1.3 US qt (1.25 l)
Front axle
(Hypoid gear oil SAE 90) 1. 2 U S q t (1. 1 l )
Power steering
(MB Power steering fluid) approx. 0.65 US qt (0.6 l)
Front wheel hubs
(high temperature roller bearing grease) approx. 1.5 oz (43 g) each
Page 837 of 4133
33 Getting started
Unlocking
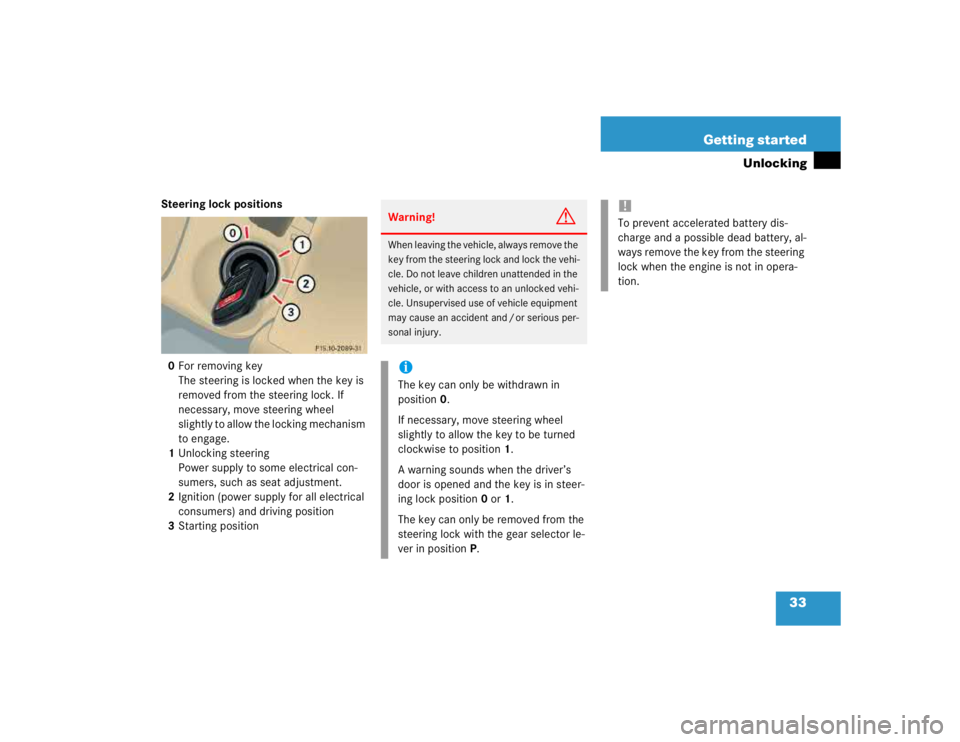
Steering lock positions
0For removing key
The steering is locked when the key is
removed from the steering lock. If
necessary, move steering wheel
slightly to allow the locking mechanism
to engage.
1Unlocking steering
Power supply to some electrical con-
sumers, such as seat adjustment.
2Ignition (power supply for all electrical
consumers) and driving position
3Starting position
Warning!
G
When leaving the vehicle, always remove the
key from the steering lock and lock the vehi-
cle. Do not leave children unattended in the
vehicle, or with access to an unlocked vehi-
cle. Unsupervised use of vehicle equipment
may cause an accident and / or serious per-
sonal injury.iThe key can only be withdrawn in
position0.
If necessary, move steering wheel
slightly to allow the key to be turned
clockwise to position1.
A warning sounds when the driver’s
door is opened and the key is in steer-
ing lock position0 or1.
The key can only be removed from the
steering lock with the gear selector le-
ver in positionP.
!To prevent accelerated battery dis-
charge and a possible dead battery, al-
ways remove the key from the steering
lock when the engine is not in opera-
tion.
Page 838 of 4133
34 Getting startedAdjusting
�AdjustingSeats
The seats can be adjusted either manually
or electrically, depending on the vehicle’s
equipment.Warning!
G
All seat, head restraint, steering wheel, and
rear view mirror adjustments, as well as fas-
tening of seat belts, must be done before
the vehicle is put into motion.Warning!
G
Do not adjust the driver’s seat while driving.
Adjusting the seat while driving could cause
the driver to lose control of the vehicle.
Never ride in a moving vehicle with the seat
back reclined. Sitting in an excessively re-
clined position can be dangerous. You could
slide under the seat belt in a collision. If you
slide under it, the belt would apply force at
the abdomen or neck.
That could cause serious or fatal injuries.
The seat back and seat belts provide the
best restraint when the wearer is in an up-
right position and belts are properly posi-
tioned on the body. Your seat must be
adjusted so that you can correctly fasten
your seat belt (
�page 42).
Never place hands under the seat or near
any moving parts while a seat is being ad-
justed.
Warning!
G
When leaving the vehicle, always remove the
key from the steering lock and lock your
vehicle.
The power seats* can also be operated with
the appropriate door open. Do not leave
children unattended in the vehicle or with
access to an unlocked vehicle. Unsuper-
vised use of vehicle equipment may cause
an accident and / or serious personal injury.
Warning!
G
Children 12 years old and under must never
ride in the front seat, except in a
Mercedes-Benz authorized BabySmart
TM1
compatible child seat, which operates with
the BabySmart
TM system installed in the ve-
hicle to deactivate the passenger front air-
bag when it is properly installed. Otherwise
they will be struck by the airbag when it in-
flates in a crash. If this happens, serious or
fatal injury will result.
According to accident statistics, children
are safer when properly restrained in the
rear seating positions than in the front seat-
ing positions. Infants and small children
must ride in back seats and be seated in an
appropriate infant or child restraint system,
which is properly secured with the vehicle's
seat belt and top tether strap, or secured via
lower anchors and top tether strap, fully in
accordance with the child seat manufactur-
er’s instructions.
1BabySmart
TMis a trademark of Siemens
Automotive Corp.
Page 841 of 4133
37 Getting started
Adjusting
Head restraint tilt
Manually adjust the angle of the head
restraint.�
Push or pull on the upper edge of the
head restraint cushion.
More information on seats can be found in
the “Controls in detail” section
(
�page 95).Power seat* adjustment
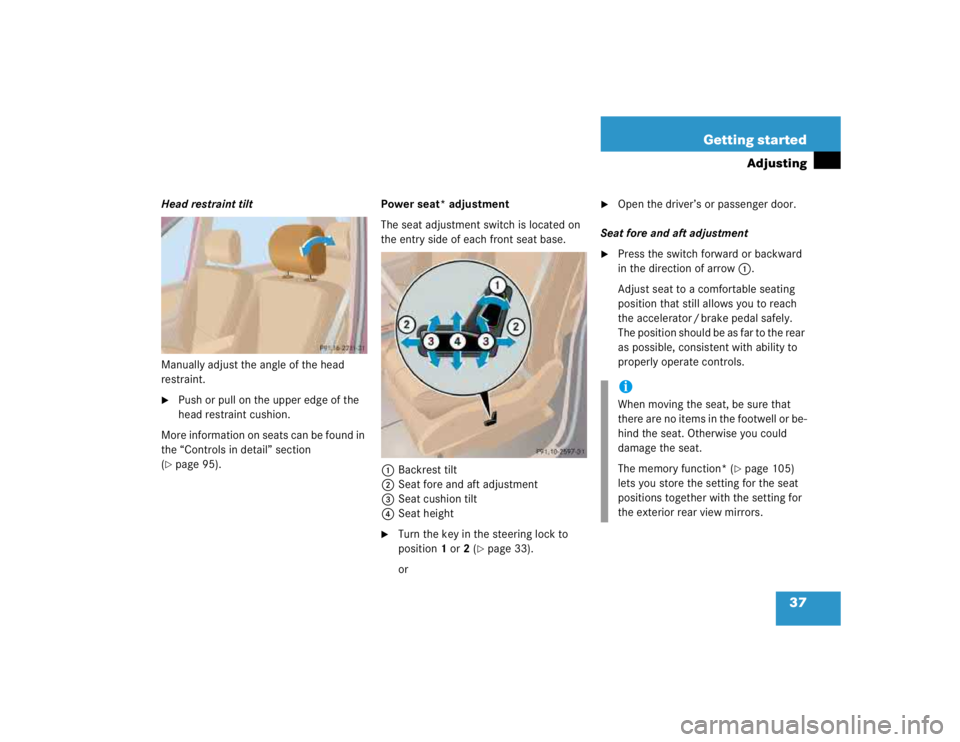
The seat adjustment switch is located on
the entry side of each front seat base.
1Backrest tilt
2 Seat fore and aft adjustment
3Seat cushion tilt
4Seat height
�
Turn the key in the steering lock to
position1 or2 (
�page 33).
or
�
Open the driver’s or passenger door.
Seat fore and aft adjustment
�
Press the switch forward or backward
in the direction of arrow1.
Adjust seat to a comfortable seating
position that still allows you to reach
the accelerator / brake pedal safely.
The position should be as far to the rear
as possible, consistent with ability to
properly operate controls.iWhen moving the seat, be sure that
there are no items in the footwell or be-
hind the seat. Otherwise you could
damage the seat.
The memory function* (
�page 105)
lets you store the setting for the seat
positions together with the setting for
the exterior rear view mirrors.
Page 857 of 4133
53 Getting started
Parking and locking
�Parking and locking
You have now completed your first drive.
You have properly stopped and parked
your vehicle. End your drive as follows.
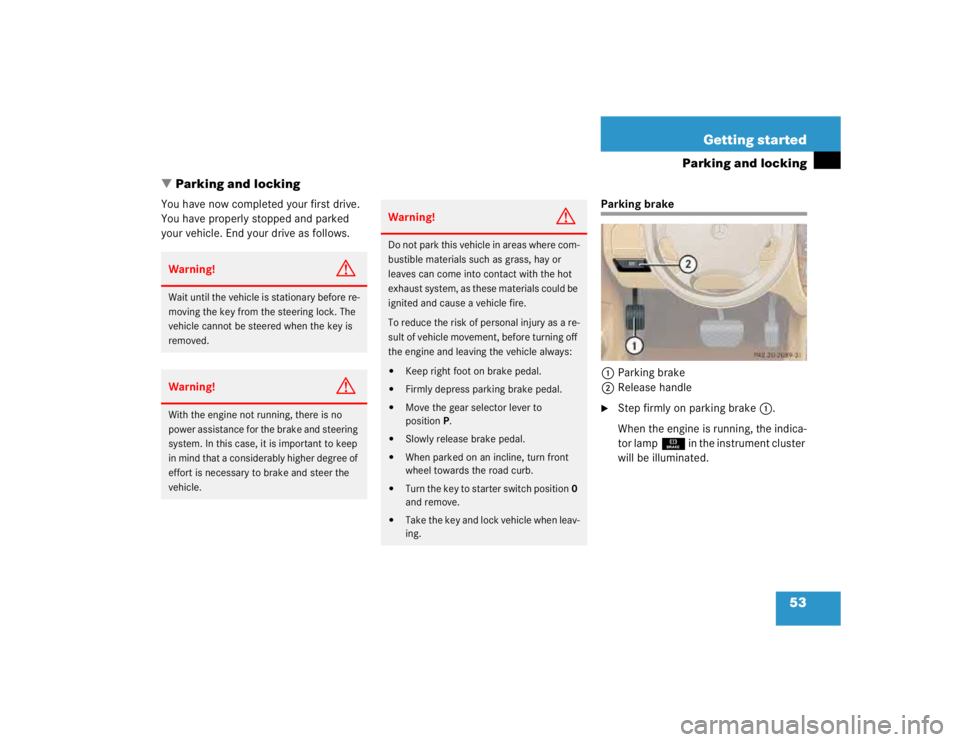
Parking brake
1Parking brake
2Release handle�
Step firmly on parking brake1.
When the engine is running, the indica-
tor lampÉ in the instrument cluster
will be illuminated.
Warning!
G
Wait until the vehicle is stationary before re-
moving the key from the steering lock. The
vehicle cannot be steered when the key is
removed.Warning!
G
With the engine not running, there is no
power assistance for the brake and steering
system. In this case, it is important to keep
in mind that a considerably higher degree of
effort is necessary to brake and steer the
vehicle.
Warning!
G
Do not park this vehicle in areas where com-
bustible materials such as grass, hay or
leaves can come into contact with the hot
exhaust system, as these materials could be
ignited and cause a vehicle fire.
To reduce the risk of personal injury as a re-
sult of vehicle movement, before turning off
the engine and leaving the vehicle always:�
Keep right foot on brake pedal.
�
Firmly depress parking brake pedal.
�
Move the gear selector lever to
positionP.
�
Slowly release brake pedal.
�
When parked on an incline, turn front
wheel towards the road curb.
�
Turn the key to starter switch position0
and remove.
�
Take the key and lock vehicle when leav-
ing.