Page 2485 of 4133
Fig. 103: Identifying Oi l Pan Bolt Diagram - Upper Part Of Oil Pan Shown On Engine 112 With 4 Matic
Upper part of oil pan shown on engine 112 without 4 MATIC
Fig. 104: Identifying Oi l Pan Bolt Diagram
- Upper Part Of Oil Pan Shown On Engine 112 Without 4
Matic
Upper part of oil pa n shown on engine 113
2001 Mercedes-Benz ML320
1998-2005 ENGINE Complete engine - 163 Chassis
me
Saturday, October 02, 2010 3:17:57 PMPage 129 © 2006 Mitchell Repair Information Company, LLC.
Page 2486 of 4133
Fig. 105: Identifying Oi l Pan Bolt Diagram - Upper Part Of Oil Pan Shown On Engine 113
REMOVE/INSTALL OIL PAN - AR01.45-P-7500FB
ENGINE 112.942 in MODEL 163.154
ENGINE 112.970 in MODEL 163.157
ENGINE 113.942 in MODEL 163.172
ENGINE 113.981 in MODEL 163.174
ENGINE 113.965 in MODEL 163.175
Shown on engine 112
2001 Mercedes-Benz ML320
1998-2005 ENGINE Complete engine - 163 Chassis
me
Saturday, October 02, 2010 3:17:57 PMPage 130 © 2006 Mitchell Repair Information Company, LLC.
Page 2487 of 4133
Fig. 106: Identifying Oil Pan Remove/Install Components - Shown On Engine 112
Remove/install
External torx setFig. 49
1Remove oil pan bottom
section (1)Model 163.154/157/172.AR01.45-P-7555V
Model 163.174/175.AR01.45-P-7555VE
*BA01.45-P-1002-01B
2Disconnect electrical line
at oil sensor (oil level,
temperature and quality)
(B40) Remove cable strap at oil
pipe.
3Remove oil pipe (2) from
dipstick Installation: Replace the
sealing ring!AR18.40-P-3510BV
*BA01.20-P-1001-01E
4Remove oil pan top
section(3)Take out oil pan to the front in
direction of travel for this step;
rotate crankshaft slightly, if
necessary.
Installation: Observe
different bolt length and bolt
diameter: ?
Screw diagram of oil panAR01.45-P-7500-06F
Notes on application of
sealant to oil panEngine 112AH01.45-P-0001-01C
2001 Mercedes-Benz ML320
1998-2005 ENGINE Complete engine - 163 Chassis
me
Saturday, October 02, 2010 3:17:58 PMPage 131 © 2006 Mitchell Repair Information Company, LLC.
Page 2488 of 4133

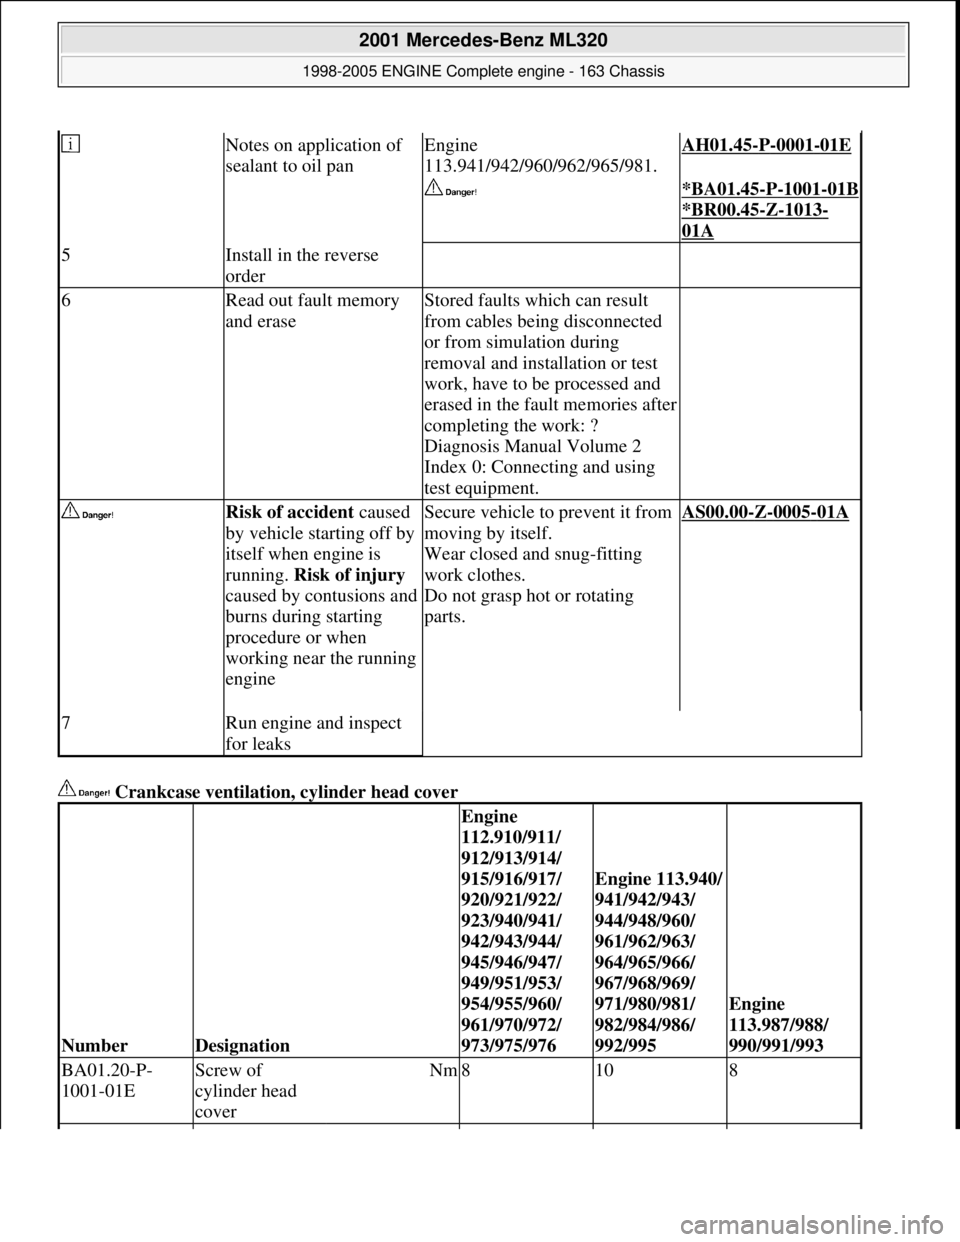
Crankcase ventilation, cylinder head cover
Notes on application of
sealant to oil panEngine
113.941/942/960/962/965/981.AH01.45-P-0001-01E
*BA01.45-P-1001-01B
*BR00.45-Z-1013-
01A
5Install in the reverse
order
6Read out fault memory
and eraseStored faults which can result
from cables being disconnected
or from simulation during
removal and installation or test
work, have to be processed and
erased in the fault memories after
completing the work: ?
Diagnosis Manual Volume 2
Index 0: Connecting and using
test equipment.
Risk of accident caused
by vehicle starting off by
itself when engine is
running. Risk of injury
caused by contusions and
burns during starting
procedure or when
working near the running
engine
Secure vehicle to prevent it from
moving by itself.
Wear closed and snug-fitting
work clothes.
Do not grasp hot or rotating
parts.AS00.00-Z-0005-01A
7Run engine and inspect
for leaks
NumberDesignation
Engine
112.910/911/
912/913/914/
915/916/917/
920/921/922/
923/940/941/
942/943/944/
945/946/947/
949/951/953/
954/955/960/
961/970/972/
973/975/976
Engine 113.940/
941/942/943/
944/948/960/
961/962/963/
964/965/966/
967/968/969/
971/980/981/
982/984/986/
992/995
Engine
113.987/988/
990/991/993
BA01.20-P-
1001-01EScrew of
cylinder head
coverNm8108
2001 Mercedes-Benz ML320
1998-2005 ENGINE Complete engine - 163 Chassis
me
Saturday, October 02, 2010 3:17:58 PMPage 132 © 2006 Mitchell Repair Information Company, LLC.
Page 2489 of 4133
Oil pan
Fig. 107: Identifying External Torx Set (001 589 76 09 00)
Repair materials
REMOVE/INSTALL BOTTOM PART OF OIL PAN - AR01.45-P-7555V
ENGINE 112.942 in MODEL 163.154
ENGINE 112.970 in MODEL 163.157
ENGINE 113.942 in MODEL 163.172
BA01.20-P-
1002-01EBolt of ignition
coils to cylinder
head coverNm888
NumberDesignation
Engine
112.910/911/
912/913/914/
915/917/920/
921/922/923/
940/941/942/
943/944/945/
946/947/949/
951/954/955/
960/961/970/
972/973/976
Engine
113.940/941/
942/943/944/
945/946/960/
961/962/963/
965/967/968/
969/980/981/
982/984/986/
992/995
BA01.45-P-
1001-01BBolt, oil pan to
crankcaseM6Nm99
M8Nm2020
BA01.45-P-
1002-01BSelf-tapping
screw of oil pan
to oil panThread not pre-
tappedNm1414
Thread pre-
tappedNm1010
NumberDesignationOrder number
BR00.45-Z-1013-01ASealantA 003 989 98 20
2001 Mercedes-Benz ML320
1998-2005 ENGINE Complete engine - 163 Chassis
me
Saturday, October 02, 2010 3:17:58 PMPage 133 © 2006 Mitchell Repair Information Company, LLC.
Page 2490 of 4133
Shown on engine 112
Fig. 108: Identifying Bottom Part Of Oil Pan Remove/Install Components
- Shown On Engine 112
Remove/install
External torx setFig. 49
1Remove engine trim panel
2Remove viscous fan (4) Right-hand thread!AR20.40-P-5660C
3.1Remove fan shroud (5) Only engine
112.942 /970.
Unscrew bolts (8) at
bottom of fan shroud.
4.1Remove air guide (9) Engine 113.942 only.
5Drain and collect engine oil *BA01.45-P-1003-01B
*BF18.00-P-1001-01H
6Unscrew nuts (7) at front
suspension carrier Before unbolting the
left engine mount, press
oil line of power steering
out of fixture.
*BA22.10-P-1001-01L
7Remove resonance tube (3)
with resonance unit (2) Do not damage the
plastic strap.
The resonance pipe is
attached at the rear at the
2001 Mercedes-Benz ML320
1998-2005 ENGINE Complete engine - 163 Chassis
me
Saturday, October 02, 2010 3:17:58 PMPage 134 © 2006 Mitchell Repair Information Company, LLC.
Page 2491 of 4133

Oil pan
intake manifold with a
plastic plate.
Separate connector of
hot film MAF sensor
(HFM) and unscrew
resonance tube at cylinder
head cover.
Engine 112.942/970.AR07.07-P-1454A
Engine 113.942/965.AR07.07-P-1454MV
8Put on engine support
bracket AR33.10-P-0100-01BV
Engine lifting device
for ML-class*WE58.40-Z-1007-11A
9Raise engine Ensure that the rear of
the engine does not touch
the body!
Do not overstretch coolant
lines and engine/
bodywork ground strap
(W11/5), detach engine/
bodywork ground strap
(W11/5) if required.
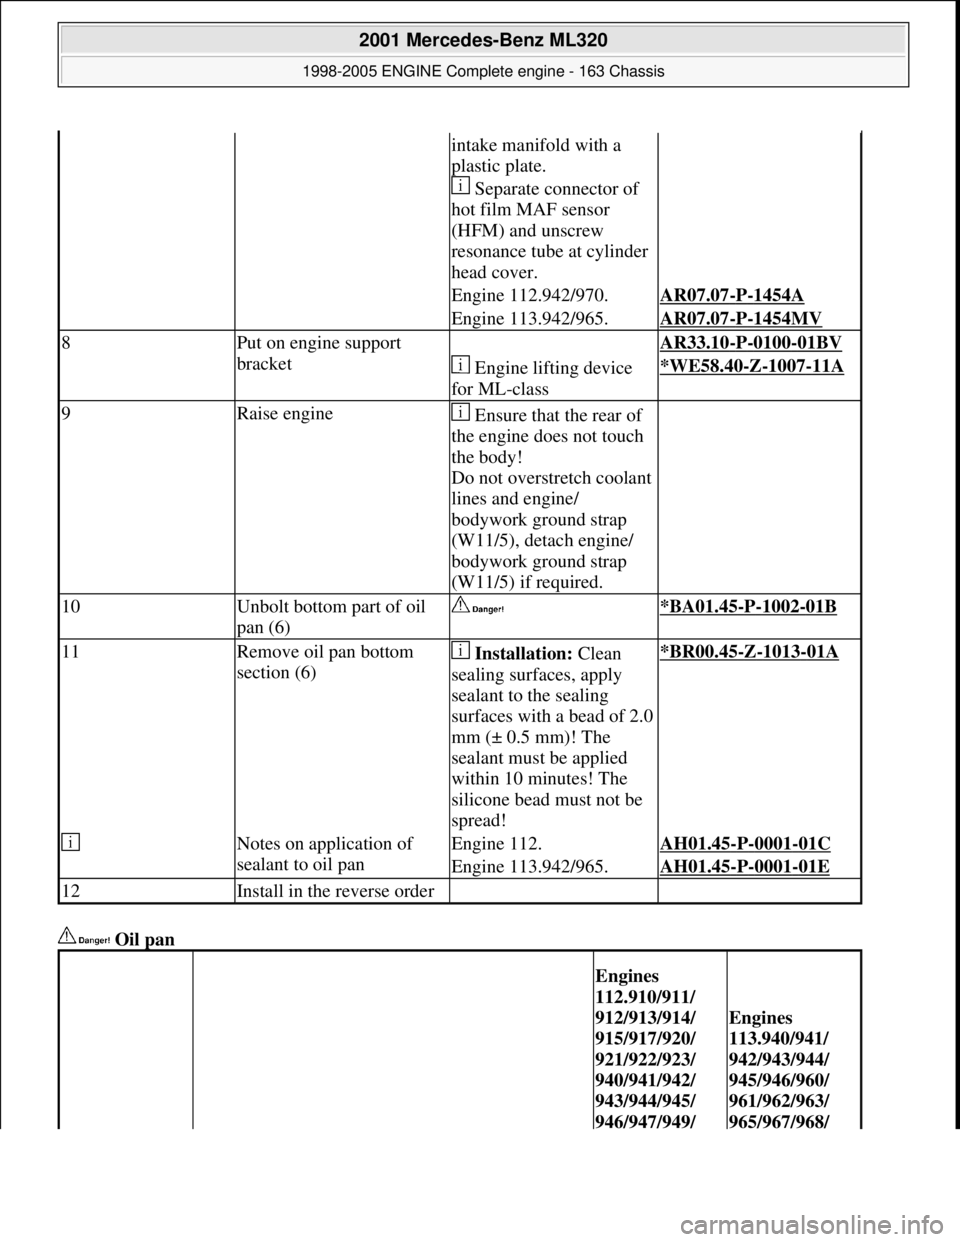
10Unbolt bottom part of oil
pan (6) *BA01.45-P-1002-01B
11Remove oil pan bottom
section (6) Installation: Clean
sealing surfaces, apply
sealant to the sealing
surfaces with a bead of 2.0
mm (± 0.5 mm)! The
sealant must be applied
within 10 minutes! The
silicone bead must not be
spread!*BR00.45-Z-1013-01A
Notes on application of
sealant to oil panEngine 112.AH01.45-P-0001-01C
Engine 113.942/965.AH01.45-P-0001-01E
12Install in the reverse order
Engines
112.910/911/
912/913/914/
915/917/920/
921/922/923/
940/941/942/
943/944/945/
946/947/949/
Engines
113.940/941/
942/943/944/
945/946/960/
961/962/963/
965/967/968/
2001 Mercedes-Benz ML320
1998-2005 ENGINE Complete engine - 163 Chassis
me
Saturday, October 02, 2010 3:17:58 PMPage 135 © 2006 Mitchell Repair Information Company, LLC.
Page 2492 of 4133

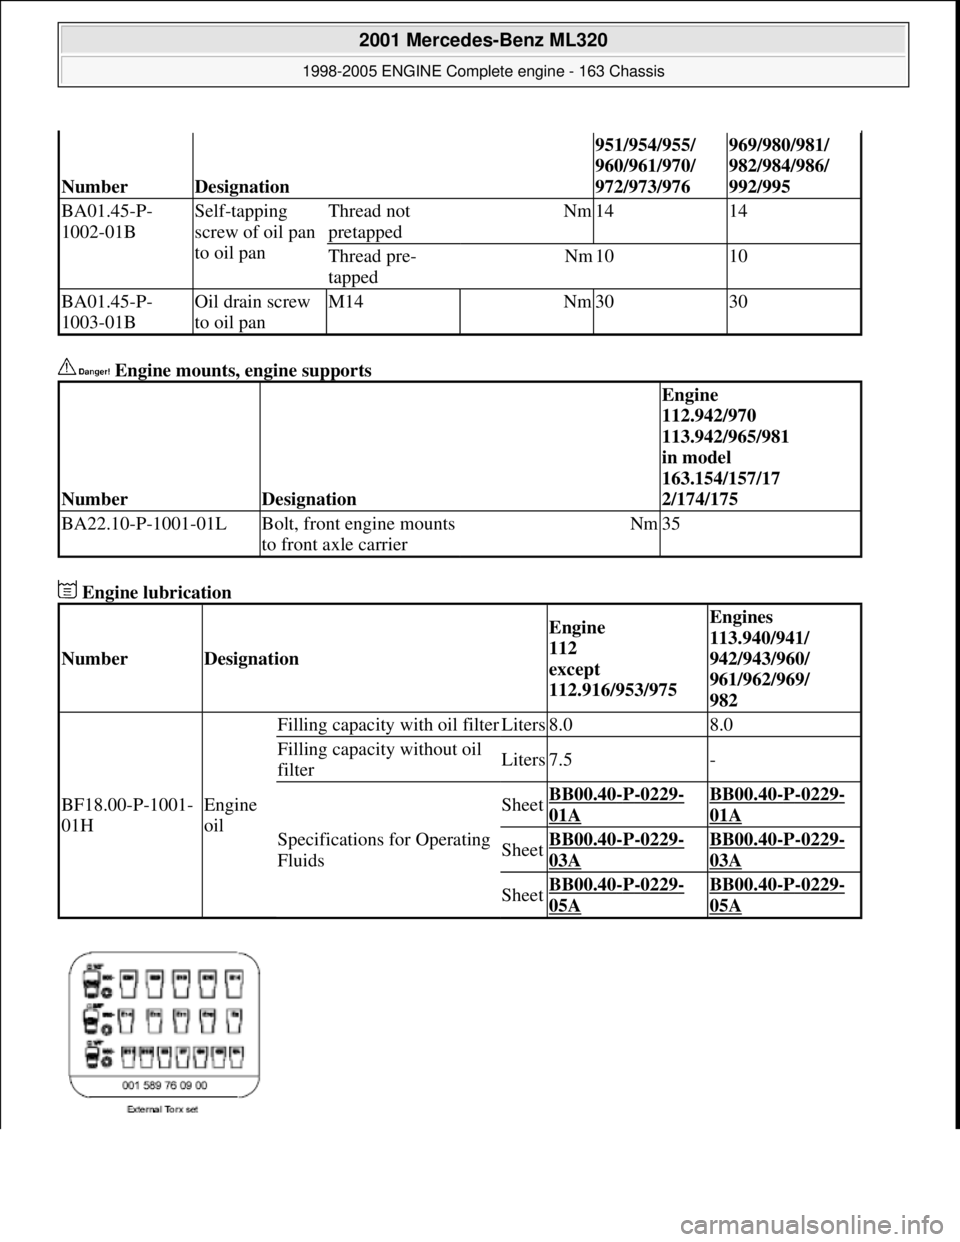
Engine mounts, engine supports
Engine lubrication
NumberDesignation
951/954/955/
960/961/970/
972/973/976969/980/981/
982/984/986/
992/995
BA01.45-P-
1002-01BSelf-tapping
screw of oil pan
to oil panThread not
pretappedNm1414
Thread pre-
tappedNm1010
BA01.45-P-
1003-01BOil drain screw
to oil panM14Nm3030
NumberDesignation
Engine
112.942/970
113.942/965/981
in model
163.154/157/17
2/174/175
BA22.10-P-1001-01LBolt, front engine mounts
to front axle carrierNm35
NumberDesignation
Engine
112
except
112.916/953/975Engines
113.940/941/
942/943/960/
961/962/969/
982
BF18.00-P-1001-
01HEngine
oil
Filling capacity with oil filterLiters8.08.0
Filling capacity without oil
filterLiters7.5-
Specifications for Operating
Fluids
SheetBB00.40-P-0229-
01A
BB00.40-P-0229-
01A
SheetBB00.40-P-0229-
03A
BB00.40-P-0229-
03A
SheetBB00.40-P-0229-
05A
BB00.40-P-0229-
05A
2001 Mercedes-Benz ML320
1998-2005 ENGINE Complete engine - 163 Chassis
me
Saturday, October 02, 2010 3:17:58 PMPage 136 © 2006 Mitchell Repair Information Company, LLC.