1997 LINCOLN MARK VIII change wheel
[x] Cancel search: change wheelPage 26 of 315

21
Vehicle Settings MenuA press of the VEHICLE SETTINGS control causes
the Message Center to display the menu features
which affect the vehicle regardless of which driver
personality profile is currently selected. Repeated
pressing of the VEHICLE SETTINGS control allows
quick cycling through the menu features. The
displayed feature can be toggled on or off, or reset
by pressing the RESET control as specifically noted
below. If a vehicle setting is changed, the display
stops automatically cycling through the menu
options and exits the vehicle settings menu, unless
the VEHICLE SETTINGS control is pressed again.
q
TRACTION CONTROLÐ This system helps
prevent wheel spin to improve tire traction. The
reset button will toggle this feature on or off.
This feature defaults to the ON state after each
key cycle. Note: The Traction Control System is
an optional feature, and this menu option will
not appear in vehicles without this option.
q
ENGLISH/METRICÐ This menu option
allows the Message Center and Automatic
Temperature Control readings to be displayed in
English or Metric units. The modes can be
toggled by using the RESET control.
q
AUTOLAMP DELAY STATUSÐ This option
displays the current autolamp delay setting.
Note: To change the delay setting you must
rotate the HEADLAMP CONTROL.
File:03fnis8.ex
Update:Thu Jun 27 10:00:37 1996
Page 75 of 315

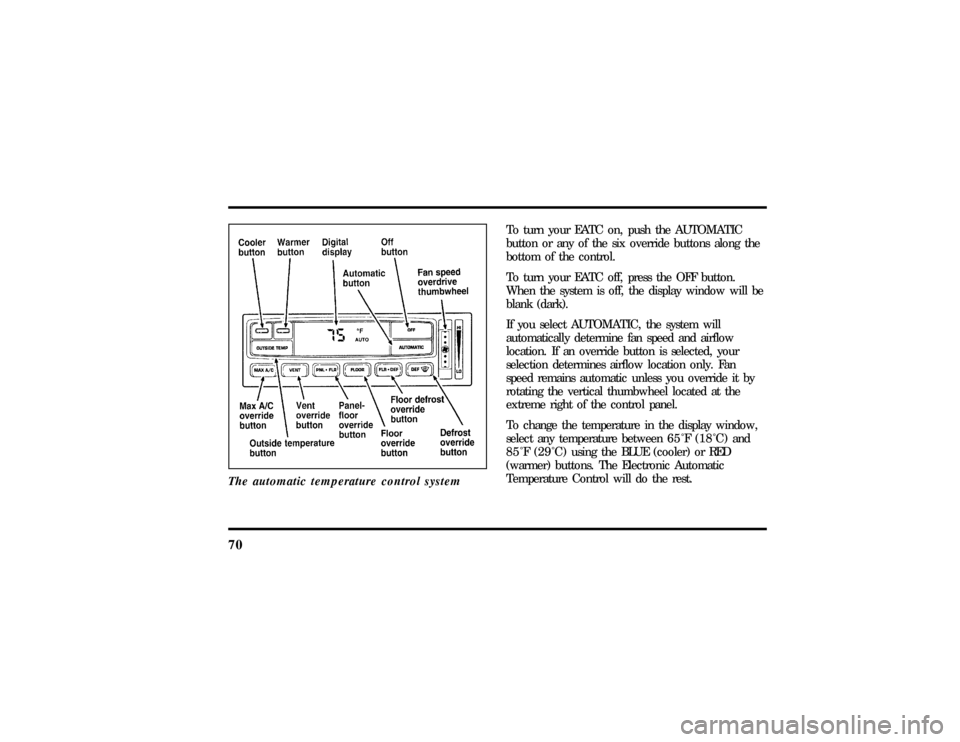
70The automatic temperature control system
To turn your EATC on, push the AUTOMATIC
button or any of the six override buttons along the
bottom of the control.
To turn your EATC off, press the OFF button.
When the system is off, the display window will be
blank (dark).
If you select AUTOMATIC, the system will
automatically determine fan speed and airflow
location. If an override button is selected, your
selection determines airflow location only. Fan
speed remains automatic unless you override it by
rotating the vertical thumbwheel located at the
extreme right of the control panel.
To change the temperature in the display window,
select any temperature between65ÊF(18ÊC) and
85ÊF(29ÊC)using the BLUE (cooler) or RED
(warmer) buttons. The Electronic Automatic
Temperature Control will do the rest.
File:05fncf8.ex
Update:Thu Jun 27 10:02:20 1996
Page 77 of 315

72When in AUTOMATIC and weather conditions
require heat, air will be sent to the floor. But, a
feature is included in your EATC to prevent
blowing cold air to the floor if the engine coolant is
not warm enough to allow heating. In 3-1/2
minutes or less, the fan speed will start to increase
and the airflow will change to the floor area.
If unusual conditions exist (i.e., window fogging,
etc.), the six manual override buttons allow you to
select special air discharge locations. A thumbwheel
allows you to adjust the fan speed to suit your
needs.
Temperature selectionThe RED and BLUE buttons at the upper left of the
Control are for temperature selection. The RED
Button will increase the set temperature and the
BLUE Button will lower the set temperature.
Pressing a button and releasing it will change the
set temperature one degree. Holding either button
in will rapidly change the temperature setting in
one degree increments to either65ÊF(18ÊC)
(BLUE) or85ÊF(29ÊC)(RED). Then, the set
temperature will jump 5 Ê and stop at either60ÊF
(16ÊC)which is maximum cooling or90ÊF(32ÊC)
which is maximum heating. When you select60ÊF
(16ÊC) or90ÊF(32ÊC), the fanwill go to HI speed
for maximum air flow.
The average temperature range used is between
68ÊF(20ÊC) and78ÊF(26ÊC).Changing the
temperature setting by several degrees outside this
range or overriding to60ÊF(16ÊC) or90ÊF(32ÊC)
will not speed up the heating or cooling process.
File:05fncf8.ex
Update:Thu Jun 27 10:02:20 1996
Page 79 of 315

74You can override the fan speed at any time. If you
use the thumbwheel to override the fan speed, the
EATC will continue to control the temperature but
you control the fan speed. To return to auto fan
control, press the AUTOMATIC button. If you are
operating in one of the override functions (FLOOR,
MAX A/C, etc.), automatic fan control will
continue unless you rotate the fan thumbwheel. Toreturn to automatic fan control, press the
AUTOMATIC button. The EATC will return to
Automatic operation. If you want to return to any
override function, press the button for that function.
The fan speed will continue to be automatically
controlled.
Manual override buttonsYour EATC has six buttons which allow you to
make special selections. The buttons are located
along the bottom edge of the EATC control and
allow you to determine where the air will be
discharged. Pressing any override button changes
the air discharge location only. It does not affect
the ability of the system to control temperature or
the fan speed. Return to fully Automatic operation
by pushing the AUTOMATIC button.
File:05fncf8.ex
Update:Thu Jun 27 10:02:20 1996
Page 180 of 315

175
NOTE:Engine torque reduction isNOTactive
when engine coolant temperature is below-10ÊF
(-23ÊC).
During the Traction Control
TM
function, which most
often occurs during low speed acceleration on
slippery surfaces, a noise may be heard coming from
the engine compartment. This is normal and may
last for a few seconds during the acceleration of the
vehicle.
In general, this system improves your vehicle's
stability and acceleration performance when road
conditions warrant. Traction Control
TM
is fully
effective at all vehicle speeds.
If the Traction Control
TM
system is cycled
excessively, the brake portion of the system will
shut down to prevent the rear brakes from
overheating. A limited Traction Control
TM
function
using engine torque will still control wheels from
spinning. A cooling down period is required to
prevent damage to the brakes. This time periodvaries and depends on brake usage during the
cooling down period. Anti-Lock braking is not
affected and will function normally during the cool
down period.
After the cool down period, the full Traction
Control
TM
function is restored.
Air Suspension SystemYour vehicle is equipped with an automatic load
leveling air suspension system. This system
maintains the vehicle height at a constant level by
automatically adding air or releasing air from the air
springs to offset changes in vehicle loads.
A shutoff switch is located in the trunk behind the
left hand vertical trim panel. If this switch is in the
OFF position, the automatic leveling system will not
operate. The switch should be OFF whenever
jacking up the vehicle. ªAIR RIDE SWITCH OFFº
will appear in the Message Center when the
File:09fngf8.ex
Update:Wed Jun 19 10:45:23 1996
Page 191 of 315

186Do not use hitches that clamp onto your vehicle's
bumper. The bumper is not designed to bear the
load.
Always check the pressure in all your vehicle's tires
when preparing to tow (see inflation
recommendation on the tire label).Using the hitchYour vehicle uses aload carryinghitch. Because
this type of hitch places the tongue load of a trailer
on the rear wheels of your vehicle, you must
distribute the load in your trailer so that only 10 to
15% of the total weight of the trailer is on the
tongue.
Tie down the load so that it does not shift and
change the weight on the hitch. This will prevent
damage to your vehicle and make your vehicle
easier to handle.
Connecting the safety chainsAlways attach the trailer's safety chains to your
vehicle. They help protect your trailer if the hitch
breaks.
To connect the trailer's safety chains:
1. Cross the chains under the trailer tongue and
attach them to your vehicle's frame or hook
retainers. Never attach the safety chains to your
vehicle's bumper. The bumper is not designed
to bear the weight of a trailer.
2. Make sure that you leave enough slack in the
chains to allow you to turn corners.
If you use a rental trailer, follow the instructions
that the rental agency gives you.
File:09fngf8.ex
Update:Wed Jun 19 10:45:23 1996
Page 208 of 315

203
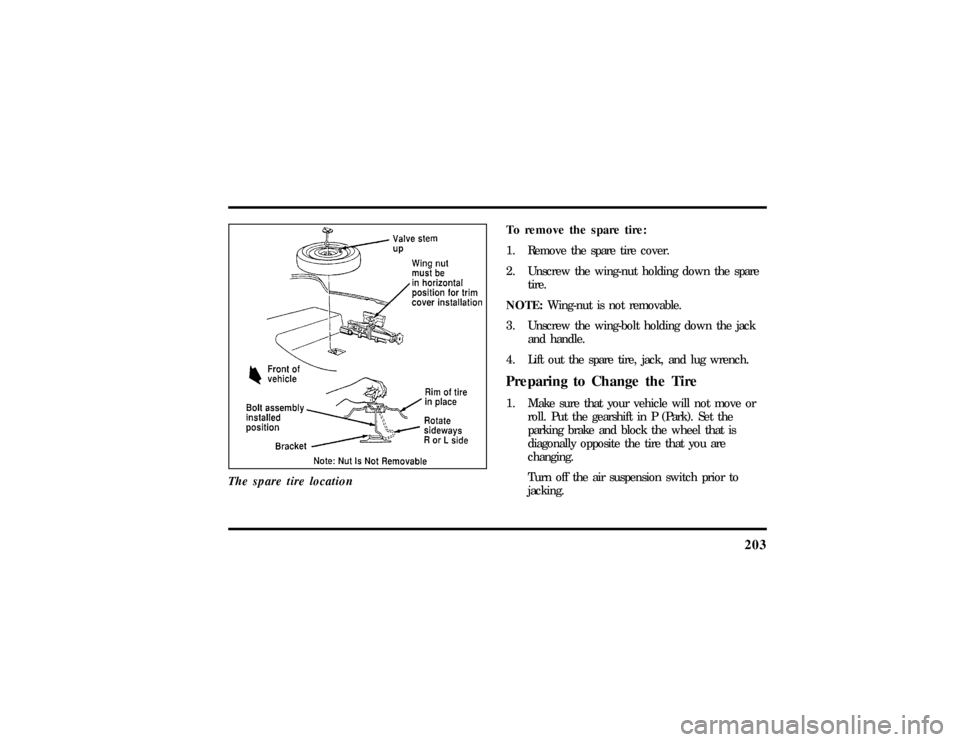
The spare tire location
To remove the spare tire:
1. Remove the spare tire cover.
2. Unscrew the wing-nut holding down the spare
tire.
NOTE:Wing-nut is not removable.
3. Unscrew the wing-bolt holding down the jack
and handle.
4. Lift out the spare tire, jack, and lug wrench.Preparing to Change the Tire1. Make sure that your vehicle will not move or
roll. Put the gearshift in P (Park). Set the
parking brake and block the wheel that is
diagonally opposite the tire that you are
changing.
Turn off the air suspension switch prior to
jacking.
File:10fner8.ex
Update:Thu Jun 20 14:27:22 1996
Page 271 of 315

266NOTE:Rear axle lube quantities must be replaced
every 100,000 miles (160,000 km) or if the axle
has been submerged in water. Otherwise, the lube
should not be checked or changed unless a leak is
suspected or repair required.Vehicle StorageMaintenance TipsIf you plan on storing your vehicle for an extended
period of time (60 days or more), refer to the
following maintenance recommendations to ensure
your vehicle stays in good operating condition.Generalq
Store all vehicles in a dry, ventilated place.
q
Protect from sunlight, if possible.
q
If vehicles are stored outside, they require
regular maintenance to protect against rust and
damage.
Bodyq
Wash vehicle thoroughly to remove dirt, grease,
oil, tar or mud from exterior surfaces, rear
wheel housing and underside of front fenders.
q
Periodically wash vehicles stored in exposed
locations.
q
Touch-up raw or primed metal to prevent rust.
q
Cover chrome and stainless steel parts with a
thick coat of auto wax to prevent discoloration.
Re-wax as necessary when the vehicle is
washed.
q
Lubricate all hood, door and trunk lid hinges
and latches with a light grade oil.
q
Cover interior soft trim to prevent fading.
q
Keep all rubber parts free from oil and solvents.
File:12fncs8.ex
Update:Thu Jun 20 14:28:48 1996