1997 HONDA ODYSSEY height
[x] Cancel search: heightPage 10 of 241
The Seat Belt System and How It Works
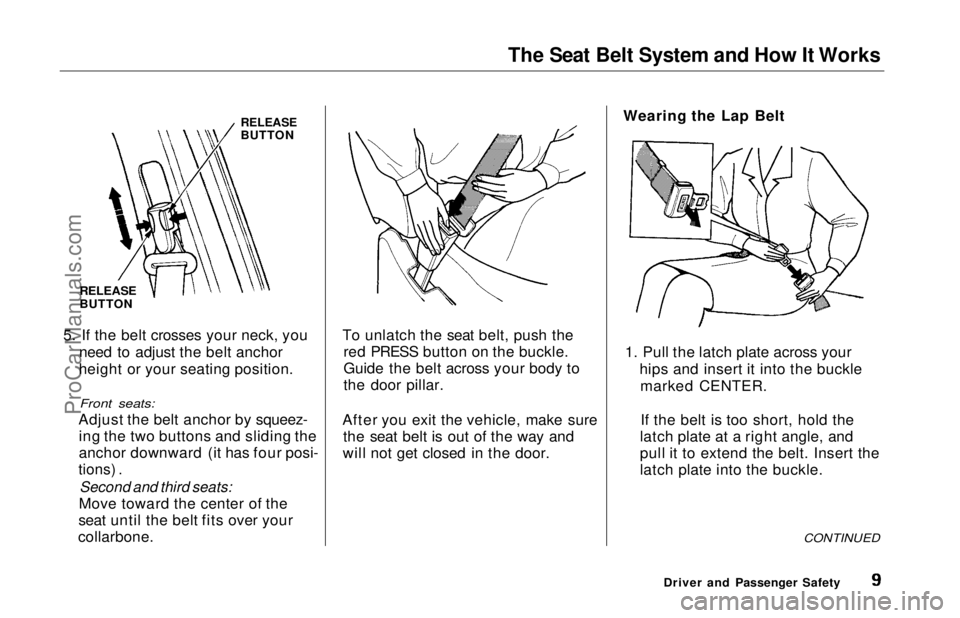
RELEASE
BUTTON
RELEASE
BUTTON
5. If the belt crosses your neck, you need to adjust the belt anchor
height or your seating position.
Front seats:
Adjust the belt anchor by squeez- ing the two buttons and sliding the
anchor downward (it has four posi-
tions) .
Second and third seats:
Move toward the center of the
seat until the belt fits over your
collarbone.
To unlatch the seat belt, push the
red PRESS button on the buckle.
Guide the belt across your body to
the door pillar.
After you exit the vehicle, make sure the seat belt is out of the way and
will not get closed in the door. Wearing the Lap Belt
1. Pull the latch plate across your hips and insert it into the bucklemarked CENTER.
If the belt is too short, hold the
latch plate at a right angle, and
pull it to extend the belt. Insert the
latch plate into the buckle.
CONTINUED
Driver and Passenger SafetyProCarManuals.comMain Menu Table of Contents s t
Page 23 of 241
Child Safety
General Guidelines for
Restraining Children Under 40 Ibs (18 kg)
Use an approved child seat. The seat
must meet Federal Motor Vehicle Safety Standard 213 (FMVSS-213) orCanadian Motor Vehicle Safety
Standards. Look for the manufac-
turer's statement of compliance on
the box and seat.
Use a seat of the right size. Make sure
the seat fits your child. Check the seat manufacturer's instructions and
labels for height and weight limits.
Secure the child seat to the car. All
approved child seats are designed to
be secured to the car seat by the lap
belt or the lap belt portion of a lap/ shoulder belt. A child whose seat is
not properly secured to the car can
be endangered in a crash. To properly route a seat belt through
a child seat, follow the seat maker's
instructions. If you use a lap/shoulder belt, be sure to follow the
instructions for securing a child seat
with a lap/shoulder belt on page 25 .
Secure the child in the child seat. Make
sure the infant or child is firmly
secured to the child seat. Use the
straps provided, and carefully follow
the manufacturer's instructions. Restraining an Infant Who
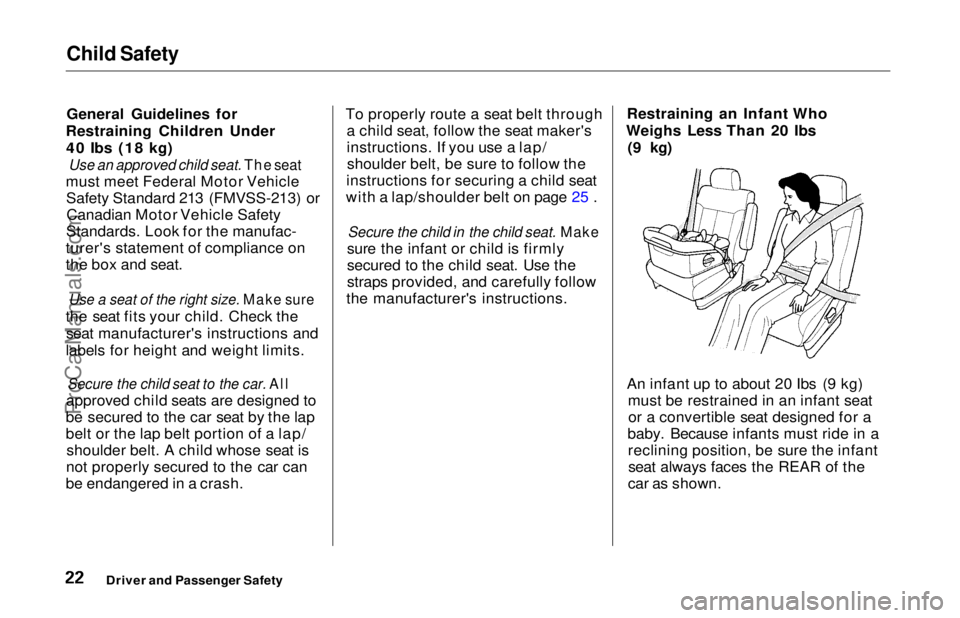
Weighs Less Than 20 Ibs (9 kg)
An infant up to about 20 Ibs (9 kg) must be restrained in an infant seator a convertible seat designed for a
baby. Because infants must ride in a reclining position, be sure the infantseat always faces the REAR of the
car as shown.
Driver and Passenger SafetyProCarManuals.comMain Menu Table of Contents s t
Page 32 of 241
Instruments and Controls
This section gives information about the controls and displays thatcontribute to the daily operation of
your Honda. All the essential controls are within easy reach.
Control Locations............................ 32
Indicator Lights................................ 33 Gauges.............................................. 37
Speedometer................................ 37
Trip Meter.................................... 37
Odometer...................................... 37
Temperature Gauge.................... 38 Fuel Gauge................................... 38
Maintenance Required Indicator.................................... 38
Controls Near the Steering
Wheel........................................ 39
Headlights.................................... 40
Daytime Running Lights............. 40
Instrument Panel Brightness..... 41
Turn Signals................................. 41
Windshield Wipers...................... 42
Windshield Washers................... 43 Rear Window Wiper and Washer......................................
43
Hazard Warning...........................
43
Rear Window Defogger.............. 44
Steering Wheel Adjustment....... 44
Steering Wheel Controls ................ 46 Cruise Control.............................. 46
Keys and Locks................................ 49
Keys...............................................49
Ignition Switch............................. 49
Power Door Locks....................... 50
Remote Transmitter....................
51
Childproof Door
Locks............... 52
Tailgate......................................... 52 Glove Box..................................... 53
Seats.................................................. 54
Passenger Seating....................... 54
Seat Adjustments......................... 54
Driver's Seat Power Height Adjustment............................... 55
Head Restraints........................... 56
Third Seat Access........................ 56
Removing the Second Seats
in the Six-Passenger Model.... 57
Folding the Second Seats in the Seven-PassengerModel.................................... 58
Reclining the Second Seat.......... 59
Folding the Third Seat in All Models............................ 60
Power Windows............................... 62
Sunroof.............................................. 63
Mirrors.............................................. 64
Adjusting the Power Mirrors..... 64
Parking Brake.................................. 65
Digital Clock..................................... 66
Beverage Holder.............................. 66
Dashboard Compartment............... 68
Center Pocket.................................. 68
Vanity Mirror................................... 68
Cigarette Lighter............................. 69
Ashtrays............................................ 69
Interior Lights.................................. 70
Ceiling Lights............................... 70
Spotlights...................................... 70
Tailgate Light............................... 71
Courtesy Lights........................... 71
Instruments and ControlsProCarManuals.comMain Menu s t
Page 45 of 241
Controls Near the Steering Wheel
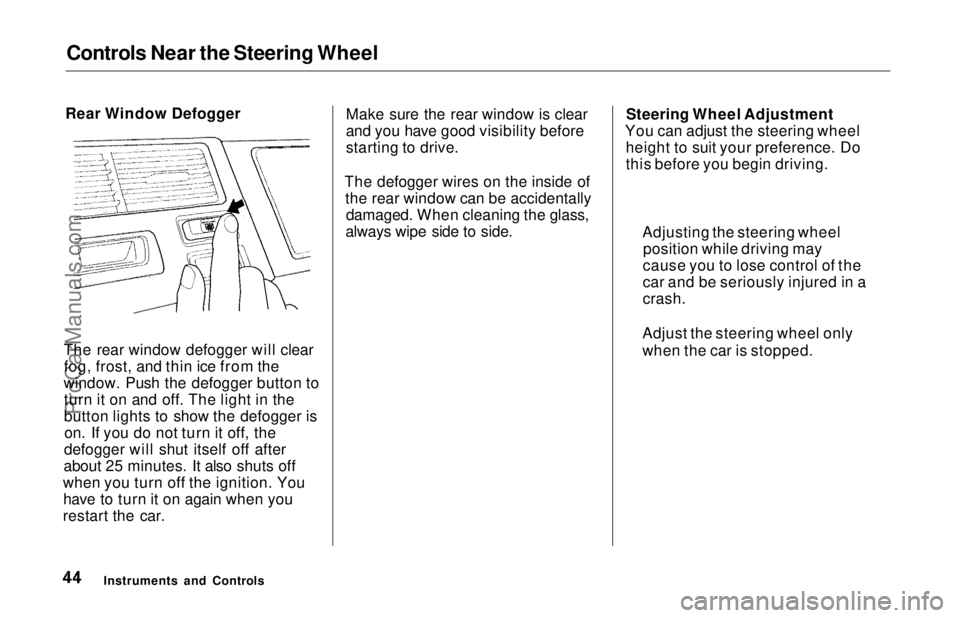
Rear Window Defogger
The rear window defogger will clear fog, frost, and thin ice from the
window. Push the defogger button to turn it on and off. The light in the
button lights to show the defogger ison. If you do not turn it off, the
defogger will shut itself off after
about 25 minutes. It also shuts off
when you turn off the ignition. You have to turn it on again when you
restart the car. Make sure the rear window is clear
and you have good visibility before
starting to drive.
The defogger wires on the inside of the rear window can be accidentallydamaged. When cleaning the glass,
always wipe side to side. Steering Wheel Adjustment
You can adjust the steering wheel height to suit your preference. Do
this before you begin driving.
Instruments and Controls Adjusting the steering wheel
position while driving may
cause you to lose control of the
car and be seriously injured in a
crash.
Adjust the steering wheel only
when the car is stopped.ProCarManuals.comMain Menu Table of Contents s t
Page 56 of 241
Seats
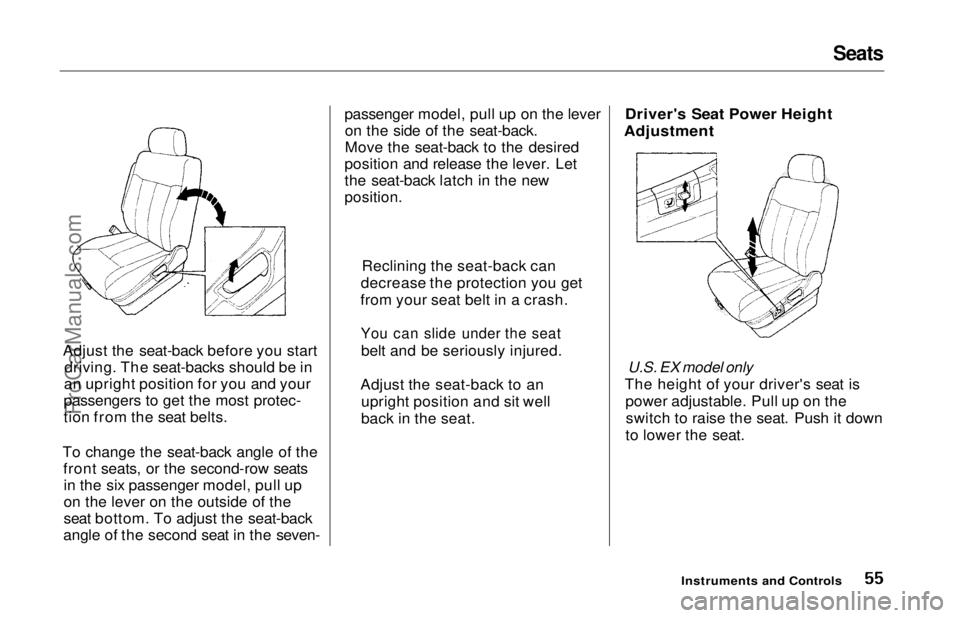
Adjust the seat-back before you start driving. The seat-backs should be in
an upright position for you and your
passengers to get the most protec-
tion from the seat belts.
To change the seat-back angle of the front seats, or the second-row seatsin the six passenger model, pull up
on the lever on the outside of the
seat bottom. To adjust the seat-back
angle of the second seat in the seven- passenger model, pull up on the lever
on the side of the seat-back.
Move the seat-back to the desired
position and release the lever. Let
the seat-back latch in the new
position.
Driver's Seat Power Height
Adjustment
U.S. EX model only
The height of your driver's seat is power adjustable. Pull up on theswitch to raise the seat. Push it down
to lower the seat.
Instruments and Controls
Reclining the seat-back can
decrease the protection you get
from your seat belt in a crash.
You can slide under the seat
belt and be seriously injured.
Adjust the seat-back to an upright position and sit well
back in the seat.ProCarManuals.comMain Menu Table of Contents s t
Page 57 of 241
Seats
Head Restraints
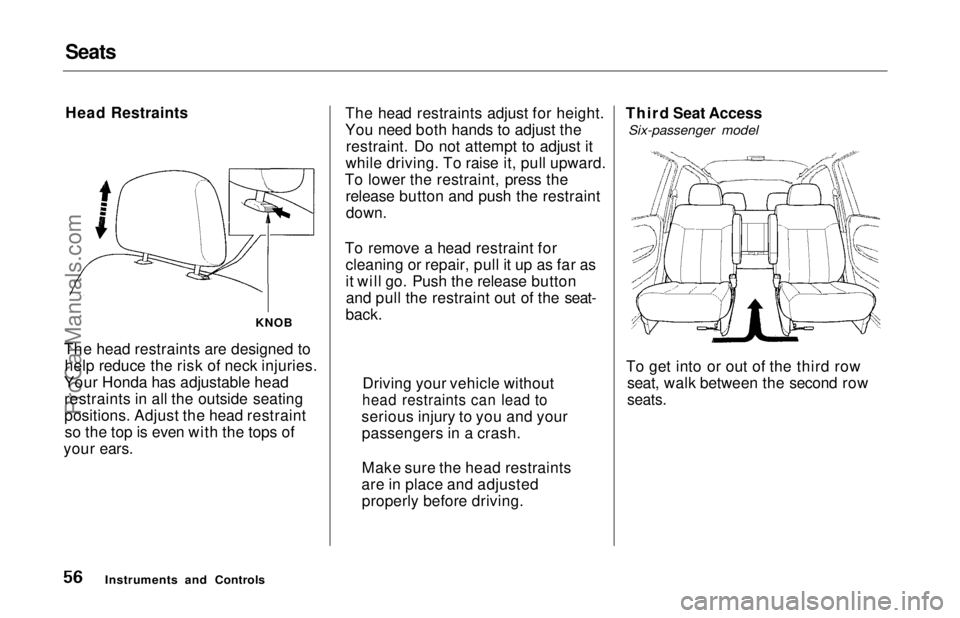
The head restraints are designed to help reduce the risk of neck injuries.
Your Honda has adjustable head restraints in all the outside seating
positions. Adjust the head restraintso the top is even with the tops of
your ears. The head restraints adjust for height.
You need both hands to adjust the
restraint. Do not attempt to adjust it
while driving. To raise it, pull upward.
To lower the restraint, press the release button and push the restraint
down.
To remove a head restraint for cleaning or repair, pull it up as far as
it will go. Push the release buttonand pull the restraint out of the seat-
back. Third Seat Access
Six-passenger model
To get into or out of the third row seat, walk between the second row
seats.
Instruments and Controls
Driving your vehicle without
head restraints can lead to
serious injury to you and your passengers in a crash.
Make sure the head restraints
are in place and adjusted properly before driving.
KNOBProCarManuals.comMain Menu Table of Contents s t
Page 219 of 241
Tire Information
Tire Size Designation
A tire's sidewall is marked with a tire size designation. You will need this
information when selecting replace-
ment tires for your car. The follow-
ing explains what the letters and
numbers in the tire size designation
mean.
(Example tire size designation)
P205/65R15 92S
P —
Applicable vehicle type (tires
marked with the prefix "P" are
intended for use on passenger cars;
however, not all tires have this
marking).
205 —
Tire width in millimeters.
65 —
Aspect ratio. The tire's section
height as a percentage of its width.
R —
Tire construction code (Radial).
15 —
Rim diameter in inches. 92
—
Load Index, a numerical code
associated with the maximum load
the tire can carry.
S —
Speed Rating Symbol. See the
speed rating chart in this section for
additional information.
Wheel Size Designation
Wheels are also marked with important information that you needif you ever have to replace one. The
following explains what the letters and numbers in the wheel size
designation mean.
(Example wheel size designation)
15
x
6
JJ
15 —
Rim diameter in inches.
6 —
Rim width in inches.
JJ —
Rim contour designation.
Tire Speed Ratings
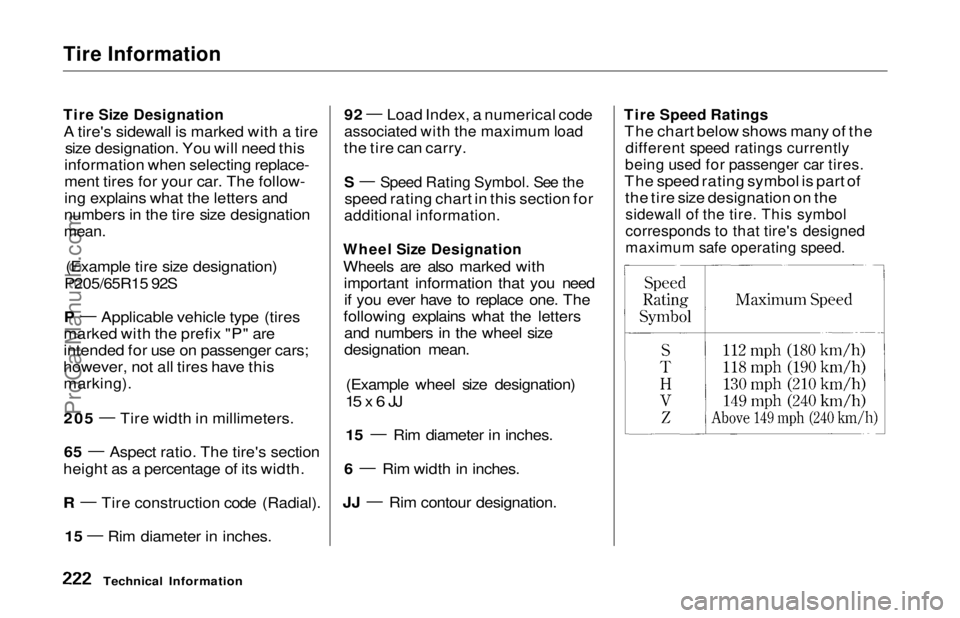
The chart below shows many of the
different speed ratings currently
being used for passenger car tires.
The speed rating symbol is part of the tire size designation on the
sidewall of the tire. This symbol
corresponds to that tire's designed
maximum safe operating speed.
Technical InformationProCarManuals.comMain Menu Table of Contents s t
Page 227 of 241
U.S. Zone Office Map
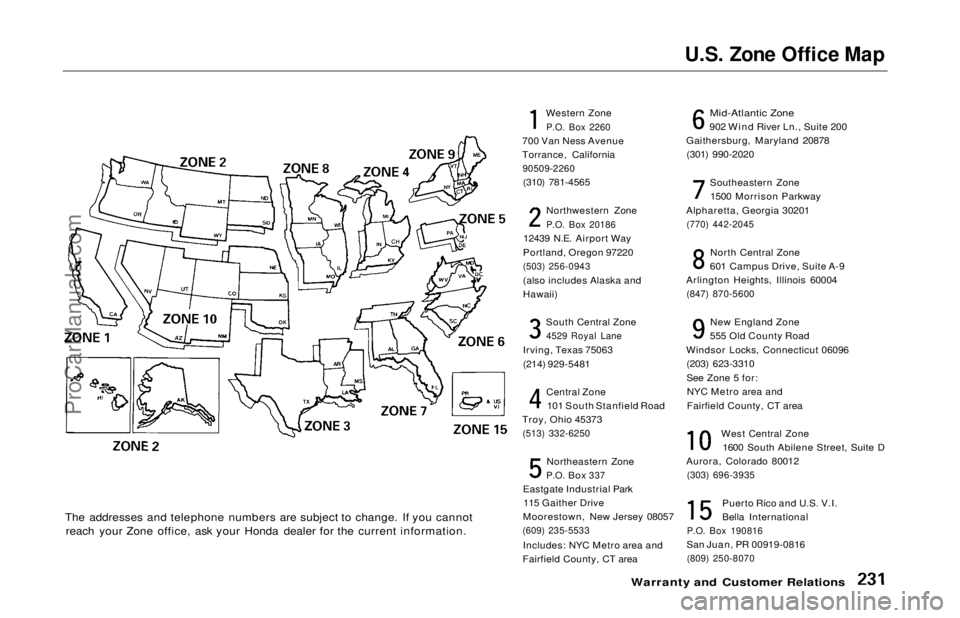
The addresses and telephone numbers are subject to change. If you cannot reach your Zone office, ask your Honda dealer for the current information. Western Zone
P.O. Box 2260
700 Van Ness Avenue
Torrance, California
90509-2260
(310) 781-4565
Northwestern Zone
P.O. Box 20186
12439 N.E. Airport Way
Portland, Oregon 97220
(503) 256-0943
(also includes Alaska and
Hawaii)
South Central Zone
4529 Royal Lane
Irving, Texas 75063
(214) 929-5481
Central Zone101 South Stanfield Road
Troy, Ohio 45373
(513) 332-6250
Northeastern Zone
P.O.
Box
337
Eastgate Industrial Park 115 Gaither Drive
Moorestown, New Jersey 08057
(609) 235-5533
Includes: NYC Metro area and
Fairfield County, CT area
Mid-Atlantic Zone
902 Wind River Ln., Suite 200
Gaithersburg, Maryland 20878 (301) 990-2020
Southeastern Zone1500 Morrison Parkway
Alpharetta, Georgia 30201
(770) 442-2045
North Central Zone
601 Campus Drive, Suite A-9
Arlington Heights, Illinois 60004
(847) 870-5600
New England Zone
555 Old County Road
Windsor Locks, Connecticut 06096 (203) 623-3310
See Zone 5 for:NYC Metro area and
Fairfield County, CT area
West Central Zone1600 South Abilene Street, Suite D
Aurora, Colorado 80012
(303) 696-3935
Puerto Rico and U.S. V.I.
Bella International
P.O. Box 190816
San Juan, PR 00919-0816
(809) 250-8070
Warranty and Customer RelationsProCarManuals.comMain Menu Table of Contents s t