1997 HONDA ODYSSEY bulb
[x] Cancel search: bulbPage 34 of 241
Indicator Lights
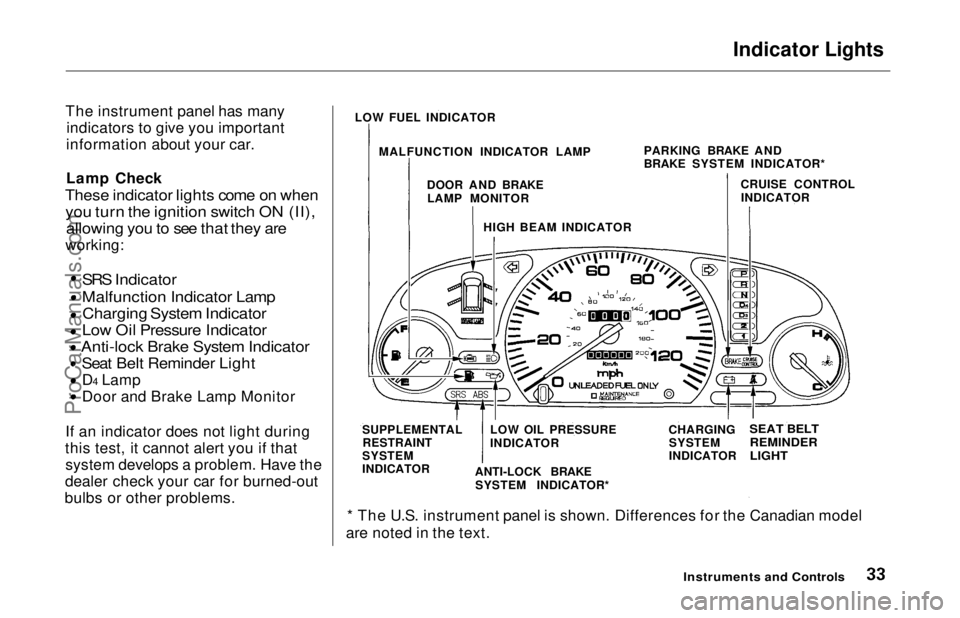
The instrument panel has many indicators to give you important
information about your car.
Lamp Check
These indicator lights come on when
you turn the ignition switch ON (II),
allowing you to see that they are
working:
SRS Indicator
Malfunction Indicator Lamp
Charging System Indicator
Low Oil Pressure Indicator
Anti-lock Brake System Indicator
Seat Belt Reminder Light
D4 Lamp
Door and Brake Lamp Monitor
If an indicator does not light during
this test, it cannot alert you if that system develops a problem. Have the
dealer check your car for burned-out
bulbs or other problems.
* The U.S. instrument panel is shown. Differences for the Canadian model
are noted in the text.
Instruments and Controls
LOW FUEL INDICATOR
MALFUNCTION INDICATOR LAMP DOOR AND BRAKELAMP MONITOR
HIGH BEAM INDICATOR PARKING BRAKE AND
BRAKE SYSTEM INDICATOR*
CRUISE CONTROLINDICATOR
SUPPLEMENTAL RESTRAINT
SYSTEM
INDICATOR LOW OIL PRESSURE
INDICATOR
ANTI-LOCK BRAKE SYSTEM INDICATOR* CHARGING
SYSTEM
INDICATOR
SEAT BELT
REMINDER
LIGHTProCarManuals.comMain Menu Table of Contents s t
Page 36 of 241
Indicator Lights
U.S.
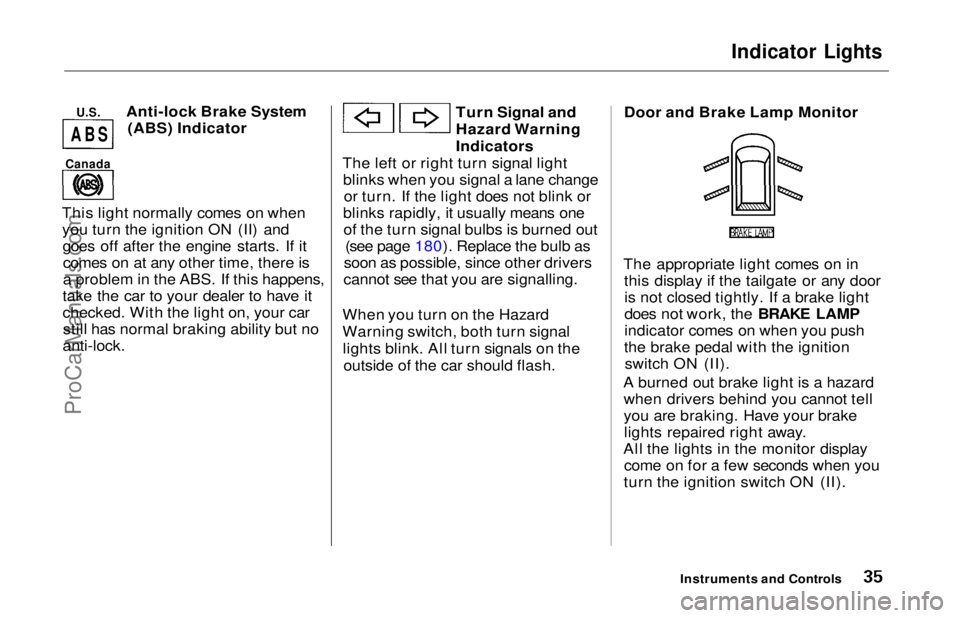
Anti-lock Brake System
(ABS) Indicator
This light normally comes on when you turn the ignition ON (II) andgoes off after the engine starts. If itcomes on at any other time, there is
a problem in the ABS. If this happens,
take the car to your dealer to have it
checked. With the light on, your car still has normal braking ability but no
anti-lock.
Turn Signal and
Hazard Warning
Indicators
The left or right turn signal light blinks when you signal a lane changeor turn. If the light does not blink or
blinks rapidly, it usually means one of the turn signal bulbs is burned out (see page 180). Replace the bulb as
soon as possible, since other drivers
cannot see that you are signalling.
When you turn on the Hazard
Warning switch, both turn signal lights blink. All turn signals on the outside of the car should flash. Door and Brake Lamp Monitor
The appropriate light comes on in this display if the tailgate or any dooris not closed tightly. If a brake light
does not work, the BRAKE LAMP
indicator comes on when you push
the brake pedal with the ignition switch ON (II).
A burned out brake light is a hazard when drivers behind you cannot tell
you are braking. Have your brakelights repaired right away.
All the lights in the monitor display come on for a few seconds when you
turn the ignition switch ON (II).
Instruments and Controls
Canada
A
B SProCarManuals.comMain Menu Table of Contents s t
Page 136 of 241
Maintenance
This section explains why it is important to keep your car well
maintained and to follow basic
maintenance safety precautions.
This section also includes Maintenance Schedules for normaldriving and severe driving conditions,
a Maintenance Record, and instruc-
tions for simple maintenance tasks
you may want to take care of
yourself.
If you have the skills and tools to per-
form more complex maintenance
tasks on your Honda, you may want to purchase the Service Manual. See
page 235 for information on how toobtain a copy, or see your Honda
dealer.
Maintenance Safety....................... 138
Important Safety Precautions.. 139
Maintenance Schedule.................. 140
Maintenance Record..................... 144
Owner Maintenance Checks........ 146
Fluid Locations............................... 147
Engine Oil....................................... 148
Adding Oil................................... 148Recommended Oil..................... 148
Synthetic Oil............................... 149
Additives..................................... 150
Changing the Oil and Filter...... 150
Cooling System.............................. 152
Adding Engine Coolant............. 152Replacing Engine Coolant........ 154
Windshield Washers..................... 156
Automatic Transmission Fluid..... 157
Brake Fluid..................................... 158
Brake System............................. 158
Anti-lock Brake System............ 159
Power Steering............................... 159
Air Cleaner Element...................... 160
Spark Plugs..................................... 162
Replacement............................... 162
Specifications............................. 163
Battery............................................ 164
Windshield Wipers........................ 166
Air Conditioning System............... 169
Drive Belts...................................... 170
Timing Belt..................................... 170
Tires................................................ 171 Inflation....................................... 171
Inspection................................... 173
Maintenance............................... 173
Tire Rotation.............................. 174 Replacing Tires and Wheels .... 174
Wheels and Tires....................... 175
Winter Driving........................... 175 Snow Tires.............................. 176
Tire Chains............................. 176
Lights.............................................. 177
Headlight Aiming...................... 177
Replacing Bulbs......................... 179
Storing Your Car............................ 184
MaintenanceProCarManuals.comMain Menu s t
Page 176 of 241
Lights
Check the operation of your car's
exterior lights at least once a month.
A burned out bulb can create an unsafe condition by reducing your
car's visibility and the ability tosignal your intentions to other
drivers.
Check the following:
Headlights (low and high beam)
Parking lights
Taillights Brake lightsHigh-mount brake light
Turn signals
Back-up lights
Hazard light function
License plate light
Side marker lights
Daytime running lights (Canadian models)
If you find any bulbs are burned out,
replace them as soon as possible. Refer to the chart on page 221 to
determine what type of replacement
bulb is needed.
Headlight Aiming
The headlights were properly aimed when your car was new. You should check their aim if you regularly carry
heavy items in the cargo area or pull a trailer. Each headlight assembly
has horizontal and vertical adjust-
ment indicators. These are set to
their "0" positions after the head-
lights are aimed at the factory.
To check these settings: 1. Make sure the fuel tank is full. Park the car on level ground.
2. The driver or someone who weighs the same should be sittingin the driver's seat for all checks
and adjustments.
Load your car with the items you
normally carry.
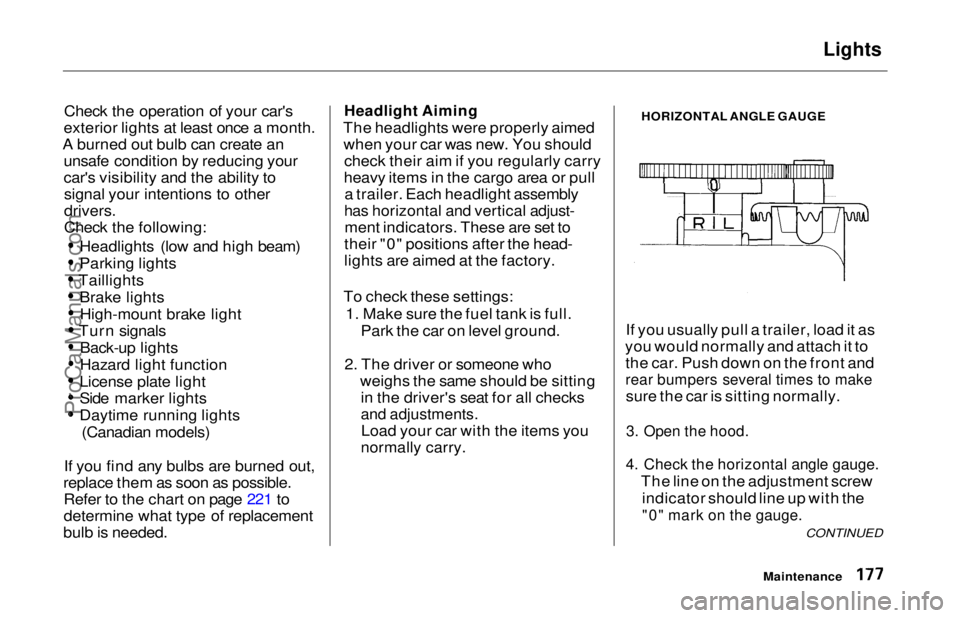
HORIZONTAL ANGLE GAUGE
If you usually pull a trailer, load it as
you would normally and attach it to the car. Push down on the front and
rear bumpers several times to make
sure the car is sitting normally.
3. Open the hood.
4. Check the horizontal angle gauge.
The line on the adjustment screwindicator should line up with the
"0" mark on the gauge.
Maintenance
CONTINUEDProCarManuals.comMain Menu Table of Contents s t
Page 178 of 241
Lights
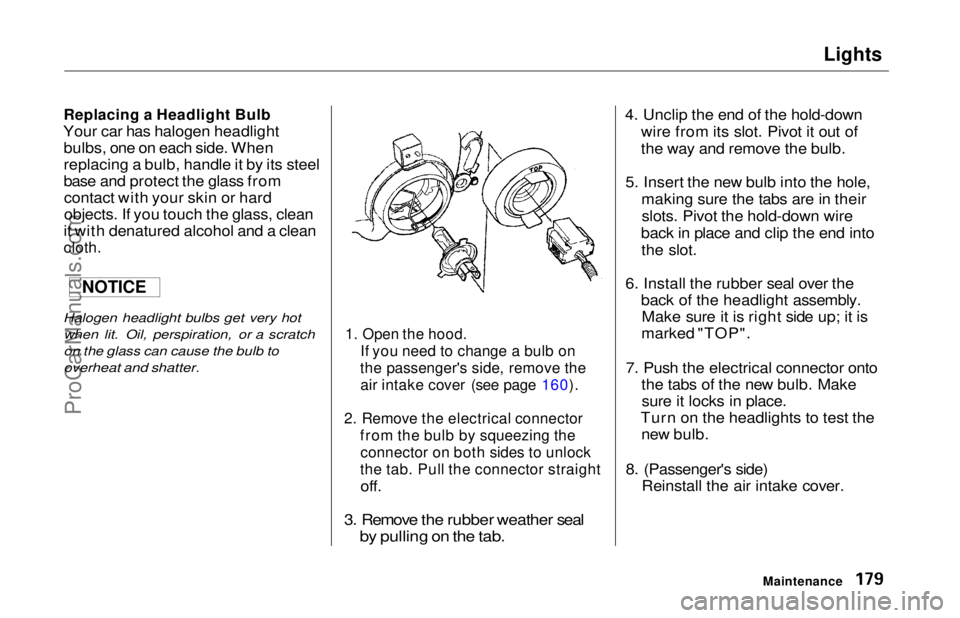
Replacing a Headlight Bulb
Your car has halogen headlight bulbs, one on each side. When
replacing a bulb, handle it by its steel
base and protect the glass fromcontact with your skin or hard
objects. If you touch the glass, clean
it with denatured alcohol and a clean
cloth.
Halogen headlight bulbs get very hot
when lit. Oil, perspiration, or a scratch
on the glass can cause the bulb to
overheat and shatter.
1. Open the hood.
If you need to change a bulb on
the passenger's side, remove the
air intake cover (see page 160).
2. Remove the electrical connector from the bulb by squeezing the
connector on both sides to unlock
the tab. Pull the connector straight
off.
3. Remove the rubber weather seal
by pulling on the tab.
4. Unclip the end of the hold-down
wire from its slot. Pivot it out of
the way and remove the bulb.
5. Insert the new bulb into the hole, making sure the tabs are in theirslots. Pivot the hold-down wire
back in place and clip the end into the slot.
6. Install the rubber seal over the back of the headlight assembly.Make sure it is right side up; it is
marked "TOP".
7. Push the electrical connector onto the tabs of the new bulb. Makesure it locks in place.
Turn on the headlights to test the new bulb.
8. (Passenger's side) Reinstall the air intake cover.
Maintenance
NOTICEProCarManuals.comMain Menu Table of Contents s t
Page 179 of 241
Lights
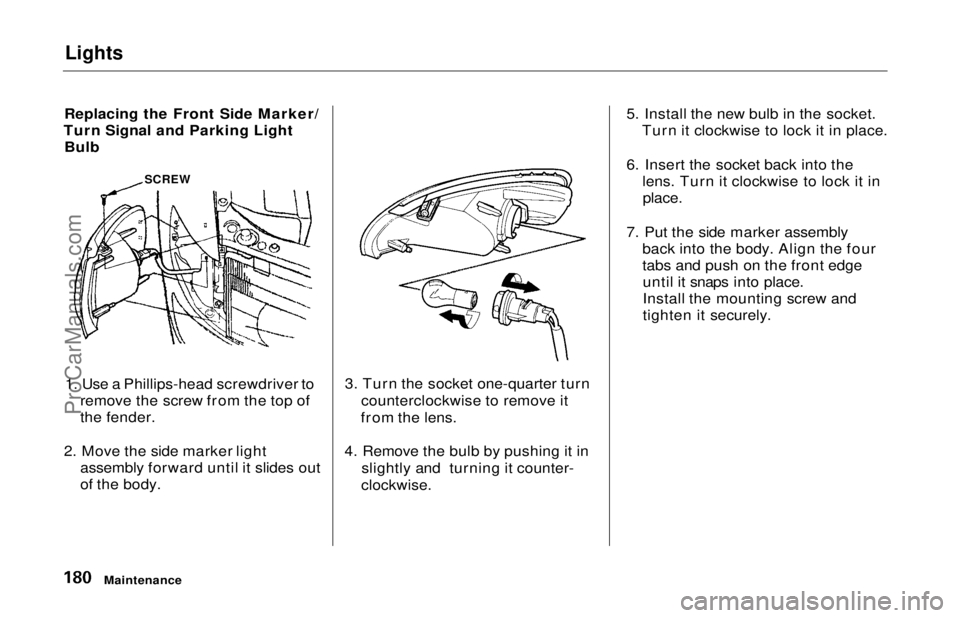
Replacing the Front Side Marker/
Turn Signal and Parking Light Bulb
1. Use a Phillips-head screwdriver to remove the screw from the top of
the fender.
2. Move the side marker light assembly forward until it slides out
of the body. 3. Turn the socket one-quarter turn
counterclockwise to remove it
from the lens.
4. Remove the bulb by pushing it in slightly and turning it counter-
clockwise.
5. Install the new bulb in the socket.
Turn it clockwise to lock it in place.
6. Insert the socket back into the lens. Turn it clockwise to lock it in
place.
7. Put the side marker assembly back into the body. Align the four
tabs and push on the front edgeuntil it snaps into place.
Install the mounting screw and
tighten it securely.
Maintenance
SCREWProCarManuals.comMain Menu Table of Contents s t
Page 180 of 241
Lights
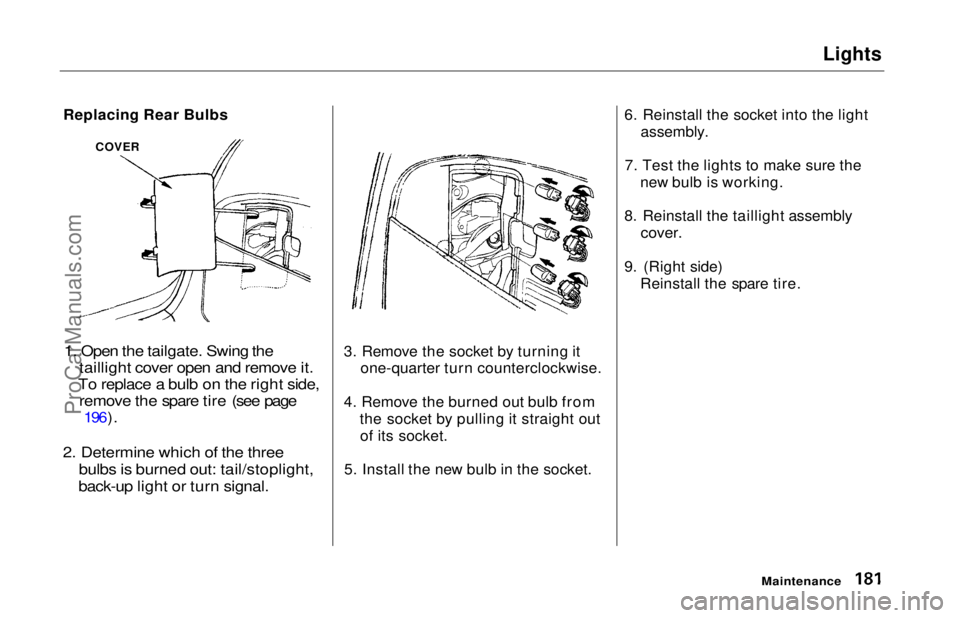
Replacing Rear Bulbs
1. Open the tailgate. Swing the taillight cover open and remove it.
To replace a bulb on the right side, remove the spare tire (see page
196).
2. Determine which of the three bulbs is burned out: tail/stoplight,
back-up light or turn signal.
3. Remove the socket by turning it
one-quarter turn counterclockwise.
4. Remove the burned out bulb from the socket by pulling it straight outof its socket.
5. Install the new bulb in the socket. 6. Reinstall the socket into the light
assembly.
7. Test the lights to make sure the new bulb is working.
8. Reinstall the taillight assembly
cover.
9. (Right side) Reinstall the spare tire.
Maintenance
COVERProCarManuals.comMain Menu Table of Contents s t
Page 181 of 241
Lights
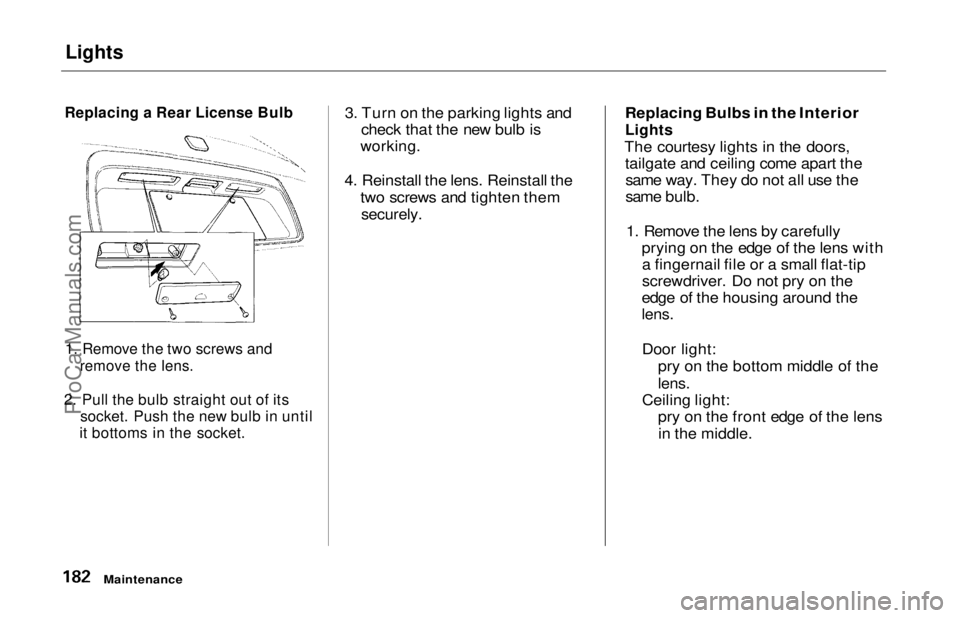
Replacing a Rear License Bulb
1. Remove the two screws and
remove the lens.
2. Pull the bulb straight out of its
socket. Push the new bulb in until
it bottoms in the socket.
3. Turn on the parking lights and
check that the new bulb is
working.
4. Reinstall the lens. Reinstall the two screws and tighten them
securely.
Replacing Bulbs in the Interior
Lights
The courtesy lights in the doors, tailgate and ceiling come apart thesame way. They do not all use the
same bulb.
1. Remove the lens by carefully prying on the edge of the lens witha fingernail file or a small flat-tip
screwdriver. Do not pry on the
edge of the housing around the
lens.
Door light: pry on the bottom middle of the
lens.
Ceiling light: pry on the front edge of the lens
in the middle.
MaintenanceProCarManuals.comMain Menu Table of Contents s t