Page 193 of 436

Before You Go Off-Roading
There are some things to do before you go out. For
example, be sure to have all necessary maintenance
and service work done. Check to make sure all
underbody shields
(if so equipped) are properly
attached. Be sure you
read all the information about
your four-wheel-drive vehicle in this manual.
Is there
enough fuel?
Is the spare tire fully inflated? Are the
fluid levels up where they should be? What are the local
laws that apply to off-roading where you’ll be driving?
If you don’t know, you should check
with law
enforcement people
in the area. Will you be on
someone’s private land?
If so, be sure to get the
necessary permission.
Loading Your Vehicle for Off-Road Driving
There are some important things to remember about
how to load your vehicle.
The heaviest things should be on the load floor and
forward
of your rear axle. Put heavier items as far
forward as you can.
Be sure the load is secured properly, so driving on
the off-road terrain doesn’t toss things around.
Cargo on the load floor piled higher than
the seatbacks can be thrown forward
during a sudden stop. You or your
passengers could be injured. Keep cargo
below the top of the seatbacks.
Unsecured cargo on the load floor can be
tossed about when driving over rough
terrain. You or your passengers can
be struck
by flying objects. Secure the
cargo properly.
Heavy loads on the roof raise the vehicle’s
center of gravity, making it more likely to
roll over. You can be seriously or fatally
injured
if the vehicle rolls over. Put heavy
loads inside the cargo area, not on the roof.
Keep cargo in the cargo area as far forward
and low
as possible.
You’ll find other important information
in this manual.
See “Vehicle Loading,” “Luggage Carrier” and “Tires”
in the Index.
ProCarManuals.com
Page 263 of 436
Removing the Spare Tire and Tools
2 and 4-Door Models Extended
Cab Models
The equipment you'll need is behind the passenger's seat.
Turn the wing nut counterclockwise and remove the jack
cover, if there is one. Remove the jacking equipment.
If you have a chassis cab, refer to the information from
the body supplierhstaller for the location of your
spare tire.
You'll use the jack handle and the ratchet to remove the
underbody-mounted spare tire.
5-23
ProCarManuals.com
Page 264 of 436
I Lower Raise
H
/1
A. Hoist Assembly
B. Ratchet
C. Jack Handle
D. Hoist Shaft
E. Valve Stem, Pointed
Down
E Spare Tire
G. Retainer
H. Hoist Cable Follow these
instructions to lower the spare tire:
1.
2.
3.
4.
One side of the ratchet has an UP marking. The other
side has a DOWN marking. Assemble the ratchet
to the hook near the end
of the jack handle (as
illustrated) with the
DOWN marking facing you.
Insert the, other end through the hole in the rear
bumper
and into the hoist shaft.
Turn the ratchet
to lower the spare tire. to the ground.
Continue to turn the ratchet until the spare tire can be
pulled out from under the vehicle.
When the tire has been lowered, tilt the retainer at
the end
of the cable so it can be pulled up through
the wheel opening,
Put the spare tire near the flat tire.
5-24
ProCarManuals.com
Page 267 of 436
Removing the Flat Tire and Installing
the
Spare Tire
1 1. Use the ratchet and
wheel wrench to loosen
all the wheel nuts. Turn
the wheel wrench
counterclockwise, with
DOWN facing you, to
loosen the wheel nuts.
Don’t remove the wheel
nuts yet.
3
Front
Position
Rear
Position
2. Position the jack under the vehicle. If the flat tire is
on the front of the vehicle, position the jack on the
frame behind the flat tire. If the flat tire is on the
rear, position the jack on the rear axle between the
spring and the shock absorber.
I-
AC
Getting under a vehicle when it is jacked up is
dangerous. If the vehicle slips off the jack, you
could be badly injured or killed. Never get under
a vehicle when it is supported only by a jack.
NOTICE:
Raising your vehicle with the jack improperly
positioned will damage the vehicle or may allow
the vehicle to
fall off the jack. Be sure to fit the
jack lift head into the proper location before
raising your vehicle.
5-27
ProCarManuals.com
Page 268 of 436
Front Position Rear Position
3. With UP on the ratchet facing you, raise the vehicle
by rotating the ratchet and wheel wrench clockwise.
Raise the vehicle far enough off the ground
so there
is enough room for the spare tire to fit.
~ 4. Remove all the wheel
nuts
and take off the
flat tire.
5. Remove any rust or dirt
from the wheel
bolts,
mounting surfaces and
spare wheel.
5-28
ProCarManuals.com
Page 271 of 436
NOTICE:
Improperly tightened wheel nuts can lead to
brake pulsation and rotor damage.
To avoid
expensive brake repairs, evenly tighten the wheel
nuts in the proper sequence and
to the proper
torque specification.
9. Put the wheel trim back on. For vehicles with plastic
wheel nut caps, tighten the caps until they are finger
tight, then tighten them an additional one-half
TI
with the ratchet and wheel wrench.
Storing a Flat or Spare Tire and Tools
'A
Storing a jack, a tire or other equipment in the
passenger compartment
of the vehicle could
cause injury. In
a sudden stop or collision, loose
equipment could strike someone. Store all these
in the proper place.
Store the flat tire where the spare tire was stored.
5-31
ProCarManuals.com
Page 272 of 436

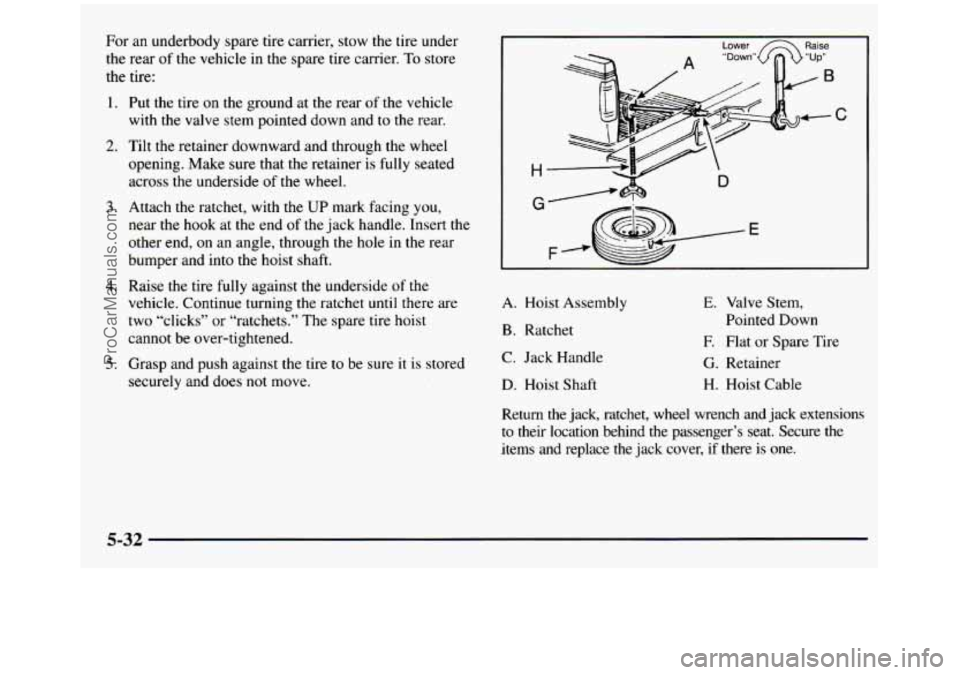
For an underbody spare tire carrier, stow the tire under
the rear
of the vehicle in the spare tire carrier. To store
the tire:
1.
2.
3.
4.
5.
Put the tire on the ground at the rear of the vehicle
with the valve stem pointed down and
to the rear.
Tilt
the retainer downward and through the wheel
opening. Make sure that the retainer
is fully seated
across the underside of the wheel.
Attach the ratchet, with the
UP mark facing you,
near the hook at the end
of the jack handle. Insert the
other end, on an angle, through
the hole in the rear
bumper and into the hoist shaft.
Raise the tire fully against the underside
of the
vehicle. Continue turning the ratchet
until there are
two “clicks” or “ratchets.” The spare tire hoist
cannot be over-tightened.
Grasp and push against the tire to be sure it is stored
securely and does not move.
I Lower Raise
H
r-
F- e>&
E
A. Hoist Assembly
B. Ratchet
C. Jack Handle
D. Hoist Shaft
E. Valve Stem,
Pointed Down
E Flat or Spare Tire
G. Retainer
H. Hoist Cable
Return
the jack, ratchet, wheel wrench and jack extensions
to their location behind the passenger’s seat. Secure the
items and replace the jack cover, if there
is one.
5-32
ProCarManuals.com
Page 328 of 436

When to Check
Check your tires once a month or more. Also, check the
tire pressure of the spare tire.
How to Check
Use a good quality pocket-type gage to check tire
pressure.
You can’t tell if your tires are properly inflated
simply by looking at them. Radial tires may look
properly inflated even when they’re underinflated.
Be sure
to put the valve caps back on the valve stems.
They help prevent leaks by keeping out
dirt and moisture.
Tire Inspection and Rotation
Tires should be rotated every 6,000 to 8,000 miles
(10 000 to 13 000 km). Any time you notice unusual
wear, rotate your tires as soon as possible and check
wheel alignment.
Also check for damaged tires or
wheels. See “When It’s Time for New Tires” and
“Wheel Replacement” later
in this section for more
information. If your vehicle has dual rear wheels, also
see “Dual Tire Operation” later in this section. The
purpose of regular rotation is to achieve more
uniform wear for all tires
on the vehicle. The first
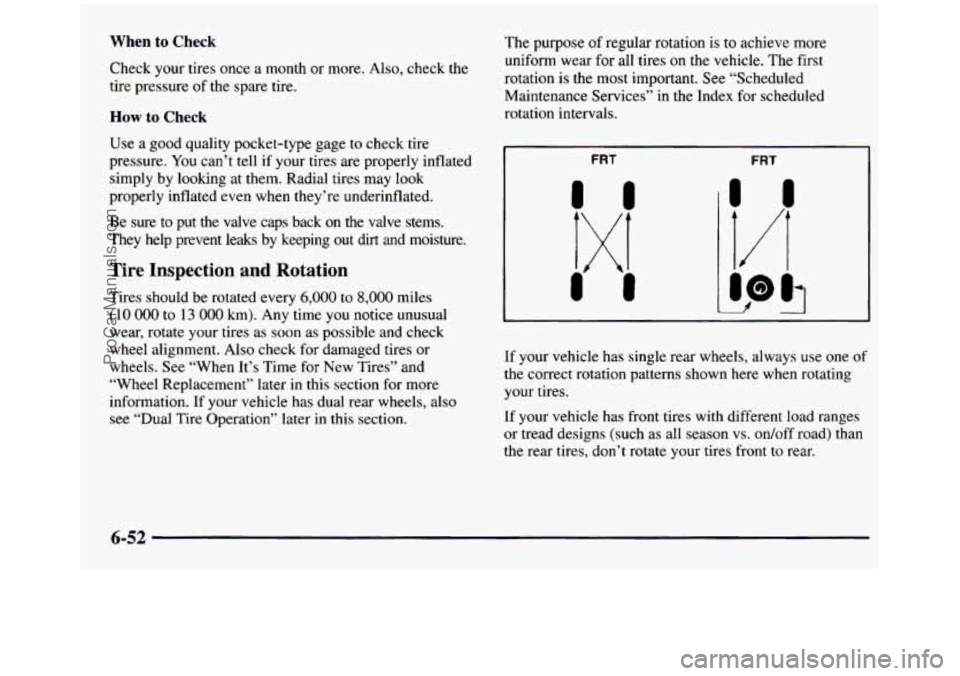
rotation is the most important. See “Scheduled
Maintenance Services” in the Index for scheduled
rotation intervals.
I FRT FRT
I
If your vehicle has single rear wheels, always use one of
the correct rotation patterns shown here when rotating
your tires.
If your vehicle has front tires with different load ranges
or tread designs (such as all season vs. odoff road)
than
the rear tires, don’t rotate your tires front to rear.
6-52
ProCarManuals.com