1997 GMC SIERRA radio
[x] Cancel search: radioPage 81 of 436
Keyless Entry System (If Equipped)
If your vehicle has this option, you can lock and unlock
your doors from about
3 feet (1 m) up to 30 feet (9 m)
away using the remote keyless entry transmitter supplied
with your vehicle.
In addition, your interior lamps will be illuminated for a
set period of time when the transmitter signal is received
by the Keyless Entry System.
Your Keyless Entry System operates on a radio
frequency subject to Federal Communications
Commission (FCC) Rules and
with Industry Canada.
This device complies with
Part 15 of the FCC Rules.
Operation
is subject to the following two conditions:
(1) this device may not cause harmful interference, and
(2) this device must accept any interference received,
including interference that may cause undesired operation.
This device complies with
RSS-210 of Industry
Canada. Operation
is subject to the following two
conditions:
(1) this device may not cause interference,
and (2) this device must accept any interference
received, including interference that may cause
undesired operation of the device. This
system has
a range of about 3 feet (1 m) up to
30 feet (9 m). At times you may notice a decrease in
range. This is normal for any remote keyless entry
system.
If the transmitter does not work or if you have
to stand closer
to your vehicle for the transmitter to
work, try this:
Check to determine if battery replacement or
transmitter resynchronization is necessary. See the
instructions
that follow.
Check the distance. You may be too far from your
vehicle.
You may need to stand closer during rainy
or snowy weather.
0 Check the location. Other vehicles or objects may
be blocking the signal. Take a few steps to the left
or right, hold the transmitter higher, and try again.
0 If you’re still having trouble, see your GM dealer or
a qualified technician for service.
Changes or modifications to this system by other than an
authorized service facility could void authorization to
use this equipment.
ProCarManuals.com
Page 85 of 436
Ignition Positions
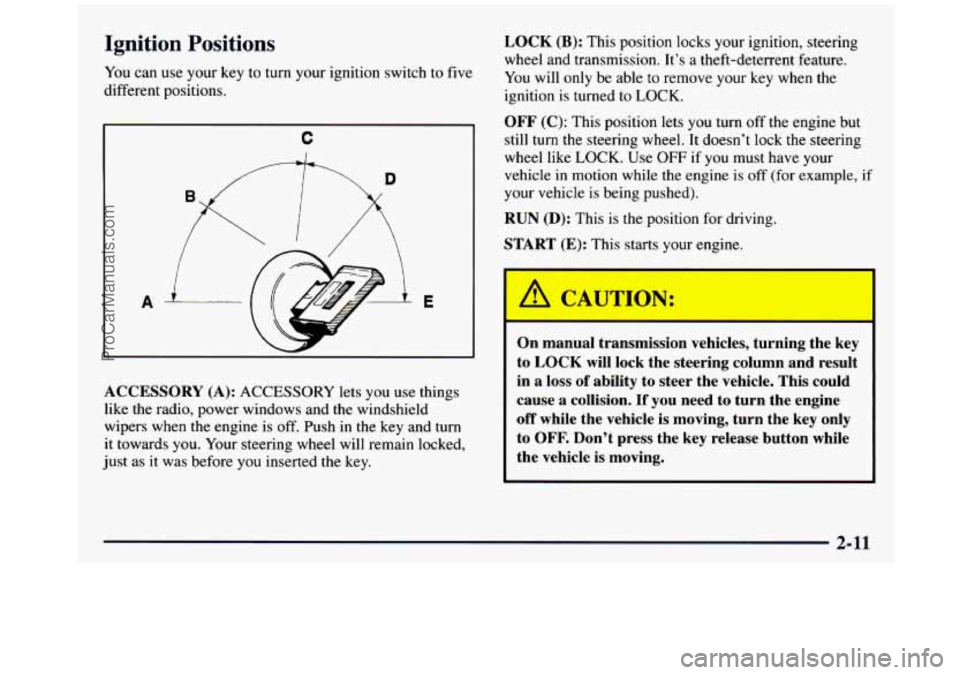
You can use your key to turn your ignition switch to five
different positions.
A E
ACCESSORY (A): ACCESSORY lets you use things
like the radio, power windows and the windshield
wipers when the engine
is off. Push in the key and turn
it towards you. Your steering wheel will remain locked,
just as it was before you inserted the key.
LOCK (B): This position locks your ignition, steering
wheel and transmission. It’s
a theft-deterrent feature.
You will only be able to remove your key when the
ignition is turned to
LOCK.
OFF (C): This position lets you turn off the engine but
still turn the steering wheel. It doesn’t lock the steering
wheel like
LOCK. Use OFF if you must have your
vehicle
in motion while the engine is off (for example,
your vehicle
is being pushed).
RUN (D): This is the position for driving.
START (E): This starts your engine.
I-
-
I A CAUTIO1.;
if
On manual transmission vehicles, turning the key
to
LOCK will lock the steering column and result
in
a loss of ability to steer the vehicle. This could
cause
a collision. If you need to turn the engine
off while the vehicle is moving, turn the key only
to
OFF. Don’t press the key release button while
the vehicle is moving.
2-11
ProCarManuals.com
Page 117 of 436
Lamps Taillamps,
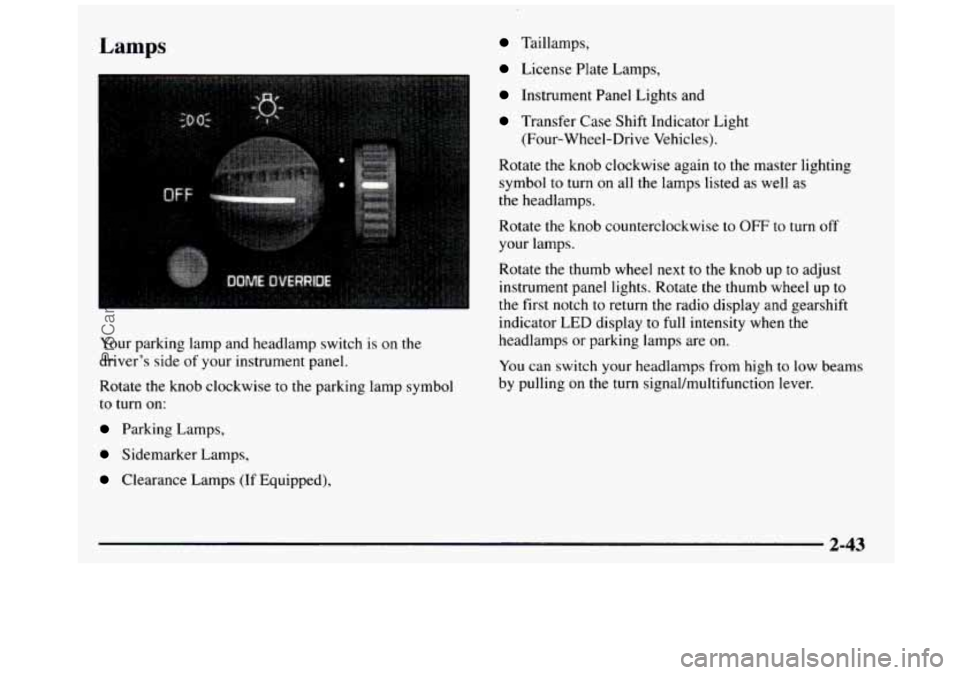
Your parking lamp and headlamp switch is
on the
driver’s side of your instrument panel.
Rotate the knob clockwise to the parking lamp symbol
to turn on:
Parking Lamps,
Sidemarker Lamps,
Clearance Lamps (If Equipped),
License Plate Lamps,
Instrument Panel Lights and
Transfer Case Shift Indicator Light
(Four-Wheel-Drive Vehicles).
Rotate the knob clockwise again to the master lighting
symbol to turn on all the lamps listed as well
as
the headlamps.
Rotate the knob counterclockwise to
OFF to turn off
your lamps.
Rotate the thumb
wheel next to the knob up to adjust
instrument panel lights.
Rotate the thumb wheel up to
the first notch to return the radio display and gearshift
indicator LED display
to full intensity when the
headlamps or parking lamps are on.
You can switch your headlamps from high to low beams
by pulling on the turn signal/multifunction lever.
2-43
ProCarManuals.com
Page 120 of 436
Interior Lamps
Instrument Panel Intensity Control
The instrument panel intensity control is located to the
right of the headlamp switch.
Rotate the thumb wheel up to adjust instrument panel
lights. Rotate the thumb wheel up to the first notch to
return the radio display and gearshift indicator
LED
display to full intensity when the headlamps or parking
lamps are on. To turn on the dome lamps (with the
vehicle doors closed) rotate the thumb wheel up to the
second notch position.
Illuminated Entry
Your vehicle is equipped with an illuminated entry feature.
When the doors are opened, the dome lamps will come
on
if the dome lamp button is out. When all the doors
are closed, or the dome lamp button is pressed in, the
lamps will stay on for a short period
of time and will
then
go out.
Front Reading Lamps (If Equipped)
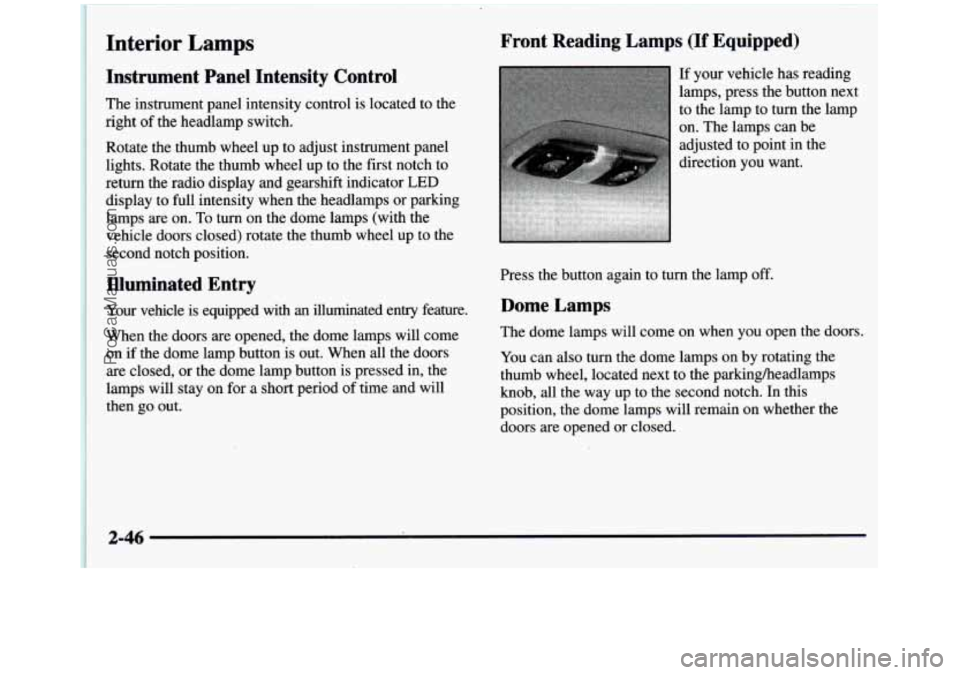
If your vehicle has reading
lamps, press the button next
to the lamp to turn the lamp
on. The lamps can be
adjusted to point in the
direction you want.
Press the button again to turn the lamp off.
Dome Lamps
The dome lamps will come on when you open the doors.
You can also turn the dome lamps on by rotating the
thumb wheel, located next to the parkingheadlamps
knob, all the way up to the second notch. In this
position, the dome lamps will remain on whether the doors are opened or closed.
2-46
ProCarManuals.com
Page 143 of 436
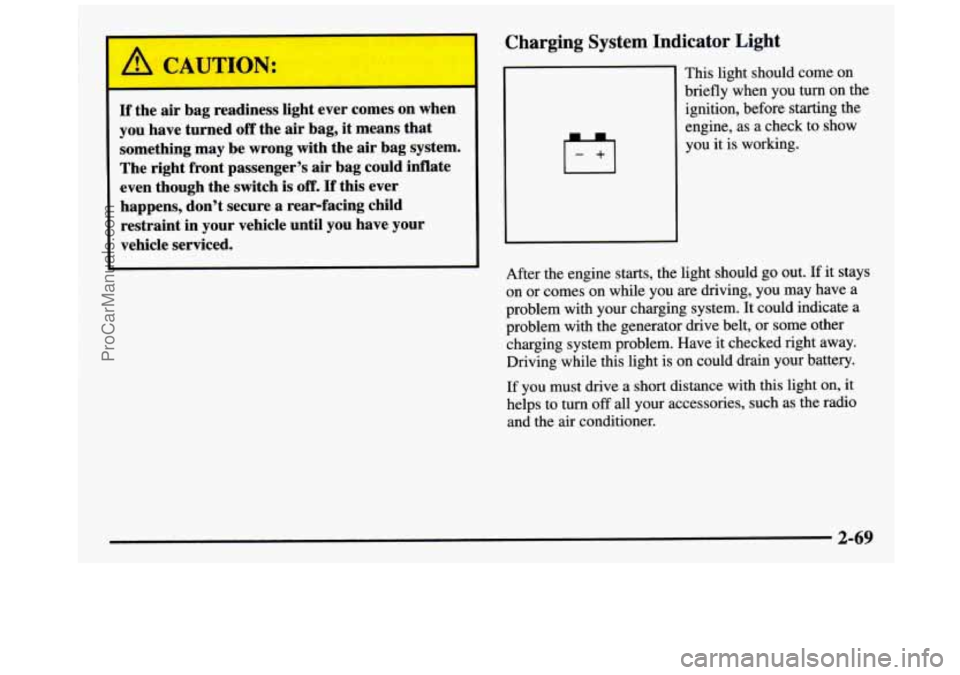
/I CAUTION: I
If the air bag readiness light ever comes on when
you have turned
off the air bag, it means that
something may be wrong with the air bag system.
The right front passenger’s
air bag could inflate
even though the switch is
off. If this ever
happens, don’t secure a rearfacing child
restraint in your vehicle until you have your
vehicle serviced.
Charging System Indicator Light
This light should come on
briefly when you
turn on the
ignition, before starting the
engine, as a check to show
you it is working.
After the engine starts, the light should go out.
If it stays
on or comes on while you are driving, you may have a
problem with your charging system. It could indicate a
problem with the generator drive belt, or some other
charging system problem. Have it checked right away.
Driving while this light is on could drain your battery.
If you must drive a
short distance with this light on, it
helps to turn
off all your accessories, such as the radio
and the air conditioner.
2-69
ProCarManuals.com
Page 153 of 436
Section 3 Comfort Controls and Audio Systems
In this section, you’ll find out how to operate the comfort control and audio systems offered with your vehicle. Be
sure to read about the particular systems supplied with your vehicle.
3-2
3-4
3-4
3-5
3-6 3-6
3-7
3-7
3-8 3-8
3-9
3- 12 Comfort Controls
Air Conditioning
Heating
Ventilation System
Defogging and Defrosting
Rear Window Defogger
Audio Systems Setting the Clock
AM-FM Stereo Radio
Playing the Radio
AM-FM Stereo with Cassette Tape Player
AM-FM Stereo with Cassette Tape and
Automatic Tone Control
3- 15
3- 16
3-20
3-21
3-23 3-24
3-25
3-26
3-26 CD
Adapter Kit
AM-FM Stereo with Compact Disc Player and
Automatic Tone Control
Playing a Compact Disc in the Single Remote
Disc Player
Theft-Deterrent Feature
Understanding Radio Reception
Tips About Your Audio System Care
of Your Cassette Tape Player
Care of Your Compact Discs
Fixed Mast Antenna
3-1
ProCarManuals.com
Page 160 of 436
AM-FM Stereo
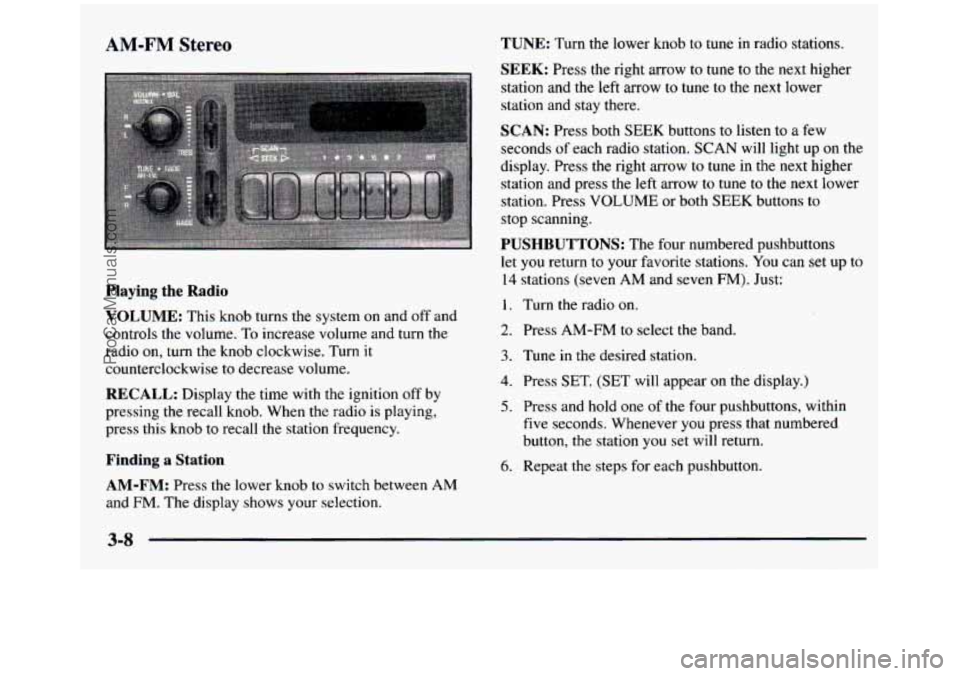
Playing the Radio
VOLUME:
This knob turns the system on and off and
controls the volume.
To increase volume and turn the
radio on, turn the knob clockwise. Turn
it
counterclockwise to decrease volume.
RECALL: Display the time with the ignition off by
pressing the recall knob. When the radio is playing, press this knob
to recall the station frequency.
Finding a Station TUNE:
Turn the lower knob to tune
in radio stations.
SEEK: Press the right arrow to tune to the next higher
station and
the left arrow to tune to the next lower
station and stay there.
SCAN: Press both SEEK buttons to listen to a few
seconds
of each radio station. SCAN will light up on the
display. Press the right arrow to tune in the next higher
station and press the left arrow to tune
to the next lower
station. Press VOLUME or both
SEEK buttons to
stop scanning.
PUSHBUTTONS: The four numbered pushbuttons
let you return to your favorite stations.
You can set up to
14 stations (seven AM and seven FM). Just:
1. Turn the radio on.
2. Press AM-FM to select the band.
3. Tune in the desired station.
4. Press SET. (SET will appear on the display.)
5. Press and hold one of the four pushbuttons, within
five seconds. Whenever you press that numbered
button, the station
you set will return.
6. Repeat the steps for each pushbutton.
AM-FM: Press the lower knob to switch between AM
and FM. The display shows your selection.
3-8
ProCarManuals.com
Page 161 of 436
In addition to the four stations already set, up to
three more stations may be preset
on each band by
pressing two adjoining buttons at the same time. Just:
1. Tune in the desired station.
2. Press SET. (SET will appear on the display.)
3. Press two adjoining buttons at the same time, within
five seconds. Whenever
you press the same two
buttons, the station you set will return.
4. Repeat the steps for each pair of pushbuttons.
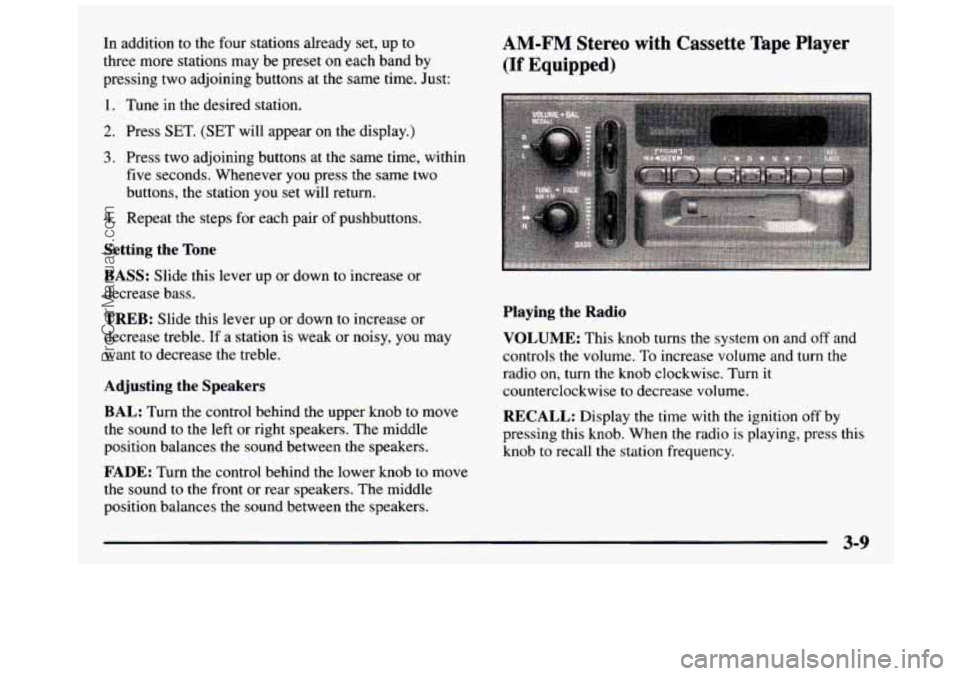
Setting the Tone
BASS:
Slide this lever up or down to increase or
decrease bass.
TREB: Slide this lever up or down to increase or
decrease treble.
If a station is weak or noisy, you may
want to decrease the treble.
Adjusting the Speakers
BAL:
Turn the control behind the upper knob to move
the sound to the left or right speakers. The middle
position balances the sound between the speakers.
FADE: Turn the control behind the lower knob to move
the sound to
the front or rear speakers. The middle
position balances the sound between the speakers.
AM-FM Stereo with Cassette Tape Player
(If Equipped)
Playing the Radio
VOLUME:
This knob turns the system on and off and
controls the volume.
To increase volume and turn the
radio on, turn the knob clockwise.
Turn it
counterclockwise to decrease volume.
RECALL: Display the time with the ignition off by
pressing this knob. When the radio is playing, press this
knob to recall the station frequency.
3-9
ProCarManuals.com