Page 228 of 356
Downloaded from www.Manualslib.com manuals search engine The coolant level should be at or above the FULL
COLD mark.
If it isn’t, you may have
a leak in the radiator hoses,
heater hoses, radiator, water pump or somewhere else in
the cooling system.
Heater and radiator hoses, and other engine
parts, can be very hot. Don’t touch them.
If you
do, you can be burned.
Don’t run the engine if there is
a leak. If you run
the engine, it could lose all coolant. That could
cause an engine fire, and you could be burned.
Get any leak fixed before you drive the vehicle.
1 NOTICE:
Engine damage if you keep running your engine
without coolant isn’t covered by your warranty.
See “Overheated Engine Protection Operating
Mode” in the Index.
If there seems to be no leak, with the engine on, check to
see if the electric engine fans
are running. If the engine
is overheating, both fans should be running.
If they
aren’t, your vehicle needs service.
5-17
Page 229 of 356
Downloaded from www.Manualslib.com manuals search engine How to Add Coolant to the Coolant
Surge Tank
If you haven’t found a problem yet, but the coolant level
isn’t at the FULL COLD mark, add a
50/50 mixture of
clean water (preferably distilled) and DEX-COOL@
coolant at the coolant surge tank, but be sure the cooling
system, including the coolant surge tank pressure cap,
is
cool before you do it. (See “Engine Coolant” in the
Index for more information.)
Steam and scalding liquids from a hot cooling
system can blow out and burn you badly. They
are under pressure, and if you turn the coolant
surge tank pressure cap
-- even a little -- they
can come out at high speed. Never turn the cap
when the cooling system, including the coolant
surge tank pressure cap, is hot. Wait for the
cooling system and coolant surge tank pressure
cap to cool if you ever have to turn the
pressure cap.
I
Page 230 of 356
Downloaded from www.Manualslib.com manuals search engine 1 A CAUTION:
~ Adding only plain water to your cooling system
can be dangerous. Plain water, or some other
liquid like alcohol, can boil before the proper
coolant mix will. Your vehicle’s coolant warning
system is set for the proper coolant mix. With
plain water or the wrong mix, your engine could
get too hot but you wouldn’t get the overheat
warning. Your engine could catch fire and you or
others could be burned. Use
a 50150 mix of clean
water and DEX-COOL@ coolant.
NOTICE:
~
In cold weather, water can freeze and crack the
engine, radiator, heater core and other parts.
So
use the recommended coolant.
A CAUTIOK
You can be burned if you spill coolant on hot
engine parts. Caolant contains ethylene glycol
and it will burn if the engine parts are hot
enough. Don’t spill coolant on a hot engine.
5-19
Page 231 of 356
Downloaded from www.Manualslib.com manuals search engine 1. You can remove the coolant surge tank pressure cap
when the cooling system, including the coolant surge
tank pressure cap and upper radiator hose, is no
longer hot. Turn the pressure cap slowly about
one-quarter turn to the left and then stop. 3. Then fill the coolant surge tank with the proper mix,
up
to the FULL COLD mark.
2.
If you hear a hiss, wait for that to stop. A hiss means
there
is still some pressure left.
Then keep turning the pressure cap slowly, and
remove it.
5-20
Page 257 of 356

Downloaded from www.Manualslib.com manuals search engine Rear Axle
When to Check Lubricant
Refer to the Maintenance Schedule to determine how
often to check the lubricant. See “Periodic Maintenance
Inspections” in the Index.
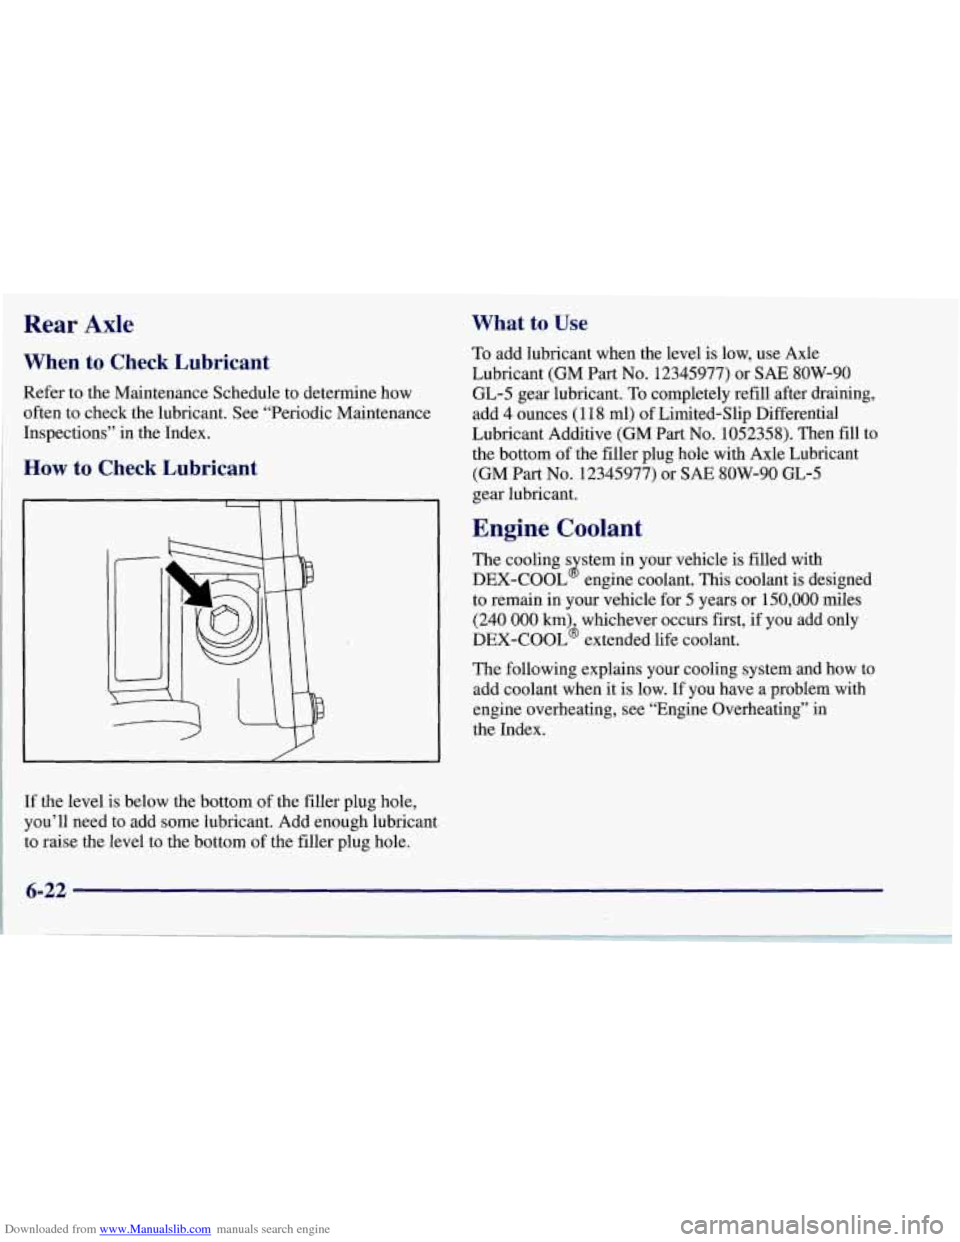
How to Check Lubricant
If the level is below the bottom of the filler plug hole,
you’ll need to add some lubricant. Add enough lubricant
to raise the level to the bottom of the filler plug hole.
What to Use
To add lubricant when the level is low, use Axle
Lubricant (GM
Part No. 12345977) or SAE 8OW-90
GL-5 gear lubricant. To completely refill after draining,
add
4 ounces (1 18 ml) of Limited-Slip Differential
Lubricant Additive (GM
Part No. 1052358). Then fill to
the bottom of the filler plug hole with Axle Lubricant
(GM
Part No. 12345977) or SAE 8OW-90 GL-5
gear lubricant.
Engine Coolant
The cooling s stem in your vehicle is filled with
DEX-COOL engine coolant. This coolant is designed
to remain in your vehicle for
5 years or 150,000 miles
(240
000 km) whichever occurs first, if you add only
DEX-COOL6 extended life coolant.
8
The following explains your cooling system and how to
add coolant when it is low.
If you have a problem with
engine overheating, see “Engine Overheating” in
the Index.
6-22
Page 258 of 356

Downloaded from www.Manualslib.com manuals search engine A 50/50 mixture of water and DEX-COOL@
coolant will:
Give freezing protection down to -34°F (-37°C).
Give boiling protection up to 265 "F (129" C).
Protect against rust and corrosion.
Help keep the proper engine temperature,
Let the warning lights and gages work as
they should.
NOTICE:
When adding coolant, it is important that you use
only
DEX-COOL@ (silicate-free) coolant.
If coolant other than DEX-COOL@ is added to
the system, premature engine, heater core or
radiator corrosion
may result. In addition, the
engine coolant will require change sooner
-- at
30,000 miles (50 000 km) or 24 months,
whichever occurs first. Damage caused
by the use
of coolant other than DEX-COOL@ is not
covered by your new vehicle warranty.
What to Use
Use a mixture of one-half clean water (preferably
distilled) and one-half
DEX-COOL' coolant which
won't damage aluminum parts.
If you use this mixture,
you don't need to add anything else.
Adding only plain water to your cooling system
can be dangerous. Plain water, or some other
liquid like alcohol, can boil before the proper
coolant mix will. Your vehicle's coolant warning
system
is set for the proper coolant mix. With
plain water or the wrong mix, your engine could
get too hot but you wouldn't get the overheat
warning. Your engine could catch fire and
you or
others could be burned. Use
a 50/50 mix of clean
water and DEX-COOL@ coolant.
I
6-23
Page 259 of 356
Downloaded from www.Manualslib.com manuals search engine NOTICE:
If you use an improper coolant mix, your engine
could overheat and be badly damaged. The
repair cost wouldn’t be covered by your
warranty. Too much water in the mix can freeze
and crack the engine, radiator, heater core and
other parts.
If you have to add coolant more than four times a year,
have your dealer check your cooling system.
NOTICE:
If you use the proper coolant, you don’t have to
add extra inhibitors or additives which claim to
improve the system. These can be harmful.
Checking Coolant
The coolant surge tank is in the engine compartment
behind the headlamp on the passenger’s side.
6-24
Page 270 of 356
Downloaded from www.Manualslib.com manuals search engine Front Turn Signal Lamps
1. Remove the front fascia close out panel
attaching bolts.
2. Remove the front fascia close out panel.
3. Grasp the cooling duct and pull to release it from the
front fascia, then reposition it. This will give you
better access to the bulb.
4. Squeeze the tab on the socket and turn it to the left to
5. Remove the bulb from the socket.
6. Reverse the steps with a new bulb.
remove the
socket with the bulb.
Front Sidemarker Lamps
Lamps” described previously.
1. Follow the first three steps in “Front Turn Signal
2. Turn the socket to the left one-quarter of a turn and
pull it out.
3. Pull the bulb straight out of the socket.
4. Reverse the steps with a new bulb.
Rear Turn Signal and Taillamps
A. Back-up Lamp
B. Inboard Taillamp
C. Outboard Taillamp
6-35