1997 CADILLAC ELDORADO sensor
[x] Cancel search: sensorPage 154 of 361
Downloaded from www.Manualslib.com manuals search engine TRANS FLUID RESET - 48: With the engine not
running and the ignition on, press and hold the OFF and
rear defog buttons until the
TRANS FLUID RESET
message appears on the DIC (between five and
20 seconds).
TRANSMISSION HOT - 112: This messages indicates
that the transaxle fluid in your vehicle is too hot. Stop
and allow your vehicle to idle until it cools down or
until this message is removed.
TRUNK OPEN - 24: This message indicates that the
trunk is open when the ignition
is in RUN.
TURN SIGNAL ON - 20: This message is a reminder,
after driving about
a mile, that you have the turn signal
on.
A multiple chime will also sound when this message
is displayed.
VEHICLE SPEED LIMITED TO XXX MPH
(KM/N) - 113: A failure in the suspension control
system has occurred when this message appears. The
PCM determines the speed your vehicle is limited to.
Have your Cadillac serviced if this message appears.
WRY LOW REFRIGERANT A/C COMPRESSOR
OFF - 12: This message means that the air conditioning
system detects a refrigerant level that is low enough to
cause damage to the air conditioning compressor.
To avoid darnage, the air conditioning compressor
automatically turns
off and the Electronic Climate
Control will automatically switch from
AUTO to ECON
and remain there. Have the air conditioning system
serviced if this message appears.
The
CV-RTD automatically adjusts the ride of your
vehicle. Automatic ride control
is achieved through a
computer used to control
and monitor the suspension
system.
The controller receives inputs from various
sensors to determine the proper system response. If the
controller detects a problem within the system, the
DIC
will display a SERVICE RIDE CONTROL message. If
this message appears, have your vehicle serviced at
your
CadilIac dealership.
Page 156 of 361

Downloaded from www.Manualslib.com manuals search engine 3-2
3-2
3-6
3-6
3-6
3-7
3-8 3-8
3-9
3-9
3 -9
3-9
3-10
3-13
Comfort Controls
Climate Control Panel
Electronic Solar Sensor
Air Conditioning
Heating
Ventilation System
Defrosting
Rear Window Defogger
HVAC Steering Wheel Controls
Climate Control Personalization
Audio Systems
Setting the Clock
AM-FM Stereo with Cassette Tape Player and
Optional Compact Disc Player
Bose
TM AM-FM Stereo with Cassette Tape
and Compact Disc Player
In this section, you’ll find out how to operate the comfort control and audio systems offered with your Cadillac. Be
sure to read about the particular systems supplied with your vehicle.
3- 17
3-2 1
3-24
3-24
3-25
3-25
3-25
3-26
3-27
3-27
Bose TM AM-FM Stereo with Cassette
Tape and Compact Disc Player with Digital
Signal Processing
Trunk Mounted CD Changer
Radio Personalization
Theft-Deterrent Feature
Audio Steering Wheel
Controls
Understanding Radio Reception
Tips About Your Audio System
Care
of Your Cassette Tape Player
Care of Your Compact Discs
Power Antenna Mast Care
Page 158 of 361

Downloaded from www.Manualslib.com manuals search engine With this dual-zone feature, the right front passenger can
control the temperature
of air for hisher own zone. The
passenger
can select a four degree warmer or cooler
temperature from the driver's setting. To turn the system
on, press the PASS/TEMP button. Press the up arrow to
increase the temperature and press the down arrow to
decrease the climate setting. Pressing the
OFF button
will
turn off the dual-zone function.
The outside temperature is always displayed when your
vehicle is running. You can change it from Fahrenheit to
Celsius by pressing the
INFO button (above the radio)
until ENGLHSH/METRIC RESET displays. Once
displayed, press the
INFO RESET button to select.
The outside temperature sensor
is located near the front
grille.
The sensor can be affected by road or engine heat
dnring idling, slow driving or when the engine is first
started after
a short trip. In order to ensure proper
automatic climate control operation,
the outside air
temperature display may not update as quickly
as
expected. This is to allow the air surrounding the outside
temperature sensor to be as close to
the actual outside
conditions as possible. This is determined by how much
time has elapsed since the vehicle has been turned
off
and by vehicle speed. Press this button to deliver
air through the floor, middle
or windshield outlets. The system will
stay in the selected
mode
until the MODE button is pushed again. Press the
up or down ~QW to cycle through the available modes.
Automatic
When the system is set for automatic operation, sensors
will control the
air delivery mode. Air will come from
the floor, middle or windshield outlets. The fan speed
will
vary as the system maintains the selected
temperature setting.
Be careful not to put anything over the
solar sensor
located in the middle
of the instrument panel near the
windshield. This sensor is used by the automatic system
to regulate temperature.
To find your comfort zone, start with the 75°F (24°C)
setting and allow about 20 minutes for the system to
regulate. Turn the
TEMP/AUTO knob to adjust the
temperature if necessary. If you' choose 60 OF ( 16 " C),
the system will remain at that maximum cooling setting
and will not regulate fan speed.
If you choose the
temperature of
90°F (32"C), the system will remain at
that maximum heating setting and will not regulate fan
speed. Choosing either maximum setting will not cause
the system to
heat or cool any faster.
Page 161 of 361

Downloaded from www.Manualslib.com manuals search engine . .. ..
The sensor monitors the sun’s solar radiation and is
located
on top of the instrument panel near the
windshield. The
ECC system uses this information to
automatically make the necessary temperature and
airflow ‘adjustments to maintain your comfort.
Air Conditioning
On hot. days,.open the windows long enough to let hot
inside air escape.
This reduces the time it takes for your
vehicle
to cool down. Then keep your windows closed
for the
air conditioner to work its best.
Press the
AC button or the TEMP/AUTO knob to turn
the system on and then select the proper MODE to direct
airflow. The system will cool and dehumidify the
air
inside the vehicle. Also while in the AUTO mode, the
system will
use recirculation as necessary to cool the air.
You may also need.to adjust the interior temperature and
fan speed as needed.
When the
air conditioner is on, you may sometimes notice
slight changes
in your vehicle’s engine speed and power.
This is normal because the system is designed to cycle. the
compressor
on and off to keep the desired temperature.
1
eating
Press the MODE button to select heater. Adjust the
interior temperature to
a comfortable level and if the fan
speed needs adjusting, press the up or down arrow.
With each system, outside air will be brought in and sent
through the floor, air conditioning or bi-level outlets
(depending on the condition). The heater works best
if
you keep your wind0w.s closed while using it.
, !
P
Page 278 of 361
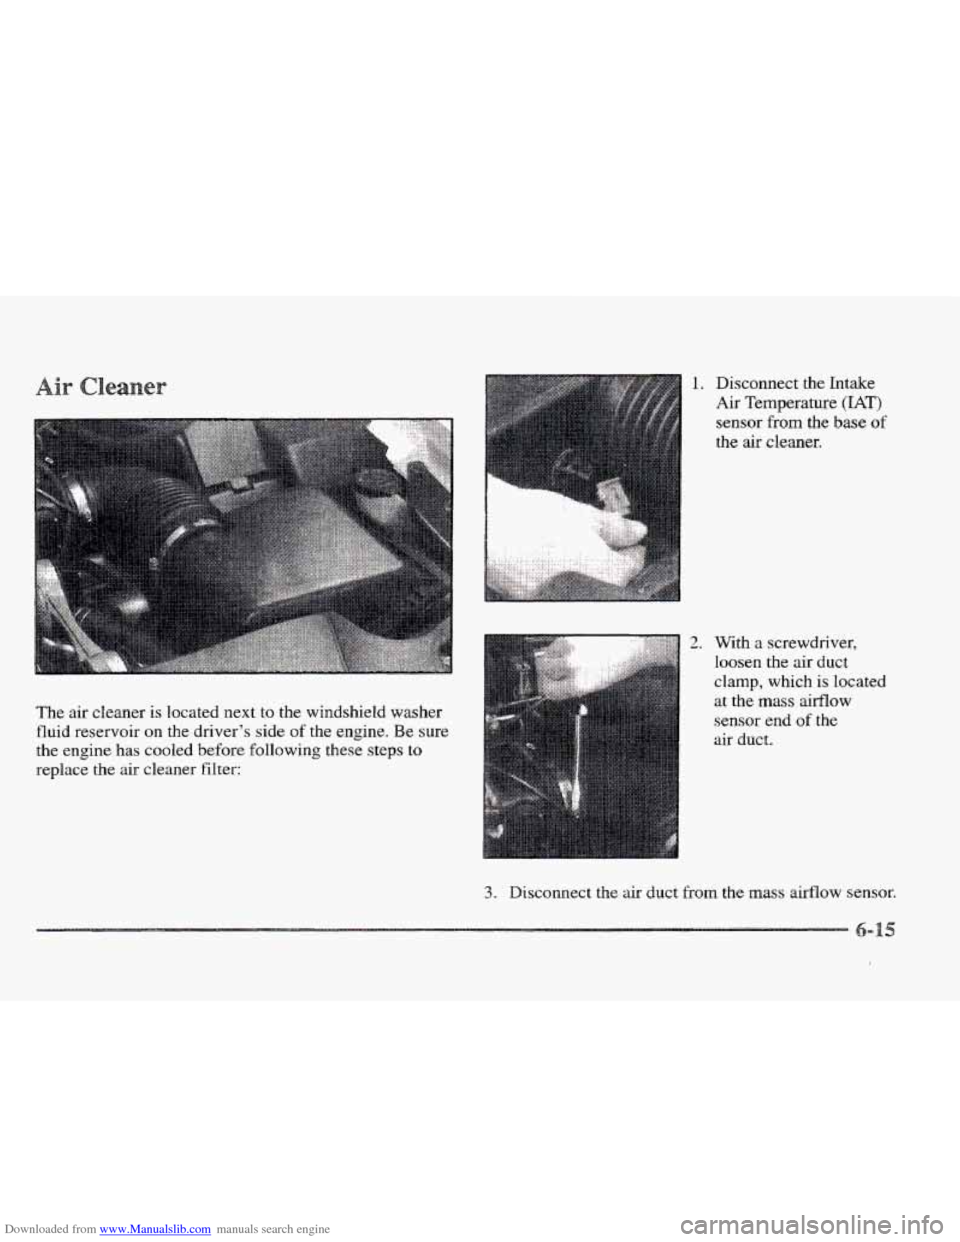
Downloaded from www.Manualslib.com manuals search engine The air cleaner is located next to the windshield washer
fluid reservoir
on the driver’s side of the engine. Be sure
the engine
has cooled before following these steps to
replace the air cleaner filter:
1. Disconnect the Intake
Air Temperature
(IAT)
sensor from the base of
the air cleaner.
2. With a screwdriver,
loosen
the air duct
clamp, which
is located
at the mass airflow
sensor end
of the
air duct.
3. Disconnect the air duct from the mass airflow sensor.
Page 279 of 361
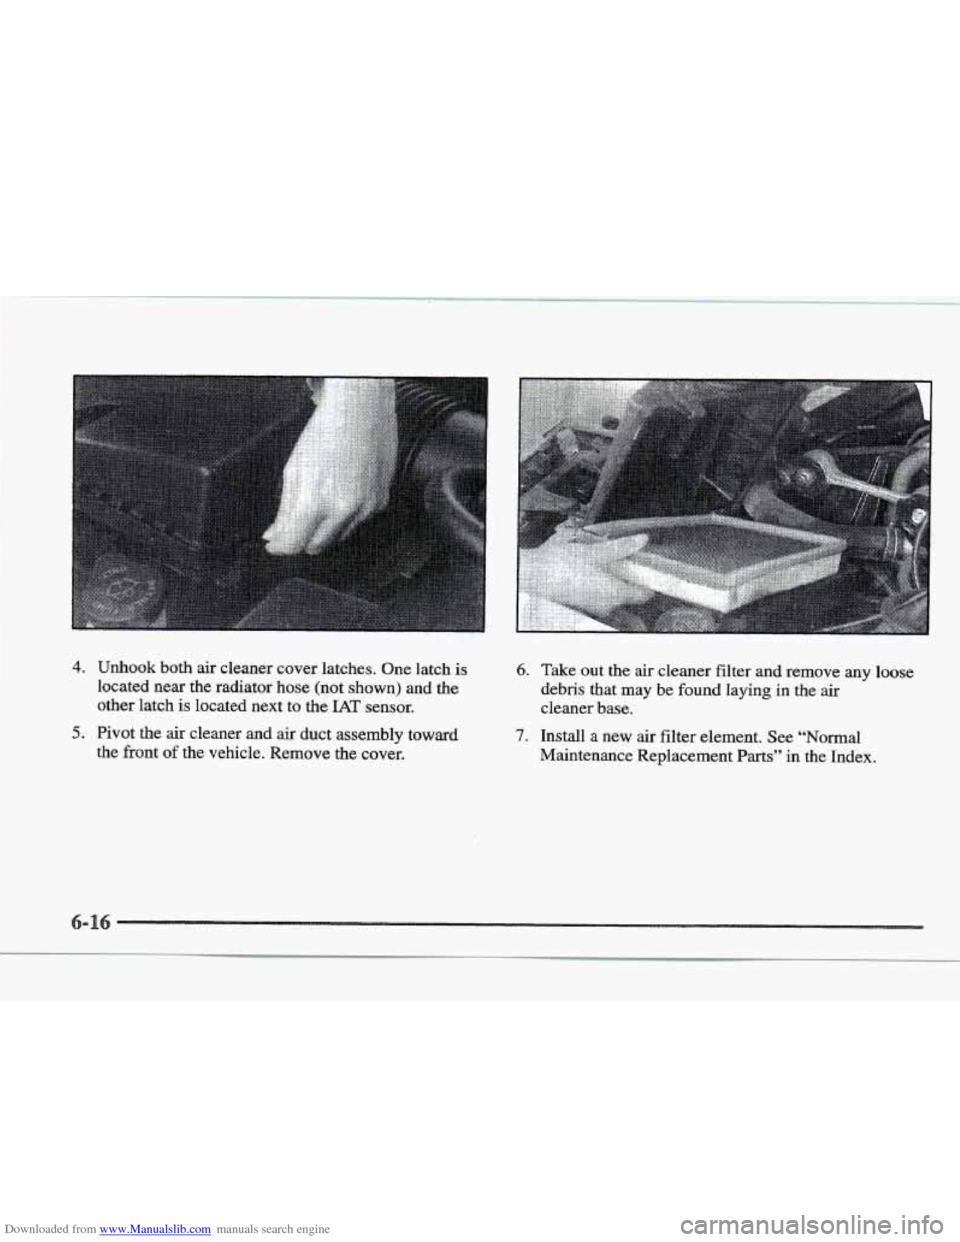
Downloaded from www.Manualslib.com manuals search engine 4. Unhook both air cleaner cover latches. One latch is
located near the radiator hose (not shown) and, the
other latch
is located next to the IAT sensor.
6.
5. Pivot the air cleaner and air duct assembly toward
the front
of the vehicle. Remove the cover.
7.
Take out the air cleaner filter and remove any loose
debris that may be found laying
in the air
cleaner base.
Install a new
air filter element. See “Normal
Maintenance Replacement
Parts” in the Index.
Page 280 of 361
Downloaded from www.Manualslib.com manuals search engine 4.
5.
1.
2.
3.
Follow these steps to reinstall the air cleaner assembly:
Slide the air cleaner lid into the slots in the front
edge
of the air cleaner base.
Pivot the
air cleaner cover and the air duct assembly
downward. Make sure that both latches are secure
and fully engaged.
Reinstall the clean air duct over the mass airflow
sensor. Make sure that the duct
is secure around the
entire outer edge of the sensor.
Tighten the air duct clamp.
Reconnect the
LA% sensor.
Refer to the Maintenance Schedule to determine when to
replace the
air filter.
See “Scheduled Maintenance Services” in the
Maintenance Schedule booklet.
. ..
.. ..
Operating the engine with the air cleaner off
can cause you or others to be burned. The air
cleaner
not only cleans the air, it stops flames if
the engine backfires. If it isn’t there, and the
engine backfires, you could be burned. Don’t
drive with it off, and be careful working on the
engine
with the air cleaner off.
If the air cleaner is off, a backfire can cause a
damaging engine fire. And, dirt can easily get
into your engine, which will damage it. Always
have the air cleaner in place when you’re driving.
Page 320 of 361
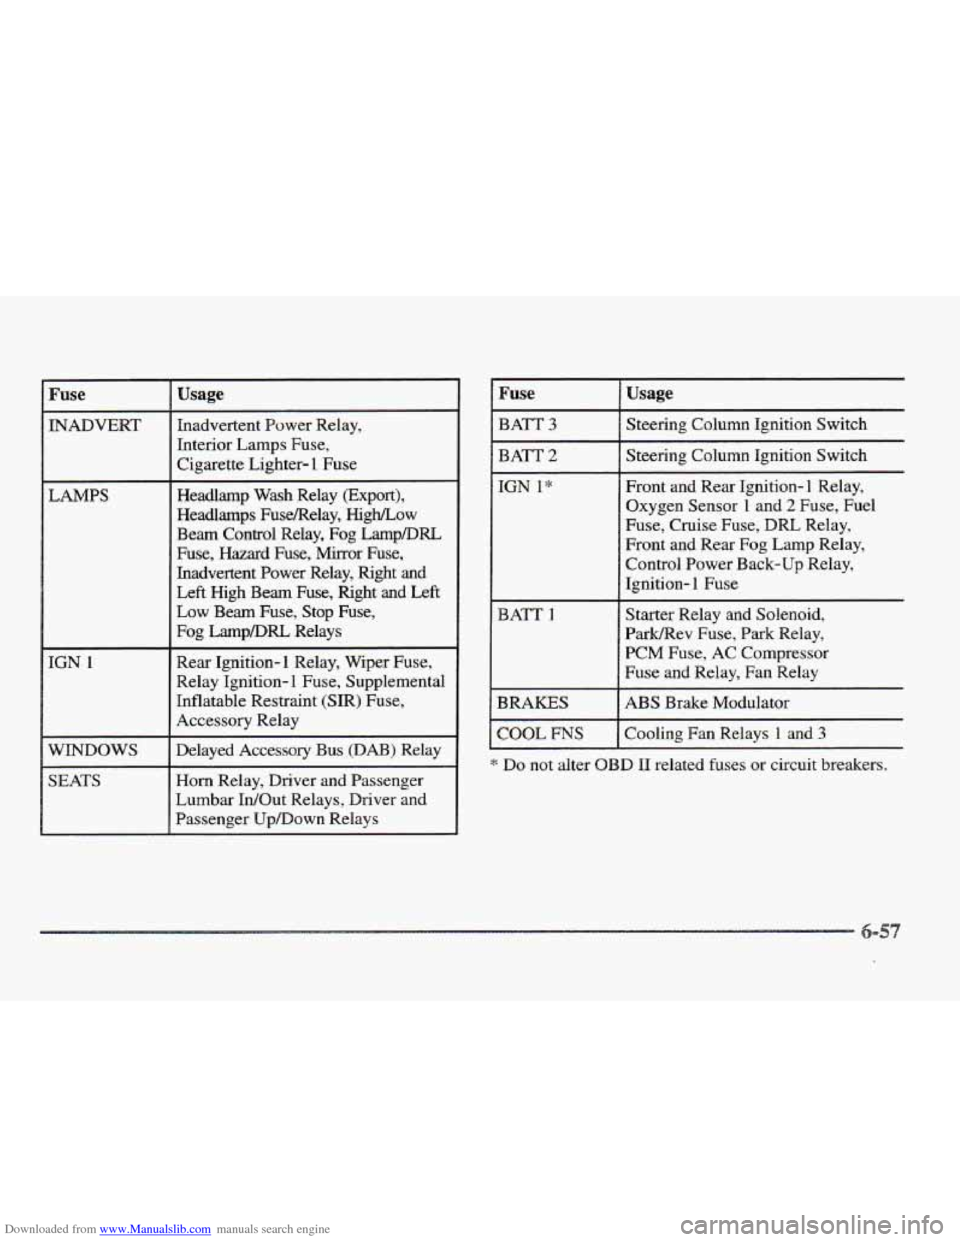
Downloaded from www.Manualslib.com manuals search engine Fuse
INADVERT
LAMPS
____~
IGN 1
WINDOWS
SEATS
Usage
Inadvertent Power Relay,
Interior Lamps
Fuse,
Cigarette Lighter- 1 Fuse
Headlamp Wash Relay (Export),
Headlamps FuseRelay,
High/Low
Beam Control Relay, Fog LampDRL
Fuse, Hazard Fuse, Mirror Fuse,
Inadvertent Power Relay, Right
and
Left High Beam Fuse, Right and Left
Low Beam Fuse, Stop Fuse,
Fog LampDRL Relays
Rear Ignition-1 Relay, Wiper Fuse,
Relay Ignition-
1 Fuse, Supplemental
Inflatable Restraint (SIR) Fuse,
Accessory Relay
Delayed Accessory Bus
(DAB) Relay
Horn Relay, Driver and Passenger
Lumbar IdOut Relays, Driver and
Passenger Up/Down Relays
I Fuse
I BATT 3
I BATT 2
I COOL ms
Usage
Steering Column Ignition Switch
Steering Column Ignition Switch
Front and Rear Ignition- 1 Relay,
Oxygen Sensor
1 and 2 Fuse, Fuel
Fuse, Cruise
Fuse, DRL Relay,
Front and
Rear Fog Lamp Relay,
Control Power Back-up Relay,
Ignition-
1 Fuse
Starter Relay and Solenoid,
Park/Rev Fuse,
Park Relay,
PCM Fuse,
AC Compressor
Fuse and Relay, Fan Relay
ABS Brake Modulator
Cooling Fan Relays
1 and 3
* Do not alter OBD I1 related fuses or circuit breakers.