1997 BUICK PARK AVENUE reset
[x] Cancel search: resetPage 150 of 420
Memory Door Locks
The memory door lock modes when shifting in and out
of PARK (P), can be changed through the DIC. You can
change these modes by different selections of the
following DIC displays:
AUTO DOOR LOCKS - OFF/ON
UNLOCK IN PARK - OFF/ON
If you choose
OFF for AUTO DOOR LOCKS your door
locks will operate normally with no automatic feature.
If you choose ON for AUTO DOOR LOCKS, and
ON
for UNLOCK IN PARK, your doors will lock every
time you shift out of PARK (P), and the doors will
unlock every time you stop and shift into PARK (P).
If you choose ON for AUTO DOOR LOCKS, and OFF
for UNLOCK IN PARK, your door locks will lock every
time you
shift out of PARK (p), and there will be no
automatic door unlock when shifting back into PARK (P).
To change modes:
1. Move the arrow on the display between ON and OFF
by pressing the ENG/MET button.
2. Once you have made your selection, press the
RESET button and your choice will be retained in
memory.
See “Memory Door Locks” in the Index for more
information about this feature.
Delayed Locking
The delayed locking feature, which delays the actual
locking of the vehicle, can be made active or inactive
through the DIC. When DELAYED LOCKING
- OFF -
ON appears on the display, use the ENGMET button to
toggle the arrow between OFF and
ON. When you have
made your choice, press the
RESET button to record
your selection.
For more information on this feature, see “Delayed
Locking” in the Index.
2-90
ProCarManuals.com
Page 151 of 420
Security Feedback
By choosing different combinations of these selections,
you can choose the type of transmitter activated
feedback when locking and unlocking your vehicle with
your transmitter. Each time you make a selection by
pressing the ENG/MET button, press the RESET button
to record your choice.
0 LOCK FEEDBACK - OFF/ON
LOCK FEEDBACK - LIGHTSLIGHTS + HORN
UNLOCK FEEDBACK - OFFLIGHTS
If you choose ON for LOCK FEEDBACK you will also
need to choose LIGHTS or LIGHTS
+ HORN.
You can select the following modes:
If you choose OFF for LOCK FEEDBACK
and
OFF for UNLOCK FEEDBACK, you will
receive no security feedback when locking or
unlocking your vehicle.
If you choose OFF for LOCK FEEDBACK and
LIGHTS for UNLOCK FEEDBACK, you will
receive no security feedback when locking your
vehicle and the exterior lamps will flash when
unlocking your vehicle.
0
e
0
0
If you choose LIGHTS for LOCK FEEDBACK and
OFF for UNLOCK FEEDBACK, your exterior
lamps will flash when locking your vehicle and you
will receive no security feedback when unlocking
your vehicle.
If you choose LIGHTS for LOCK FEEDBACK and
LIGHTS for UNLOCK FEEDBACK, your exterior
lamps will flash when locking and when unlocking
your vehicle.
If you choose LIGHTS
+ HORN for LOCK
FEEDBACK and OFF for UNLOCK FEEDBACK,
your exterior lamps will flash and the horn will chirp
when locking your vehicle and you will receive no
security feedback when unlocking your vehicle.
If you choose LIGHTS + HORN for LOCK
FEEDBACK and LIGHTS for UNLOCK
FEEDBACK, your exterior lamps will flash and
the horn will chirp when locking your vehicle and
your exterior lamps will flash when unlocking
your vehicle.
For more information on this feature, see “Security
Feedback’’ in the Index.
2-91
ProCarManuals.com
Page 152 of 420
Perimeter Lighting
When the UNLOCK button on the transmitter is
pressed, the
DRL lamps (high-beams at reduced
intensity), parking lamps and back-up lamps will turn on
if it is dark enough according to the twilight sentinel.
You can control activation of this feature by choosing
OFF or ON when the PERIMETER LIGHTS choice is
displayed on the DIC. Make your choice by pressing the
ENGMET button and record your choice by pressing
the RESET button.
Memory Seat Recall
NOTE: If you want to choose PERIMETER
LIGHTS ON, you must also choose LIGHTS for
UNLOCK FEEDBACK while making the security
feedback choices.
For more information on this feature, see “Perimeter
Lighting” in the Index. This feature recalls the position
of your seat.
You can program this feature to be active by choosing
ON when the SEAT RECALL choice appears, or
inactive by choosing
OFF when the SEAT RECALL
choice appears on the DIC. Make your choices by
pressing the ENGMET button and store them to
memory by then pressing the RESET button.
You can also program this feature to recall your memory
seat position or the exit seat position.
Memory Position: Choose ON when the SEAT
RECALL choice appears, and then choose MEMORY
when the RECALL POSITION choice appears.
Exit Position: Choose ON when the SEAT RECALL
choice appears, and then choose EXIT when the
RECALL POSITION choice appears and your seat
will move all the way down and back for easy exit.
The seat will also move when you enter the vehicle
after unlocking
it with a Remote Keyless Entry
transmitter. This will allow for easy entry as well.
For more information on this feature, see “Memory Seats” in the Index.
2-92
ProCarManuals.com
Page 162 of 420
Audio Systems
Your Delco audio system has been designed to operate
easily and give years of listening pleasure. You will get the
most enjoyment out of it if you acquaint yourself with it
first. Find out what your Delco system can do and how to
operate all its controls, to be sure you’re getting the mos\
t
out
of the advanced engineering that went into it.
Setting the Clock
Press and hold HRS until the correct hour appears. Press
and hold
MIN until the correct minute appears.
You may set the clock with the ignition
off if you
press
RECALL first and follow the same procedure
described above.
Personal Choice Radio Controls
(If Equipped)
This feature allows two different drivers to store and recall
their
own radio settings for AM and FM presets, last tuned
station, volume, tone and audio source (radio, cassette or
CD). The Personal Choice settings recalled by the audio
system
are determined by the transmitter used to enter the
vehicle. After the
UNLOCK button of a remote keyless
entry transmitter is pressed and the ignition is in
RUN, the
radio will adjust to the last settings of the identified drive\
r. The settings can also
be changed by briefly pressing one of
the MEMORY seat switches located on the diver’s door
panel. When adjustments are made, the new settings are automatically saved for the driver.
AM-FM Stereo with Cassette Tape Player
(If Equipped)
Playing the Radio
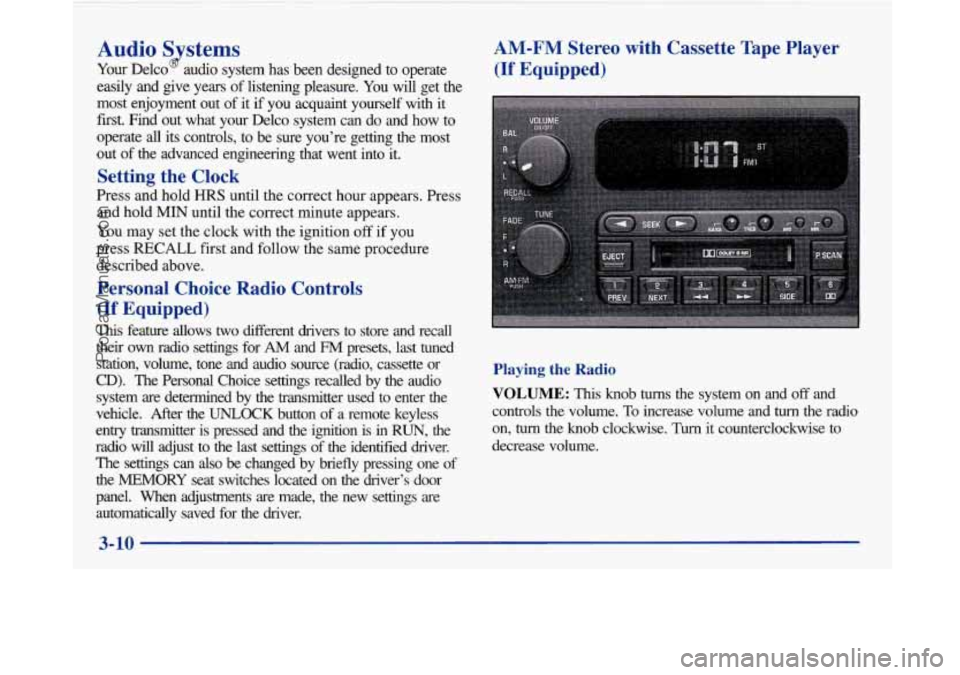
VOLUME: This knob turns the system on and off and
controls the volume.
To increase volume and turn the radio
on,
turn the knob clockwise. Turn it counterclockwise to
decrease volume.
3-10
-
ProCarManuals.com
Page 163 of 420

RECALL: Press the upper knob briefly to recall the
station being played or to display the clock. To change
what is normally shown on the display (station or time),
press the knob until you see the display you want, then
hold the knob until the display flashes. If you press the
knob when the ignition is
off, the clock will show for a
few seconds.
Finding a Station
AM-FM: Press the lower knob to switch between AM,
FMl and FM2. The display shows your selection.
TUNE: Turn the lower knob to choose radio stations.
SEEK: Press the right or left arrow to go to the next
higher or lower station and stay there. The sound will
mute while seeking.
SCAN: Press one of the SEEK arrows for two seconds,
and SCAN will appear on the display. Use SCAN to
listen to stations for a few seconds. The radio will go to
a station, stop for a few seconds, then go on to the next
station. Press one of the
SEEK arrows again to stop
scanning. The sound will mute while scanning.
PUSHBUTTONS: The six numbered pushbuttons let
you return to your favorite stations. You can set up to
18 stations (six AM, six FM1 and six FM2). Just:
1. Turn the radio on.
2. Press AM-FM to select the band.
3. Tune in the desired station.
4. Press and hold one of the six numbered buttons. The
sound will mute. When it returns, release the button.
Whenever you press that numbered button, the
station you set will return.
5. Repeat the steps for each pushbutton.
P SCAN: Press this button to listen to each of your
preset stations for a few seconds. The radio will go to
the first preset station, stop for a few seconds, then go
on to the next preset station. Press
P SCAN again to stop
scanning. The radio will not stop at a preset
if the station
is weak.
ProCarManuals.com
Page 165 of 420
If any error occurs repeatedly or if an error can’t be
corrected, please contact your dealer. If your radio
displays an error number, write it down and provide it to
your dealer when reporting the problem.
PREV (1): Press this button to search for the previous
selection on the tape. Your tape must have at least
three seconds of silence between each selection for
PREV to work. The sound will mute while seelung.
NEXT (2): Press this button to search for the next
selection on the tape. Your tape must have at least
three seconds of silence between each selection for
NEXT to work. The sound will mute while seeking.
The
SEEK left and right arrows will also find the
previous and next selections on the tape.
44 (3): Press this button to reverse the tape rapidly.
Press it again to return to playing speed. The radio will
play while the tape reverses.
bb (4): Press this button to advance quickly to another
part
of the tape. Press the button again to return to playing
speed. The radio will play while the tape advances.
SIDE (5): Press this button to change the side of the
tape that is playing.
00 (6): Press this button to reduce background noise.
The display will show either
OFF or ON for a few
seconds when you press the button.
Dolby@ Noise Reduction
is manufactured under a
license from Dolby Laboratories Licensing Corporation.
Dolby and the double-D symbol are trademarks of
Dolby Laboratories Licensing Corporation.
EJECT Press this button to remove the tape. The raalo
will play.
If you leave a cassette tape in the player while
listening to the radio, it may become warm.
CLN: If this message appears on the display, the
cassette tape player needs to be cleaned. It will still play
tapes, but you should clean it as soon as possible to
prevent damage to
the tapes and player. See “Care of
Your Cassette Tape Player” in the Index. After you clean
the player, press and hold EJECT for five seconds to
reset the CLN indicator. The radio will display
--- to
show the indicator was reset.
3-13
ProCarManuals.com
Page 167 of 420
PUSHBUTTONS: The six numbered pushbuttons let
you return to your favorite stations. You can set up to
18 stations (six AM, six FM1 and six FM2). Just:
1. Turn the radio on.
2. Press AM-FM to select the band.
3. Tune in the desired station.
4. Press TONE to select the setting you prefer.
5. Press and hold one of the six numbered buttons. The
sound will mute. When it returns, release the button.
Whenever you press that numbered button, the
station you set will return and the tone you selected
will be automatically selected for that button.
6. Repeat the steps for each pushbutton.
P SCAN: Press this button to listen to each of your
preset stations for a few seconds. The radio will go to
the first preset station, stop for a few seconds, then
go
on to the next preset station. Press P SCAN again to stop
scanning. If a preset station has weak reception, the
radio will not stop at the preset station.
AUTO SET Press this button and the system will seek
and set the
12 strongest FM or the 6 strongest AM
stations on your preset buttons (depending on which band (AM or FM)
you are listening to). AUTO SET
will flash while seeking and will remain on until this
function is complete.
To return to the stations you
manually set, press AUTO
SET again.
Setting the Tone
BASS:
Press this knob lightly so it extends. Turn the
knob to increase or decrease bass.
TREB: Press this knob lightly so it extends. Turn the
knob to increase or decrease treble. If a station is weak
or noisy, you may want to decrease the treble.
Push these knobs back into their stored positions when
you’re not using them.
TONE: This feature allows you to choose preset bass
and treble equalization settings designed for classical,
pop, rock, jazz, talk and country/western stations.
CLASS will appear on the display when you first press
TONE. Each time you press it, another setting will
appear on the display. Press it again after
C & W
appears and MANUAL will appear. Tone control will
return to the BASS and TREB knobs. Also, if you use
the BASS and TREB knobs, control will return to them
and MANUAL will appear.
3-15
ProCarManuals.com
Page 169 of 420
PREV (1): Press this button to search for the previous
selection on the tape. Your tape must have at least
three seconds of silence between each selection for
PREV to work. The sound will mute while seeking.
NEXT (2): Press this button to search for the next
selection on the tape. Your tape must have at least
three seconds
of silence between each selection for
NEXT to work. The sound will mute while seeking.
The SEEK up and down arrows will also find the
previous and next selections on the tape.
44 (3): Press this button to reverse the tape rapidly.
Press it again to return to playing speed. The radio will
play while the tape reverses.
.. (4): Press this button to advance quickly to another
part of the tape. Press the button again to return to playing
speed. The radio will play while the tape advances.
SIDE (5): Press this button to change the side of the
tape that is playing.
00 (6): Press this button to reduce background noise.
The double-D symbol will appear on the display. Dolby Noise Reduction
is manufactured under a license
from Dolby Laboratories Licensing Corporation. Dolby
and the double-D symbol are trademarks
of Dolby
Laboratories Licensing Corporation.
AM-FM: Press this button to play the radio when a tape
is in the player.
SOURCE: Press this button to change to the tape
function when the radio is on. TAPE PLAY with an
arrow will appear on the display when the tape is active.
EJECT Press this button to remove the tape. The radio
will play. If you leave a cassette tape in the player while
listening to the radio, it may become warm.
CLN: If this message appears on the display, the
cassette tape player needs to be cleaned. It will still play
tapes, but you should clean it as soon as possible to
prevent damage to the tapes and player. See “Care of
Your Cassette Tape Player’’ in the Index. After
you clean
the player, press and hold EJECT for five seconds to
reset the CLN indicator. The radio will display
--- to
show the indicator was reset.
3-17
ProCarManuals.com