Page 17 of 62
- Install pull sleeve from 3241 seal installer onto camshaft.
Pa
ge 17 of 62 Valve
gear, servicin
g
11/21/2002 htt
p://127.0.0.1:8080/audi/servlet/Dis
play?action=Goto&t
yp
e=re
pair&id=AUDI.B5.GE03.15.1
Page 18 of 62
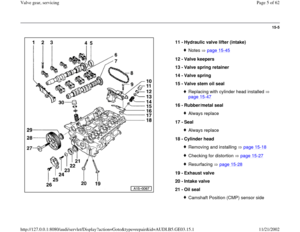
15-16
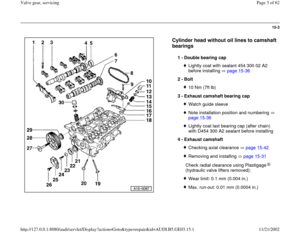
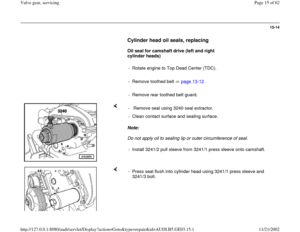
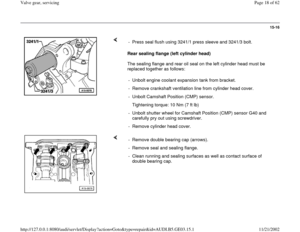
Rear sealing flange (left cylinder head)
The sealing flange and rear oil seal on the left cylinder head must be
replaced together as follows: - Press seal flush using 3241/1 press sleeve and 3241/3 bolt.
- Unbolt engine coolant expansion tank from bracket.
- Remove crankshaft ventilation line from cylinder head cover.
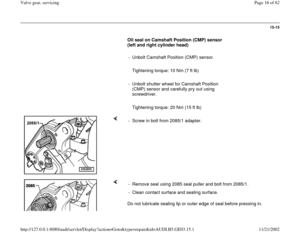
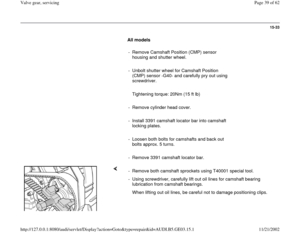
- Unbolt Camshaft Position (CMP) sensor.
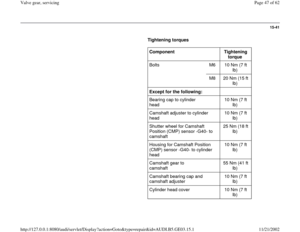
Tightening torque: 10 Nm (7 ft lb)
- Unbolt shutter wheel for Camshaft Position (CMP) sensor G40 and
carefully pry out using screwdriver.
- Remove cylinder head cover.
- Remove double bearing cap (arrows).
- Remove seal and sealing flange.
- Clean running and sealing surfaces as well as contact surface of
double bearing cap.
Pa
ge 18 of 62 Valve
gear, servicin
g
11/21/2002 htt
p://127.0.0.1:8080/audi/servlet/Dis
play?action=Goto&t
yp
e=re
pair&id=AUDI.B5.GE03.15.1
Page 19 of 62
15-17
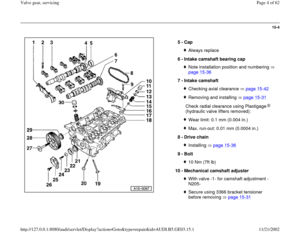
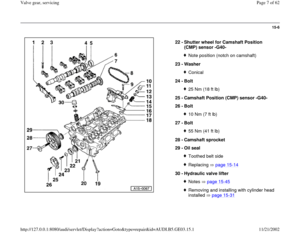
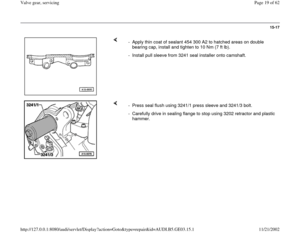
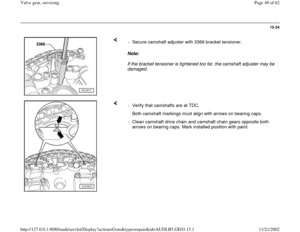
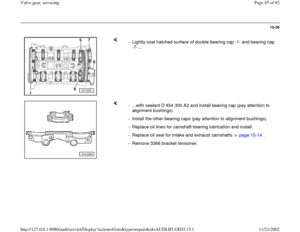
- Apply thin coat of sealant 454 300 A2 to hatched areas on double
bearing cap, install and tighten to 10 Nm (7 ft lb).
- Install pull sleeve from 3241 seal installer onto camshaft.
- Press seal flush using 3241/1 press sleeve and 3241/3 bolt.
- Carefully drive in sealing flange to stop using 3202 retractor and plastic
hammer.
Pa
ge 19 of 62 Valve
gear, servicin
g
11/21/2002 htt
p://127.0.0.1:8080/audi/servlet/Dis
play?action=Goto&t
yp
e=re
pair&id=AUDI.B5.GE03.15.1
Page 20 of 62
15-18
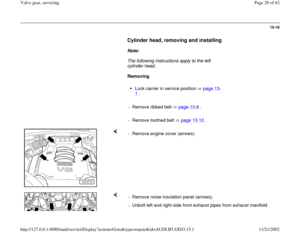
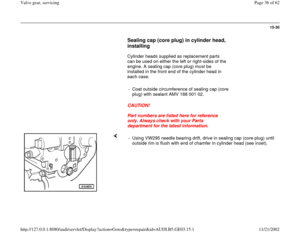
Cylinder head, removing and installing
Note:
The following instructions apply to the left
cylinder head.
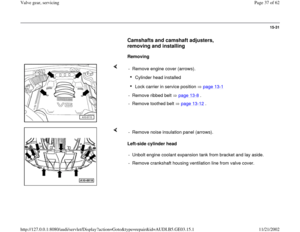
Removing
Lock carrier in service position page 13
-
1 .
- Remove ribbed belt page 13
-8 .
- Remove toothed belt page 13
-12
.
- Remove engine cover (arrows).
- Remove noise insulation panel (arrows).
- Unbolt left and right-side front exhaust pipes from exhaust manifold.
Pa
ge 20 of 62 Valve
gear, servicin
g
11/21/2002 htt
p://127.0.0.1:8080/audi/servlet/Dis
play?action=Goto&t
yp
e=re
pair&id=AUDI.B5.GE03.15.1
Page 21 of 62
- Unbolt exhaust system from transmission bracket.
Pa
ge 21 of 62 Valve
gear, servicin
g
11/21/2002 htt
p://127.0.0.1:8080/audi/servlet/Dis
play?action=Goto&t
yp
e=re
pair&id=AUDI.B5.GE03.15.1
Page 22 of 62

15-19
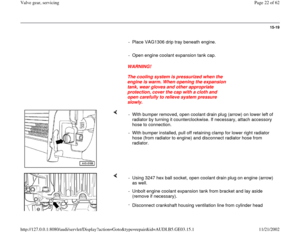
- Place VAG1306 drip tray beneath engine.
- Open engine coolant expansion tank cap.
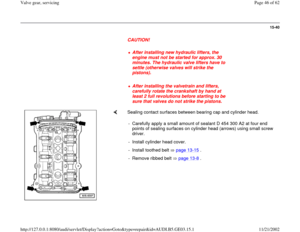
WARNING!
The cooling system is pressurized when the
engine is warm. When opening the expansion
tank, wear gloves and other appropriate
protection, cover the cap with a cloth and
open carefully to relieve system pressure
slowly.
- With bumper removed, open coolant drain plug (arrow) on lower left of
radiator by turning it counterclockwise. If necessary, attach accessory
hose to connection.
- With bumper installed, pull off retaining clamp for lower right radiator
hose (from radiator to engine) and disconnect radiator hose from
radiator.
- Using 3247 hex ball socket, open coolant drain plug on engine (arrow)
as well.
- Unbolt engine coolant expansion tank from bracket and lay aside
(remove if necessary).
-
Disconnect crankshaft housing ventilation line from cylinder head
Pa
ge 22 of 62 Valve
gear, servicin
g
11/21/2002 htt
p://127.0.0.1:8080/audi/servlet/Dis
play?action=Goto&t
yp
e=re
pair&id=AUDI.B5.GE03.15.1
Page 23 of 62
cover.
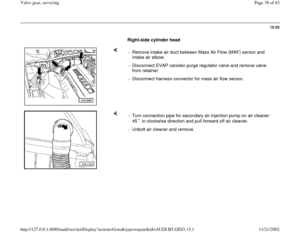
- Remove intake air duct between Mass Air Flow (MAF) sensor and
intake air elbow.
Pa
ge 23 of 62 Valve
gear, servicin
g
11/21/2002 htt
p://127.0.0.1:8080/audi/servlet/Dis
play?action=Goto&t
yp
e=re
pair&id=AUDI.B5.GE03.15.1
Page 24 of 62

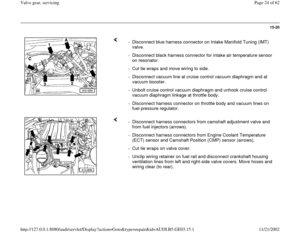
valve.
- Disconnect black harness connector for intake air temperature sensor
on resonator.
- Cut tie wraps and")
15-20
- Disconnect blue harness connector on Intake Manifold Tuning (IMT)
valve.
- Disconnect black harness connector for intake air temperature sensor
on resonator.
- Cut tie wraps and move wiring to side.
- Disconnect vacuum line at cruise control vacuum diaphragm and at
vacuum booster.
- Unbolt cruise control vacuum diaphragm and unhook cruise control
vacuum diaphragm linkage at throttle body.
- Disconnect harness connector on throttle body and vacuum lines on
fuel pressure regulator.
- Disconnect harness connectors from camshaft adjustment valve and
from fuel injectors (arrows).
- Disconnect harness connectors from Engine Coolant Temperature
(ECT) sensor and Camshaft Position (CMP) sensor (arrows).
- Cut tie wraps on valve cover.
- Unclip wiring retainer on fuel rail and disconnect crankshaft housing
ventilation lines from left and right-side valve covers. Move hoses and
wiring clear (to rear).
Pa
ge 24 of 62 Valve
gear, servicin
g
11/21/2002 htt
p://127.0.0.1:8080/audi/servlet/Dis
play?action=Goto&t
yp
e=re
pair&id=AUDI.B5.GE03.15.1


The sealing flange and rear oil seal on the left cylinder head must be
replaced together as follows: - Press seal flush using 3241/1 press sl")
.
- Install pull sleeve from 3241 seal installer onto camshaft.")


 sensor and
intake air elbow.
Pa
ge 23 of 62 Valve
gear, servicin
g
11/21/2002 htt
p://127.0.0.1:8080/audi/servlet/Dis
play?action=Goto&")