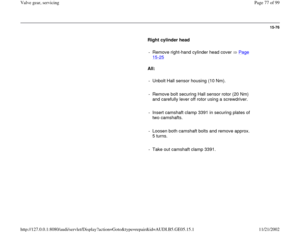
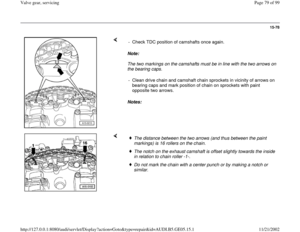
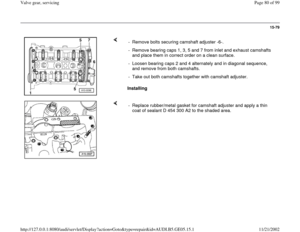
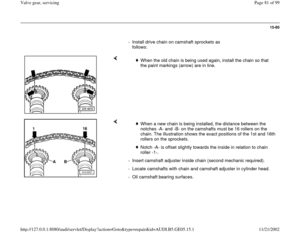
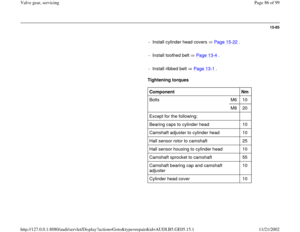
Page 89 of 99
15-88
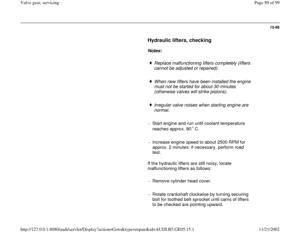
Hydraulic lifters, checking
Notes:
Replace malfunctioning lifters completely (lifters
cannot be adjusted or repaired).
When new lifters have been installed the engine
must not be started for about 30 minutes
(otherwise valves will strike pistons).
Irregular valve noises when starting engine are
normal.
- Start engine and run until coolant temperature
reaches approx. 80 C.
- Increase engine speed to about 2500 RPM for
approx. 2 minutes: if necessary, perform road
test.
If the hydraulic lifters are still noisy, locate
malfunctioning lifters as follows:
- Remove cylinder head cover.
- Rotate crankshaft clockwise by turning securing
bolt for toothed belt sprocket until cams of lifters
to be checked are pointing upward.
Pa
ge 89 of 99 Valve
gear, servicin
g
11/21/2002 htt
p://127.0.0.1:8080/audi/servlet/Dis
play?action=Goto&t
yp
e=re
pair&id=AUDI.B5.GE05.15.1
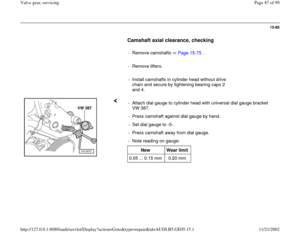
Page 90 of 99
15-89
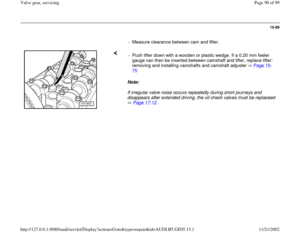
- Measure clearance between cam and lifter.
Note:
If irregular valve noise occurs repeatedly during short journeys and
disappears after extended driving, the oil check valves must be replaceed
Page 17
-12
. - Push lifter down with a wooden or plastic wedge. If a 0.20 mm feeler
gauge can then be inserted between camshaft and lifter, replace lifter:
removing and installing camshafts and camshaft adjuster Page 15
-
75
Pa
ge 90 of 99 Valve
gear, servicin
g
11/21/2002 htt
p://127.0.0.1:8080/audi/servlet/Dis
play?action=Goto&t
yp
e=re
pair&id=AUDI.B5.GE05.15.1
Page 91 of 99
15-90
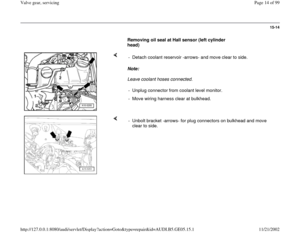
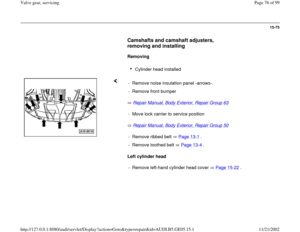
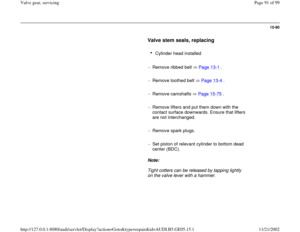
Valve stem seals, replacing
Cylinder head installed
- Remove ribbed belt Page 13
-1 .
- Remove toothed belt Page 13
-4 .
- Remove camshafts Page 15
-75
.
- Remove lifters and put them down with the
contact surface downwards. Ensure that lifters
are not interchanged.
- Remove spark plugs.
- Set piston of relevant cylinder to bottom dead
center (BDC).
Note:
Tight cotters can be released by tapping lightly
on the valve lever with a hammer.
Pa
ge 91 of 99 Valve
gear, servicin
g
11/21/2002 htt
p://127.0.0.1:8080/audi/servlet/Dis
play?action=Goto&t
yp
e=re
pair&id=AUDI.B5.GE05.15.1
Page 92 of 99
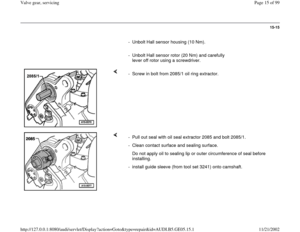
15-91
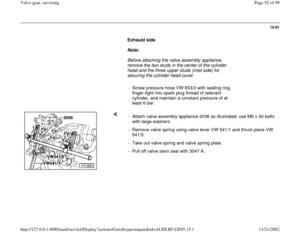
Exhaust side
Note:
Before attaching the valve assembly appliance,
remove the two studs in the center of the cylinder
head and the three upper studs (inlet side) for
securing the cylinder head cover.
- Screw pressure hose VW 653/3 with sealing ring
finger-tight into spark plug thread of relevant
cylinder, and maintain a constant pressure of at
least 6 bar.
- Attach valve assembly appliance 2036 as illustrated: use M6 x 40 bolts
with large washers.
- Remove valve spring using valve lever VW 541/1 and thrust piece VW
541/5.
- Take out valve spring and valve spring plate.
- Pull off valve stem seal with 3047 A.
Pa
ge 92 of 99 Valve
gear, servicin
g
11/21/2002 htt
p://127.0.0.1:8080/audi/servlet/Dis
play?action=Goto&t
yp
e=re
pair&id=AUDI.B5.GE05.15.1
Page 93 of 99
15-92
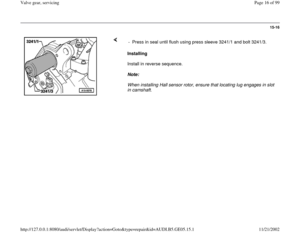
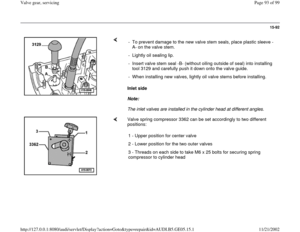
Inlet side
Note:
The inlet valves are installed in the cylinder head at different angles. - To prevent damage to the new valve stem seals, place plastic sleeve -
A- on the valve stem.
- Lightly oil sealing lip.
- Insert valve stem seal -B- (without oiling outside of seal) into installing
tool 3129 and carefully push it down onto the valve guide.
- When installing new valves, lightly oil valve stems before installing.
Valve spring compressor 3362 can be set accordingly to two different
positions:
1 - Upper position for center valve
2 - Lower position for the two outer valves
3 - Threads on each side to take M6 x 25 bolts for securing spring
compressor to cylinder head
Pa
ge 93 of 99 Valve
gear, servicin
g
11/21/2002 htt
p://127.0.0.1:8080/audi/servlet/Dis
play?action=Goto&t
yp
e=re
pair&id=AUDI.B5.GE05.15.1
Page 94 of 99
15-93
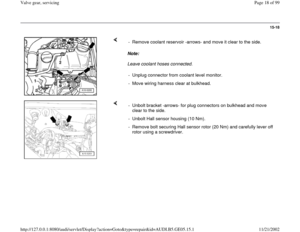
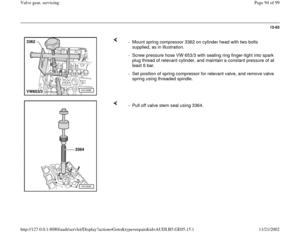
- Mount spring compressor 3362 on cylinder head with two bolts
supplied, as in illustration.
- Screw pressure hose VW 653/3 with sealing ring finger-tight into spark
plug thread of relevant cylinder, and maintain a constant pressure of at
least 6 bar.
- Set position of spring compressor for relevant valve, and remove valve
spring using threaded spindle.
- Pull off valve stem seal using 3364.
Pa
ge 94 of 99 Valve
gear, servicin
g
11/21/2002 htt
p://127.0.0.1:8080/audi/servlet/Dis
play?action=Goto&t
yp
e=re
pair&id=AUDI.B5.GE05.15.1
Page 95 of 99
15-94
Reworking valves
Valves must not be reworked. Only grinding-in (lapping) is permitted.
WARNING!
Note precautions required when disposing of sodium-cooled
exhaust valves Page 15
-87
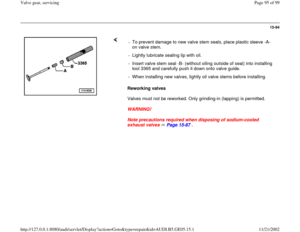
. - To prevent damage to new valve stem seals, place plastic sleeve -A-
on valve stem.
- Lightly lubricate sealing lip with oil.
- Insert valve stem seal -B- (without oiling outside of seal) into installing
tool 3365 and carefully push it down onto valve guide.
- When installing new valves, lightly oil valve stems before installing.
Pa
ge 95 of 99 Valve
gear, servicin
g
11/21/2002 htt
p://127.0.0.1:8080/audi/servlet/Dis
play?action=Goto&t
yp
e=re
pair&id=AUDI.B5.GE05.15.1
Page 96 of 99
15-95
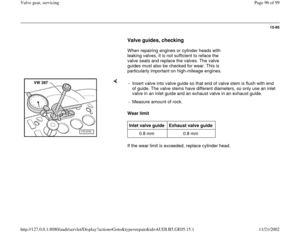
Valve guides, checking
When repairing engines or cylinder heads with
leaking valves, it is not sufficient to reface the
valve seats and replace the valves. The valve
guides must also be checked for wear. This is
particularly important on high-mileage engines.
Wear limit
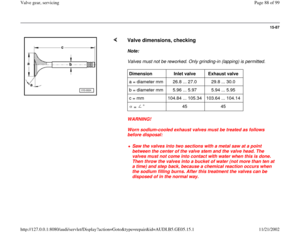
If the wear limit is exceeded, replace cylinder head. - Insert valve into valve guide so that end of valve stem is flush with end
of guide. The valve stems have different diameters, so only use an inlet
valve in an inlet guide and an exhaust valve in an exhaust guide.
- Measure amount of rock. Inlet valve guide
Exhaust valve guide
0.8 mm 0.8 mm
Pa
ge 96 of 99 Valve
gear, servicin
g
11/21/2002 htt
p://127.0.0.1:8080/audi/servlet/Dis
play?action=Goto&t
yp
e=re
pair&id=AUDI.B5.GE05.15.1


.
When new lifters have been installed the engi")


 for
secu")


 is permitted.
WARNING!
Note precautions required when disposing of sodium-cooled
exhaust valves Page 15
-8")
