Page 291 of 1503
P/S ADJUSTMENT GUIDE
07973-6920001
11. Insert the steering rack into the cylinder housing,
being careful not to damage the steering rack
sliding surface.
13. If the pinion dust seal was removed, drive in the
new dust seal until it bottoms on the step on the pi-
nion set screw.
14. Grease the sealing lip of the pinion dust seal.
• Press the new lower bearing into the gearbox
housing until it seats using a press and special
tool.
NOTE:
• Install the lower bearing with the wider side of
the outer race toward the bottom of the
gearbox.
• Hold the outer race with the tool securely.
• Do not allow dust and other foreign materials to
enter the lower bearing.
12. Install the steering pinion into the gearbox.
NOTE: Do not engage the steering pinion with the
steering rack this time.ProCarManuals.com
Page 1101 of 1503
Seats
Seat Cover Replacement (cont'd)
7. Detach the hooks, then remove the seat-back
cushion.
HOOKS
8. Detach the clips, then remove the seat cover.
Clip locations
SEAT COVER
9. Installation is the reverse of the removal procedure.
NOTE:
• To prevent wrinkles when installing the seat
cover, make sure the material is stretched even-
ly over the frame before securing all the hooks
and clips.
• If necessary, replace any damaged clips.
• Before installing the seat cushion, scrape the old
adhesive smoothly from the seat cushion frame.
Clean the bonding surface with a sponge
dampened in alcohol.
Apply an adhesive to the shadowed area as
shown.
Forward
SEAT CUSHION
FRAME
SEAT-BACK
CUSHION
ADHESIVE AREAProCarManuals.com
Page 1422 of 1503
Power Seats
Seat Switch Test
CAUTION: Be careful not to damage the seats, the
interior trim or the body.
1. Remove the two screws, then remove the power
seat switch from the power seat.
2. Disconnect the 5P connectors from each power seat
switch.
3. Check for continuity between the terminals, in each
switch position, according to the table.
RECLINE
SWITCH
SLIDE
SWITCH
SLIDE
RECLINE
Position
Terminal
FORWARD
NEUTRAL
BACKWARD
FORWARD
NEUTRAL
BACKWARDProCarManuals.com
Page 1423 of 1503

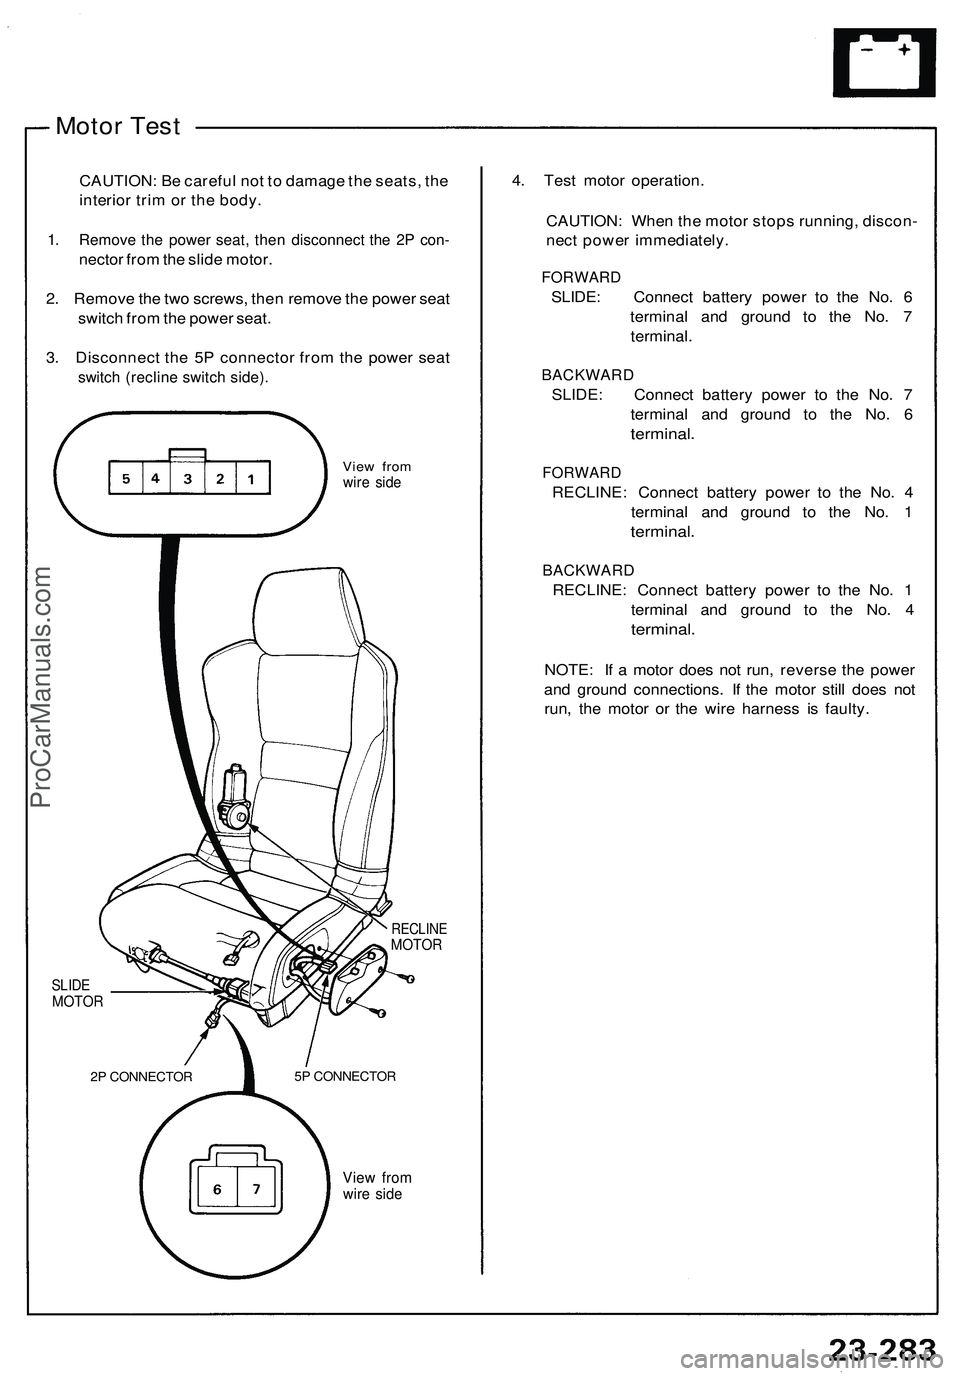
Motor Test
CAUTION: Be careful not to damage the seats, the
interior trim or the body.
1. Remove the power seat, then disconnect the 2P con-
nector from the slide motor.
2. Remove the two screws, then remove the power seat
switch from the power seat.
3. Disconnect the 5P connector from the power seat
switch (recline switch side).
View from
wire side
RECLINE
MOTOR
SLIDE
MOTOR
View from
wire side
4. Test motor operation.
CAUTION: When the motor stops running, discon-
nect power immediately.
FORWARD
SLIDE: Connect battery power to the No. 6
terminal and ground to the No. 7
terminal.
BACKWARD
SLIDE: Connect battery power to the No. 7
terminal and ground to the No. 6
terminal.
FORWARD
RECLINE: Connect battery power to the No. 4
terminal and ground to the No. 1
terminal.
BACKWARD
RECLINE: Connect battery power to the No. 1
terminal and ground to the No. 4
terminal.
NOTE: If a motor does not run, reverse the power
and ground connections. If the motor still does not
run, the motor or the wire harness is faulty.
2P CONNECTOR
5P CONNECTORProCarManuals.com