Page 63 of 1202
PP190-02
PP-16
- PREPARATIONCOOLING
1996 TERCEL (RM440U)
EQUIPMENT
Radiator cap tester
Torque wrench
Page 143 of 1202
SS0N9-04
- SERVICE SPECIFICATIONSCOOLING
SS-13
143 Author�: Date�:
1996 TERCEL (RM440U)
COOLING
SERVICE DATA
ThermostatValve opening temperature
Valve lift at 95°C (203°F)80 - 84°C (176 - 183°F)
8 mm (0.31 in.) or more
Radiator capRelief valve opening pressure STD
Minimum74 - 103 kPa (0.75 - 1.05 kgf/cm2, 10.7 - 14.9 psi)
59 kPa (0.6 kgf/cm2, 8.5 psi)
No. 1 electric
cooling fanRotating amperage M/T
A/T5.7 - 7.7 A
8.6 - 11.6 A
No. 2 electric
cooling fanRotating amperage6.4 - 7.4 A
Page 447 of 1202
P20496
P20406
- ENGINE MECHANICALCYLINDER HEAD
EM-25
1996 TERCEL (RM440U)
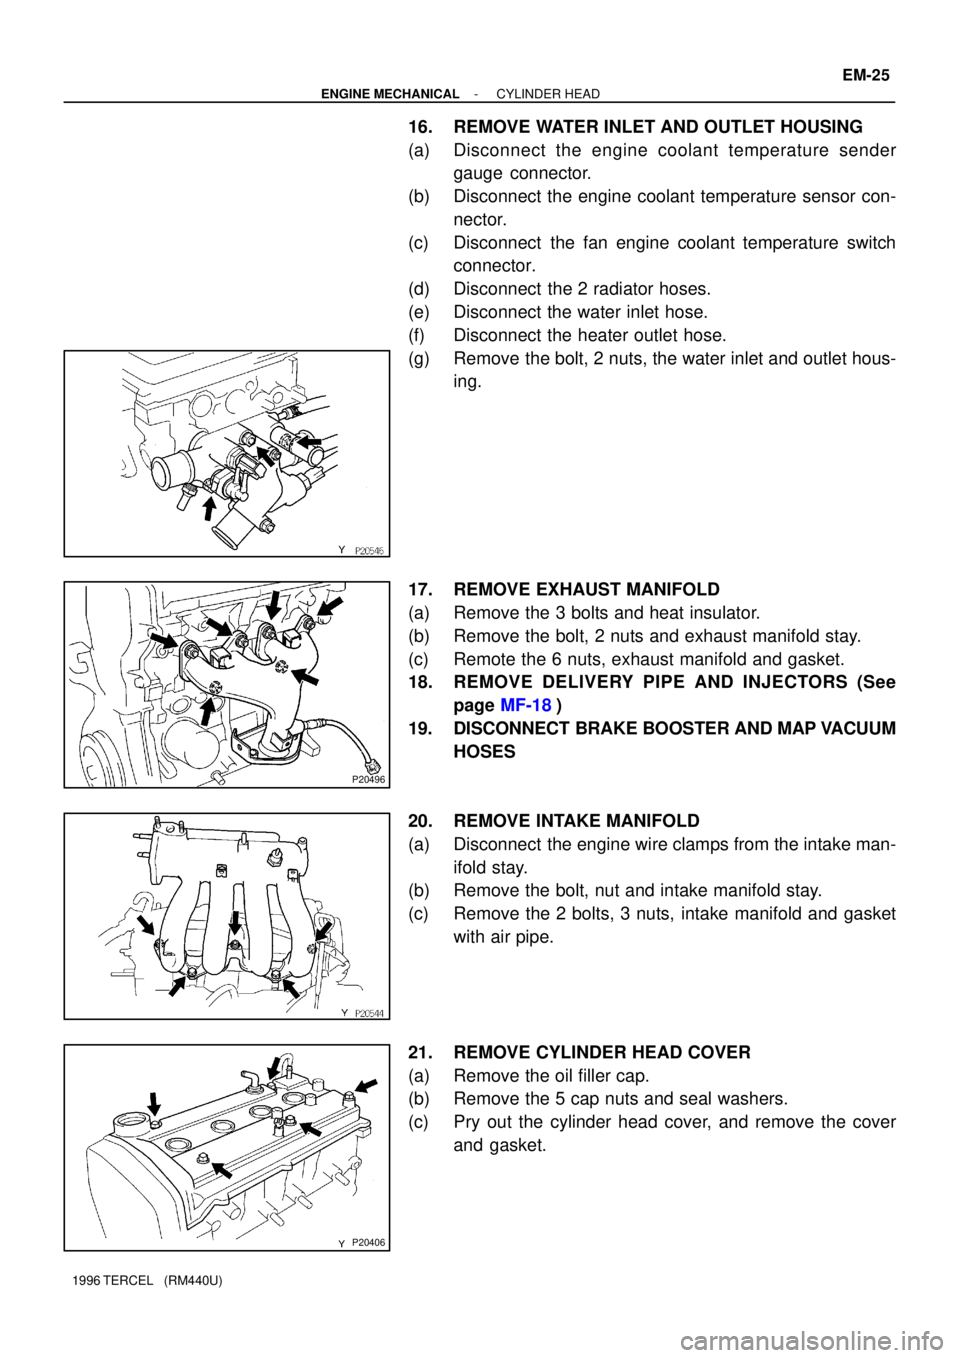
16. REMOVE WATER INLET AND OUTLET HOUSING
(a) Disconnect the engine coolant temperature sender
gauge connector.
(b) Disconnect the engine coolant temperature sensor con-
nector.
(c) Disconnect the fan engine coolant temperature switch
connector.
(d) Disconnect the 2 radiator hoses.
(e) Disconnect the water inlet hose.
(f) Disconnect the heater outlet hose.
(g) Remove the bolt, 2 nuts, the water inlet and outlet hous-
ing.
17. REMOVE EXHAUST MANIFOLD
(a) Remove the 3 bolts and heat insulator.
(b) Remove the bolt, 2 nuts and exhaust manifold stay.
(c) Remote the 6 nuts, exhaust manifold and gasket.
18. REMOVE DELIVERY PIPE AND INJECTORS (See
page MF-18)
19. DISCONNECT BRAKE BOOSTER AND MAP VACUUM
HOSES
20. REMOVE INTAKE MANIFOLD
(a) Disconnect the engine wire clamps from the intake man-
ifold stay.
(b) Remove the bolt, nut and intake manifold stay.
(c) Remove the 2 bolts, 3 nuts, intake manifold and gasket
with air pipe.
21. REMOVE CYLINDER HEAD COVER
(a) Remove the oil filler cap.
(b) Remove the 5 cap nuts and seal washers.
(c) Pry out the cylinder head cover, and remove the cover
and gasket.
Page 474 of 1202

EM-52
- ENGINE MECHANICALCYLINDER HEAD
1996 TERCEL (RM440U)
HINT:
Avoid applying an excess amount to the surface. Be especially
careful near oil passages.
�Parts must be assembled within 15 minutes of ap-
plication. Otherwise, the material must be removed
and reapplied.
�Immediately remove nozzle from tube and reinstall
cap.
�Do not pour in any coolant until at least 2 hours after
installation is completed.
(c) Install the water outlet housing with the bolt and 2 nuts.
Torque: 17.5 N´m (175 kgf´cm, 13 ft´lbf)
(d) Connect the 2 radiator hoses.
(e) Connect the water inlet hose.
(f) Connect the heater outlet hose.
(g) Connect the engine coolant temperature sensor connec-
tor.
(h) Connect the engine coolant temperature sender gauge
connector.
(i) Connect the fan engine coolant temperature switch con-
nector.
20. INSTALL CAMSHAFT POSITION SENSOR AND EGR
VSV
(a) Install a new O-ring to the position sensor.
(b) Install the position sensor with the bolt.
Torque: 8.0 N´m (80 kgf´cm, 69 in.´lbf)
(c) Install the EGR VSV with the bolt.
Torque: 17.5 N´m (175 kgf´cm, 13 in.´lbf)
(d) Connect the position sensor and EGR VSV connectors.
21. INSTALL EGR VALVE AND VACUUM MODULATOR
(a) Install a new gasket and the EGR valve with the 2 nuts.
Torque: 30 N´m (300 kgf´cm, 22 in.´lbf)
(b) Install the EGR vacuum modulator and bracket with the
bolt.
Page 582 of 1202
CO0HQ-03
- COOLINGCOOLANT
CO-1
581 Author�: Date�:
1996 TERCEL (RM440U)
COOLANT
INSPECTION
1. CHECK ENGINE COOLANT LEVEL AT RADIATOR RESERVOIR
The engine coolant level should be between the ºLOWº and ºFULLº lines.
If low, check for leaks and add engine coolant up to the ºFULLº line, ºwhen the engine is cold.º
2. CHECK ENGINE COOLANT QUALITY
(a) Remove the radiator cap.
CAUTION:
To avoid the danger of being burned, do not remove the radiator cap while the engine and radiator
are still hot, as fluid and steam can be blown out under pressure.
(b) There should not be any excessive deposits of rust or scale around the radiator cap or radiator filler
hole, and the coolant should be free from oil.
If excessively dirty, replace the coolant.
(c) Reinstall the radiator cap.
Page 583 of 1202

CO0HR-04
P20196
Drain Plug
Drain Plug
CO-2
- COOLINGCOOLANT
1996 TERCEL (RM440U)
REPLACEMENT
1. DRAIN ENGINE COOLANT
(a) Remove the radiator cap.
CAUTION:
To avoid the danger of being burned, do not remove the ra-
diator cap while the engine and radiator are still hot, as fluid
and steam can be blown out under pressure.
(b) Loosen the radiator drain plug (on the right side of the ra-
diator lower tank) and engine drain plug (on the left front
of the cylinder block), and drain the coolant.
(c) Close the drain plugs.
Torque: 25 N´m (250 kgf´cm, 18 ft´lbf)
2. FILL ENGINE COOLANT
(a) Slowly fill the system with coolant.
�Use a good brand of ethylene-glycol base coolant
and mix it according to the manufacturer's direc-
tions.
�Using coolant which includes more than 50 % ethyl-
ene-glycol (but not more than 70 %) is recom-
mended.
NOTICE:
�Do not use an alcohol type coolant.
�The coolant should be mixed with demineralized wa-
ter or distilled water.
Capacity (w/ Heater):
M/T4.9 liters (5.2 US qts, 4.3 lmp. qts)
A/T5.3 liters (5.6 US qts, 4.7 lmp. qts)
(b) Install the radiator cap.
(c) Start the engine, and bleed the cooling system.
(d) Refill the radiator reservoir with coolant until it reaches the
ºFULLº line.
3. CHECK ENGINE COOLANT FOR LEAKS
Page 594 of 1202

CO18A-01
CO1242
Radiator Cap Tester
Radiator Cap
30° or More
- COOLINGRADIATOR
CO-13
1996 TERCEL (RM440U)
ON-VEHICLE INSPECTION
1. REMOVE RADIATOR CAP
CAUTION:
To avoid the danger of being burned, do not remove the ra-
diator cap while the engine and radiator are still hot, as fluid
and steam can be blown out under pressure.
2. INSPECT RADIATOR CAP
NOTICE:
�If the radiator cap has contaminations, always rinse
it with water.
�Before using a radiator cap tester, wet the relief valve
and pressure valve with engine coolant or water.
�When performing steps (a) and (b) below, keep the
tester at an angle of over 30° above the horizontal.
(a) Using a radiator cap tester, slowly pump the tester and
check that air is coming from the vacuum valve.
Pump speed: 1 push/3 seconds or more
NOTICE:
Push the pump at a constant speed.
If air is not coming from the vacuum valve, replace the radiator
cap.
(b) Pump the tester and measure the relief valve opening
pressure.
Pump speed: 1 push within 1 second
NOTICE:
This pump speed is for the first pump only (in order to close
the vacuum valve). After this, the pump speed can be re-
duced.
Standard opening pressure:
74 - 103 kPa (0.75 - 1.05 kgf/cm
2, 10.7 - 14.9 psi)
HINT:
Use the tester's maximum reading as the opening pressure.
If the opening pressure is less than minimum, replace the radia-
tor cap.
3. INSPECT COOLING SYSTEM FOR LEAKS
(a) Fill the radiator with coolant and attach a radiator cap tes-
ter.
(b) Warm up the engine.
(c) Pump it to 118 kPa (1.2 kgf/cm
2, 17.1 psi), and check that
the pressure does not drop.
If the pressure drops, check the hoses, radiator or water pump
for leaks. If no external leaks are found, check the heater core,
cylinder block and head.
4. REINSTALL RADIATOR CAP
Page 597 of 1202
CO0Y2-02
(b)
(a)
P20609
(c)(d)
P20754
Plug
(e)
P20755
A/T
(A)
P20610
Radiator Lower Hose
Radiator Lower Support CO-16
- COOLINGRADIATOR
1996 TERCEL (RM440U)
REMOVAL
1. REMOVE ENGINE UNDER COVERS
2. DRAIN ENGINE COOLANT
3. REMOVE RADIATOR RESERVOIR TANK ASSEMBLY
4. REMOVE RADIATOR ASSEMBLY
(a) Disconnect the No.1 cooling fan connector.
(b) w/ A/C:
Disconnect the No.2 cooling fan connector.
(c) Disconnect the radiator upper hose from the radiator.
(d) Disconnect the radiator lower hose from the water inlet.
(e) Disconnect the 2 A/T oil cooler hoses from the radiator.
HINT:
Plug the hose to prevent oil from escaping.
(f) Remove the 2 bolts and 2 upper radiator supports.
Torque: 12 N´m (120 kgf´cm, 9 ft´lbf)
HINT:
(A/T only):
After installation, check that the rubber cushion (A) of the sup-
port is not depressed.
(g) Remove the radiator assembly.
(h) Remove the 2 radiator lower supports and the lower ra-
diator hose.