Page 466 of 1202

P20389
Gasket
EM1OG-01
P20419
EX
(A)
Bi-Hexagon Wrench
(B)IN
(B)
(A)(B)
(B)(B)
(B)
8
61 3
9
10 4 257
(A) (A) (A)(A) IN
EX
P20413
Painted Mark
90°
P20174
(b)(c)
(d)(e)
EM-44
- ENGINE MECHANICALCYLINDER HEAD
1996 TERCEL (RM440U)
INSTALLATION
1. PLACE CYLINDER HEAD ON CYLINDER BLOCK
(a) Place a new cylinder head gasket in position on the cylin-
der block.
NOTICE:
Be careful of the installation direction.
(b) Place the cylinder head in position on the cylinder head
gasket.
2. INSTALL CYLINDER HEAD BOLTS
HINT:
�The cylinder head bolts are tightened in 2 progressive
steps (steps (b) and (d)).
�If any cylinder head bolt is broken or deformed, replace
it.
�There are 2 lengths of cylinder head bolts, long (A) and
short (B).
(a) Apply a light coat of engine oil on the threads and under
the heads of the cylinder head bolts.
(b) First, using a bi-hexagon wrench 8 mm, install and uni-
formly tighten the 10 cylinder head bolts, in several
passes, in the sequence shown.
Torque: 45 N´m (450 kgf´cm, 33 ft´lbf)
If any one of the cylinder head bolts does not meet the torque
specification, replace the cylinder head bolt.
(c) Mark the front of the cylinder head bolt head with paint.
(d) Retighten the cylinder head bolts 90° in the numerical or-
der shown.
(e) Check that the painted mark is now at a 90° angle to front.
3. ASSEMBLE INTAKE CAMSHAFT
(a) Mount the hexagonal wrench head portion of the cam-
shaft in a vise.
NOTICE:
Be careful not to damage the camshaft.
(b) Install the camshaft gear spring.
(c) Install the camshaft sub-gear.
(d) Install the wave washer.
HINT:
Align the pins on the gears with the gear spring ends.
Page 469 of 1202
P20411
P20365
8
613
4
2 57
9
10
EM0050
MP Grease
P20407
P20247
Seal Packing
- ENGINE MECHANICALCYLINDER HEAD
EM-47
1996 TERCEL (RM440U)
(n) Place the No.2 bearing cap in its proper location. When
doing this, check that there is no gap between the cylinder
head and the contact surface of bearing cap.
(o) Temporarily tighten the bearing cap bolts, alternately
tightening the left and right bolts uniformly.
(p) Install the camshaft housing plug.
(q) Install and uniformly tighten the 10 bearing cap bolts, in
several passes, in the sequence shown.
Torque: 13 N´m (13 kgf´cm, 9 ft´lbf)
(r) Apply MP grease to a new camshaft oil seal lip.
(s) Install the oil seal as far as the deepest part of the cylinder
head.
(t) Clean the installed surfaces of the No.1 bearing cap and
cylinder head with cleaner.
(u) Apply seal packing to the No.1 bearing cap as shown.
Seal packing:
Part No. 08826-00080 or equivalent
Page 470 of 1202

P20410
P20366
8
6
13 4
2
57
9 10
P20369
Timing Mark
EXIN
Other Timing Mark
P20557
P20363
EM-48
- ENGINE MECHANICALCYLINDER HEAD
1996 TERCEL (RM440U)
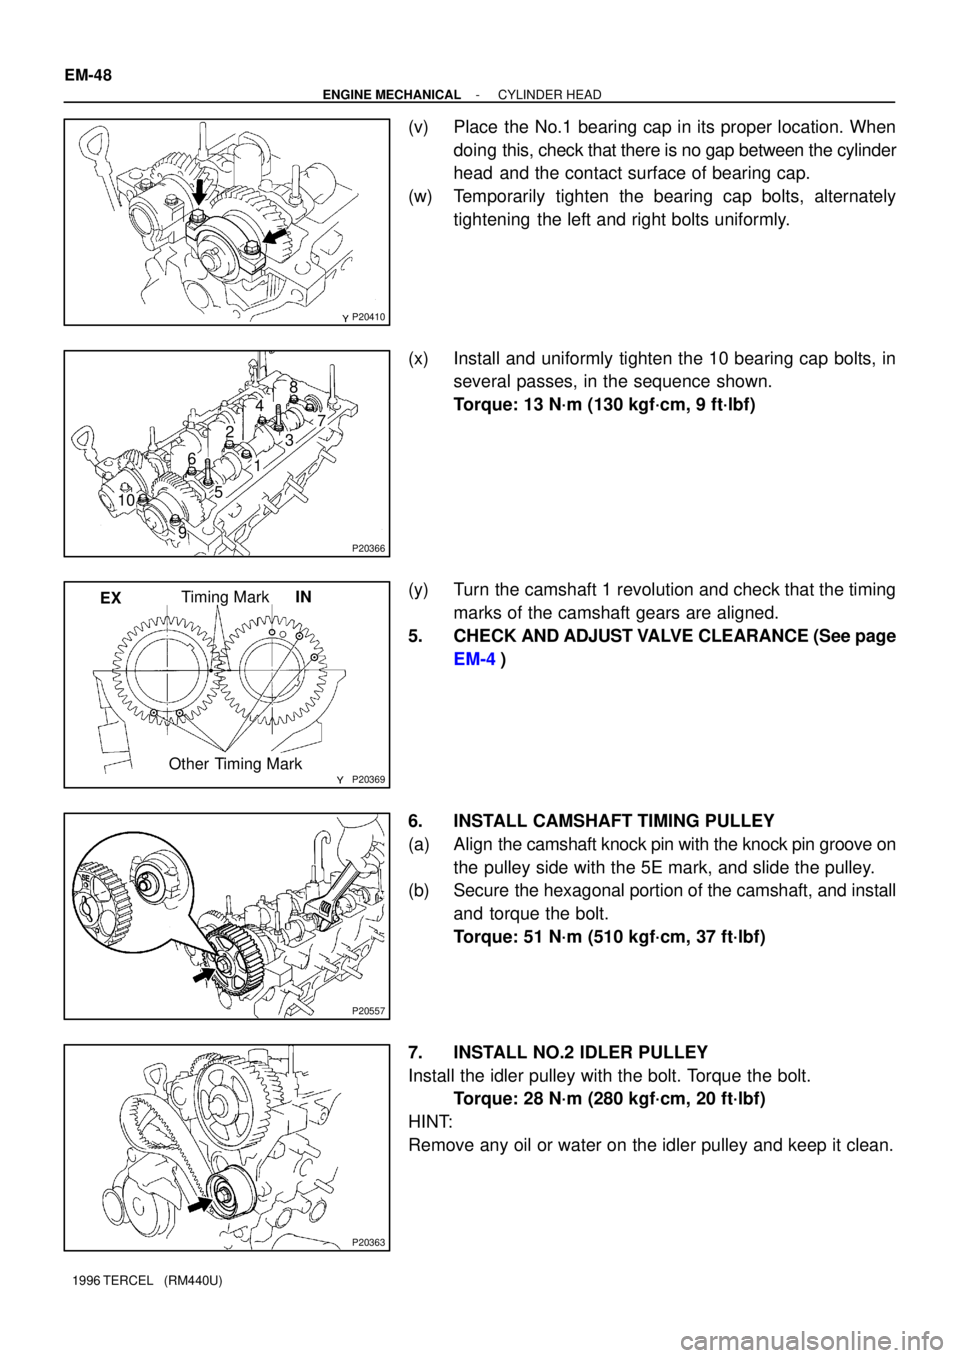
(v) Place the No.1 bearing cap in its proper location. When
doing this, check that there is no gap between the cylinder
head and the contact surface of bearing cap.
(w) Temporarily tighten the bearing cap bolts, alternately
tightening the left and right bolts uniformly.
(x) Install and uniformly tighten the 10 bearing cap bolts, in
several passes, in the sequence shown.
Torque: 13 N´m (130 kgf´cm, 9 ft´lbf)
(y) Turn the camshaft 1 revolution and check that the timing
marks of the camshaft gears are aligned.
5. CHECK AND ADJUST VALVE CLEARANCE (See page
EM-4)
6. INSTALL CAMSHAFT TIMING PULLEY
(a) Align the camshaft knock pin with the knock pin groove on
the pulley side with the 5E mark, and slide the pulley.
(b) Secure the hexagonal portion of the camshaft, and install
and torque the bolt.
Torque: 51 N´m (510 kgf´cm, 37 ft´lbf)
7. INSTALL NO.2 IDLER PULLEY
Install the idler pulley with the bolt. Torque the bolt.
Torque: 28 N´m (280 kgf´cm, 20 ft´lbf)
HINT:
Remove any oil or water on the idler pulley and keep it clean.