Page 530 of 1202

P19552
TOYOTA Hand-Held Tester
DLC3
P20392
SF1PR-02
P20176
P20391
- MFIFUEL PUMP
MF-5
529 Author�: Date�:
1996 TERCEL (RM440U)
FUEL PUMP
ON-VEHICLE INSPECTION
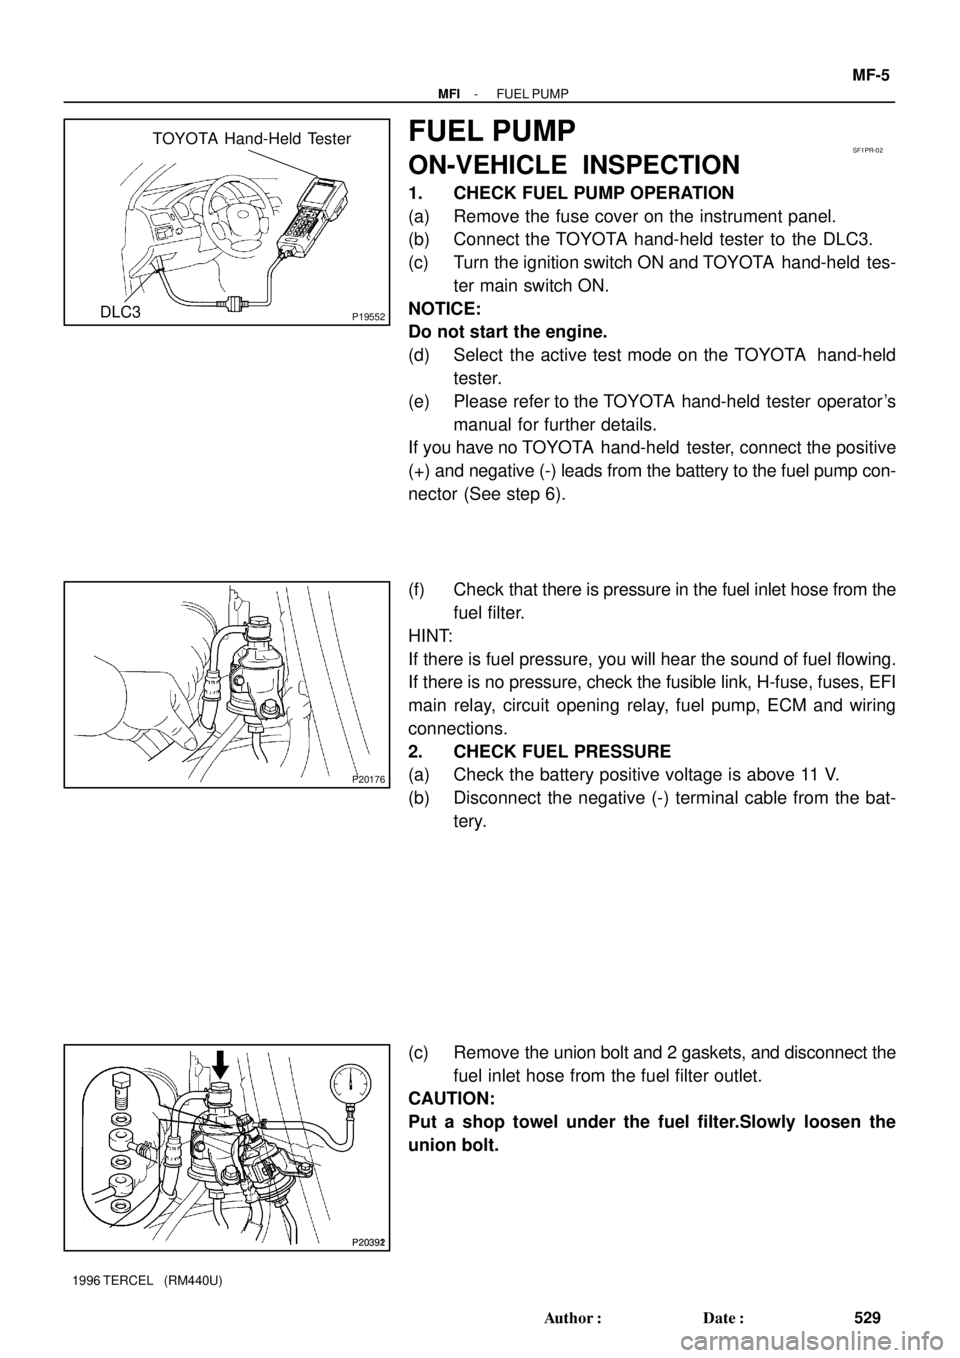
1. CHECK FUEL PUMP OPERATION
(a) Remove the fuse cover on the instrument panel.
(b) Connect the TOYOTA hand-held tester to the DLC3.
(c) Turn the ignition switch ON and TOYOTA hand-held tes-
ter main switch ON.
NOTICE:
Do not start the engine.
(d) Select the active test mode on the TOYOTA hand-held
tester.
(e) Please refer to the TOYOTA hand-held tester operator's
manual for further details.
If you have no TOYOTA hand-held tester, connect the positive
(+) and negative (-) leads from the battery to the fuel pump con-
nector (See step 6).
(f) Check that there is pressure in the fuel inlet hose from the
fuel filter.
HINT:
If there is fuel pressure, you will hear the sound of fuel flowing.
If there is no pressure, check the fusible link, H-fuse, fuses, EFI
main relay, circuit opening relay, fuel pump, ECM and wiring
connections.
2. CHECK FUEL PRESSURE
(a) Check the battery positive voltage is above 11 V.
(b) Disconnect the negative (-) terminal cable from the bat-
tery.
(c) Remove the union bolt and 2 gaskets, and disconnect the
fuel inlet hose from the fuel filter outlet.
CAUTION:
Put a shop towel under the fuel filter.Slowly loosen the
union bolt.
Page 531 of 1202

P20392
SST
MF-6
- MFIFUEL PUMP
530 Author�: Date�:
1996 TERCEL (RM440U)
(d) Install the fuel inlet hose and SST (pressure gauge) to the
fuel filter outlet with the 3 gaskets and union bolt.
SST 09268-45012
Torque: 29.0 N´m (290 kgf´cm, 22 ft´lbf)
(e) Wipe off any splattered gasoline.
(f) Reconnect the negative (-) terminal cable to the battery.
(g) Connect the TOYOTA hand-held tester to the DLC3 (See
step 1 check fuel pump operation (a) to (f)).
(h) Turn the ignition switch ON.
(i) Measure the fuel pressure.
Fuel pressure:
281 - 287 kPa
(2.87 - 2.93 kgf/cm
2, 40.8 - 41.7 psi)
If pressure is high, replace the fuel pressure regulator.
(j) If pressure is low, check these parts:
�Fuel hoses and connection
�Fuel pump
�Fuel filter
�Fuel pressure regulator
(k) Remove the TOYOTA hand-held tester from the DLC3.
(l) Reinstall the fuse cover on instrument panel.
(m) Start the engine.
(n) Disconnect the vacuum sensing hose from the fuel pres-
sure regulator.
(o) Measure the fuel pressure at idle.
Fuel pressure:
281 - 287 kPa (2.87 - 2.93 kgf/cm
2, 40.8 - 41.7 psi)
(p) Reconnect the vaccum sensing hose to the fuel pressure
regulator plug the hose end.
(q) Measure the fuel pressure at idle.
Fuel pressure:
226 - 265 kPa (2.3 - 2.6 kgf/cm
2, 33 - 37 psi)
If pressure is not as specified, check the vacuum sensing hose
and fuel pressure regulator.
(r) Stop the engine.
(s) Check that the fuel pressure remains as specified for 5
minutes after the engine has stopped.
Fuel pressure:
147 kPa (1.5 kgf/cm
2, 21 psi) or more
If pressure is not as specified, check the fuel pump, pressure
regulator and/or injector.
(t) After checking fuel pressure, disconnect the negative (-)
terminal cable from the battery and carefully remove the
SST to prevent gasoline from splashing.
SST 09268-45012
(u) Connect the fuel inlet hose to the fuel filter with 2 new gas-
kets and the union bolt.
Page 544 of 1202

SF1PV-02
P20397
Union Bolt
Gasket
SST (Hose)
Fuel Filter
(On Vehicle) SST (Union)
- MFIINJECTOR
MF-19
1996 TERCEL (RM440U)
INSPECTION
1. INSPECT INJECTOR INJECTION
CAUTION:
Keep injector clean of sparks during the test.
(a) Remove the union bolt and 2 gaskets, and disconnect the
fuel inlet hose from the fuel filter outlet.
(b) Connect SST (union and hose) to the fuel filter outlet with
2 gaskets and union bolts.
SST 09268-41046 (90405-09015)
Torque: 29 N´m (290 kgf´cm, 22 ft´lbf)
(c) Remove the pressure regulator from the delivery pipe
(See page MF-14).
(d) Install a O-ring to the fuel inlet of pressure regulator.
(e) Connect SST (hose) to the fuel inlet of the pressure regu-
lator with SST (union) and the 2 bolts.
SST 09268-41046 (09268-41091)
Torque: 8.0 N´m (80 kgf´cm, 69 ft´lbf)
(f) Connect the fuel return hose to the fuel outlet of the pres-
sure regulator.
CAUTION:
Install a suitable vinyl hose onto the injector to prevent
gasoline from splashing out.
(g) Remove the fuse cover on the instrument panel.
Page 545 of 1202

Z14695
SST (Hose)
SST (Union)
O-Ring
SST
(Clamp)
Vinyl Tube
P19552
TOYOTA Hand-Held Tester
DLC3
FI3211
SST
(Wire)
Connect
FI1676
MF-20
- MFIINJECTOR
1996 TERCEL (RM440U)
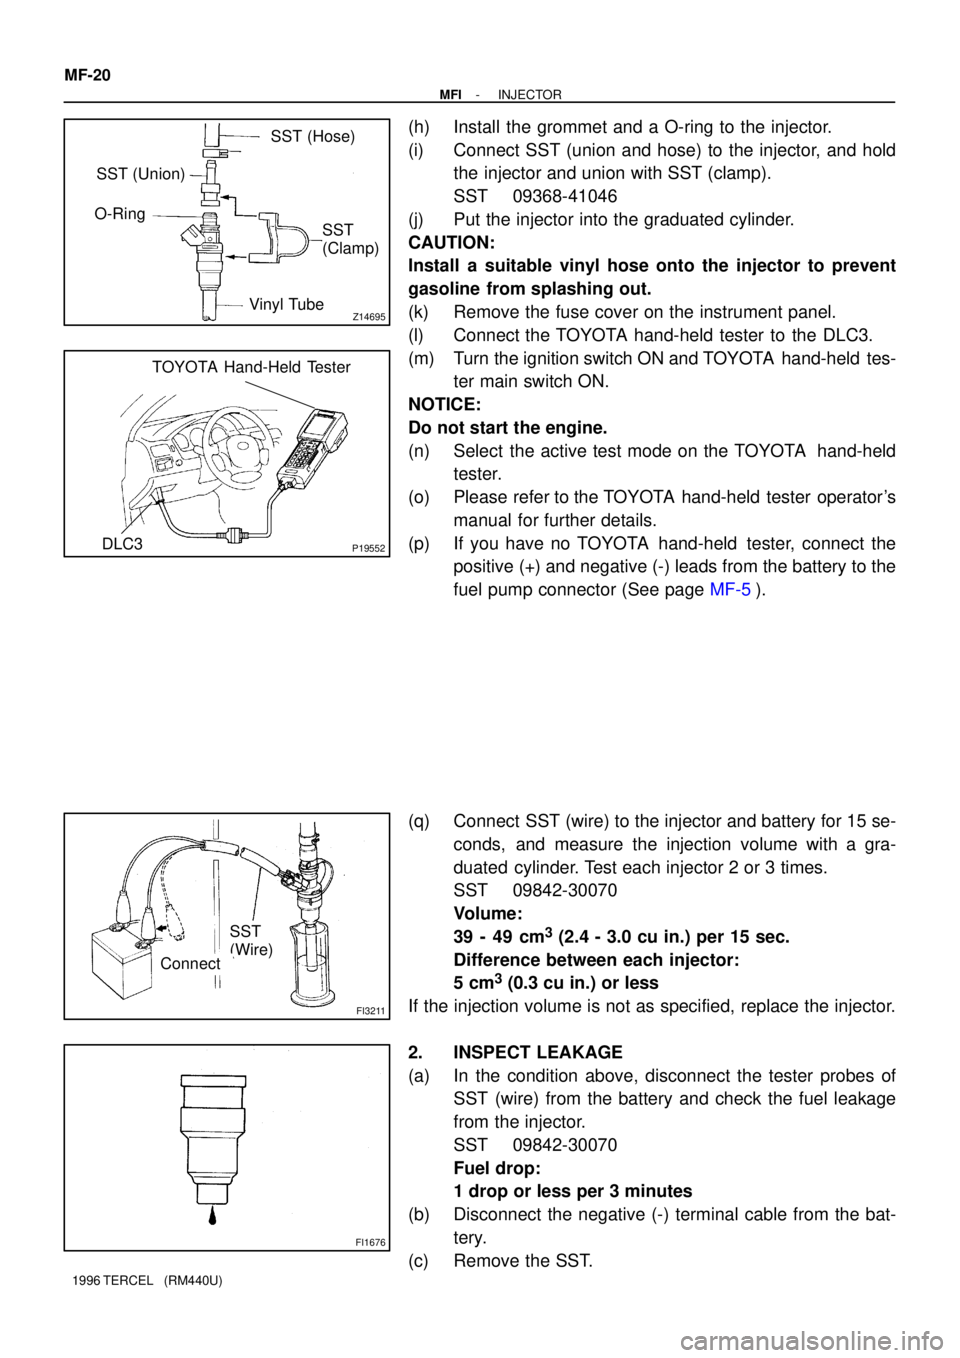
(h) Install the grommet and a O-ring to the injector.
(i) Connect SST (union and hose) to the injector, and hold
the injector and union with SST (clamp).
SST 09368-41046
(j) Put the injector into the graduated cylinder.
CAUTION:
Install a suitable vinyl hose onto the injector to prevent
gasoline from splashing out.
(k) Remove the fuse cover on the instrument panel.
(l) Connect the TOYOTA hand-held tester to the DLC3.
(m) Turn the ignition switch ON and TOYOTA hand-held tes-
ter main switch ON.
NOTICE:
Do not start the engine.
(n) Select the active test mode on the TOYOTA hand-held
tester.
(o) Please refer to the TOYOTA hand-held tester operator's
manual for further details.
(p) If you have no TOYOTA hand-held tester, connect the
positive (+) and negative (-) leads from the battery to the
fuel pump connector (See page MF-5).
(q) Connect SST (wire) to the injector and battery for 15 se-
conds, and measure the injection volume with a gra-
duated cylinder. Test each injector 2 or 3 times.
SST 09842-30070
Volume:
39 - 49 cm
3 (2.4 - 3.0 cu in.) per 15 sec.
Difference between each injector:
5 cm
3 (0.3 cu in.) or less
If the injection volume is not as specified, replace the injector.
2. INSPECT LEAKAGE
(a) In the condition above, disconnect the tester probes of
SST (wire) from the battery and check the fuel leakage
from the injector.
SST 09842-30070
Fuel drop:
1 drop or less per 3 minutes
(b) Disconnect the negative (-) terminal cable from the bat-
tery.
(c) Remove the SST.
Page 546 of 1202
- MFIINJECTOR
MF-21
1996 TERCEL (RM440U)
SST 09268-41046, 09842-30070, 09843-18020
(d) Reinstall the pressure regulator to the delivery pipe (See
page MF-15).
(e) Reconnect the fuel inlet hose to the fuel filter outlet with
2 new gaskets and the union bolt.
Torque: 29 N´m (290 kgf´cm, 22 ft´lbf)
(f) Turn the ignition switch OFF.
(g) Disconnect the TOYOTA hand- held tester from the
DLC3.
(h) Reinstall the fuse cover on the instrument panel.
Page 581 of 1202
P19552
TOYOTA Hand-Held Tester
DLC3SF0WH-03
MF-56
- MFIFUEL CUT RPM
580 Author�: Date�:
1996 TERCEL (RM440U)
FUEL CUT RPM
INSPECTION
1. WARM UP ENGINE
Allow the engine to warm up to normal operating temperature.
2. CONNECT TOYOTA HAND-HELD TESTER OR OBDII
SCAN TOOL
(a) Remove the fuse cover on the instrument panel.
(b) Connect the TOYOTA hand-held tester or OBDII scan
tool to the DLC3.
(c) Please refer to the TOYOTA hand-held tester or OBDII
scan tool operator's manual for futher details.
3. INSPECT FUEL CUT OFF PRM
(a) Increase the engine speed to at least 2,500 rpm.
(b) Use a sound scope to check for injector operating noise.
(c) Check that when the throttle lever is released, injector op-
eration noise stops momentarily and then resumes.
HINT:
Measure with the A/C OFF.
Fuel return rpm: 900 rpm
4. DISCONNECT TOYOTA HAND- HELD TESTER OR
OBDII SCAN TOOL
Page 604 of 1202

CO0Y5-02
P20875
Above 94°C
P20883
Ammeter
Battery
- COOLINGELECTRIC COOLING FAN
CO-23
603 Author�: Date�:
1996 TERCEL (RM440U)
ELECTRIC COOLING FAN
ON-VEHICLE INSPECTION
1. CHECK COOLING FAN OPERATION WITH LOW TEM-
PERATURE (Below 83°C (181°F))
(a) Turn the ignition switch ON.
(b) Check that the cooling fan stops.
If not, check the cooling fan relay and ECT switch, and check
for a separated connector or severed wire between the cooling
fan relay and ECT switch.
(c) Disconnect the ECT switch connector.
(d) Check that the cooling fan rotates.
If not, check the engine main relay, cooling fan relay, cooling
fan, fuses, and check for short circuit between the cooling fan
relay and ECT switch.
(e) Reconnect the ECT switch connector.
2. CHECK COOLING FAN OPERATION WITH HIGH TEM-
PERATURE (Above 94°C (201°F))
(a) Start the engine, and raise coolant temperature to above
94°C (201°F).
(b) Check that the cooling fan rotates.
If not, replace the ECT switch.
3. INSPECT NO.1 COOLING FAN
(a) Disconnect the cooling fan connector.
(b) Connect battery and ammeter.
(c) Check that the cooling fan rotates smoothly, and check
the reading on the ammeter.
Standard amperage:
M/T5.7 - 7.7 A
A/T8.6 - 11.6 A
(d) Reconnect the cooling fan connector.
4. INSPECT NO.2 COOLING FAN
(a) Disconnect the cooling fan connector.
(b) Connect battery and ammeter.
(c) Check that the cooling fan rotates smoothly, and check
the reading on the ammeter.
Standard amperage: 6.4 - 7.4 A
(d) Reconnect the cooling fan connector.
Page 679 of 1202

CH0H6-01
Z11580
Blue White Red
OK Charging
NecessaryInsufficient
Water
N00313
CH-2
- CHARGINGCHARGING SYSTEM
1996 TERCEL (RM440U)
ON-VEHICLE INSPECTION
1. CHECK BATTERY SPECIFIC GRAVITY AND ELEC-
TROLYTE LEVEL
(a) Check the electrolyte quantity of each cell.
If insufficient, refill with distilled (or purified) water.
(b) Check the specific gravity of each cell.
Standard specific gravity:
1.27 - 1.29 at 20°C (68°F)
If the specific gravity is less than specification, charge the bat-
tery.
HINT:
Check the indicator as shown in illustration.
2. CHECK BATTERY TERMINALS, FUSIBLE LINK AND
FUSES
(a) Check that the battery terminals are not loose or cor-
roded.
If the terminals are corroded, clean the terminals.
(b) Check the fusible link and fuses for continuity.
Fusible linkMAIN 2.0A
HfALT 100AH-fuseAM1 50A
AM2 15A
FGAUGE 15AFuseIGN 7.5A
ALT-S 7.5A
3. INSPECT DRIVE BELT
(a) Visually check the drive belt for excessive wear, frayed
cords etc.
If any defect is found, replace the drive belt.
HINT:
Cracks on the rib side of a drive belt are considered acceptable.
If the drive belt has chunks missing from the ribs, it should be
replaced.