Page 493 of 1202
EM9988
EM3441
P20487
EM9392
EM3444
- ENGINE MECHANICALCYLINDER BLOCK
EM-71
1996 TERCEL (RM440U)
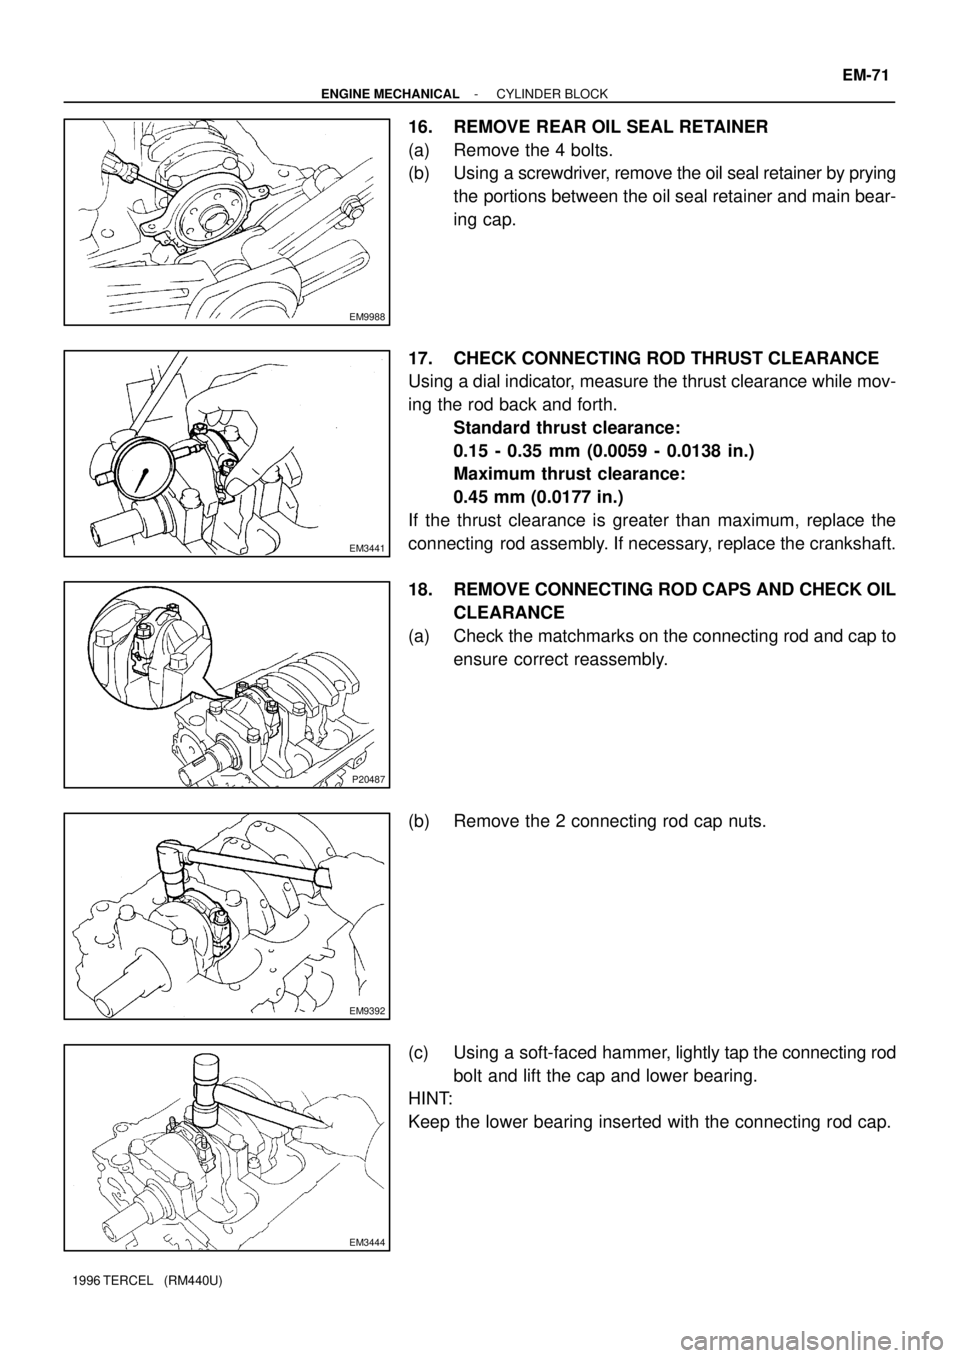
16. REMOVE REAR OIL SEAL RETAINER
(a) Remove the 4 bolts.
(b) Using a screwdriver, remove the oil seal retainer by prying
the portions between the oil seal retainer and main bear-
ing cap.
17. CHECK CONNECTING ROD THRUST CLEARANCE
Using a dial indicator, measure the thrust clearance while mov-
ing the rod back and forth.
Standard thrust clearance:
0.15 - 0.35 mm (0.0059 - 0.0138 in.)
Maximum thrust clearance:
0.45 mm (0.0177 in.)
If the thrust clearance is greater than maximum, replace the
connecting rod assembly. If necessary, replace the crankshaft.
18. REMOVE CONNECTING ROD CAPS AND CHECK OIL
CLEARANCE
(a) Check the matchmarks on the connecting rod and cap to
ensure correct reassembly.
(b) Remove the 2 connecting rod cap nuts.
(c) Using a soft-faced hammer, lightly tap the connecting rod
bolt and lift the cap and lower bearing.
HINT:
Keep the lower bearing inserted with the connecting rod cap.
Page 494 of 1202
EM3445
EM9405
EM3447
Plastigage
EM3448
EM3449
EM-72
- ENGINE MECHANICALCYLINDER BLOCK
1996 TERCEL (RM440U)
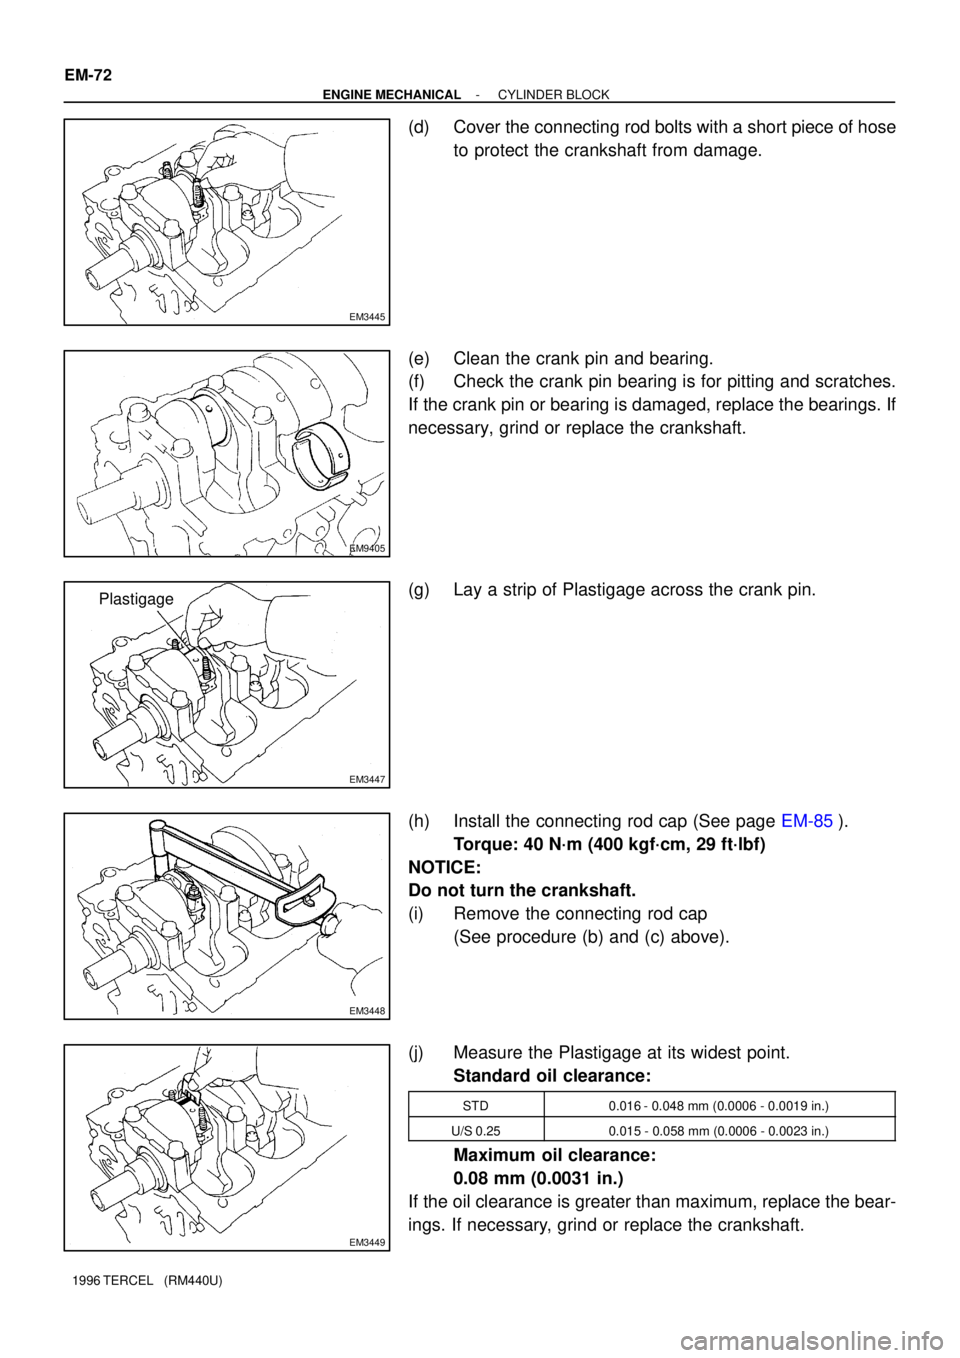
(d) Cover the connecting rod bolts with a short piece of hose
to protect the crankshaft from damage.
(e) Clean the crank pin and bearing.
(f) Check the crank pin bearing is for pitting and scratches.
If the crank pin or bearing is damaged, replace the bearings. If
necessary, grind or replace the crankshaft.
(g) Lay a strip of Plastigage across the crank pin.
(h) Install the connecting rod cap (See page EM-85).
Torque: 40 N´m (400 kgf´cm, 29 ft´lbf)
NOTICE:
Do not turn the crankshaft.
(i) Remove the connecting rod cap
(See procedure (b) and (c) above).
(j) Measure the Plastigage at its widest point.
Standard oil clearance:
STD0.016 - 0.048 mm (0.0006 - 0.0019 in.)
U/S 0.250.015 - 0.058 mm (0.0006 - 0.0023 in.)
Maximum oil clearance:
0.08 mm (0.0031 in.)
If the oil clearance is greater than maximum, replace the bear-
ings. If necessary, grind or replace the crankshaft.
Page 495 of 1202
P20473
Mark
1,2 or 3
Mark
1,2 or 3
P20491
EM3445
- ENGINE MECHANICALCYLINDER BLOCK
EM-73
1996 TERCEL (RM440U)
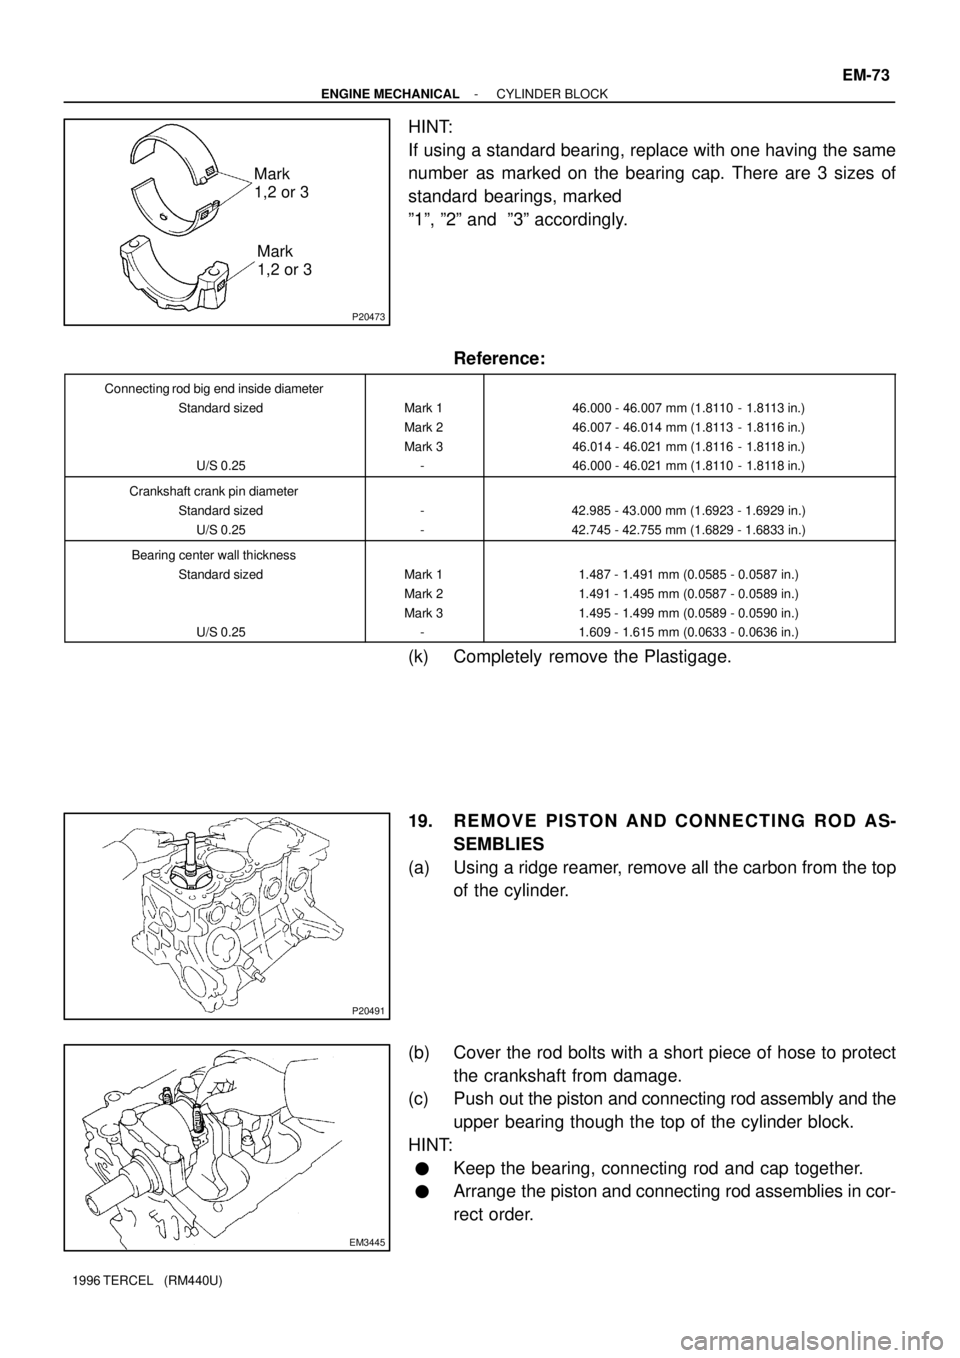
HINT:
If using a standard bearing, replace with one having the same
number as marked on the bearing cap. There are 3 sizes of
standard bearings, marked
º1º, º2º and º3º accordingly.
Reference:
Connecting rod big end inside diameter
Standard sized
U/S 0.25
Mark 1
Mark 2
Mark 3
-46.000 - 46.007 mm (1.8110 - 1.8113 in.)
46.007 - 46.014 mm (1.8113 - 1.8116 in.)
46.014 - 46.021 mm (1.8116 - 1.8118 in.)
46.000 - 46.021 mm (1.8110 - 1.8118 in.)
Crankshaft crank pin diameter
Standard sized
U/S 0.25
-
-42.985 - 43.000 mm (1.6923 - 1.6929 in.)
42.745 - 42.755 mm (1.6829 - 1.6833 in.)
Bearing center wall thickness
Standard sized
U/S 0.25
Mark 1
Mark 2
Mark 3
-1.487 - 1.491 mm (0.0585 - 0.0587 in.)
1.491 - 1.495 mm (0.0587 - 0.0589 in.)
1.495 - 1.499 mm (0.0589 - 0.0590 in.)
1.609 - 1.615 mm (0.0633 - 0.0636 in.)
(k) Completely remove the Plastigage.
19. REMOVE PISTON AND CONNECTING ROD AS-
SEMBLIES
(a) Using a ridge reamer, remove all the carbon from the top
of the cylinder.
(b) Cover the rod bolts with a short piece of hose to protect
the crankshaft from damage.
(c) Push out the piston and connecting rod assembly and the
upper bearing though the top of the cylinder block.
HINT:
�Keep the bearing, connecting rod and cap together.
�Arrange the piston and connecting rod assemblies in cor-
rect order.
Page 499 of 1202
P20489
P20548
Z07984
SST SST
SST
SSTSSTPiston
Pin
SST
- ENGINE MECHANICALCYLINDER BLOCK
EM-77
1996 TERCEL (RM440U)
23. CHECK FIT BETWEEN PISTON AND PIN
Try to move the piston back and forth on the piston pin.
If any movement is felt, replace the piston and pin as a set.
24. REMOVE PISTON RINGS
(a) Using a piston ring expander, remove the compression
rings.
(b) Remove the 2 side rails and oil ring expander by hand.
HINT:
Arrange the rings in the correct order only.
25. DISCONNECT CONNECTING ROD FROM PISTON
(a) Using SST, press out the piston pin from the piston.
(b) Remove the connecting rod.
SST 09221-25024 (09221-00020, 09221-00030,
09221-00130, 09221-00140, 09221-00150)
HINT:
�The piston and pin are a matched set.
�Arrange the pistons, pins, rings, connecting rods and
bearings in correct order.
Page 503 of 1202
P20540
P20527
Top of Cylinder Block
110 mm
(4.33 in.,)
EM7639
N00301
- ENGINE MECHANICALCYLINDER BLOCK
EM-81
1996 TERCEL (RM440U)
8. INSPECT PISTON RING GROOVE CLEARANCE
Using a feeler gauge, measure the clearance between new pis-
ton ring and the wall of the ring groove.
Ring groove clearance:
No.10.04 - 0.08 mm (0.0016 - 0.0031 in.)
No.20.03 - 0.07 mm (0.0012 - 0.0028 in.)
If the oil clearance is greater than maximum, replace the piston.
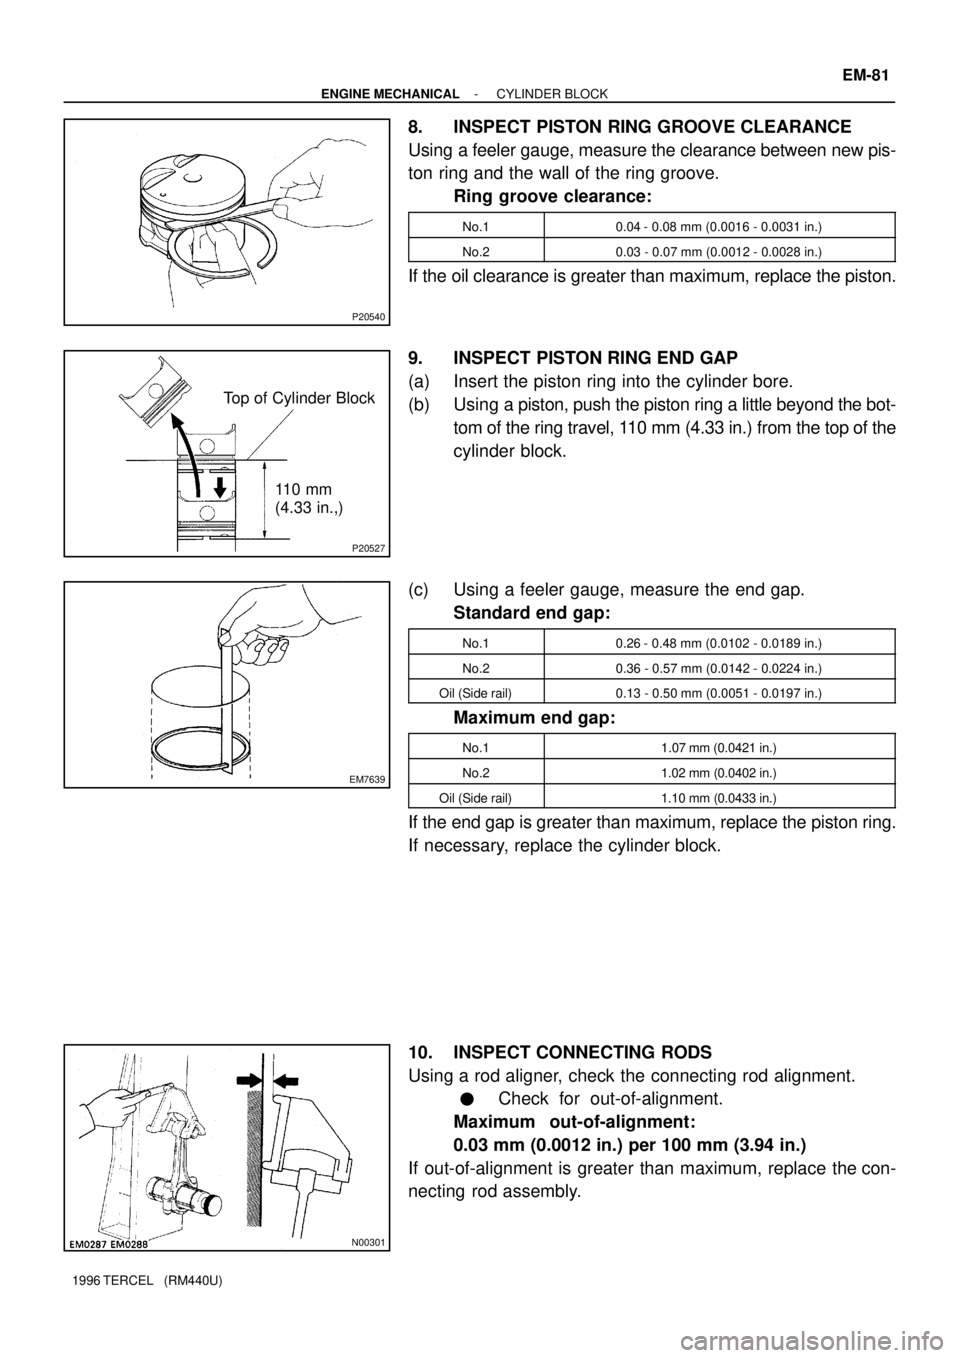
9. INSPECT PISTON RING END GAP
(a) Insert the piston ring into the cylinder bore.
(b) Using a piston, push the piston ring a little beyond the bot-
tom of the ring travel, 110 mm (4.33 in.) from the top of the
cylinder block.
(c) Using a feeler gauge, measure the end gap.
Standard end gap:
No.10.26 - 0.48 mm (0.0102 - 0.0189 in.)
No.20.36 - 0.57 mm (0.0142 - 0.0224 in.)
Oil (Side rail)0.13 - 0.50 mm (0.0051 - 0.0197 in.)
Maximum end gap:
No.11.07 mm (0.0421 in.)
No.21.02 mm (0.0402 in.)
Oil (Side rail)1.10 mm (0.0433 in.)
If the end gap is greater than maximum, replace the piston ring.
If necessary, replace the cylinder block.
10. INSPECT CONNECTING RODS
Using a rod aligner, check the connecting rod alignment.
�Check for out-of-alignment.
Maximum out-of-alignment:
0.03 mm (0.0012 in.) per 100 mm (3.94 in.)
If out-of-alignment is greater than maximum, replace the con-
necting rod assembly.
Page 504 of 1202
N00302
EM3208
N00295
EM-82
- ENGINE MECHANICALCYLINDER BLOCK
1996 TERCEL (RM440U)
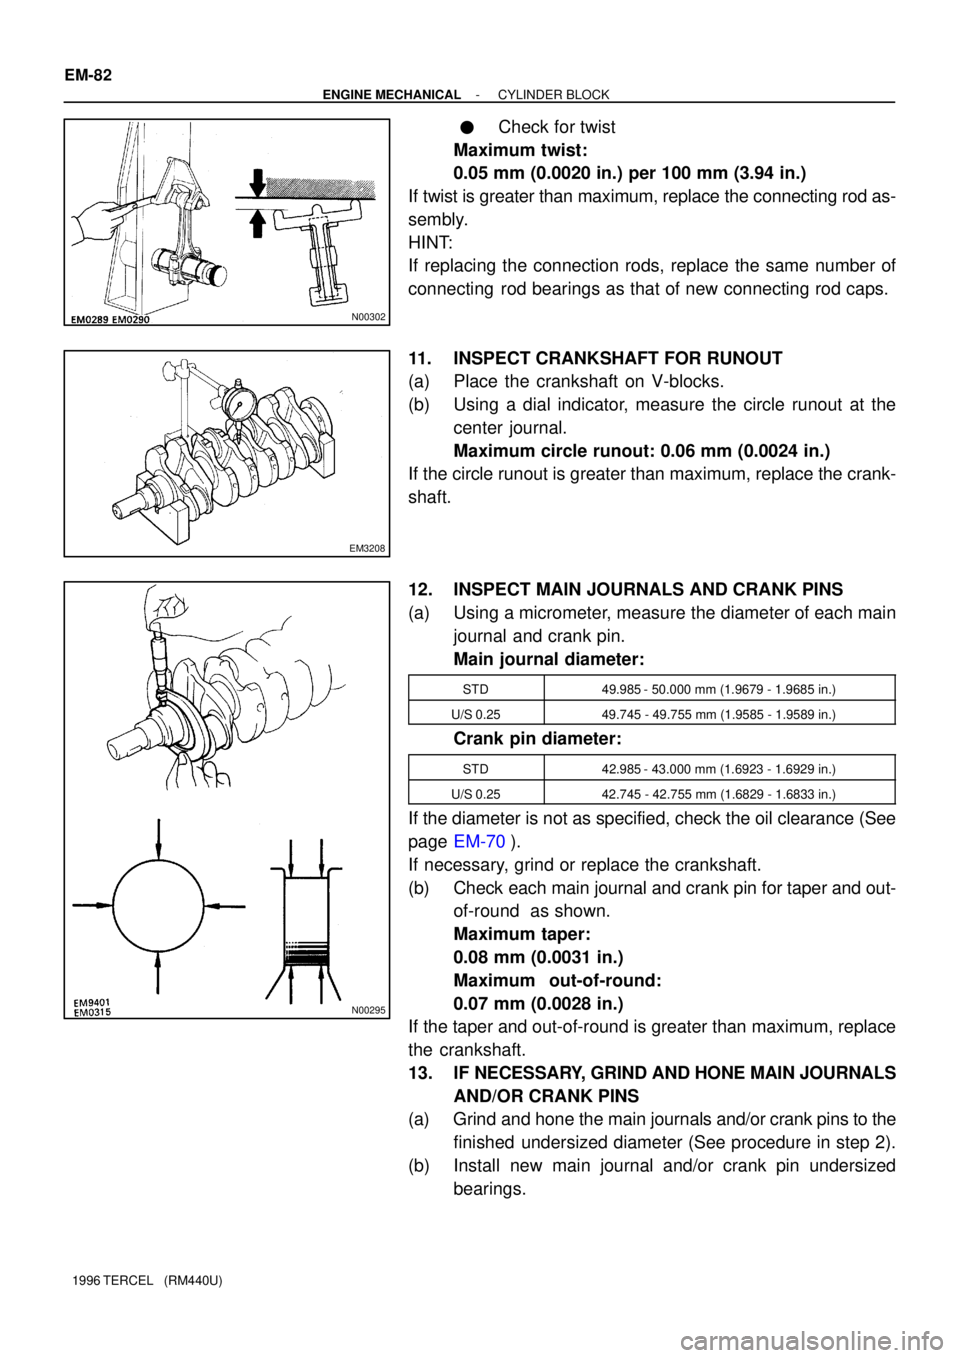
�Check for twist
Maximum twist:
0.05 mm (0.0020 in.) per 100 mm (3.94 in.)
If twist is greater than maximum, replace the connecting rod as-
sembly.
HINT:
If replacing the connection rods, replace the same number of
connecting rod bearings as that of new connecting rod caps.
11. INSPECT CRANKSHAFT FOR RUNOUT
(a) Place the crankshaft on V-blocks.
(b) Using a dial indicator, measure the circle runout at the
center journal.
Maximum circle runout: 0.06 mm (0.0024 in.)
If the circle runout is greater than maximum, replace the crank-
shaft.
12. INSPECT MAIN JOURNALS AND CRANK PINS
(a) Using a micrometer, measure the diameter of each main
journal and crank pin.
Main journal diameter:
STD49.985 - 50.000 mm (1.9679 - 1.9685 in.)
U/S 0.2549.745 - 49.755 mm (1.9585 - 1.9589 in.)
Crank pin diameter:
STD42.985 - 43.000 mm (1.6923 - 1.6929 in.)
U/S 0.2542.745 - 42.755 mm (1.6829 - 1.6833 in.)
If the diameter is not as specified, check the oil clearance (See
page EM-70).
If necessary, grind or replace the crankshaft.
(b) Check each main journal and crank pin for taper and out-
of-round as shown.
Maximum taper:
0.08 mm (0.0031 in.)
Maximum out-of-round:
0.07 mm (0.0028 in.)
If the taper and out-of-round is greater than maximum, replace
the crankshaft.
13. IF NECESSARY, GRIND AND HONE MAIN JOURNALS
AND/OR CRANK PINS
(a) Grind and hone the main journals and/or crank pins to the
finished undersized diameter (See procedure in step 2).
(b) Install new main journal and/or crank pin undersized
bearings.
Page 507 of 1202
EM0JT-05
P20471
Front Mark
(Cavity)
Front Mark
(Protrusion)
Z08055
SST
Piston Pin
SSTSST
SST
SST
SST SST
P20549
P20560
1R
2R
- ENGINE MECHANICALCYLINDER BLOCK
EM-85
1996 TERCEL (RM440U)
REASSEMBLY
HINT:
�Thoroughly clean all parts to be assembled.
�Before installing the parts, apply new engine oil to all slid-
ing and rotating surfaces.
�Replace all gaskets, O-rings and oil seals with new parts.
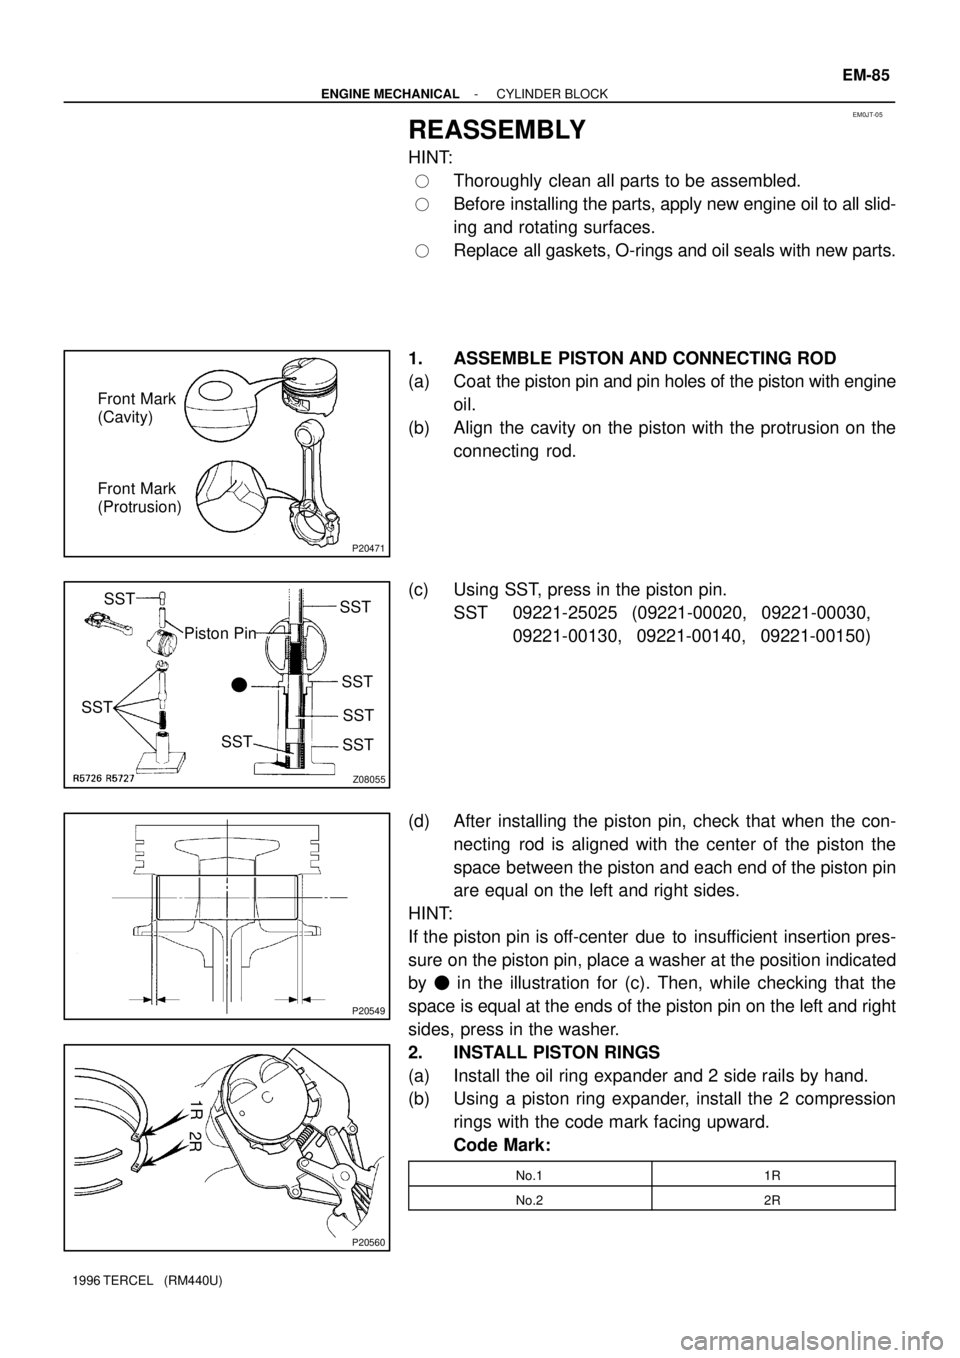
1. ASSEMBLE PISTON AND CONNECTING ROD
(a) Coat the piston pin and pin holes of the piston with engine
oil.
(b) Align the cavity on the piston with the protrusion on the
connecting rod.
(c) Using SST, press in the piston pin.
SST 09221-25025 (09221-00020, 09221-00030,
09221-00130, 09221-00140, 09221-00150)
(d) After installing the piston pin, check that when the con-
necting rod is aligned with the center of the piston the
space between the piston and each end of the piston pin
are equal on the left and right sides.
HINT:
If the piston pin is off-center due to insufficient insertion pres-
sure on the piston pin, place a washer at the position indicated
by � in the illustration for (c). Then, while checking that the
space is equal at the ends of the piston pin on the left and right
sides, press in the washer.
2. INSTALL PISTON RINGS
(a) Install the oil ring expander and 2 side rails by hand.
(b) Using a piston ring expander, install the 2 compression
rings with the code mark facing upward.
Code Mark:
No.11R
No.22R
Page 508 of 1202
P20867
Front
ExpanderNo.2
Compression
Ring
Upper Side
Rail
Front Mark (Cavity) No.1
Compression
RingLower Side Rail
EM3477
EM9416
P20550
EM9417
EM-86
- ENGINE MECHANICALCYLINDER BLOCK
1996 TERCEL (RM440U)
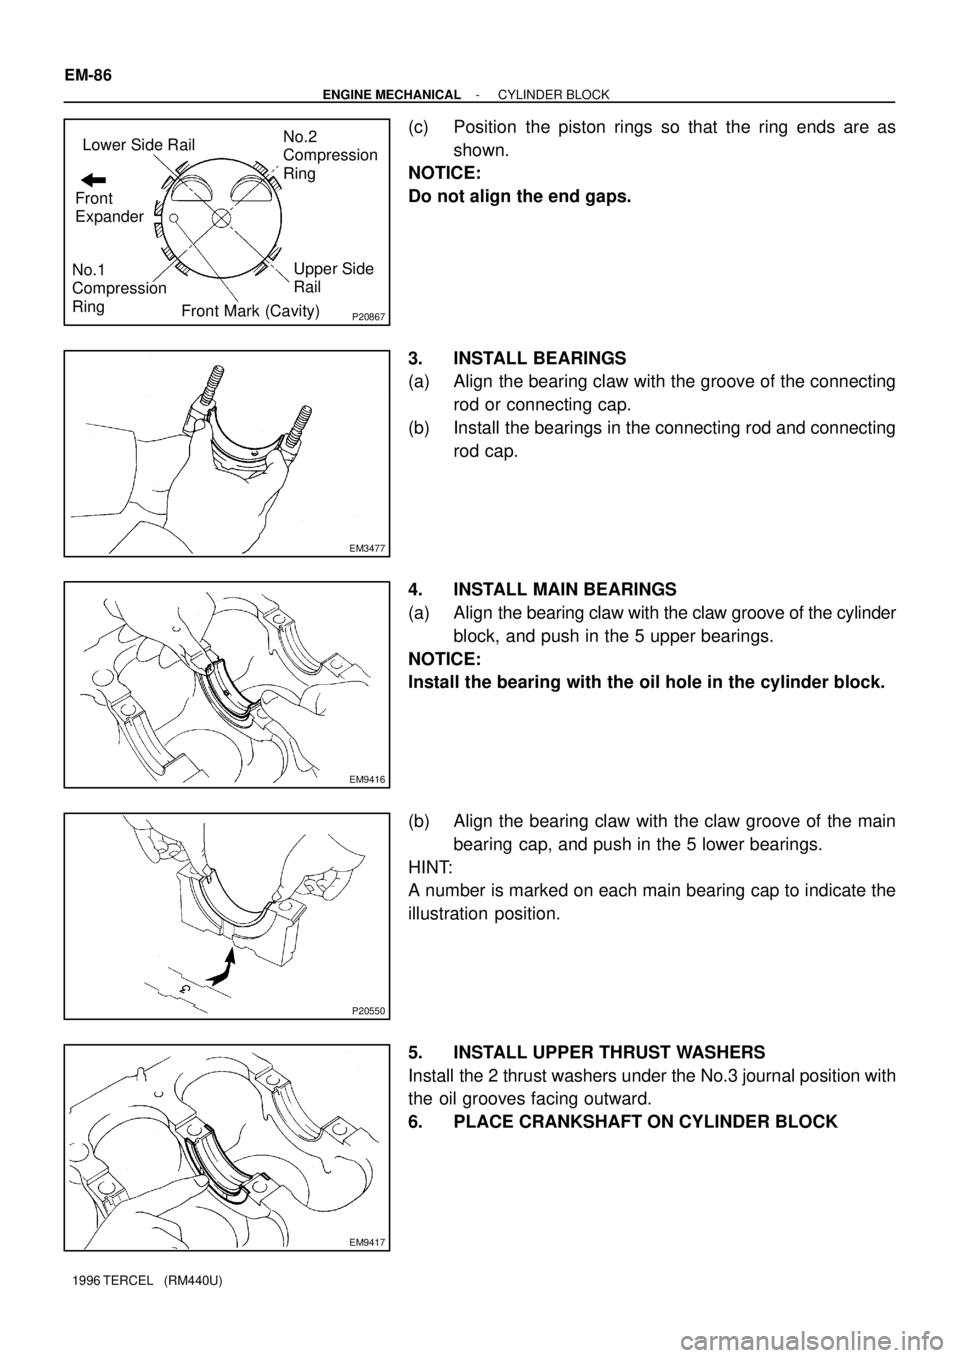
(c) Position the piston rings so that the ring ends are as
shown.
NOTICE:
Do not align the end gaps.
3. INSTALL BEARINGS
(a) Align the bearing claw with the groove of the connecting
rod or connecting cap.
(b) Install the bearings in the connecting rod and connecting
rod cap.
4. INSTALL MAIN BEARINGS
(a) Align the bearing claw with the claw groove of the cylinder
block, and push in the 5 upper bearings.
NOTICE:
Install the bearing with the oil hole in the cylinder block.
(b) Align the bearing claw with the claw groove of the main
bearing cap, and push in the 5 lower bearings.
HINT:
A number is marked on each main bearing cap to indicate the
illustration position.
5. INSTALL UPPER THRUST WASHERS
Install the 2 thrust washers under the No.3 journal position with
the oil grooves facing outward.
6. PLACE CRANKSHAFT ON CYLINDER BLOCK
