Page 295 of 1399

BO38W−01
−
BODY QUARTER WINDOW GLASS
BO−55
1996 LAND CRUISER (RM451U)
INSTALLATION
1. INSTALL WEATHERSTRIP ON GLASS
(a) Attach the weatherstrip to the glass.
NOTICE:
If the weatherstrip has hardened, it may develop leaks. Use
a new one if possible.
(b) Insert a cord into the groove of the weatherstrip all the way
around with the ends overlapping.
2. INSTALL QUARTER WINDOW GLASS
(a) Apply soapy water to contact surface of the weatherstrip lip and to the body flange.
HINT:
Begin installation in the middle of the lower part of the quarter
window glass.
(b) Hold the glass in position on the body.
(c) From the inside, pull on one cord at an angle so it pulls the
lip over the flange. From the outside, press the glass
along the weatherstrip until the glass is installed.
3. FIX IN GLASS
To make the glass fix snugly, tap from the outside with your
open hand.
4. INSPECT FOR LEAKS AND REPAIR
(a) Do a leak test.
(b) Seal any leak with auto glass sealer.
5. INSTALL ROOF HEADLINING
6. INSTALL ASSIST GRIPS
7. INSTALL REAR PILLAR GARNISH
8. INSTALL QUARTER PILLAR GARNISH
Brought to you by BirfMark
Brought to you by BirfMark
Version 1.11 - 03/16/2010
Page 296 of 1399
BO−56
−
BODY QUARTER WINDOW GLASS
1996 LAND CRUISER (RM451U)
9. INSTALL REAR DOOR SCUFF PLATE
10. INSTALL REAR SEAT SIDE GARNISH
11. INSTALL QUARTER TRIM
12. INSTALL BACK DOOR SCUFF PLATE
13. w/ No. 2 Rear Seat:
INSTALL NO. 2 REAR SEAT
Brought to you by BirfMark
Brought to you by BirfMark
Version 1.11 - 03/16/2010
Page 1007 of 1399
PP2YT−01
PP−66
−
PREPARATION BODY ELECTRICAL
1996 LAND CRUISER (RM451U)
EQUIPMENT
Bulb (3.4 W)Fuel sender gauge
Seat belt warning relay
Bulb (21 W)Turn signal flasher relay
Clip removerFor removing cowl louver
Dry cell batteryFuel sender gauge
Masking tapeRear window defogger wire
Oil bathEngine oil level warning switch
Test lead
ThermometerEngine coolant temperature sender gauge
Engine oil level warning switch
Tin foilRear window defogger wire
Torque wrench
Brought to you by BirfMark
Brought to you by BirfMark
Version 1.11 - 03/16/2010
Page 1008 of 1399
PP3KK−01
−
PREPARATION BODY ELECTRICAL
PP−67
1996 LAND CRUISER (RM451U)
SSM (Special Service Materials)
08833−00070Adhesive 1324,
THREE BOND 1324 or equivalentPower seat housing set nut
Power seat slide and vertical motor set
screw
08833−00080Adhesive 1344
THREE BOND 1344
LOCTITE 242 or equivalentLow oil pressure warning switch
Engine coolant temperature sender
gauge
08888−88888DuPont Paste No. 4817 or
equivalentRear window defogger
Brought to you by BirfMark
Brought to you by BirfMark
Version 1.11 - 03/16/2010
Page 1037 of 1399
SST
R13455
10 m (33 ft) or more
H02457
−
SUPPLEMENTAL RESTRAINT SYSTEM STEERING WHEEL PAD AND SPIRAL CABLE
RS−13
1996 LAND CRUISER (RM451U)
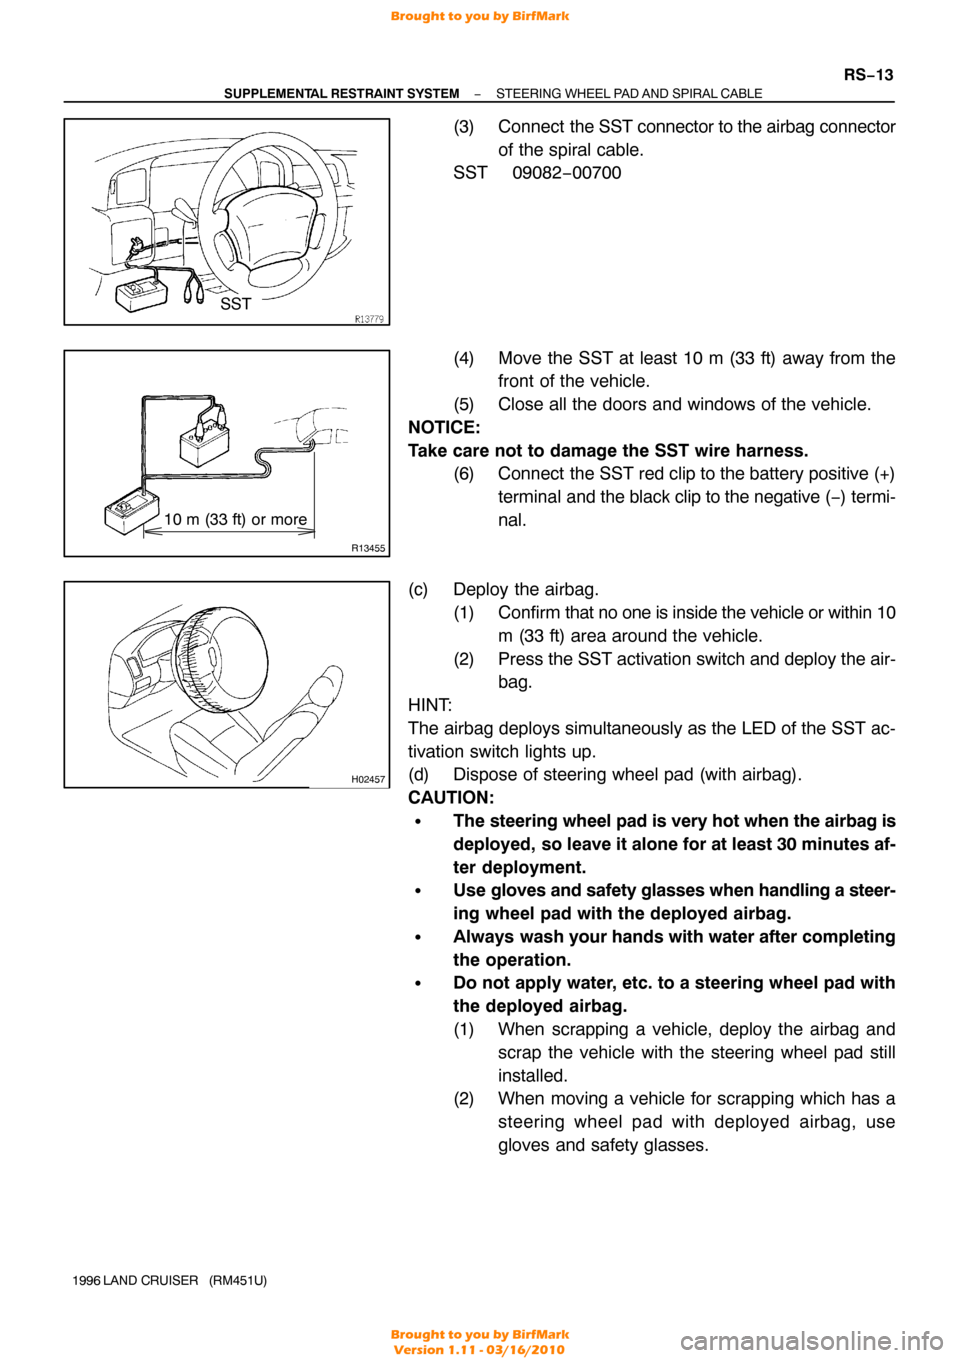
(3) Connect the SST connector to the airbag connector
of the spiral cable.
SST 09082−00700
(4) Move the SST at least 10 m (33 ft) away from the front of the vehicle.
(5) Close all the doors and windows of the vehicle.
NOTICE:
Take care not to damage the SST wire harness. (6) Connect the SST red clip to the battery positive (+)
terminal and the black clip to the negative ( −) termi-
nal.
(c) Deploy the airbag. (1) Confirm that no one is inside the vehicle or within 10
m (33 ft) area around the vehicle.
(2) Press the SST activation switch and deploy the air- bag.
HINT:
The airbag deploys simultaneously as the LED of the SST ac-
tivation switch lights up.
(d) Dispose of steering wheel pad (with airbag).
CAUTION:
�The steering wheel pad is very hot when the airbag is
deployed, so leave it alone for at least 30 minutes af-
ter deployment.
�Use gloves and safety glasses when handling a steer-
ing wheel pad with the deployed airbag.
�Always wash your hands with water after completing
the operation.
�Do not apply water, etc. to a steering wheel pad with
the deployed airbag.
(1) When scrapping a vehicle, deploy the airbag and scrap the vehicle with the steering wheel pad still
installed.
(2) When moving a vehicle for scrapping which has a
steering wheel pad with deployed airbag, use
gloves and safety glasses.
Brought to you by BirfMark
Brought to you by BirfMark
Version 1.11 - 03/16/2010
Page 1050 of 1399

AB0158
SSTBattery
SST
R13455
←→
10 m (33 ft) or more
H03286
RS−26
−
SUPPLEMENTAL RESTRAINT SYSTEM FRONT PASSENGER AIRBAG ASSEMBLY
1996 LAND CRUISER (RM451U)
1. AIRBAG DEPLOYMENT WHEN SCRAPPING VE-
HICLE
HINT:
Have a battery ready as the power source to deploy the airbag.
(a) Check functioning of the SST. (See page RS−11 )
(b) Disconnect the airbag connector. (1) Remove the glove compartment door.
(2) Remove the No.1 under cover.
NOTICE:
When handling the airbag connector , take care not to dam-
age the airbag wire harness.
(3) Pull up the connector.
(4) Disconnect the airbag connector.
(c) Install the SST. (1) Connect the SST connector to the front passengerairbag assembly connector.
SST 09082−00700
NOTICE:
To avoid damaging the SST connector and wire harness,
do not lock the secondary lock of the twin lock.
(2) Move the SST to at least 10 m (33 ft) away from the
front of the vehicle.
(3) Close all the doors and windows of the vehicle.
NOTICE:
Take care not to damage the SST wire harness.
(4) Connect the SST red clip to the battery positive (+)terminal and the black clip to the negative (+) termi-
nal.
(d) Deploy the airbag. (1) Confirm that no one is inside the vehicle or within 10
m (33 ft) area around the vehicle.
(2) Press the SST activation switch and deploy the air- bag.
HINT:
The airbag deploys simultaneously as the LED of the SST ac-
tivation switch lights up.
Brought to you by BirfMark
Brought to you by BirfMark
Version 1.11 - 03/16/2010
Page 1342 of 1399

SS1EK−02
−
SERVICE SPECIFICATIONS BODY
SS−41
164
Author�: Date�:
1996 LAND CRUISER (RM451U)
BODY
TORQUE SPECIFICATION
Part tightenedN·mkgf·cmft·lbf
FRONT BUMPER
Front bumper arm x Front bumper bracket3940029
Front bumper arm x Body3940029
Front bumper extension x Front bumper5.45548 in.·lbf
REAR BUMPER
Rear bumper extension x Rear bumper reinforcement131309
Rear bumper extension reinforcement x Body5.45548 in.·lbf
HOOD
Hood hinge x Body1818513
Hood lock x Body88069 in.·lbf
FRONT DOOR
Door hinge x Body2424017
Door hinge x Door panel2424017
Door lock x Door panel55043 in.·lbf
Window regulator x Door panel55043 in.·lbf
REAR DOOR
Door hinge x Body2424017
Door hinge x Door panel2424017
Door lock x Door panel55043 in.·lbf
Window regulator x Door panel55043 in.·lbf
WIPER AND WASHER
Front wiper arm x Wiper link2021015
Wiper link x Body5.45548 in.·lbf
Wiper motor x Body5.45548 in.·lbf
Rear wiper arm x Wiper motor5.45548 in.·lbf
WHEEL OPENING EXTENSION
Front wheel opening extension x Body5.45548 in.·lbf
Rear wheel opening extension x Body5.45548 in.·lbf
INSTRUMENT P ANEL
Front passenger airbag assembly x Instrument panel reinforcement2021015
FRONT MANUAL SEAT
Seat truck x Body3940029
Seat reclining assembly x Seatback frame5253038
Lumber support x Seatback frame1818513
FRONT POWER SEAT
Seat truck x Body3940029
Power seat adjuster x Seatback frame3737527
Power seat adjuster x Seatback cushion frame1818513
Lumber support x Seatback frame1818513
NO. 1 REAR SEAT
Seat cushion hinge x Body3940029
Seat cushion hinge x Seat cushion frame3940029
Brought to you by BirfMark
Brought to you by BirfMark
Version 1.11 - 03/16/2010
Page:
< prev 1-8 9-16 17-24