Page 1142 of 1399
SA24T−01
SA2310
−
SUSPENSION AND AXLE REAR DIFFERENTIAL CARRIER
SA−79
1996 LAND CRUISER (RM451U)
REMOVAL
1. w/ Differential lock:
SHIFT REAR DIFFERENTIAL TO LOCK
(a) Turn the ignition switch to the ON position.
(b) Keep the center differential lock condition.
(c) Turn the differential lock control switch to the RR or FR/ RR position and lock the rear differential.
HINT:
Rotating the tires, check they are in the differential lock condi-
tion.
(d) Disconnect the cable from the negative terminal of the battery.
2. DRAIN DIFFERENTIAL OIL
3. REMOVE REAR AXLE SHAFTS (See page SA−63 )
4. DISCONNECT PROPELLER SHAFT (See page PR−3 )
5. REMOVE DIFFERENTIAL CARRIER ASSEMBLY
(a) Remove the 10 nuts, washers and differential carrier as- sembly.
NOTICE:
Be careful not to damage the installation surface. Torque: 73 N·m (740 kgf·cm, 54 ft·lbf)
(b) Remove the gasket.
Brought to you by BirfMark
Brought to you by BirfMark
Version 1.11 - 03/16/2010
Page 1153 of 1399
SA2425
SSTSST
Front
Rear
SA3102
SST
R13414
SST
SA−90
−
SUSPENSION AND AXLE REAR DIFFERENTIAL CARRIER
1996 LAND CRUISER (RM451U)
(g) After the ring gear cools down enough, tighten the set
bolts uniformly and a little at a time.
Torque: 110 N·m (1,125 kgf·cm, 81 ft·lbf)
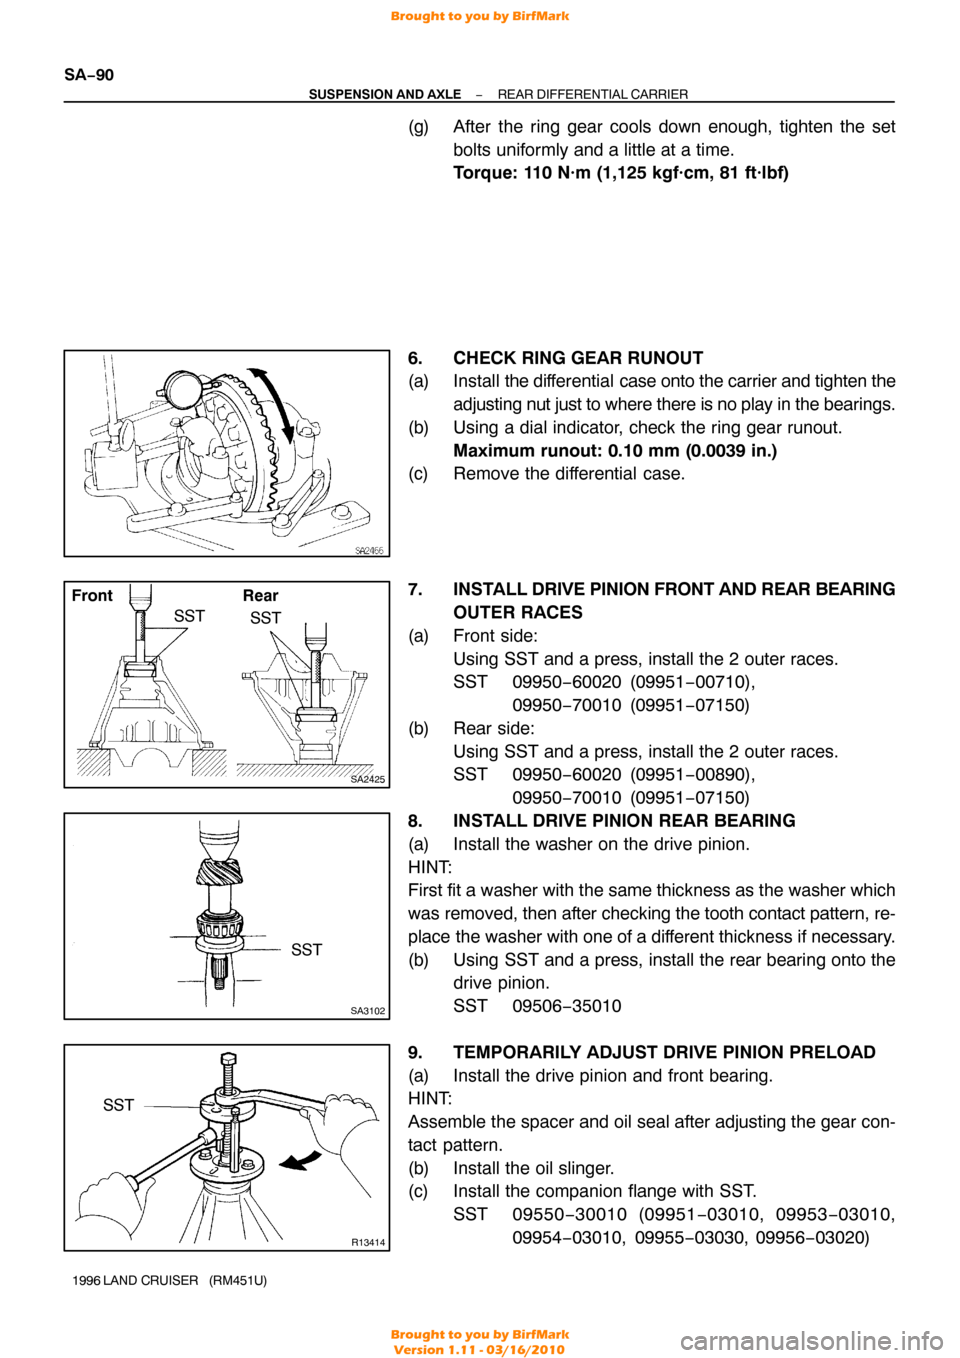
6. CHECK RING GEAR RUNOUT
(a) Install the differential case onto the carrier and tighten the
adjusting nut just to where there is no play in the bearings.
(b) Using a dial indicator, check the ring gear runout. Maximum runout: 0.10 mm (0.0039 in.)
(c) Remove the differential case.
7. INSTALL DRIVE PINION FRONT AND REAR BEARING
OUTER RACES
(a) Front side: Using SST and a press, install the 2 outer races.
SST 09950−60020 (09951 −00710),
09950 −70010 (09951 −07150)
(b) Rear side: Using SST and a press, install the 2 outer races.
SST 09950−60020 (09951 −00890),
09950 −70010 (09951 −07150)
8. INSTALL DRIVE PINION REAR BEARING
(a) Install the washer on the drive pinion.
HINT:
First fit a washer with the same thickness as the washer which
was removed, then after checking the tooth contact pattern, re-
place the washer with one of a different thickne ss if necessary.
(b) Using SST and a press, install the rear bearing onto the drive pinion.
SST 09506−35010
9. TEMPORARILY ADJUST DRIVE PINION PRELOAD
(a) Install the drive pinion and front bearing.
HINT:
Assemble the spacer and oil seal after adjusting the gear con-
tact pattern.
(b) Install the oil slinger.
(c) Install the companion flange with SST. SST 09550 −30010 (09951 −03010, 09953 −03010,
09954 −03010, 09955 −03030, 09956−03020)
Brought to you by BirfMark
Brought to you by BirfMark
Version 1.11 - 03/16/2010
Page 1172 of 1399
SA1VO−02
Z07259
Outside
Actuator Installation
Hole Shift Fork
R08154
3
2
1.5
50 °
108 °
Matchmark
(Groove)
SA2306
SA2420
−
SUSPENSION AND AXLE DIFFERENTIAL LOCKING SYSTEM
SA−109
1996 LAND CRUISER (RM451U)
INSTALLATION
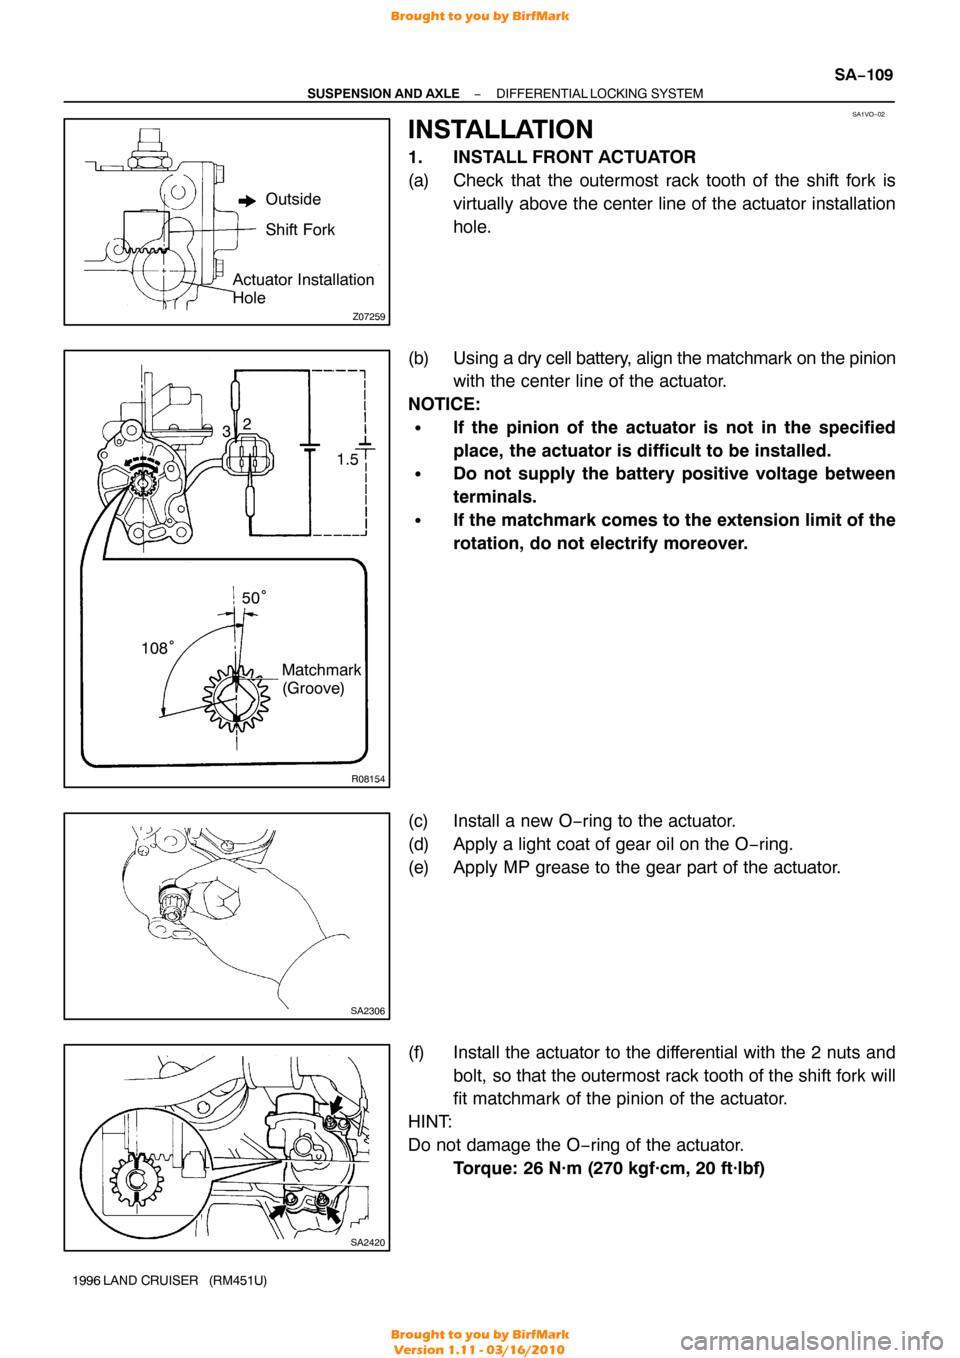
1. INSTALL FRONT ACTUATOR
(a) Check that the outermost rack tooth of the shift fork is
virtually above the center line of the actuator installation
hole.
(b) Using a dry cell battery, alig n the matchmark on the pinion
with the center line of the actuator.
NOTICE:
�If the pinion of the actuator is not in the specified
place, the actuator is difficult to be installed.
�Do not supply the battery positive voltage between
terminals.
�If the matchmark comes to the extension limit of the
rotation, do not electrify moreover.
(c) Install a new O−ring to the actuator.
(d) Apply a light coat of gear oil on the O −ring.
(e) Apply MP grease to the gear part of the actuator.
(f) Install the actuator to the differential with the 2 nuts and bolt, so that the outermost rack tooth of the shift fork will
fit matchmark of the pinion of the actuator.
HINT:
Do not damage the O −ring of the actuator.
Torque: 26 N·m (270 kgf·cm, 20 ft·lbf)
Brought to you by BirfMark
Brought to you by BirfMark
Version 1.11 - 03/16/2010
Page 1176 of 1399
SA1VP−01
R08418
−
SUSPENSION AND AXLE COIL SPRING AND REAR SHOCK ABSORBER
SA−11 3
1996 LAND CRUISER (RM451U)
REMOVAL
1. REMOVE REAR WHEEL
Torque:
Steel wheel: 147 N·m (1,500 kgf·cm, 109 ft·lbf)
Aluminum wheel: 103 N·m (1,050 kgf·cm, 76 ft·lbf)
2. REMOVE REAR SHOCK ABSORBER
(a) Remove the lower bolt holding the shock absorber from the rear axle housing.
Torque: 64 N·m (650 kgf·cm, 47 ft·lbf)
(b) Remove the retainer and 2 cushions, disconnect the shock absorber.
(c) Remove the 2 upper bolts and shock absorber. Torque: 50 N·m (510 kgf·cm, 37 ft·lbf)
(d) Remove these parts from the shock absorber:
�Nut
�3 Retainers
�2 Cushions
�Bracket
Torque: 69 N·m (700 kgf·cm, 51 ft·lbf)
3. DISCONNECT STABILIZER BAR BRACKETS FROM
REAR AXLE HOUSING (See page SA−124 )
4. DISCONNECT LATERAL CONTROL ROD FROM REAR AXLE HOUSING (See page SA−11 8 )
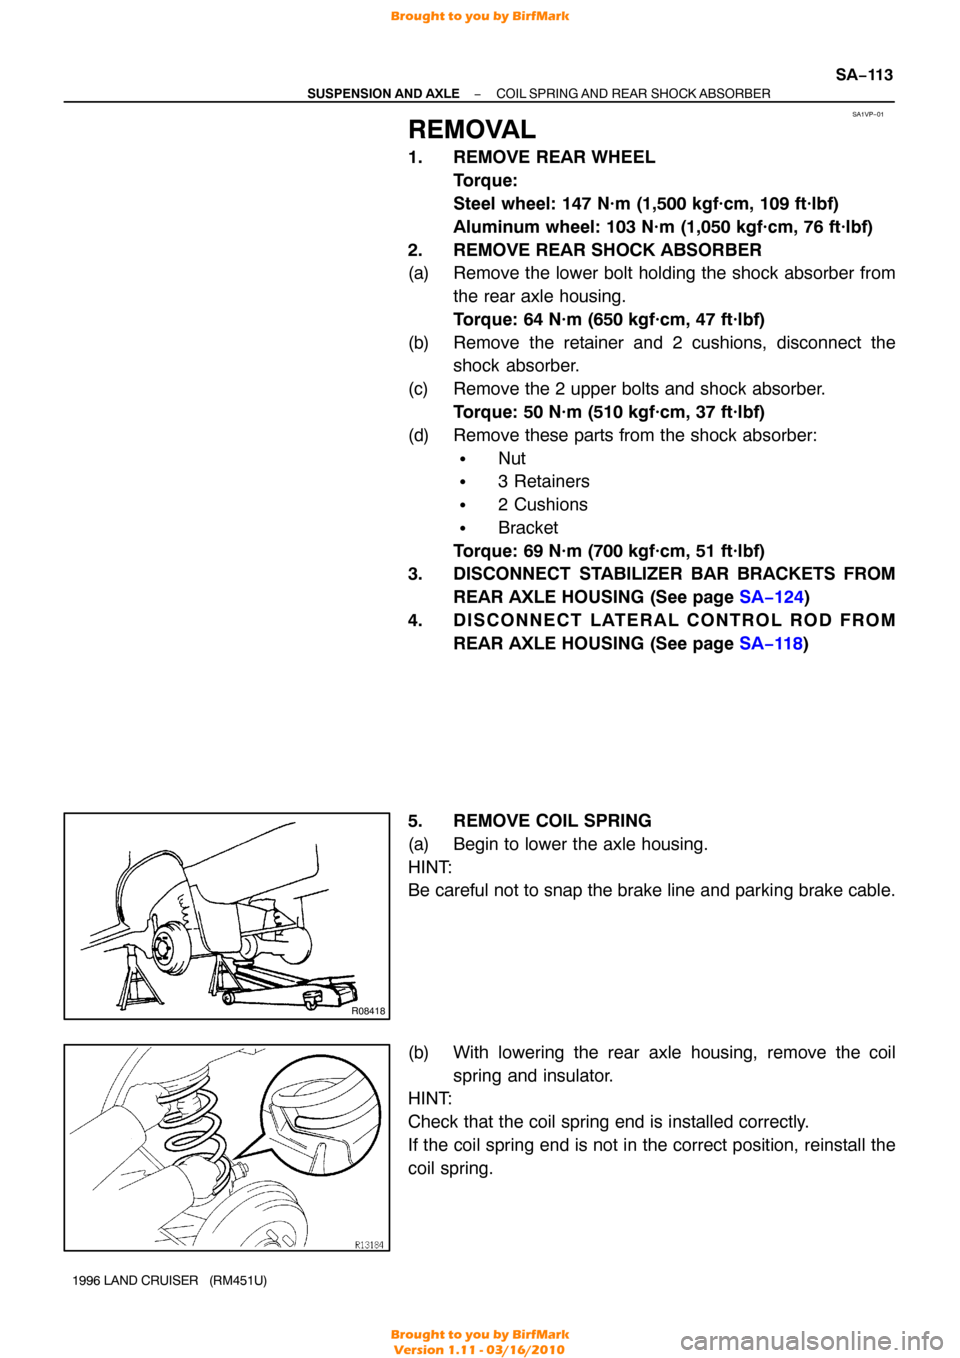
5. REMOVE COIL SPRING
(a) Begin to lower the axle housing.
HINT:
Be careful not to snap the brake line and parking brake cable.
(b) With lowering the rear axle housing, remove the coil spring and insulator.
HINT:
Check that the coil spring end is installed correctly.
If the coil spring end is not in the correct position, reinstall the
coil spring.
Brought to you by BirfMark
Brought to you by BirfMark
Version 1.11 - 03/16/2010
Page 1178 of 1399
SA1VQ−01
SA0627
−
SUSPENSION AND AXLE COIL SPRING AND REAR SHOCK ABSORBER
SA−11 5
1996 LAND CRUISER (RM451U)
INSPECTION
INSPECT SHOCK ABSORBER
Compress and extend the shock absorber rod and check that
there is no abnormal resistance or unusual operation sounds.
If there is any abnormality, replace the shock absorber with a
new one.
NOTICE:
When discarding the shock absorber, use the following
procedure.
Brought to you by BirfMark
Brought to you by BirfMark
Version 1.11 - 03/16/2010
Page 1189 of 1399
SF1ED−04
−
SFI SFI SYSTEM
SF−1
629
Author�: Date�:
1996 LAND CRUISER (RM451U)
SFI SYSTEM
PRECAUTION
1. BEFORE WORKING ON FUEL SYSTEM, DISCON-
NECT NEGATIVE (−) TERMINAL CABLE FROM THE
BATTERY.
HINT:
Any diagnostic trouble code retained by the computer will be
erased when the negative ( −) terminal cable is disconnected.
Therefore, if necessary, read the diagnosis before disconnect-
ing the negative ( −) terminal cable from the battery.
2. DO NOT SMOKE OR WORK NEAR AN OPEN FLAME WHEN WORKING ON FUEL SYSTEM.
3. KEEP GASOLINE AWAY FROM RUBBER OR
LEA TH-
ER PARTS
4. MAINTENANCE PRECAUTIONS
(a) In event of engine misfire, these precautions should be taken.
(1) Check proper connection of battery terminals, etc.
(2) Handle high −tension cords carefully.
(3) After repair work, check that the ignition coil termi- nals and all other ignition system lines are recon-
nected securely.
(4) When cleaning the engine compartment, be espe-
cially careful to protect the electrical system from
water.
(b) Precautions when handling the oxygen sensor. (1) Do not allow the oxygen sensor to drop or hit
against an object.
(2) Do not allow the sensor to come in contact with wa- ter.
5. IF VEHICLE IS EQUIPPED WITH MOBILE RA-
DIO
SYSTEM (HAM, CB, ETC.)
If the vehicle is equipped with a mobile communication system,
refer to the precaution in the IN section.
6. AIR INDUCTION SYSTEM
(a) Separation of the engine oil dipstick, oil filler cap, PCV hose, etc. may cause the engine to run out of tune.
(b) Disconnection, looseness or cracks in the parts of the air
induction system between the throttle body and cylinder
head will allow air suction and cause the engine to run out
of tune.
7. ELECTRONIC CONTROL SYSTEM
(a) Before removing SFI wiring connectors, terminals, etc., first disconnect the power by either turning the ignition
switch OFF or disconnecting the negative ( −) terminal
cable from the battery.
Brought to you by BirfMark
Brought to you by BirfMark
Version 1.11 - 03/16/2010
Page 1192 of 1399
P09286
New O−ring
Grommet Injector
Delivery Pipe WRONG
CORRECT
P09401
Fuel Return Hose
SF−4
−
SFI SFI SYSTEM
632
Author�: Date�:
1996 LAND CRUISER (RM451U)
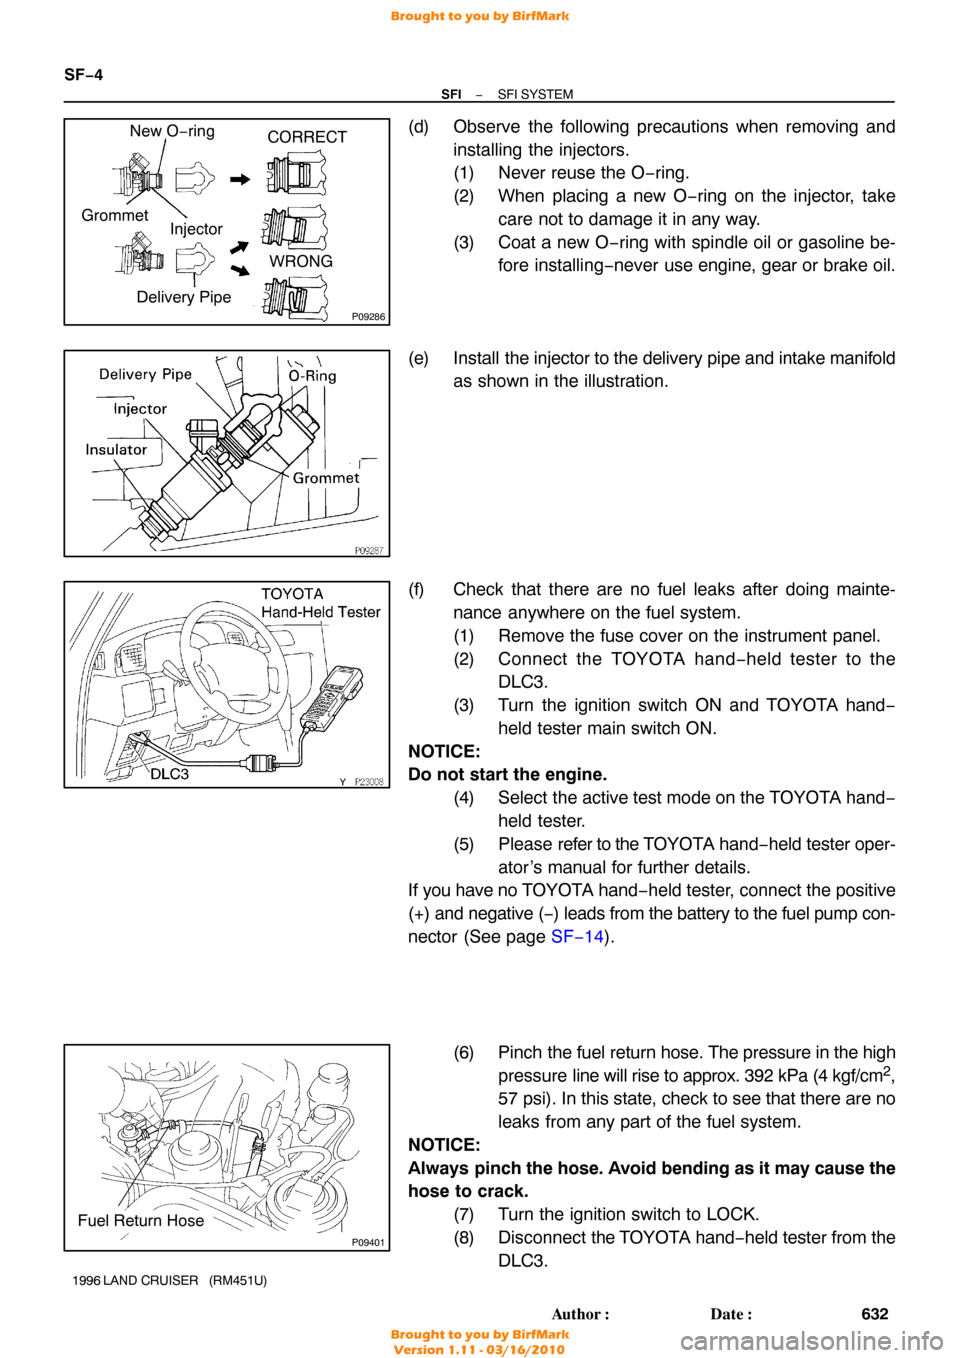
(d) Observe the following precautions when removing and
installing the injectors.
(1) Never reuse the O −ring.
(2) When placing a new O −ring on the injector, take
care not to damage it in any way.
(3) Coat a new O −ring with spindle oil or gasoline be-
fore installing −never use engine, gear or brake oil.
(e) Install the injector to the delivery pipe and intake manifold
as shown in the illustration.
(f) Check that there are no fuel leaks after doing mainte- nance anywhere on the fuel system.
(1) Remove the fuse cover on the instrument panel.
(2) Connect the TOYOTA hand− held tester to the
DLC3.
(3) Turn the ignition switch ON and TOYOTA hand −
held tester main switch ON.
NOTICE:
Do not start the engine. (4) Select the active test mode on the TOYOTA hand−held tester.
(5) Please refer to the TOYOTA hand −held tester oper-
ator ’s manual for further details.
If you have no T OYOTA hand−held tester, connect the positive
(+) and negative ( −) leads from the battery to the fuel pump con-
nector (See page SF−14 ).
(6) Pinch the fuel return hose. The pressure in the high
pressure line will rise to approx. 392 kPa (4 kgf/cm
2,
57 psi). In this state, check to see that there are no
leaks from any part of the fuel system.
NOTICE:
Always pinch the hose. Avoid bending as it may cause the
hose to crack.
(7) Turn the ignition switch to LOCK.
(8) Disconnect the TOYOTA hand −held tester from the
DLC3.
Brought to you by BirfMark
Brought to you by BirfMark
Version 1.11 - 03/16/2010
Page 1199 of 1399
SF1EG−02
SF−14
−
SFI FUEL PUMP
1996 LAND CRUISER (RM451U)
INSPECTION
1. REMOVE SECOND SEATS
2. REMOVE SCUFF PLATE
3. REMOVE SIDE GARNISH
4. REMOVE STEP PLATE
5. DISCONNECT FLOOR MATS
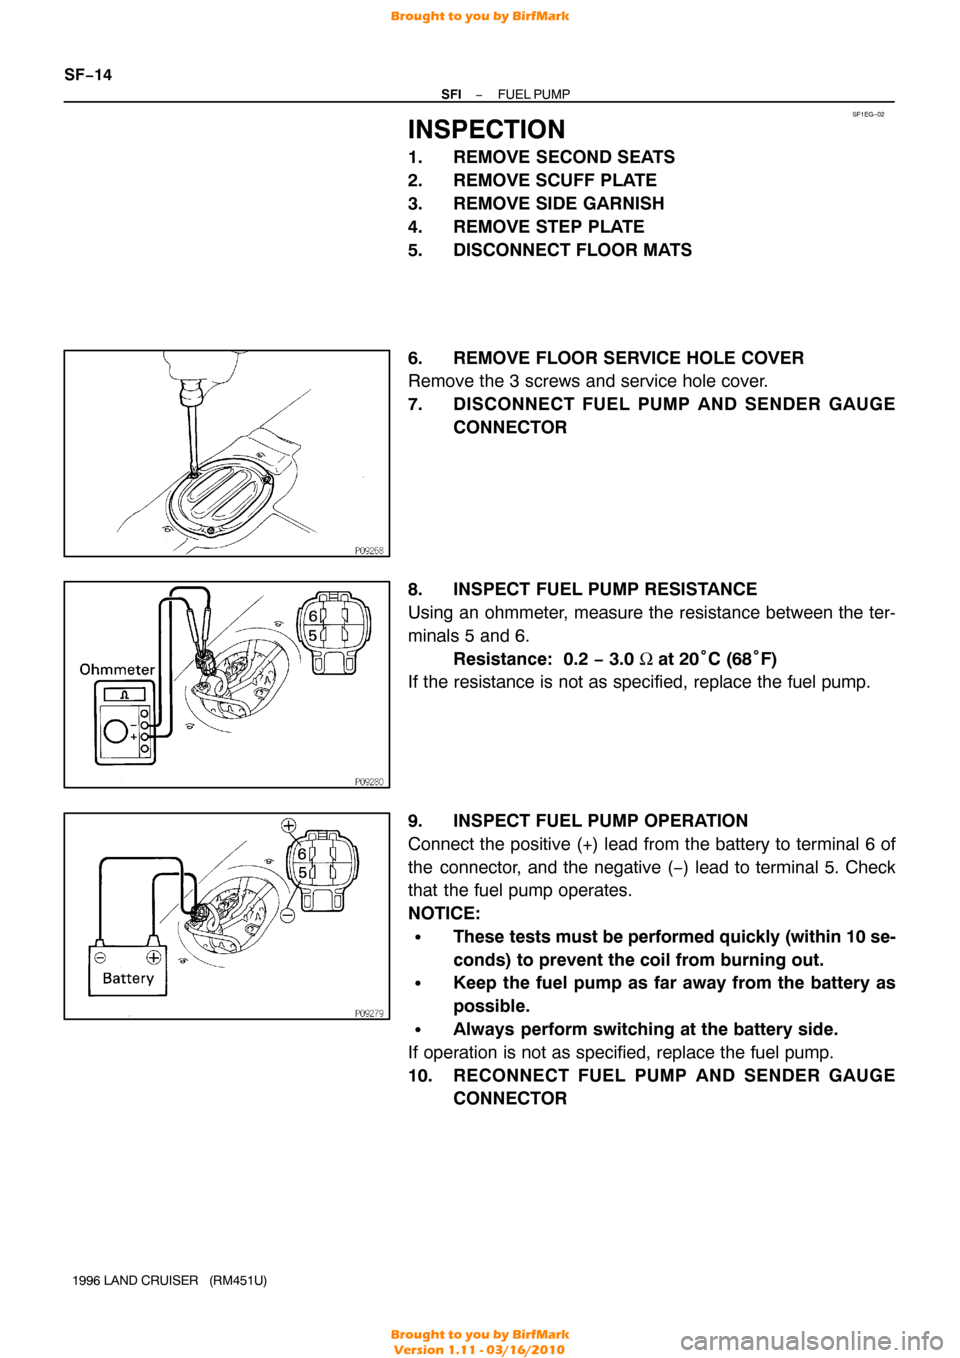
6. REMOVE FLOOR SERVICE HOLE COVER
Remove the 3 screws and service hole cover.
7. DISCONNECT FUEL PUMP AND SENDER GAUGE CONNECTOR
8. INSPECT FUEL PUMP RESISTANCE
Using an ohmmeter, measure the resistance between the ter-
minals 5 and 6. Resistance: 0.2 − 3.0 Ω at 20°C (68°F)
If the resistance is not as specified, replace the fuel pump.
9. INSPECT FUEL PUMP OPERATION
Connect the positive (+) lead from the battery to terminal 6 of
the connector, and the negative ( −) lead to terminal 5. Check
that the fuel pump operates.
NOTICE:
�These tests must be performed quickly (within 10 se-
conds) to prevent the coil from burning out.
�Keep the fuel pump as far away from the battery as
possible.
�Always perform switching at the battery side.
If operation is not as specified, replace the fuel pump.
10. RECONNECT FUEL PUMP AND SENDER GAUGE CONNECTOR
Brought to you by BirfMark
Brought to you by BirfMark
Version 1.11 - 03/16/2010