Page 40 of 226
If your seat belt cannot be fa")
35
The third seat belts can be stowed
when not in use.
Seat belts must be stowed before you fold
the seatback. (See Rear seatsÐTake-
down third seatº in this chapter.)If your seat belt cannot be fastened se-
curely because it is not long enough, a
personalized seat belt extender is avail-
able from your Toyota dealer free of
charge.
Please contact your local Toyota dealer
so that the dealer can order the proper re-
quired length for the extender. Bring the
heaviest coat you expect to wear for prop-
er measurement and selection of length.
Additional ordering information is avail-
able at your Toyota dealer.
When using the seat belt extender,
observe the following. Failure to fol-
low these instructions could result
in less effectiveness of the seat belt
restraint system in case of vehicle
accident, increasing the chance of
personal injury.
�Never use the seat belt extender if
you can fasten the seat belt with-
out it.
�Remember that the extender pro-
vided for you may not be safe
when used on a different vehicle,
or for another person or a different
seating position than the one orig-
inally intended for.
CAUTION!To connect the extender to the seat
belt, insert the tab into the seat belt
buckle so that the PRESSº signs on
the buckle-release buttons of the ex-
tender and the seat belt are both facing
outward as shown.
You will hear a click when the tab locks
into the buckle.
When releasing the seat belt, press on the
buckle-release button on the extender,
not on the seat belt. This helps prevent
damage to the vehicle interior and extend-
er itself.
When not in use, remove the extender
and store in the vehicle for future use.
ÐStowing the third seat belts
(wagon) ÐSeat belt extender
ProCarManuals.com
Page 41 of 226

36
�After inserting the tab, make sure
the tab and buckle are locked and
that the seat belt extender is not
twisted.
�Do not insert coins, clips, etc. in
the buckle as this may prevent you
from properly latching the tab and
buckle.
�If the seat belt does not function
normally, immediately contact
your Toyota dealer.
CAUTION!
The SRS (Supplemental Restraint Sys-
tem) airbags are designed to provide
further protection to the driver and
front passenger when added to the pri-
mary protection provided by the seat
belts.
In response to a severe frontal impact, the
SRS airbags work together with the seat
belts to prevent or reduce injury by inflat-
ing, in order to decrease the likelihood of
the driver's or front passenger's head or
chest directly hitting the steering wheel or
dashboard. The passenger airbag is acti-
vated even with no passenger in the front
seat.This indicator comes on when the
ignition key is turned to the ACCº or
ONº position. It goes off after about 6
seconds. This means the SRS airbags
are operating properly.
The SRS airbag warning light system
monitors the front airbag sensors, center
airbag sensor assembly, inflators, warn-
ing light, interconnecting wiring and power
sources.
SRS airbags
ProCarManuals.com
Page 47 of 226

42Toyota strongly urges the use of child
restraint systems for children small
enough to use it.
The laws of all fifty states in the U.S.A.
and Canada now require the use of a child
restraint system.
CAUTION!
For effective protection in automo-
bile accidents and sudden stops,
children must be properly re-
strained. Holding a child in your
arms is not a substitute for a child
restraint system. In an accident, the
child can be crushed against the
windshield, or between you and the
vehicle's interior if you are unre-
strained.A child restraint system for a small
child or baby must itself be restrained
on the seat with either the lap belt or
the lap portion of the lap/shoulder
belt.
The child restraint system should conform
to the size of the child and properly fit the
vehicle seat. For greater safety, the child
restraint system should be installed in the
rear seat. According to accident statistics,
children are safer when properly re-
strained in the rear seat than in the front
seat.
CAUTION!
Do not use child restraint system on
the rear-facing third seat.
When installing a child restraint system,
follow the instructions provided by the
manufacturer of the system. General di-
rections are also provided under the fol-
lowing illustrations.
CAUTION!
After installing the child restraint
system, make sure it is secured in
place. If it is not restrained securely,
it may cause injury to the child in the
event of a sudden stop or accident.When not using the child restraint system,
keep it secured with the seat belt or place
it somewhere other than in passenger
compartment. This will prevent it injuring
passengers in the event of a sudden stop
or accident.
Your vehicle has anchors for securing the
top strap of a child restraint system. The
anchor nuts are welded beneath the sheet
metal to permit installation of an anchor
bracket for a child restraint system.
To install an anchor bracket, use an 8 mm
X 30 mm X 1.25 mm coarse thread metric
bolt and a 15 mm (0.6 in.) spacer. Note
that the bolts accompanying many child
restraint systems are not metric. You can
damage the anchor nuts on your vehicle
if you force bolts with different thread into
the anchor nuts.
For instructions about how to install the
anchor bracket, see (C) TOP STRAP
ANCHORS AND LOCATIONSº .
If your child restraint system does not pro-
vide any of the necessary parts, you can
purchase the following items from your
Toyota dealer.
* CRS installation kit
(Part No. 04731-22012)
Ðcontains 1 bolt, 3 types of spacers
and 1 locking clip.
* Bolt (Part No. 91511-60830)
Child restraintÐ
ÐChild restraint precautionsÐChild restraint system
ProCarManuals.com
Page 48 of 226
43
(A) INSTALLATION ON REAR SEAT
CENTER (forward-facing rear seat
only)
When installing a rear-facing child re-
straint system, follow the same procedure
as when installing a forward-facing child
restraint system.
CAUTION!
Do not use a rear-facing child re-
straint system in the rear seat if it in-
terferes with the lock mechanism of
the front seats. This may cause se-
vere injury to the child and front
passenger in case of sudden brak-
ing or a collision.
1. Fasten the center lap belt over the
child restraint system following the in-
structions provided by its manufactur-
er.
CAUTION!
�After inserting the tab, make sure
the tab and buckle are locked.
�Do not insert coins, clips, etc. in
the buckle as this may prevent you
from properly latching the tab and
buckle.
�If the seat belt does not function
normally, immediately contact your
Toyota dealer.
ProCarManuals.com
Page 51 of 226
46
Do not use a rear-facing child re-
straint system in the rear seat if it in-
terferes with the lock mechanism of
the front seats. This may cause se-
vere injury to the child and front
passenger in case of sudden brak-
ing or a collision.
CAUTION!
1. Fasten the lap and shoulder belt over
the child restraint system following the in-
struction provided by its manufacturer.
Keep the lap portion of the belt tight.
CAUTION!
�After inserting the tab, make sure
the tab and buckle are locked.
�Do not insert coins, clips, etc. in
the buckle as this may prevent you
from properly latching the tab and
buckle.
�If the seat belt does not function
normally, immediately contact
your Toyota dealer.
2. Fully extend the shoulder belt to put it
in the lock mode.
ProCarManuals.com
Page 53 of 226
48
Make sure the seat belt is securely
locked. Also make sure the child re-
straint system is secure by pushing
and pulling it in different directions.
CAUTION!
5. To remove the child restraint system,
press the buckle-release button and al-
low the belt to retract. Unlock the top
strap.(C) TOP STRAP ANCHORS AND
LOCATIONS
Sedan and coupeÐOn the filler panel
behind the rear seat
a. Make an anchor hole in the filler panel
With plugs: Take out the plug.
Without plugs: Find the hole in the filler
panel by running your fingers across the
filler panel trim at the locations shown in
the illustration. Then cut out the covering
directly above the hole in the filler panel.
b. Insert a 15 mm (0.6 in.) spacer and
tighten down the anchor bracket for your
child restraint system with a bolt. Torque
the bolt to 16.5Ð24.7 NVm (1.68Ð2.52
kgfVm, 12.2Ð18.2 ftVlbf).
ProCarManuals.com
Page 55 of 226
50
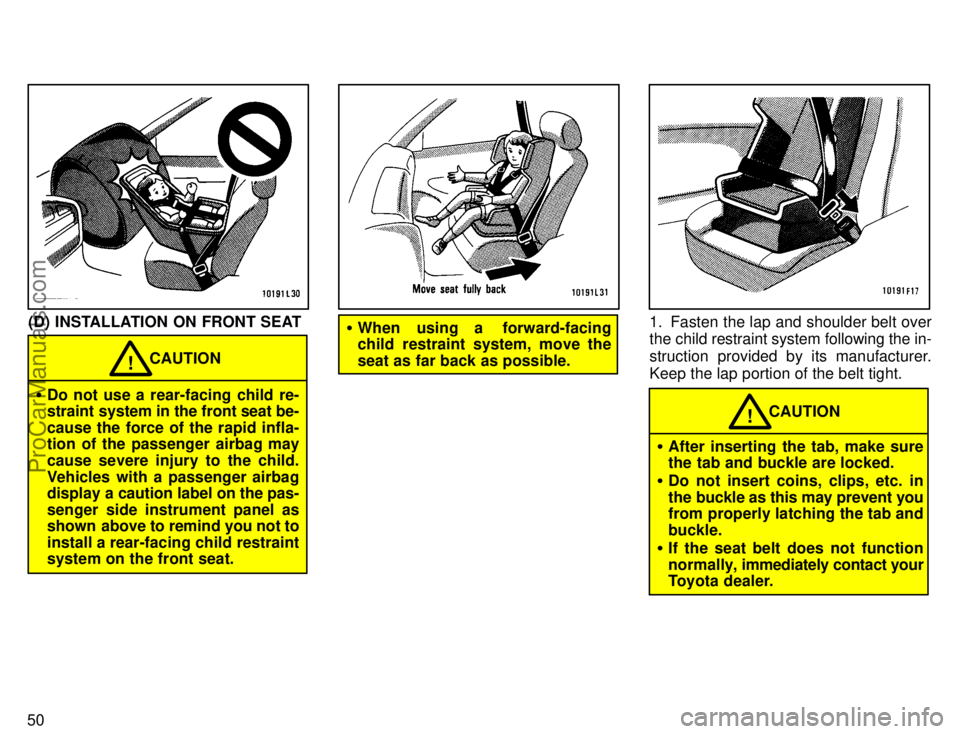
(D) INSTALLATION ON FRONT SEAT
�Do not use a rear-facing child re-
straint system in the front seat be-
cause the force of the rapid infla-
tion of the passenger airbag may
cause severe injury to the child.
Vehicles with a passenger airbag
display a caution label on the pas-
senger side instrument panel as
shown above to remind you not to
install a rear-facing child restraint
system on the front seat.
CAUTION!
�When using a forward-facing
child restraint system, move the
seat as far back as possible.1. Fasten the lap and shoulder belt over
the child restraint system following the in-
struction provided by its manufacturer.
Keep the lap portion of the belt tight.
CAUTION!
�After inserting the tab, make sure
the tab and buckle are locked.
�Do not insert coins, clips, etc. in
the buckle as this may prevent you
from properly latching the tab and
buckle.
�If the seat belt does not function
normally, immediately contact your
Toyota dealer.
ProCarManuals.com
Page 56 of 226
51
2. Fully extend the shoulder belt to put in
the lock mode.3. Place the shoulder belt between the
vehicle seatback and the child restraint
system and allow it to retract. To hold the
child restraint system securely, let the
shoulder belt retract as far as it will go
while firmly pushing down the child re-
straint system.4. If your child restraint system requires
the use of a top strap, latch the hook onto
the tab of the rear center belt and tighten
the top strap.
ProCarManuals.com
 INSTALLATION ON REAR SEAT
CENTER (forward-facing rear seat
only)
When installing a rear-facing child re-
straint system, follow the same procedure
as when installing a forward-facing child
rest")