Page 161 of 226
155
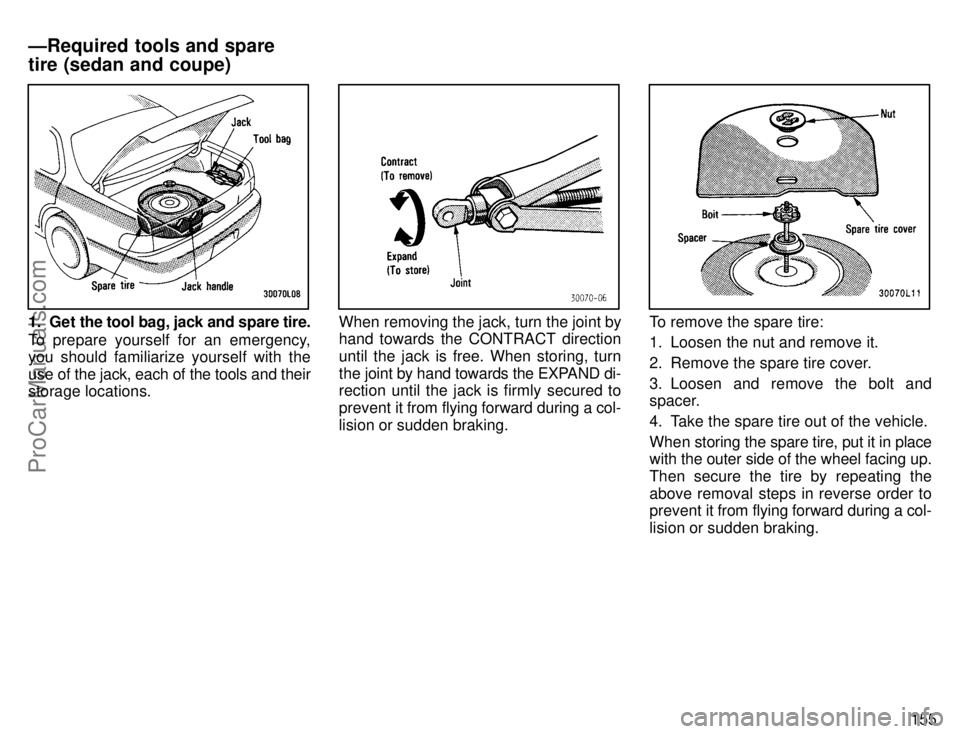
1. Get the tool bag, jack and spare tire.
To prepare yourself for an emergency,
you should familiarize yourself with the
use of the jack, each of the tools and their
storage locations.When removing the jack, turn the joint by
hand towards the CONTRACT direction
until the jack is free. When storing, turn
the joint by hand towards the EXPAND di-
rection until the jack is firmly secured to
prevent it from flying forward during a col-
lision or sudden braking.To remove the spare tire:
1. Loosen the nut and remove it.
2. Remove the spare tire cover.
3. Loosen and remove the bolt and
spacer.
4. Take the spare tire out of the vehicle.
When storing the spare tire, put it in place
with the outer side of the wheel facing up.
Then secure the tire by repeating the
above removal steps in reverse order to
prevent it from flying forward during a col-
lision or sudden braking.
ÐRequired tools and spare
tire (sedan and coupe)
ProCarManuals.com
Page 162 of 226
156
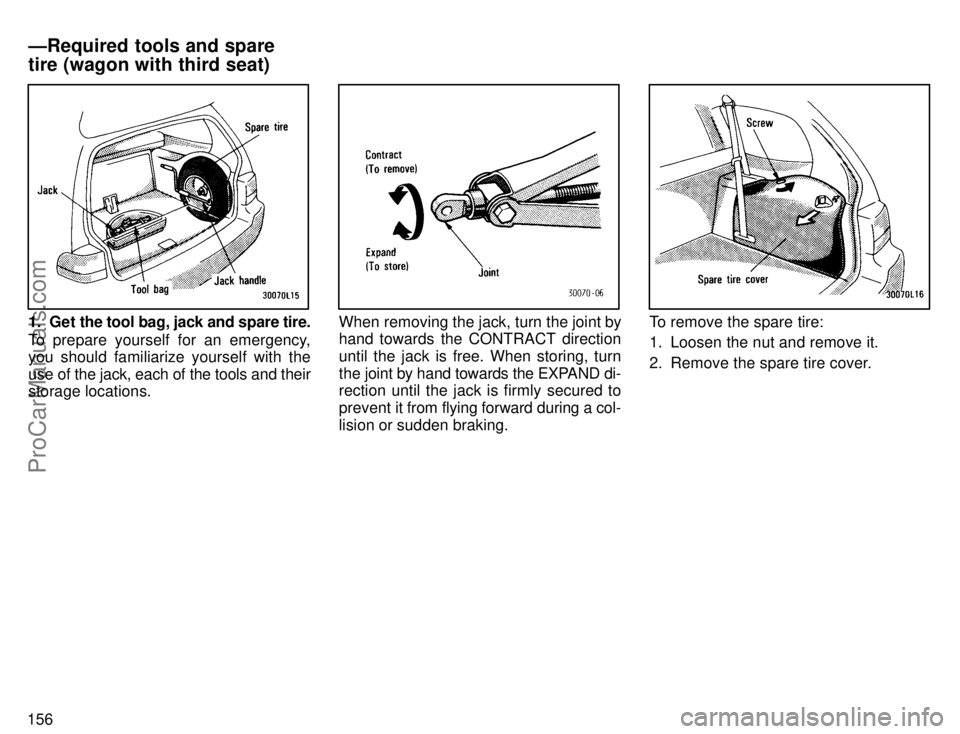
1. Get the tool bag, jack and spare tire.
To prepare yourself for an emergency,
you should familiarize yourself with the
use of the jack, each of the tools and their
storage locations.When removing the jack, turn the joint by
hand towards the CONTRACT direction
until the jack is free. When storing, turn
the joint by hand towards the EXPAND di-
rection until the jack is firmly secured to
prevent it from flying forward during a col-
lision or sudden braking.To remove the spare tire:
1. Loosen the nut and remove it.
2. Remove the spare tire cover.
ÐRequired tools and spare
tire (wagon with third seat)
ProCarManuals.com
Page 163 of 226
157
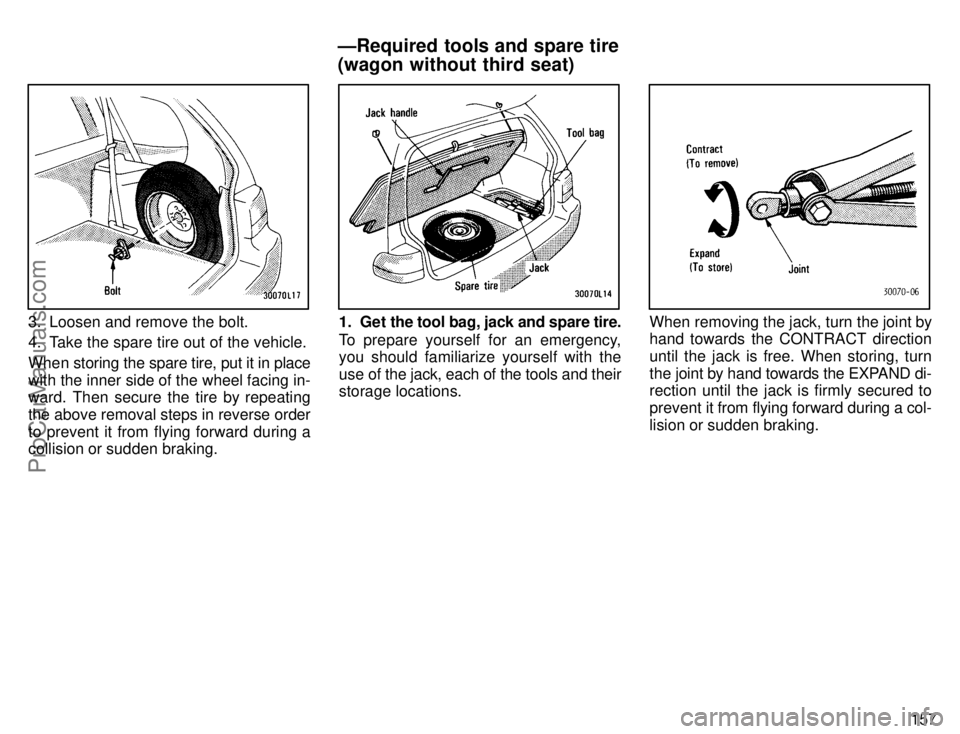
3. Loosen and remove the bolt.
4. Take the spare tire out of the vehicle.
When storing the spare tire, put it in place
with the inner side of the wheel facing in-
ward. Then secure the tire by repeating
the above removal steps in reverse order
to prevent it from flying forward during a
collision or sudden braking.1. Get the tool bag, jack and spare tire.
To prepare yourself for an emergency,
you should familiarize yourself with the
use of the jack, each of the tools and their
storage locations.When removing the jack, turn the joint by
hand towards the CONTRACT direction
until the jack is free. When storing, turn
the joint by hand towards the EXPAND di-
rection until the jack is firmly secured to
prevent it from flying forward during a col-
lision or sudden braking.
ÐRequired tools and spare tire
(wagon without third seat)
ProCarManuals.com
Page 168 of 226
162
11.Check the air pressure of the re-
placed tire.
Adjust the air pressure to the specification
designated in Part 8. If the pressure is
lower, drive slowly to the nearest service
station and fill to the correct pressure.
Do not forget to reinstall the tire inflation
valve cap as dirt and moisture could get
into the valve core and possibly cause air
leakage. If the cap is missing, have a new
one put on as soon as possible.
12. Restow all the tools, jack and flat
tire securely.
As soon as possible after changing
wheels, tighten the wheel nuts to the
torque specified in Part 8 with a torque
wrench and have a technician repair the
flat tire.
Before driving, make sure all the
tools, jack and flat tire are securely
in place in their storage location to
reduce the possibility of personal
injury during a collision or sudden
braking.CAUTION
!
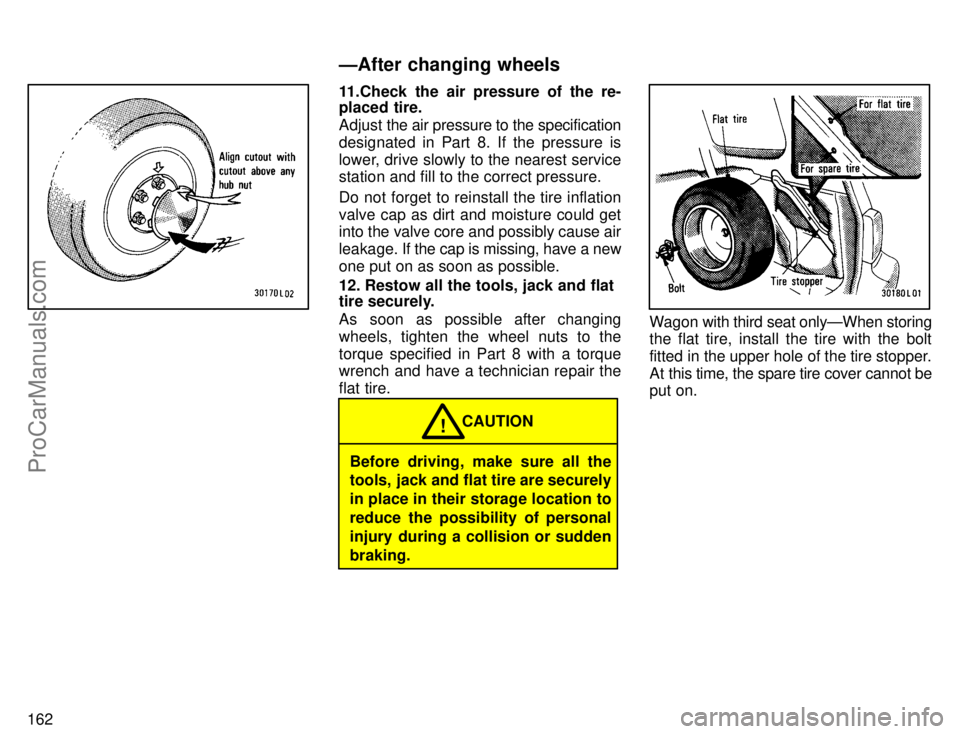
Wagon with third seat onlyÐWhen storing
the flat tire, install the tire with the bolt
fitted in the upper hole of the tire stopper.
At this time, the spare tire cover cannot be
put on.
ÐAfter changing wheels
ProCarManuals.com
Page 198 of 226

192WHEN TO USE SNOW TIRES OR
CHAINS
Snow tires or chains are recom-
mended when driving on snow or ice.
On wet or dry roads, conventional tires
provide better traction than snow tires.
SNOW TIRE SELECTION
If you need snow tires, select the same
size, construction and load capacity
as the original tires on your Toyota.
Do not use tires other than those men-
tioned above. Do not install studded tires
without first checking local regulations for
possible restrictions.
SNOW TIRE INSTALLATION
Snow tires should be installed on all
wheels.
Installing snow tires on the front wheels
only can lead to an excessive difference
in road grip capability between the front
and rear tires which could cause loss of
vehicle control.
When storing removed tires, you should
store them in a cool dry place. Mark the di-
rection of rotation and be sure to install
them in the same direction when replac-
ing.
CAUTION!
�Do not drive with the snow tires in-
correctly inflated.
�Never drive over 120 km/h (75
mph) with any type of snow tires.
TIRE CHAIN SELECTION
Use the tire chains of correct size and
type.
Use SAE Class Sº type radial tire chains
except radial cable chains or V-bar type
chains.
Regulations regarding the use of tire
chains vary according to location or
type of road, so always check them be-
fore installing chains.
CHAIN INSTALLATION
Install the chains on the front tires as
tightly as possible. Do not use tire
chains on the rear tires. Retighten
chains after driving 0.5'1.0 km
(1/4'1/2 mile).
When installing chains on your tires, care-
fully follow the instructions of the chain
manufacturer.
If wheel covers are used, they will be
scratched by the chain band, so remove
the covers before putting on the chains.
CAUTION!
�Do not exceed 50 km/h (30 mph) or
the chain manufacturer's recom-
mended speed limit, whichever is
lower.
�Drive carefully avoiding bumps,
holes, and sharp turns, which may
cause the vehicle to bounce.
�Avoid sharp turns or locked-
wheel braking, as use of chains
may adversely affect vehicle han-
dling.
NOTICE
Do not attempt to use a tire chain on
the compact spare tire, as it may
result in damage to the vehicle as
well as the tire.
Installing snow tires and chains
ProCarManuals.com