Page 18 of 226

13 FROM OUTSIDE
To open the back door, insert the key
and turn it clockwise to unlock. Then
pull the handle and raise the door.
To close the door, lower it and press down
on it. After closing the back door, try pull-
ing it up to make sure it is securely closed.
FROM INSIDE (vehicles with third seat)
Turn the lock knob rightward to lock
and leftward to unlock the back door.
To open the door, pull the handle and
push the door outward.
For closing, hold the lever and lower the
door. After closing the back door, try push-
ing it outward to make sure it is securely
closed.
See Luggage stowage precautionsº in
Part 2 for precautions to observe in load-
ing luggage.
Closing the back door with the lock knob
set in the lock position will also lock the
back door. Be careful not to lock your keys
in the vehicle.
Vehicles with power door lock sys-
temÐTo lock the back door, push the
power door lock switch on the LOCK
side. Pushing on the UNLOCK side
will unlock it.
At this time, all the side doors are oper-
ated simultaneously (See Side doorsº.).
You can, of course, lock and unlock the
back door manually.Vehicles without power door lock sys-
temÐTo lock the back door, push the
switch on the LOCKº side. To unlock
the back door, push the switch on the
UNLOCKº side.
You can, of course, lock and unlock the
back door manually.
ÐPower back door lock
ProCarManuals.com
Page 19 of 226

14
Move the lock lever to the LOCKº
position as shown on the label.
This feature allows you to lock a back door
so it can be opened from the outside only,
not from inside. We recommend using this
feature whenever small children are in the
vehicle.
CAUTION!
�Before driving, be sure that the
doors are closed and locked.
Along with the proper use of seat
belts, locking the back door helps
prevent the passengers from be-
ing thrown out from the vehicle
during an accident. It also helps
prevent the back door from being
opened unintentionally.
�Keep the back door closed while
driving. This not only keeps the
luggage from being thrown out
but also prevents exhaust gases
from entering the vehicle.
To open the hood, pull the hood lock
release lever under the dash. The hood
will spring up slightly. In front of the
vehicle, press up on the auxiliary
catch lever and lift the hood.
Before closing the hood, check to see that
you have not forgotten any tools, rags,
etc. Then lower the hood and make sure
it locks into place. If necessary, press
down gently on the front edge to lock it.
ÐBack door child protector
(with third seat) Hood
ProCarManuals.com
Page 20 of 226
15
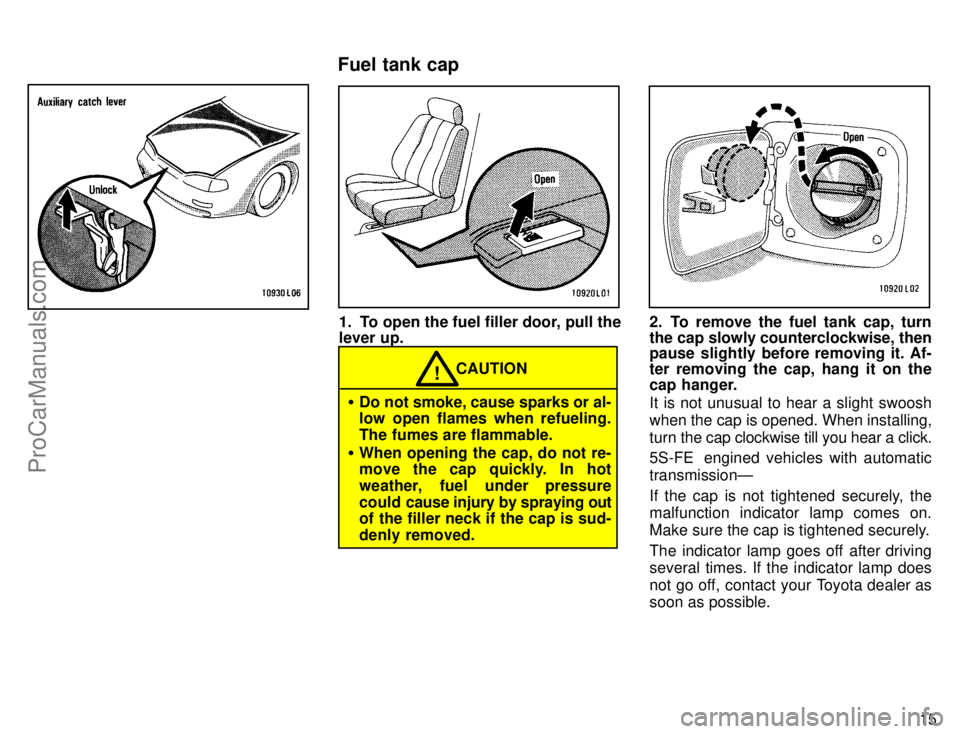
1. To open the fuel filler door, pull the
lever up.
CAUTION!
�Do not smoke, cause sparks or al-
low open flames when refueling.
The fumes are flammable.
�When opening the cap, do not re-
move the cap quickly. In hot
weather, fuel under pressure
could cause injury by spraying out
of the filler neck if the cap is sud-
denly removed.
2. To remove the fuel tank cap, turn
the cap slowly counterclockwise, then
pause slightly before removing it. Af-
ter removing the cap, hang it on the
cap hanger.
It is not unusual to hear a slight swoosh
when the cap is opened. When installing,
turn the cap clockwise till you hear a click.
5S-FE engined vehicles with automatic
transmissionÐ
If the cap is not tightened securely, the
malfunction indicator lamp comes on.
Make sure the cap is tightened securely.
The indicator lamp goes off after driving
several times. If the indicator lamp does
not go off, contact your Toyota dealer as
soon as possible.
Fuel tank cap
ProCarManuals.com
Page 24 of 226

Part 1SeatsFront seatsÐ
ÐSeat adjustment precautions
19
OPERATION OF
INSTRUMENTS AND
CONTROLSÐ
Chapter 1-3
Seats, Seat belts,
Steering wheel
and Mirrors
�Seats
�Front seats
�Rear seats
�Head restraints
�Seat belts
�SRS airbags
�Child restraint
�Tilt steering wheel
�Outside rear view mirrors
�Anti-glare inside rear view
mirror
�Vanity mirrors
While the vehicle is being driven, all ve-
hicle occupants should have the seatback
upright, sit well back in the seat and prop-
erly wear the seat belts provided.
CAUTION!
�Do not drive with the vehicle occu-
pants not properly seated, such as
sitting on top of a folded-down
seatback, or in the luggage
compartment. Persons not proper-
ly seated and restrained by seat
belts can be severely injured in the
event of emergency braking or a
collision.
�During driving, do not let passen-
gers stand up or move around be-
tween seats. Balance can be un-
steady and severe injuries can oc-
cur in the event of emergency brak-
ing or a collision.Adjust the driver's seat so that the foot
pedals, steering wheel and instrument
panel controls are within easy reach of the
driver.
CAUTION!
�Adjustments should not be made
while the vehicle is moving, as the
seat may unexpectedly move and
cause the driver to lose control of
the vehicle.
�When adjusting the seat, be care-
ful not to hit the seat against a pas-
senger or luggage.
�After adjusting the seat position,
try sliding it forward and backward
to make sure it is locked in posi-
tion.
�After adjusting the seatback, exert
body pressure to make sure it is
locked in position.
�Do not put objects under the seats
as they may interfere with the seat-
lock mechanism or unexpectedly
push up the seat position adjust-
ing lever; the seat may suddenly
move, causing the driver to lose
control of the vehicle.
�While adjusting the seat, do not
put your hands under the seat or
near the moving parts. You may
jam your hands or fingers.
ProCarManuals.com
Page 25 of 226

20
ADJUSTING SEAT POSITION
Pull the lock release lever up. Then
slide the seat to the desired position
with slight body pressure and release
the lever.
ADJUSTING SEATBACK ANGLE
Lean forward and pull the lock release
lever. Then lean back to the desired
angle and release the lever.
CAUTION!
To reduce the risk of sliding under
the lap belt during a collision, avoid
reclining the seatback any more
than needed. The seat belts provide
maximum protection when the driv-
er and the passenger are sitting up
straight and well back in the seats.
If you are reclined, the lap belt may
slide past your hips and apply re-
straint forces directly to the abdo-
men. Therefore, in the event of a
frontal collision, the risk of personal
injury may increase with increasing
recline of the seatback.ADJUSTING DRIVER'S SEAT CUSH-
ION ANGLE
Turn the knob either way.
ADJUSTING DRIVER'S SEAT LUM-
BAR SUPPORT
Pull the lever forward and release.
Repeat this until you have a comfortable
support.
ÐAdjusting front seats
(manual seat)
ProCarManuals.com
Page 26 of 226

21
ADJUSTING SEAT POSITION
Move the control switch in the desired
direction.
Releasing the switch will stop the seat at
that position.
Do not place anything under the seat. It
might interfere with the seat movement.
ADJUSTING SEATBACK ANGLE
Lean forward and pull the lock release
lever. Then lean back to the desired
angle and release the lever.
CAUTION!
To reduce the risk of sliding under
the lap belt during a collision, avoid
reclining the seatback any more
than needed. The seat belts provide
maximum protection when the driv-
er and the passenger are sitting up
straight and well back in the seats.
If you are reclined, the lap belt may
slide past your hips and apply re-
straint forces directly to the abdo-
men. Therefore, in the event of a
frontal collision, the risk of person-
al injury may increase with increas-
ing recline of the seatback.ADJUSTING DRIVER'S SEAT CUSH-
ION ANGLE
Move the control switch in the desired
direction.
Releasing the switch will stop the seat at
that position.
ADJUSTING DRIVER'S SEAT LUM-
BAR SUPPORT
Pull the lever forward and release.
Repeat this until you have a comfortable
support.
ÐAdjusting front seats
(power seatÐtype A)
ProCarManuals.com
Page 28 of 226

23
ADJUSTING SEAT POSITION
Move the control switch in the desired
direction.
Releasing the switch will stop the seat at
that position.
Do not place anything under the seat. It
might interfere with the seat movement.
ADJUSTING SEATBACK ANGLE
Move the control switch in the desired
direction.
Releasing the switch will stop the seat-
back at that position.
CAUTION!
To reduce the risk of sliding under
the lap belt during a collision, avoid
reclining the seatback any more
than needed. The seat belts provide
maximum protection when the driv-
er and the passenger are sitting up
straight and well back in the seats.
If you are reclined, the lap belt may
slide past your hips and apply re-
straint forces directly to the abdo-
men. Therefore, in the event of a
frontal collision, the risk of personal
injury may increase with increasing
recline of the seatback.
For easy access to the rear seat, do
this.
1. Lift the seatback lock release lever or
press the release pedal.
The seat will slide forward slightly.
2. Move the seat to the front-most posi-
tion.
ÐAdjusting front seats
(power seatÐtype C)ÐMoving passenger's seat
for rear seat entry (coupe)
ProCarManuals.com
Page 29 of 226

24
Before entry, push the seat belt hanger
down as far as it will go if it is in the
raised position.
After passengers are in, lift up the seat-
back and return the seat until it locks.
CAUTION!
�After putting back the seat, try
pushing the seat forward and rear-
ward to make sure that it is se-
cured in place.
�Never allow anyone to rest their
foot on the release pedal while the
vehicle is moving.
Unlock the seatback, and fold it down.
This will enlarge the trunk room as far as
the front seatbacks. See Luggage stow-
age precautionsº in Part 2 for precautions
to observe in loading luggage.
If desired, each seatback may be folded
separately.
CAUTION!
When returning the seatback to the
upright position:
�Make sure the seat belts are not
twisted or caught in the seatback
and are arranged in their proper
position for ready use.
�Make sure the seatback is secure-
ly locked by pushing forward and
rearward on the top of the seat-
back.
Rear seatsÐ
ÐFold-down rear seat
(sedan and coupe)
ProCarManuals.com