1996 TOYOTA 4RUNNER ECU
[x] Cancel search: ECUPage 17 of 217
16
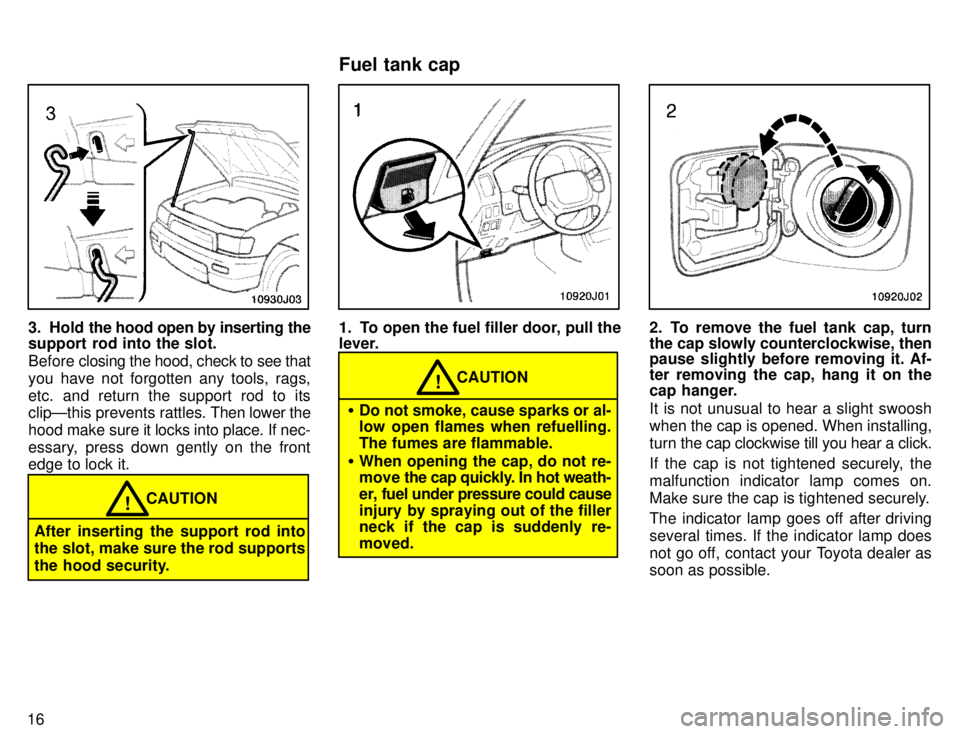
3. Hold the hood open by inserting the
support rod into the slot.
Before closing the hood, check to see that
you have not forgotten any tools, rags,
etc. and return the support rod to its clipÐthis prevents rattles. Then lower the
hood make sure it locks into place. If nec-
essary, press down gently on the front
edge to lock it.
CAUTION!
After inserting the support rod into
the slot, make sure the rod supports
the hood security.
1. To open the fuel filler door, pull the
lever.
CAUTION!
� Do not smoke, cause sparks or al-
low open flames when refuelling.
The fumes are flammable.
� When opening the cap, do not re-
move the cap quickly. In hot weath-
er, fuel under pressure could cause
injury by spraying out of the filler
neck if the cap is suddenly re- moved.
2. To remove the fuel tank cap, turn
the cap slowly counterclockwise, then
pause slightly before removing it. Af-
ter removing the cap, hang it on the
cap hanger.
It is not unusual to hear a slight swoosh
when the cap is opened. When installing,
turn the cap clockwise till you hear a click.
If the cap is not tightened securely, themalfunction indicator lamp comes on.
Make sure the cap is tightened securely.
The indicator lamp goes off after driving several times. If the indicator lamp does
not go off, contact your Toyota dealer as soon as possible.
Fuel tank cap
Page 24 of 217
23
For easy access to the temporary third seat, do this.
1. Swing
the right side bottom cushion up
by pulling the lock release strap.
It is hinged at the front edge, so just lift it up.
2. Unlock the left side seatback and fold it down.
After the passengers are in, lift up the left
side seatback and return the right side
bottom cushion.
CAUTION!
When returning the right side bot-
tom cushion to its place: � Do not forget to pull out the buckle
of the side seatbelts and center
seatbelt and arranged them in
their proper position for ready use.
� Make sure the bottom cushion is securely locked by trying to pull up the edge of the cushion near
the lock release straps.
When returning the seatback to the upright position: �Make sure the seat belts are not
twisted or caught in the seatback
and are arranged in their proper
position for ready use.
� Make sure the seatback is secure-
ly locked by pushing forward and
rearward on the top of the seat- back.
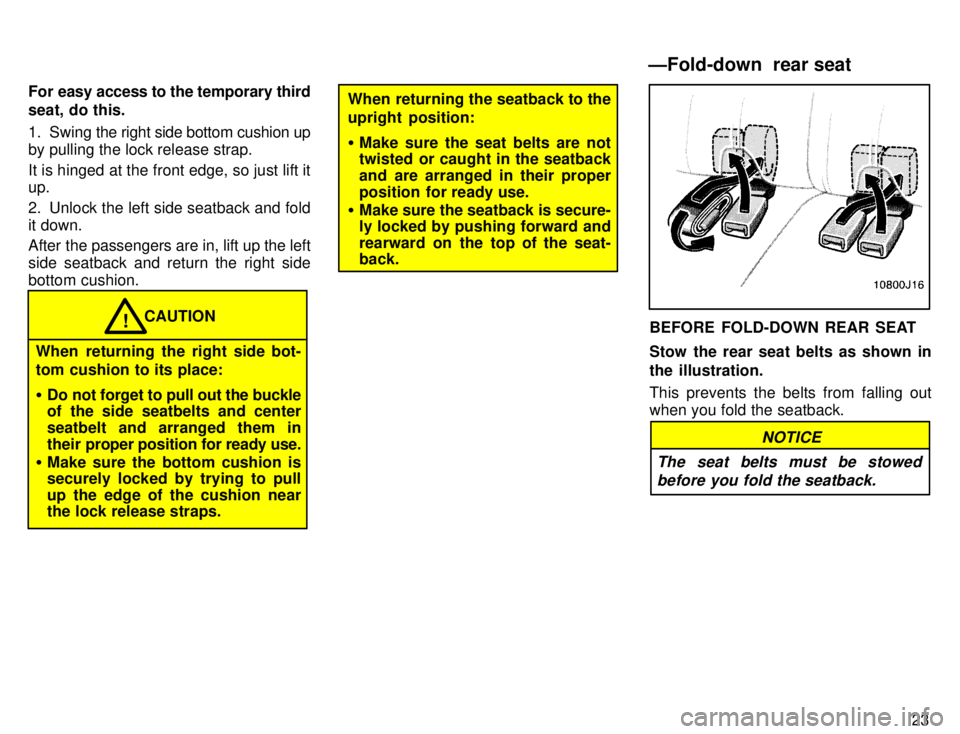
BEFORE FOLD-DOWN REAR SEAT
Stow the rear seat belts as shown in
the illustration.
This prevents the belts from falling out
when you fold the seatback.
NOTICE
The seat belts must be stowed before you fold the seatback.
ÐFold-down rear seat
Page 25 of 217
24
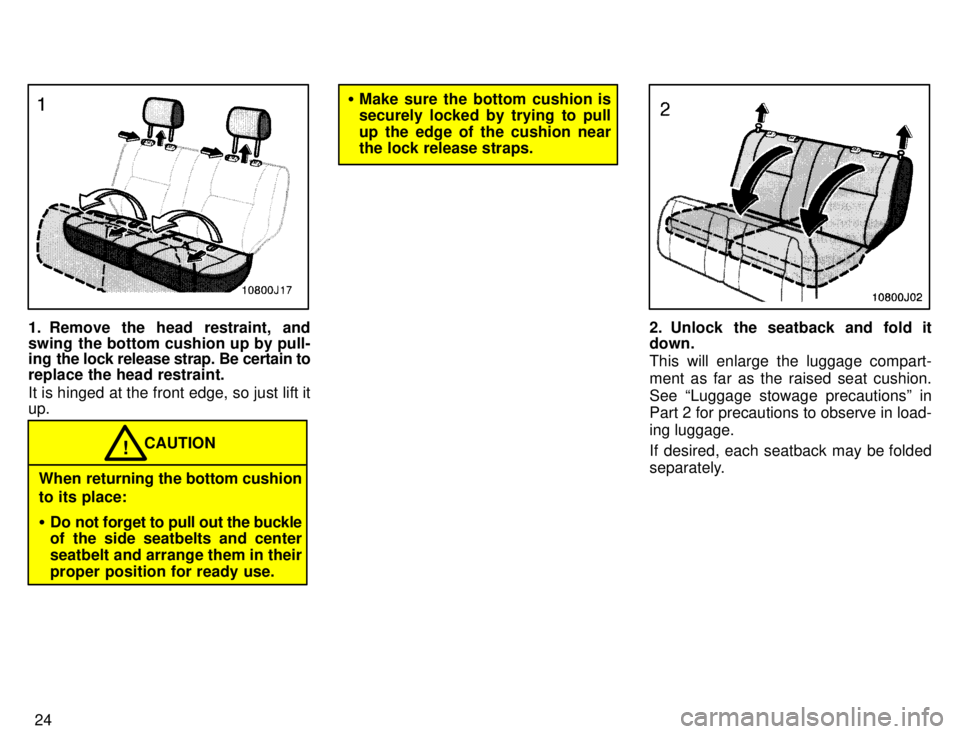
1. Remove the head restraint, and
swing the bottom cushion up by pull-
ing the lock release strap. Be certain to replace the head restraint.
It is hinged at the front edge, so just lift it up.
CAUTION!
When returning the bottom cushion
to its place: � Do not forget to pull out the buckle
of the side seatbelts and center
seatbelt and arrange them in their
proper position for ready use.
�Make sure the bottom cushion is securely locked by trying to pull up the edge of the cushion near
the lock release straps.
2. Unlock the seatback and fold it down.
This will enlarge the luggage compart-
ment as far as the raised seat cushion.See Luggage stowage precautionsº in
Part 2 for precautions to observe in load- ing luggage.
If desired, each seatback may be folded
separately.
Page 26 of 217
25
CAUTION!
When returning the seatback to the
upright position: � Make sure the seat belts are not
twisted or caught in the seatback
and are arranged in their proper
position for ready use.
� Make sure the seatback is secure-
ly locked by pushing forward and rearward on the top of the seat-
back. Be certain to replace the
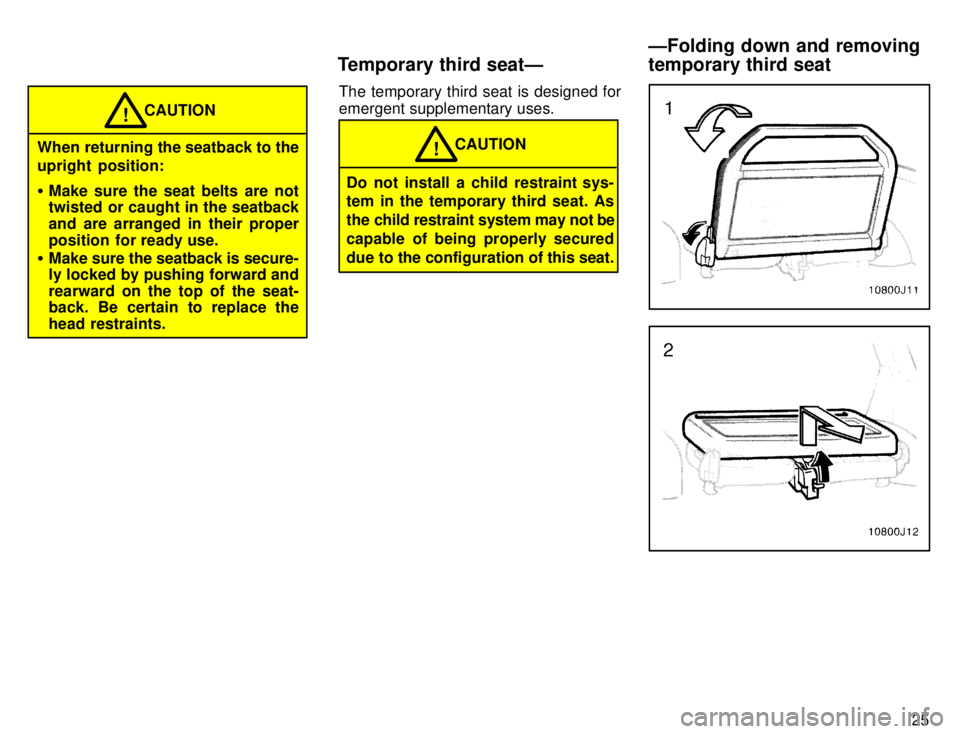
head restraints. The temporary third seat is designed for emergent supplementary uses.
CAUTION!
Do not install a child restraint sys- tem in the temporary third seat. As
the child restraint system may not be
capable of being properly secured
due to the configuration of this seat.
Temporary third seatÐ ÐFolding down and removing temporary third seat
Page 27 of 217
26
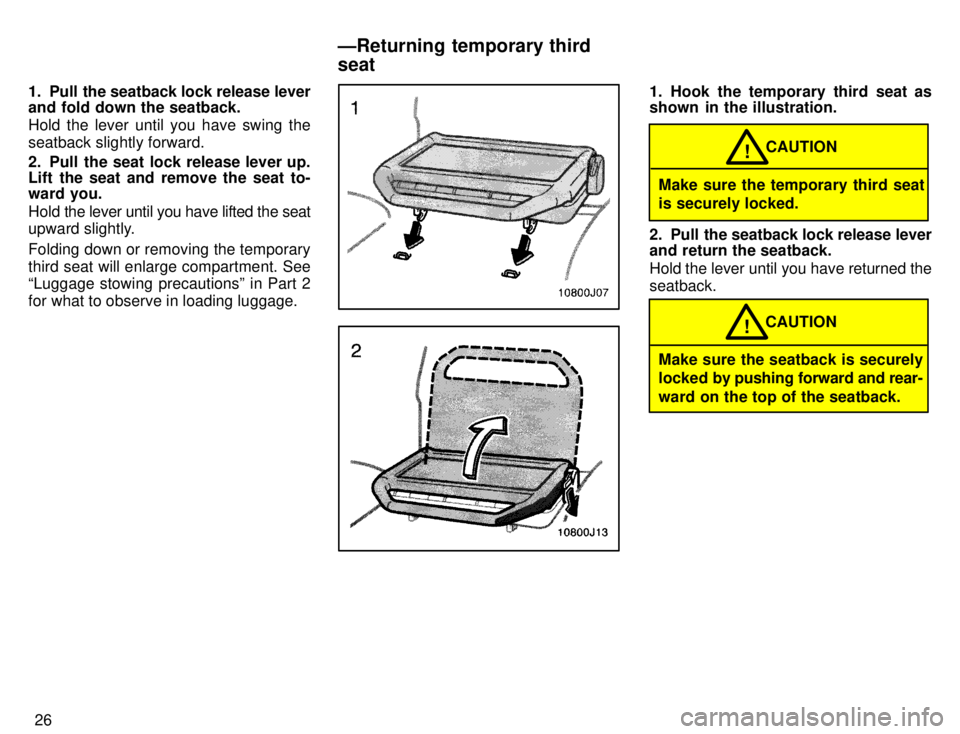
1. Pull the seatback lock release lever
and fold down the seatback.
Hold the lever until you have swing the
seatback slightly forward.
2. Pull the seat lock release lever up.
Lift the seat and remove the seat to-
ward you.
Hold
the lever until you have lifted the seat
upward slightly. Folding down or removing the temporary third seat will enlarge compartment. See
Luggage stowing precautionsº in Part 2
for what to observe in loading luggage.
1. Hook the temporary third seat as
shown in the illustration.
CAUTION!
Make sure the temporary third seat
is securely locked.
2. Pull the seatback lock release lever
and return the seatback.
Hold the lever until you have returned the seatback.
CAUTION!
Make sure the seatback is securely
locked by pushing forward and rear-
ward on the top of the seatback.
ÐReturning temporary third seat
Page 28 of 217
27
Front
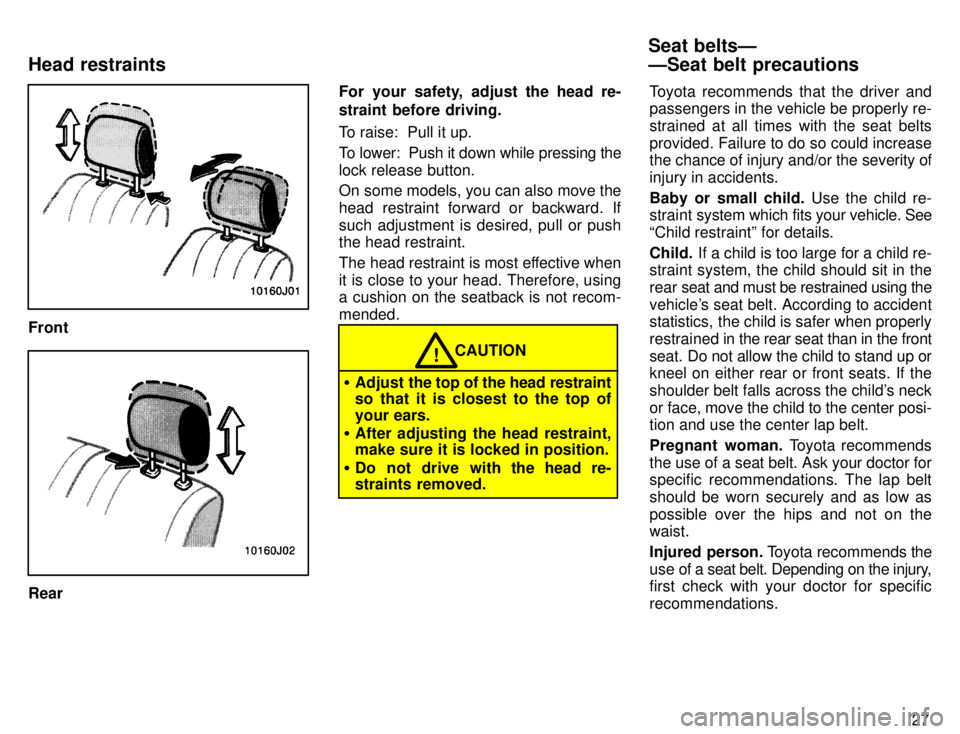
RearFor your safety, adjust the head re-
straint before driving.
To raise: Pull it up.
To lower: Push it down while pressing the lock release button.
On some models, you can also move the
head restraint forward or backward. If
such adjustment is desired, pull or push the head restraint.
The head restraint is most effective when
it is close to your head. Therefore, using a cushion on the seatback is not recom- mended.
CAUTION!
� Adjust the top of the head restraint
so that it is closest to the top of
your ears.
� After adjusting the head restraint,
make sure it is locked in position.
� Do not drive with the head re-
straints removed. Toyota recommends that the driver and
passengers in the vehicle be properly re- strained at all times with the seat belts
provided. Failure to do so could increase
the chance of injury and/or the severity of
injury in accidents. Baby or small child.
Use the child re-
straint system which fits your vehicle. See
Child restraintº for details.Child. If a child is too large for a child re-
straint system, the child should sit in the rear seat and must be restrained using the
vehicle's seat belt. According to accident
statistics, the child is safer when properly
restrained in the rear seat than in the front
seat. Do not allow the child to stand up or
kneel on either rear or front seats. If the
shoulder belt falls across the child's neck
or face, move the child to the center posi- tion and use the center lap belt.
Pregnant woman. Toyota recommends
the use of a seat belt. Ask your doctor for
specific recommendations. The lap belt
should be worn securely and as low as
possible over the hips and not on the waist.
Injured person. Toyota recommends the
use of a seat belt. Depending on the injury,
first check with your doctor for specific recommendations.
Seat beltsÐ ÐSeat belt precautions
Head restraints
Page 29 of 217
27
Front
RearFor your s
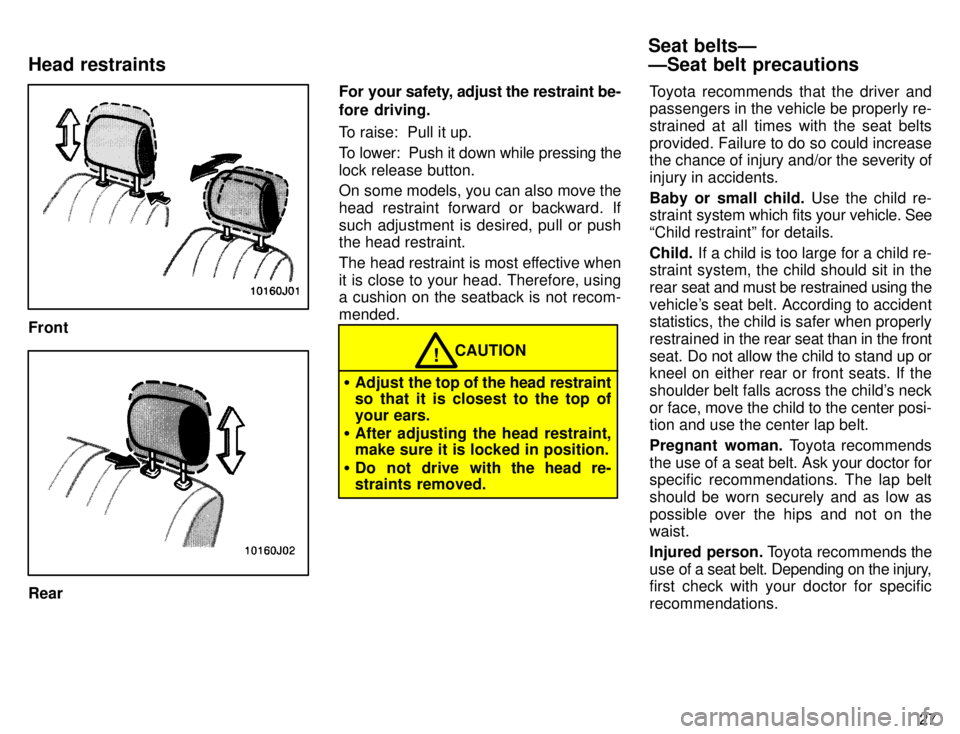
afety, adjust the restraint be-
fore driving.
To raise: Pull it up.
To lower: Push it down while pressing the lock release button.
On some models, you can also move the
head restraint forward or backward. If
such adjustment is desired, pull or push the head restraint.
The head restraint is most effective when
it is close to your head. Therefore, using a cushion on the seatback is not recom- mended.
CAUTION!
� Adjust the top of the head restraint
so that it is closest to the top of
your ears.
� After adjusting the head restraint,
make sure it is locked in position.
� Do not drive with the head re-
straints removed. Toyota recommends that the driver and
passengers in the vehicle be properly re- strained at all times with the seat belts
provided. Failure to do so could increase
the chance of injury and/or the severity of
injury in accidents. Baby or small child.
Use the child re-
straint system which fits your vehicle. See
Child restraintº for details.Child. If a child is too large for a child re-
straint system, the child should sit in the rear seat and must be restrained using the
vehicle's seat belt. According to accident
statistics, the child is safer when properly
restrained in the rear seat than in the front
seat. Do not allow the child to stand up or
kneel on either rear or front seats. If the
shoulder belt falls across the child's neck
or face, move the child to the center posi- tion and use the center lap belt.
Pregnant woman. Toyota recommends
the use of a seat belt. Ask your doctor for
specific recommendations. The lap belt
should be worn securely and as low as
possible over the hips and not on the waist.
Injured person. Toyota recommends the
use of a seat belt. Depending on the injury,
first check with your doctor for specific recommendations.
Seat beltsÐ ÐSeat belt precautions
Head restraints
Page 31 of 217
29
If the seat belt cannot be pulled out of the
retractor,
firmly pull the belt and release it.
You will then be able to smoothly pull the
belt out of the retractor.
When a passenger's shoulder belt is com-
pletely extended and is then retracted
even slightly, the belt is locked in that posi-
tion and cannot be extended. This feature
is used to hold the child restraint system
securely. (For details, see Child restraintº
in this chapter.) To free the belt again, fully
retract the belt and then pull the belt out
once more.
CAUTION!
� After inserting the tab, make sure
the tab and buckle are locked and that the belt is not twisted.
� Do not insert coins, clips, etc. in
the buckle as this may prevent you
from properly latching the tab andbuckle.
� If the seat belt does not function
normally, i mmediately contact your
Toyota dealer.
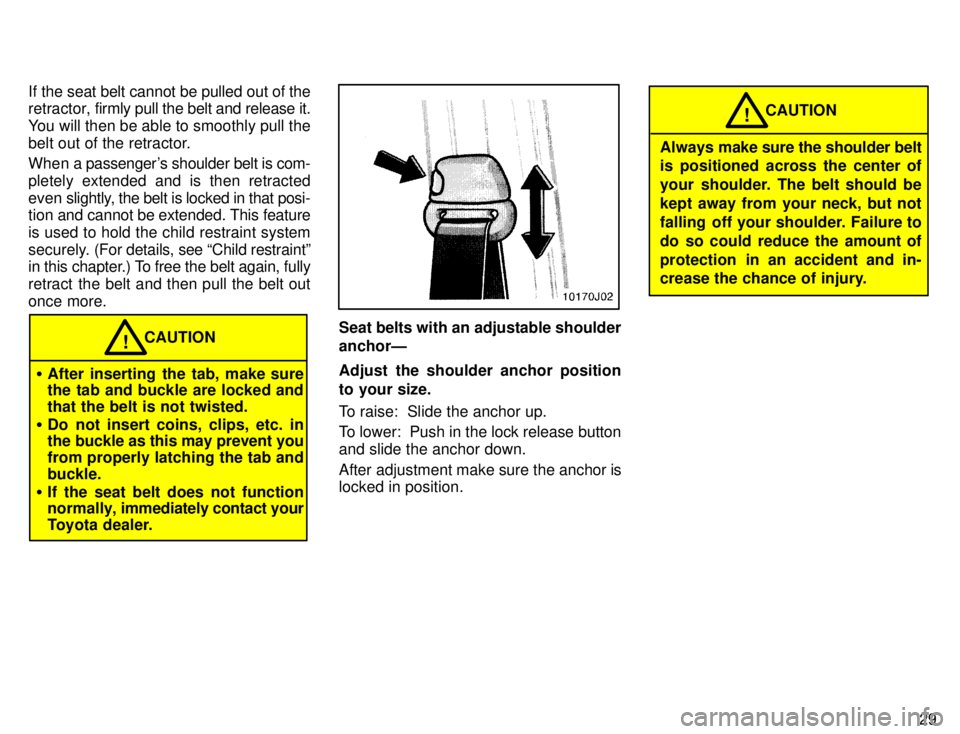
Seat belts with an adjustable shoulder anchorÐ
Adjust the shoulder anchor position
to your size.
To raise: Slide the anchor up.
To lower: Push in the lock release button
and slide the anchor down.
After adjustment make sure the anchor is
locked in position.
CAUTION!
Always make sure the shoulder belt
is positioned across the center of
your shoulder. The belt should be
kept away from your neck, but not
falling off your shoulder. Failure to
do so could reduce the amount of
protection in an accident and in-
crease the chance of injury.