1996 NISSAN FRONTIER key
[x] Cancel search: keyPage 79 of 198
WARNING
Alcohol in the blood stream reduces
coordination, delays reaction time and
impairs judgement. Driving after drink-
ing alcohol increases the likelihood of
being involved in an accident injuring
yourself and others. Additionally, if you
are injured in the accident alcohol can
increase the severity of injury.
NISSAN is committed to safe driving. How-
ever, you must choose not to drive under
the influence of alcohol. Every year thou-
sands of people are injured or killed in
alcohol related accidents. Although the local
laws vary on what is considered to be
legally intoxicated, the fact is that alcohol
affects all people differently and most
people underestimate the effects of alcohol.
Remember, drinking and driving don't mix!
And that's true for drugs, too (over the
counter, prescription, and illegal drugs).
Don't drive if your ability to operate your
vehicle is impaired by alcohol, drugs, or
some other physical condition.
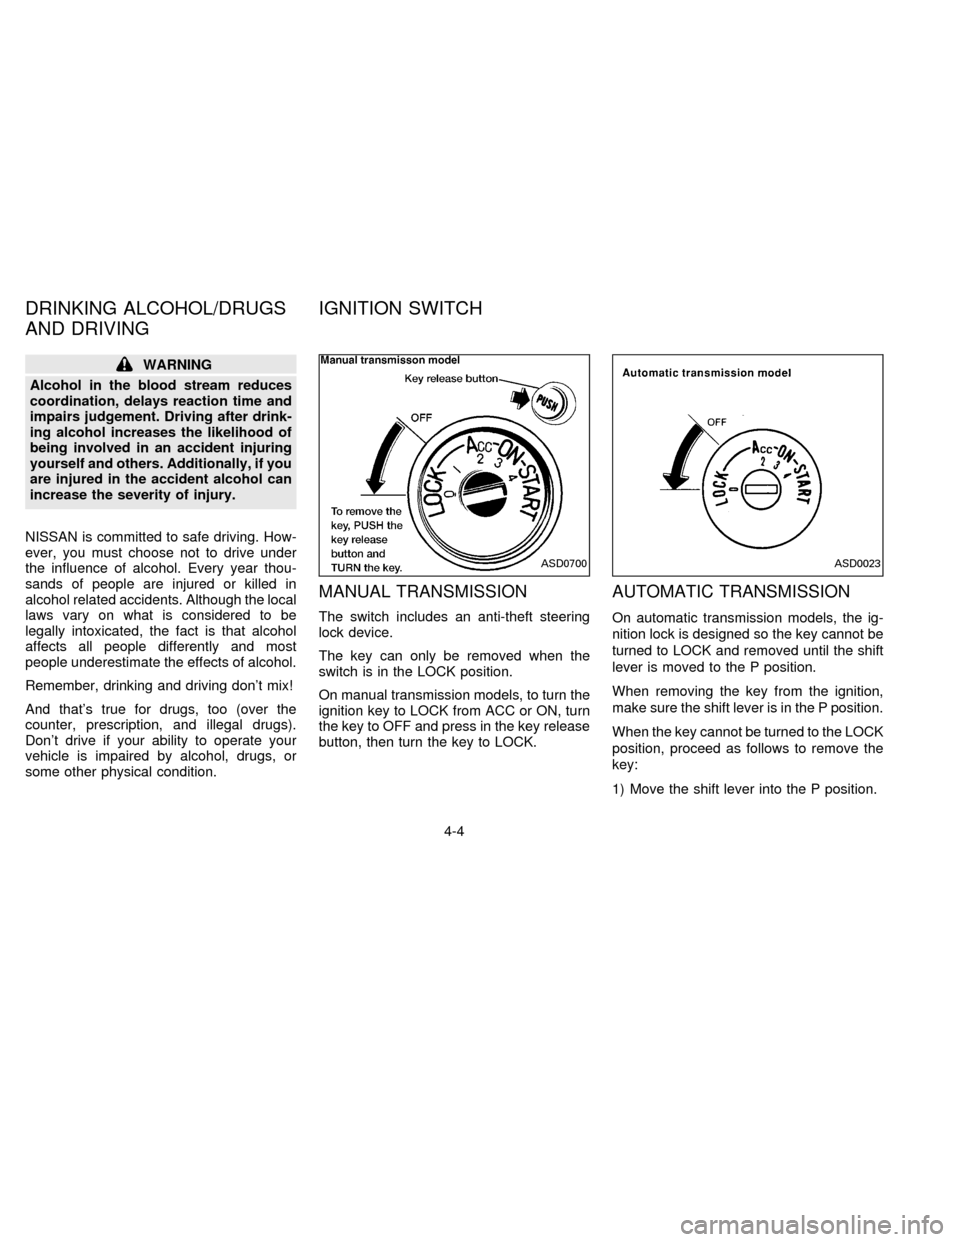
MANUAL TRANSMISSION
The switch includes an anti-theft steering
lock device.
The key can only be removed when the
switch is in the LOCK position.
On manual transmission models, to turn the
ignition key to LOCK from ACC or ON, turn
the key to OFF and press in the key release
button, then turn the key to LOCK.
AUTOMATIC TRANSMISSION
On automatic transmission models, the ig-
nition lock is designed so the key cannot be
turned to LOCK and removed until the shift
lever is moved to the P position.
When removing the key from the ignition,
make sure the shift lever is in the P position.
When the key cannot be turned to the LOCK
position, proceed as follows to remove the
key:
1) Move the shift lever into the P position.
ASD0700ASD0023
DRINKING ALCOHOL/DRUGS
AND DRIVINGIGNITION SWITCH
4-4
ZX
Page 80 of 198
2) Turn the ignition key slightly in the ON
direction.
3) Turn the key toward the LOCK position.
4) Remove the key.
The shift lever is designed so it cannot be
moved out of P and into any of the other
gear positions if the ignition key is turned to
OFF or if the key is removed from the
switch.The shift lever can be moved if the
ignition switch is in the ACC position.
The shift lever can also be moved if the
ignition switch is in the ON position and
the foot brake pedal is depressed.
WARNING
cTo lock the steering wheel, remove
the key. To unlock the steering
wheel, insert the key and turn it gen-
tly while rotating the steering wheel
slightly right and left.
cNever remove the key while driving.
If the key is removed, the steering
wheel will lock. This may cause the
driver to lose control of the vehicle
and could result in serious vehicle
damage or personal injury.
Key positions
LOCK Normal parking position (0)
OFF (Manual transmission model) (1)
The engine can be turned off without locking
the steering wheel. When removing the key
from the key cylinder, push the key release
button at this position and turn the key to
LOCK.
ACC (Accessories) (2)
This position activates electrical accesso-
ries such as the radio when the engine is
not running.
ON (Normal operating position) (3)
This position turns on the ignition system
and electrical accessories.
START (4)
This position starts the engine. As soon as
the engine has started, release the key. It
automatically returns to the ON position.cMake sure the area around the vehicle is
clear.
cCheck fluid levels such as engine oil,
coolant, brake and clutch fluid, and win-
dow washer fluid as frequently as pos-
sible, at least whenever you refuel.
cCheck that all windows and lights are
clean.
cVisually inspect tires for their appearance
and condition. Also check tires for proper
inflation.
cLock all doors.
cPosition seat and adjust head restraints.
cAdjust inside and outside mirrors.
cFasten seat belts and ask all passengers
to do likewise.
cCheck the operation of warning lights
when key is turned to the ON (3) position.
BEFORE STARTING THE
ENGINE
4-5
ZX
Page 81 of 198
The automatic transmission in your vehicle
(if so equipped) is electronically controlled
by a microcomputer to produce maximum
power and smooth operation.
Shown on the following pages are the rec-
ommended operating procedures for your
automatic transmission. Follow these pro-
cedures for maximum vehicle performance
and driving enjoyment.
Starting the vehicle
cAfter starting the engine, fully depress
the foot brake pedal and push the shift
lever button before shifting the selector
lever to the D, R, 2 or 1 position. Be sure
the vehicle is fully stopped before at-
tempting to shift the selector lever.
This automatic transmission is designed
so the foot brake pedal MUST be de-
pressed before shifting from P to any
drive position while the ignition switch is
ON.
Normally, the shift lever cannot be
moved out of P and into any of the other
gear positions if the ignition key is
turned to OFF or if the key is removed
from the switch.When the battery charge is low, the shift
lever can be moved if the ignition switch
is in the ACC position.
1. Keep the foot brake pedal depressed and
push the shift lever button to shift into a
driving gear.
2. Release the parking brake and foot
brake, then gradually start the vehicle in
motion.WARNING
cCold engine idle speed is high, so
use caution when shifting into a for-
ward or reverse gear before the en-
gine has warmed up.
cAvoid revving up the engine while
the vehicle is stopped. This could
cause unexpected vehicle move-
ment.
Driving precautions
To help prevent transmission damage:
cDo not depress the accelerator pedal
while shifting from P or N to R, D, 2 or
1. Always depress the brake pedal
until shifting is completed.cNever shift to P or R while vehicle is
moving.
cWhen stopping the vehicle on an up-
hill grade, do not hold the vehicle by
depressing the accelerator pedal. The
foot brake should be used for this
purpose.
DRIVING WITH AUTOMATIC
TRANSMISSION
4-6
ZX
Page 82 of 198

Shifting with automatic transmission
Push the button to shift into P, R or from D
to 2. All other positions can be selected
without pushing the button.
P (Park):
Use this selector position when the vehicle
is parked or when starting the engine. Al-
ways be sure the vehicle is at a complete
stop. For maximum safety, depress the
brake pedal, then push in the selector lever
button and move the lever to the P position.
Apply the parking brake. When parking on a
hill, apply the parking brake first, then shiftthe lever into the P position.
Shifting from P (Park)
If the ignition switch is in the ON position
and the foot brake pedal is depressed, but
the shift lever still cannot be moved out of P
(Park) use the following procedure:
1. Shut the engine off and remove the key.
2. Apply the parking brake.
3. Reinsert the key and turn it clockwise to
the ACC position.
4. Depress the brake pedal, move the shift
lever to N (Neutral) and start the engine.These instructions for starting the vehicle in
N (Neutral) should only be used until service
can be obtained.
R (Reverse):
Use this position to back up. Shift into this
position only after the vehicle has com-
pletely stopped.
N (Neutral):
Neither forward nor reverse gear is en-
gaged. The engine can be started in this
position. You may shift to N and restart a
stalled engine while the vehicle is moving.
D (Drive):
Use this position for all normal forward
driving.
2 (Second gear):
Use for hill climbing, effective engine brak-
ing on downhill grades or starting on slip-
pery roads.
Do not downshift into the 2 position at speeds
over 62 MPH (100 km/h), and do not exceed
62 MPH (100 km/h) in the 2 position.
ASD0701
4-7
ZX
Page 85 of 198
2nd 22 (35)
3rd 30 (48)
4th & 5th þ (þ)þ (þ)1. Apply the parking brake.
2.Automatic transmission:
Move the selector lever to P (Park) or N
(Neutral) (P preferred).
The shift lever cannot be moved out of
P and into any of the other gear posi-
tions if the ignition key is turned to
OFF or if the key is removed from the
switch.
The starter is designed not to operate
if the selector lever is in one of the
driving positions.
Manual transmission:
Move the gearshift lever to N (Neutral),
and depress the clutch pedal to the floor
while starting the engine.
The starter is designed not to operate
unless the clutch pedal is depressed.
3. Crank the enginewith your foot off the
accelerator pedalby turning the ignition
key to START. Release the key when the
engine starts. If the engine starts, but
fails to run, repeat the above procedure.
Ð If the engine is very hard to start in
extremely cold or hot weather, de-press the accelerator pedal fully and
hold it to help start the engine.
Ð In the summer, when restarting the
engine within 30 minutes after it has
been stopped, keep the accelerator
pedal fully depressed while starting.
CAUTION
Do not operate the starter for more than
15 seconds at a time. If the engine does
not start, turn the key off and wait 10
seconds before cranking again, other-
wise the starter could be damaged.
4.Warm-up
Always allow the engine to idle for at
least 30 seconds after starting. Drive at
moderate speed for a short distance first,
especially in cold weather.
STARTING THE ENGINE
4-10
ZX
Page 100 of 198
WARNING
The transfer control lever must
be in the 2H, 4H or 4L position to
prevent the vehicle from rolling.
Never place it in the N position. Other-
wise, the vehicle could roll unexpect-
edly even if the manual transmission is
in gear.
3. To help prevent the vehicle from rolling
into the street when parked on an incline,
it is a good practice to turn the wheels as
illustrated.
cHEADED DOWNHILL WITH CURB:
s1
Turn the wheels into the curb and move
the vehicle forward until the curb side
wheel gently touches the curb.
cHEADED UPHILL WITH CURB:
s2
Turn the wheels away from the curb and
move the vehicle back until the curb side
wheel gently touches the curb.
cHEADED UPHILL OR DOWNHILL, NO
CURB:
s3
Turn the wheels toward the side of the
road so the vehicle will move away from
the center of the road if it moves.
4. Turn the ignition key to the LOCK posi-
tion and remove the key.
CAUTION
cNever leave the engine running while
the vehicle is unattended.
cNever leave children unattended in
the vehicle.cDriving with vacuum assisted brakes:
The brake booster aids braking by using
engine vacuum. If the engine stops, you
can stop the vehicle by depressing the
brake pedal. However, greater foot pres-
sure on the brake pedal will be required
to stop the vehicle and the stopping
distance will be longer.
cDriving with power assisted steering:
The power assisted steering is designed
to use a hydraulic pump, driven by the
engine, to assist steering.
If the engine stops or drive belt breaks,
you will still have control of the vehicle.
However, much greater steering effort is
needed, especially in sharp turns or at
low speeds.
cWet brakes:
When the vehicle is washed or driven
through water, the brakes may get wet.
As a result, your braking distance will be
longer and the vehicle may pull to one
side during braking.
To dry brakes, drive the vehicle at a safe
speed while lightly pressing the brake
pedal to heat-up the brakes. Do this until
PRECAUTIONS WHEN
DRIVING
4-25
ZX
Page 102 of 198
the transfer gear. The rear wheels lock if the
front wheels lock. If this happens, the rear
anti-lock brake system may cease function-
ing but the ordinary brakes will continue to
operate normally. The ABS brake warning
light will then come on.
The above condition is not a malfunction
and the rear anti-lock brake system recov-
ers when the engine is started again. The
ABS brake warning light then goes off.
Using the System
Depress the brake pedal and hold it down.
It is not necessary to pump the brake pedal.
Doing so may result in increased stopping
distances.
WARNING
The rear anti-lock brake system is a
sophisticated device. But it cannot pre-
vent accidents resulting from careless
or dangerous driving techniques. It can
help maintain vehicle control under
some conditions, but remember that
the stopping distance on slippery sur-
faces will be longer than on normal
surfaces even with rear wheel ABS.Stopping distances may also be long-
eron rough, gravel, or snow covered
roads, or if you are using tire chains.
Always maintain a safe distance from
the vehicle in front of you. Ultimately
the responsibility for safety of self and
others rests in the hands of the driver.
Tire type and condition may also affect
braking effectiveness.
cWhen replacing tires, install the
specified size of tires on all 4 wheels.
cWhen installing a spare tire, make
sure it is the proper size and type as
specified on the tire placard. See
``Tire placard'' in the ``Technical and
consumer information'' section.
Freeing a frozen door lock
To prevent a door lock from freezing, apply
de-icer or glycerin through the key hole. If
the lock becomes frozen, heat the key be-
fore inserting it into the key hole.
Anti-freeze
In the winter when it is anticipated that the
temperature will drop below 32ÉF (0ÉC),
check anti-freeze (ethylene glycol base) to
assure proper winter protection. For details,
see ``Engine cooling system'' in the ``Do-it-
yourself operations'' section.
Battery
If the battery is not fully charged during
extremely cold weather conditions, the bat-
tery fluid may freeze and damage the bat-
tery. To maintain maximum efficiency, the
battery should be checked regularly. For
details, see ``Battery'' in the ``Do-it-yourself
operations'' section.
Draining of coolant water
If the vehicle is to be left outside without
anti-freeze, drain the cooling system by
opening the drain valves located under the
radiator and on the engine block. Refill
COLD WEATHER DRIVING
CAUTIONS
4-27
ZX
Page 114 of 198
cMake sure that cables do not touch
moving parts in the engine compart-
ment and that clamps do not contact
any other metal.
5. Start the engine of the booster vehicle
and let it run for a few minutes.
6. Keep the engine speed of the booster
vehicle at about 2,000 rpm, and start
your engine in the normal manner.
CAUTION
Do not keep the starter motor engaged
for more than 10 seconds. If the engine
does not start right away, turn the key
off and wait 3 to 4 seconds before
trying again.
7. After starting your engine, carefully dis-
connect the negative cable and then the
positive cable.
8. Replace the vent caps (if so equipped).
Be sure to dispose of the cloth used to
cover the vent holes as it may be con-
taminated with corrosive acid.
CAUTION
cAutomatic transmission models can-
not be started by pushing. This may
cause transmission damage.
cThree-way catalyst equipped models
should not be started by pushing
since the three-way catalyst may be
damaged.
cNever try to start the vehicle by tow-
ing it; when the engine starts, the
forward surge could cause the ve-
hicle to collide with the tow vehicle.If your vehicle is overheating (indicated by
an extremely high temperature gauge read-
ing), or if you feel a lack of engine power,
detect abnormal noise, etc., take the follow-
ing steps:
WARNING
cDo not continue to drive if your ve-
hicle overheats. Doing so could
cause a vehicle fire.
cTo avoid the danger of being
scalded, never remove the radiator
cap while the engine is still hot.
When the radiator cap is removed,
pressurized hot water will spurt out,
possibly causing serious injury.
cDo not open the hood if steam is
coming out.
1. Move the vehicle safely off the road,
apply the parking brake and move the
gearshift lever to Neutral (automatic
transmission to P).
Do not stop the engine.
2. Turn off the air conditioning. Open all the
windows, move the heater or air condi-
tioner temperature control to maximum
PUSH STARTING IF YOUR VEHICLE
OVERHEATS
5-9
ZX