1996 NISSAN FRONTIER length
[x] Cancel search: lengthPage 45 of 198
To increase your confidence in the belts,
check the operation as follows:
cGrasp the shoulder belt and pull quickly
forward. The retractor should lock and
restrict further belt movement.
If the retractor does not lock during this
check or if you have any question about belt
operation, see your NISSAN dealer.
Replacing front seat belt (3-point
type only)
The front seat belts are shock absorber
types. Replace the belt when the loop has
been pulled out and ``REPLACE BELT'' is
visible. This indicator means the seat belt
has been overstressed.
2-POINT TYPE WITHOUT
RETRACTOR (Center of bench
seat)
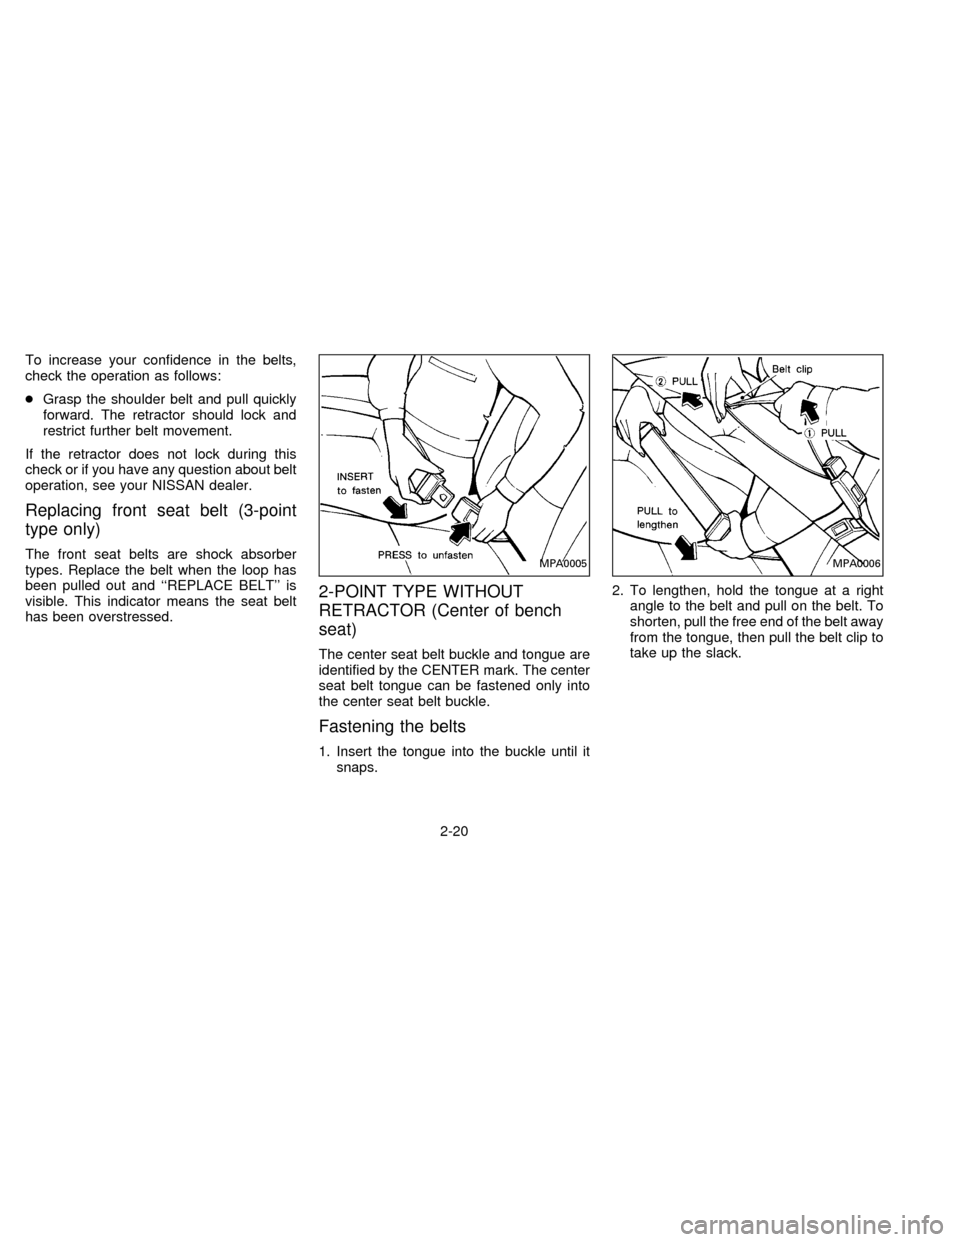
The center seat belt buckle and tongue are
identified by the CENTER mark. The center
seat belt tongue can be fastened only into
the center seat belt buckle.
Fastening the belts
1. Insert the tongue into the buckle until it
snaps.2. To lengthen, hold the tongue at a right
angle to the belt and pull on the belt. To
shorten, pull the free end of the belt away
from the tongue, then pull the belt clip to
take up the slack.
MPA0005MPA0006
2-20
ZX
Page 46 of 198
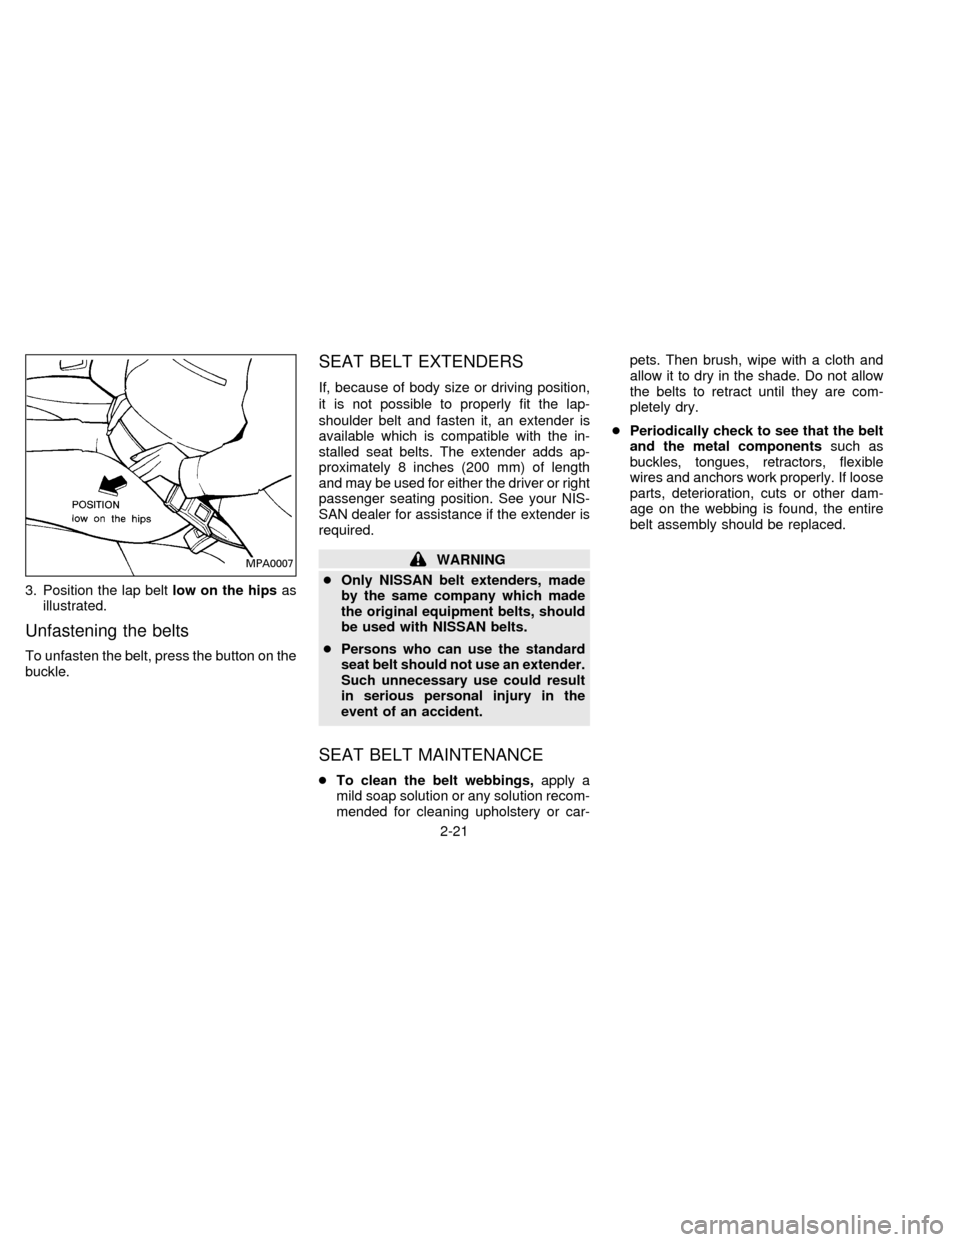
3. Position the lap beltlow on the hipsas
illustrated.
Unfastening the belts
To unfasten the belt, press the button on the
buckle.
SEAT BELT EXTENDERS
If, because of body size or driving position,
it is not possible to properly fit the lap-
shoulder belt and fasten it, an extender is
available which is compatible with the in-
stalled seat belts. The extender adds ap-
proximately 8 inches (200 mm) of length
and may be used for either the driver or right
passenger seating position. See your NIS-
SAN dealer for assistance if the extender is
required.
WARNING
cOnly NISSAN belt extenders, made
by the same company which made
the original equipment belts, should
be used with NISSAN belts.
cPersons who can use the standard
seat belt should not use an extender.
Such unnecessary use could result
in serious personal injury in the
event of an accident.
SEAT BELT MAINTENANCE
cTo clean the belt webbings,apply a
mild soap solution or any solution recom-
mended for cleaning upholstery or car-pets. Then brush, wipe with a cloth and
allow it to dry in the shade. Do not allow
the belts to retract until they are com-
pletely dry.
cPeriodically check to see that the belt
and the metal componentssuch as
buckles, tongues, retractors, flexible
wires and anchors work properly. If loose
parts, deterioration, cuts or other dam-
age on the webbing is found, the entire
belt assembly should be replaced.
MPA0007
2-21
ZX
Page 49 of 198
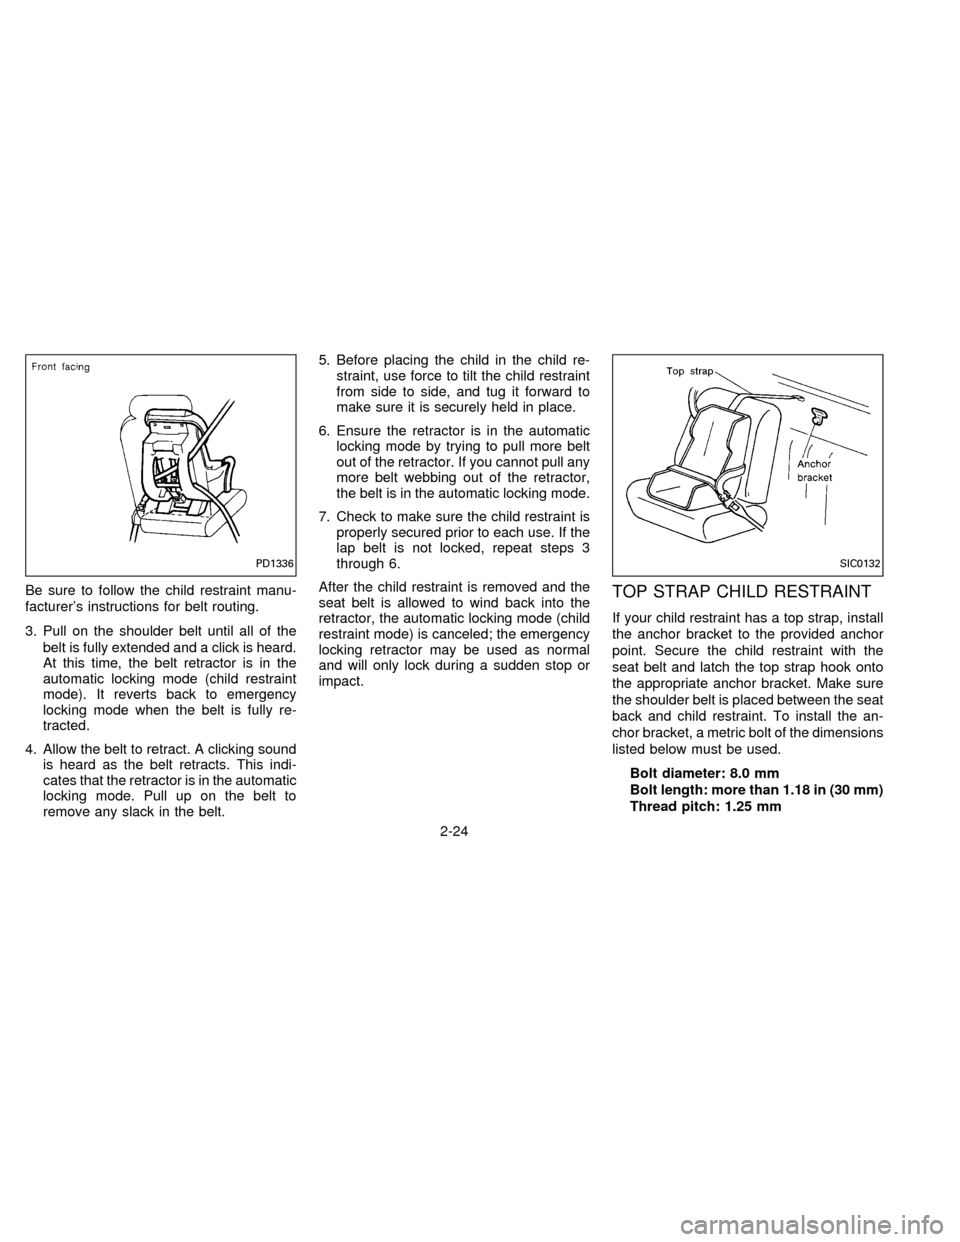
Be sure to follow the child restraint manu-
facturer's instructions for belt routing.
3. Pull on the shoulder belt until all of the
belt is fully extended and a click is heard.
At this time, the belt retractor is in the
automatic locking mode (child restraint
mode). It reverts back to emergency
locking mode when the belt is fully re-
tracted.
4. Allow the belt to retract. A clicking sound
is heard as the belt retracts. This indi-
cates that the retractor is in the automatic
locking mode. Pull up on the belt to
remove any slack in the belt.5. Before placing the child in the child re-
straint, use force to tilt the child restraint
from side to side, and tug it forward to
make sure it is securely held in place.
6. Ensure the retractor is in the automatic
locking mode by trying to pull more belt
out of the retractor. If you cannot pull any
more belt webbing out of the retractor,
the belt is in the automatic locking mode.
7. Check to make sure the child restraint is
properly secured prior to each use. If the
lap belt is not locked, repeat steps 3
through 6.
After the child restraint is removed and the
seat belt is allowed to wind back into the
retractor, the automatic locking mode (child
restraint mode) is canceled; the emergency
locking retractor may be used as normal
and will only lock during a sudden stop or
impact.TOP STRAP CHILD RESTRAINT
If your child restraint has a top strap, install
the anchor bracket to the provided anchor
point. Secure the child restraint with the
seat belt and latch the top strap hook onto
the appropriate anchor bracket. Make sure
the shoulder belt is placed between the seat
back and child restraint. To install the an-
chor bracket, a metric bolt of the dimensions
listed below must be used.
Bolt diameter: 8.0 mm
Bolt length: more than 1.18 in (30 mm)
Thread pitch: 1.25 mm
PD1336SIC0132
2-24
ZX
Page 67 of 198

The cassette tape automatically changes
direction to play the other side when the first
side is complete. At this time, the arrow in
the display window changes direction.
Fast forwarding or rewinding the
tape
Push either the FF (fast forward) or REW
(rewind) button for the desired direction.
The
orsymbol illuminates in the
display. To stop the FF or REW function,
press the PLAY/STOP button.
Automatic Program Search (APS)
fast forwarding or APS rewinding
the tape
Push either the APS FF or APS REW button
while the tape is playing. The tape runs
quickly, stops, then plays the next selection.
The
orsymbol illuminates in
the display.
This system searches for the blank intervals
between selections. If there is a blank inter-
val within one program or there is no interval
between programs, the system may not
stop in the desired or expected location.
Changing the direction of tape play
Push the PROG (program) select button.
The
orsymbol illuminates in the
display window to indicate which program
side is playing.
PLAY/STOP button
Push the PLAY/STOP button to stop cas-
sette tape play and turn the audio system
off. Press the PLAY/STOP button again to
resume cassette tape play.
Also use the PLAY/STOP button to resume
play when the tape is in the fast forward or
rewind mode.
Dolby NR (noise reduction)
Push theDOLBY NR button for
Dolby NR encoded tapes to reduce high
frequency tape noise. The indicator light
comes on.
Dolby NR is manufactured under license
from Dolby Laboratories Licensing Corpora-
tion. DOLBY NR and the double-D symbol
are trademarks of Dolby Laboratories Li-
censing Corporation.
If in the clock priority mode when the
button is pressed,and TAPE il-luminate in the display window for about ten
seconds. The clock mode than returns to
the display window.
Metal or chrome tape usage
The cassette player is automatically set to
high performance play when playing a metal
or chrome cassette tape. The indicator
METAL comes on when playing a metal or
chrome cassette tape.
Ejecting the cassette tape
Push the EJECT button.
The cassette tape automatically comes out.
Precautions on cassette player op-
eration
cTo maintain good quality sound, NIS-
SAN recommends using cassette
tapes of 60 minutes or shorter in
length.
cCassette tapes should be removed
from the player when not in use. Store
cassettes in their protective cases,
away from direct sunlight, heat, mois-
ture and magnetic sources.
3-14
ZX
Page 73 of 198
Metal or chrome tape usage
The cassette player is automatically set to
high performance play when playing a metal
or chrome cassette tape.
The indicator will come on when playing a
metal or chrome cassette tape.
Ejecting the cassette tape
Push the EJECT button. The tape automati-
cally comes out.
Precautions on cassette player op-
eration
cTo maintain good quality sound, NIS-
SAN recommends using cassette
tapes of 60 minutes or shorter in
length.
cCassette tapes should be removed
from the player when not in use. Store
cassettes in their protective cases,
away from direct sunlight, heat, mois-
ture and magnetic sources.
cDirect sunlight can cause the cassette
to become deformed. The use of a
deformed cassette may cause the cas-
sette to jam in the player.cDo not use a cassette that has a label
which is peeling and loose. If used,
the label could jam in the player.
cIf a cassette has loose tape, insert a
pencil through one of the cassette
hubs and rewind the tape firmly
around the hubs. Loose tape may
cause tape jamming and wavering
sound quality.
cOver a period of time, the playback
head, capstan and pinch roller may
gather a tape coating residue as the
tape passes over the head. This resi-
due accumulation can cause a weak
or wavering sound and should be re-
moved periodically with a head clean-
ing tape. If the residue is not removed
periodically, the player may need to
be disassembled for cleaning.The antenna cannot be shortened but can
be removed. Turn its base counterclockwise
to remove the antenna.
CAUTION
Be sure to remove the antenna before
washing the vehicle in an automatic car
wash, or the antenna may be damaged.
MANUAL ANTENNA
3-20
ZX
Page 77 of 198
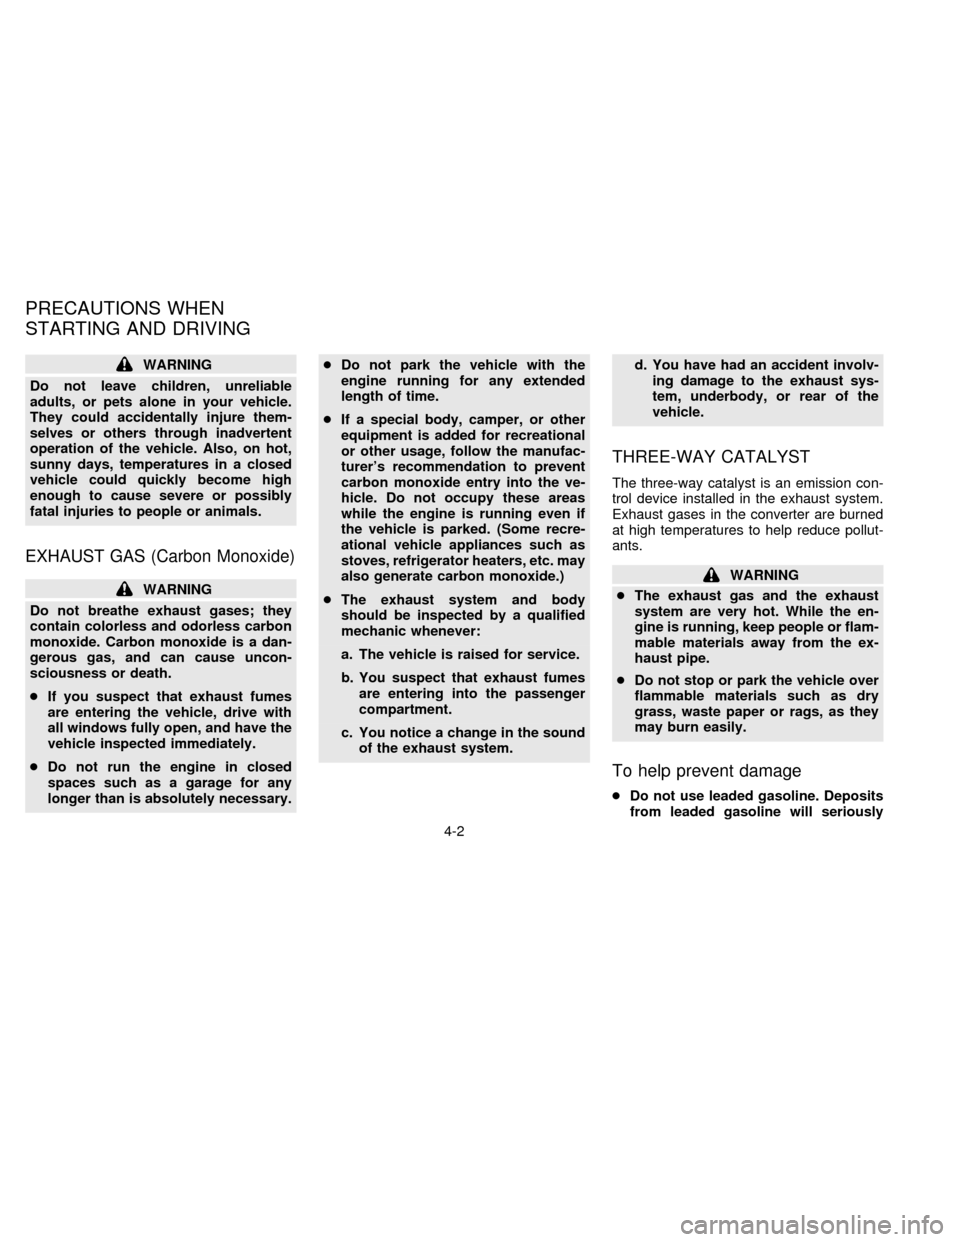
WARNING
Do not leave children, unreliable
adults, or pets alone in your vehicle.
They could accidentally injure them-
selves or others through inadvertent
operation of the vehicle. Also, on hot,
sunny days, temperatures in a closed
vehicle could quickly become high
enough to cause severe or possibly
fatal injuries to people or animals.
EXHAUST GAS (Carbon Monoxide)
WARNING
Do not breathe exhaust gases; they
contain colorless and odorless carbon
monoxide. Carbon monoxide is a dan-
gerous gas, and can cause uncon-
sciousness or death.
cIf you suspect that exhaust fumes
are entering the vehicle, drive with
all windows fully open, and have the
vehicle inspected immediately.
cDo not run the engine in closed
spaces such as a garage for any
longer than is absolutely necessary.cDo not park the vehicle with the
engine running for any extended
length of time.
cIf a special body, camper, or other
equipment is added for recreational
or other usage, follow the manufac-
turer's recommendation to prevent
carbon monoxide entry into the ve-
hicle. Do not occupy these areas
while the engine is running even if
the vehicle is parked. (Some recre-
ational vehicle appliances such as
stoves, refrigerator heaters, etc. may
also generate carbon monoxide.)
cThe exhaust system and body
should be inspected by a qualified
mechanic whenever:
a. The vehicle is raised for service.
b. You suspect that exhaust fumes
are entering into the passenger
compartment.
c. You notice a change in the sound
of the exhaust system.d. You have had an accident involv-
ing damage to the exhaust sys-
tem, underbody, or rear of the
vehicle.
THREE-WAY CATALYST
The three-way catalyst is an emission con-
trol device installed in the exhaust system.
Exhaust gases in the converter are burned
at high temperatures to help reduce pollut-
ants.
WARNING
cThe exhaust gas and the exhaust
system are very hot. While the en-
gine is running, keep people or flam-
mable materials away from the ex-
haust pipe.
cDo not stop or park the vehicle over
flammable materials such as dry
grass, waste paper or rags, as they
may burn easily.
To help prevent damage
cDo not use leaded gasoline. Deposits
from leaded gasoline will seriously
PRECAUTIONS WHEN
STARTING AND DRIVING
4-2
ZX
Page 174 of 198
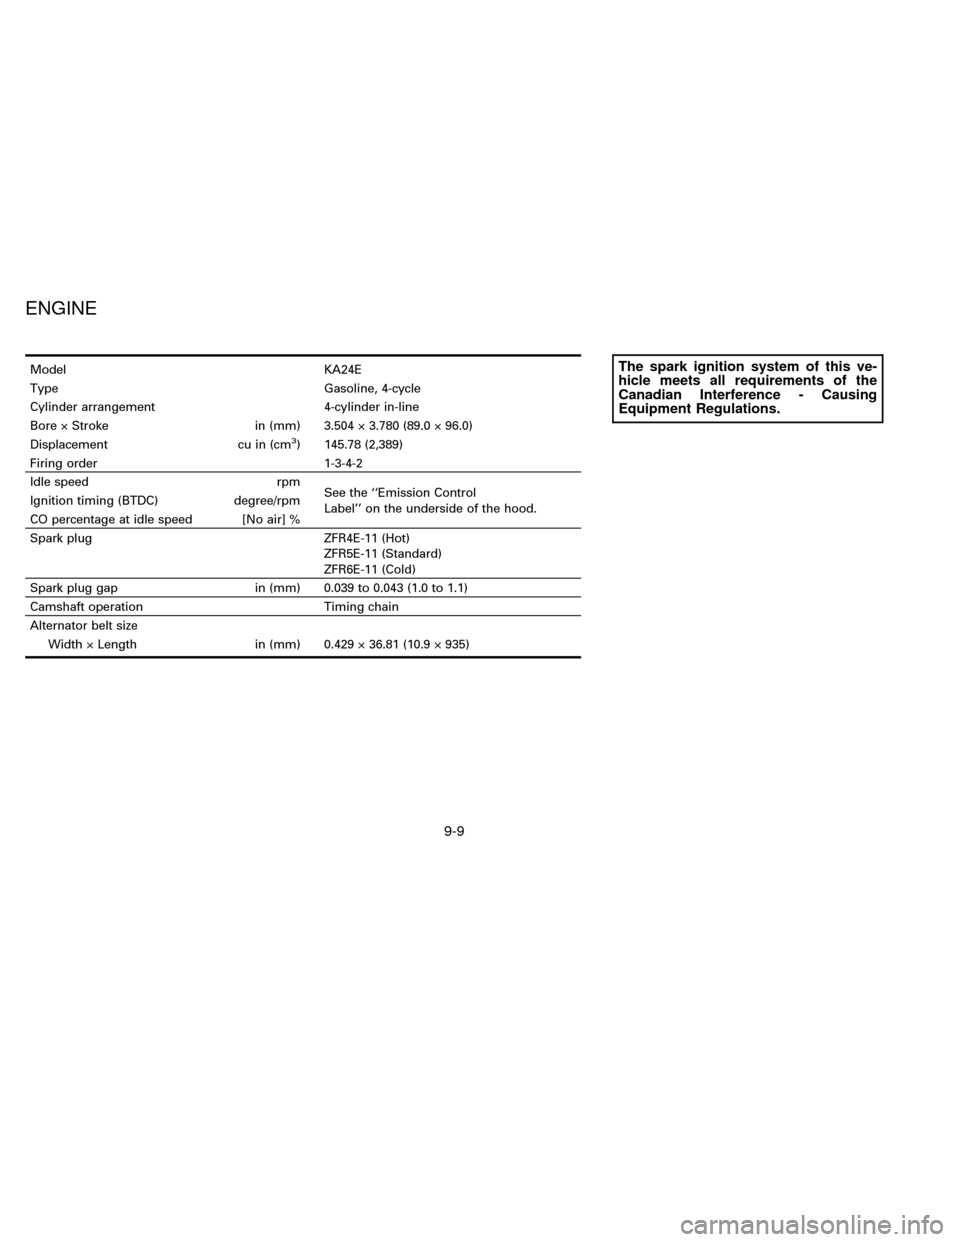
Model KA24E
Type Gasoline, 4-cycle
Cylinder arrangement 4-cylinder in-line
Bore ý Stroke in (mm) 3.504 ý 3.780 (89.0 ý 96.0)
Displacement cu in (cm
3) 145.78 (2,389)
Firing order 1-3-4-2
Idle speed rpm
See the ``Emission Control
Label'' on the underside of the hood. Ignition timing (BTDC) degree/rpm
CO percentage at idle speed [No air] %
Spark plug ZFR4E-11 (Hot)
ZFR5E-11 (Standard)
ZFR6E-11 (Cold)
Spark plug gap in (mm) 0.039 to 0.043 (1.0 to 1.1)
Camshaft operation Timing chain
Alternator belt size
Width ý Length in (mm) 0.429 ý 36.81 (10.9 ý 935)
The spark ignition system of this ve-
hicle meets all requirements of the
Canadian Interference - Causing
Equipment Regulations.
ENGINE
9-9
ZX
Page 176 of 198
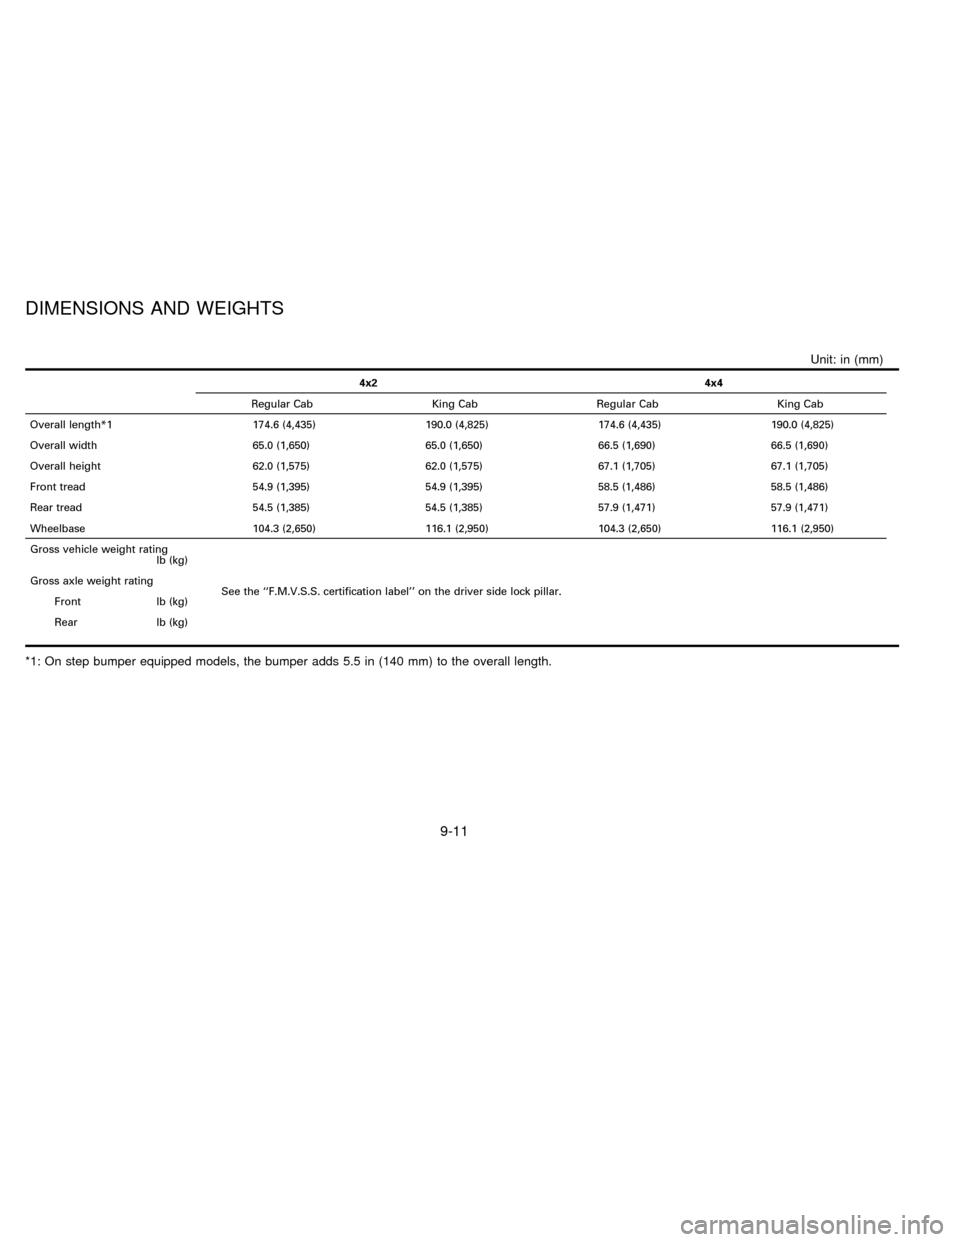
Unit: in (mm)
4x2 4x4
Regular Cab King Cab Regular Cab King Cab
Overall length*1 174.6 (4,435) 190.0 (4,825) 174.6 (4,435) 190.0 (4,825)
Overall width 65.0 (1,650) 65.0 (1,650) 66.5 (1,690) 66.5 (1,690)
Overall height 62.0 (1,575) 62.0 (1,575) 67.1 (1,705) 67.1 (1,705)
Front tread 54.9 (1,395) 54.9 (1,395) 58.5 (1,486) 58.5 (1,486)
Rear tread 54.5 (1,385) 54.5 (1,385) 57.9 (1,471) 57.9 (1,471)
Wheelbase 104.3 (2,650) 116.1 (2,950) 104.3 (2,650) 116.1 (2,950)
Gross vehicle weight rating
lb (kg)
See the ``F.M.V.S.S. certification label'' on the driver side lock pillar. Gross axle weight rating
Front lb (kg)
Rear lb (kg)
*1: On step bumper equipped models, the bumper adds 5.5 in (140 mm) to the overall length.
DIMENSIONS AND WEIGHTS
9-11
ZX