1996 NISSAN FRONTIER ECU
[x] Cancel search: ECUPage 36 of 198
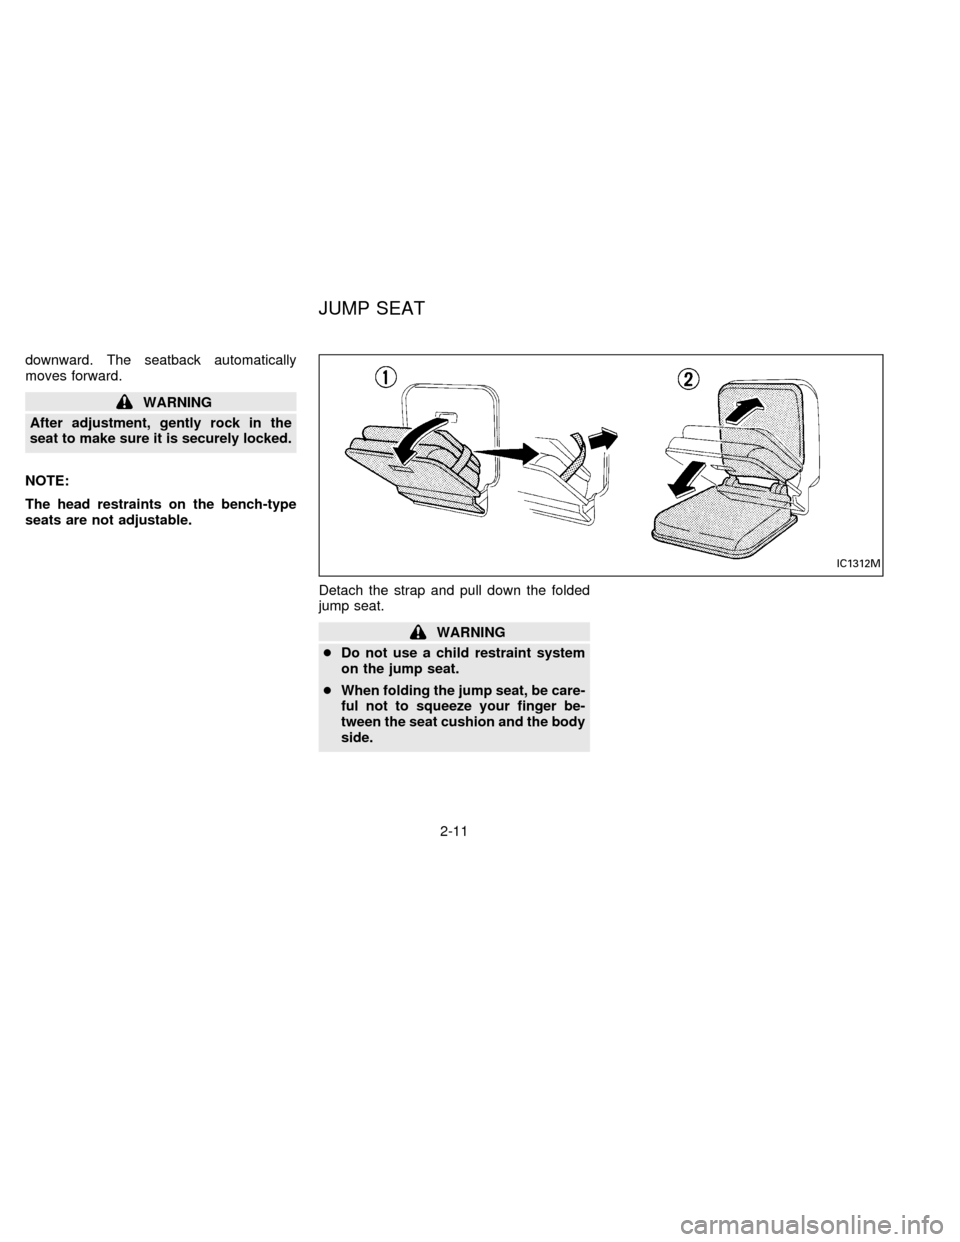
downward. The seatback automatically
moves forward.
WARNING
After adjustment, gently rock in the
seat to make sure it is securely locked.
NOTE:
The head restraints on the bench-type
seats are not adjustable.
Detach the strap and pull down the folded
jump seat.
WARNING
cDo not use a child restraint system
on the jump seat.
cWhen folding the jump seat, be care-
ful not to squeeze your finger be-
tween the seat cushion and the body
side.
IC1312M
JUMP SEAT
2-11
ZX
Page 42 of 198
PRECAUTIONS ON SEAT BELT
USAGE
Your chances of being injured in an acci-
dent and/or the severity of injury may be
greatly reduced if you are wearing your seat
belt and it is properly adjusted. NISSAN
strongly encourages you and all of your
passengers to buckle up every time you
drive, even if your seating position includes
an supplemental air bag.
Some states, provinces or territories
may specify that seat belts be worn at all
times when a vehicle is being driven.
WARNING
cEvery person who drives or rides in
this vehicle should use a seat belt at
all times. Children should be in ap-
propriate child restraints.
c
The belt should be properly adjusted
to a snug fit. Failure to do so reduces
the effectiveness of the entire restraint
system and increases the chance or
severity of injury in an accident.
cDo not wear the belt inside out or
twisted. Be sure the seat belt tongue is
securely fastened to the proper buckle.
cDo not allow more than one person
to use the same belt.
cAll seat belt assemblies including
retractors and attaching hardware
should be inspected after any colli-
sion at your NISSAN dealer. NISSAN
recommends that all seat belt as-
semblies in use during a collision be
replaced unless the collision was
minor and the belts show no damage
and continue to operate properly.
Seat belt assemblies not in use dur-
ing a collision should also be in-
spected and replaced if either dam-
age or improper operation is noted.
cNever carry more people in the ve-
hicle than there are seat belts.
cNever allow anyone to ride in the
cargo area or in a slide-in camper or
other type cargo area cover while the
vehicle is in motion. These areas do
not contain seat belts. It is not de-
signed for passengers. They could
be injured in sudden braking or
collision.cIf the seat belt warning lamp glows
continuously while the ignition is
turned ON with all doors closed and
all seat belts fastened, it may indi-
cate a malfunction in the system.
Have the system checked by your
NISSAN dealer.
cBe sure to observe the following
cautions when using seat belts. Fail-
ure to do so could increase the
chance and/or severity of injury in an
accident.
cAlways route the shoulder belt over
your outer shoulder and across your
chest. Never run the belt under your
arm or across your neck. The belt
should be away from your face and
neck, but not falling off your
shoulder.
c
Position the lap belt as low as pos-
sible AROUND THE HIPS, NOT THE
WAIST.
cSerious injury or death can occur if
the seat belt is not worn properly.
SEAT BELTS
2-17
ZX
Page 47 of 198
WARNING
Infants and small children should al-
ways be placed in an appropriate child
restraint while riding in the vehicle.
Failure to use a child restraint can re-
sult in serious injury or death.
Children and infants should never be
carried on your lap. It is not possible for
even the strongest adult to resist the
forces of a severe accident. The child
could be crushed between the adult
and parts of the vehicle. Also, do not
put the same seat belt around both
your child and yourself.
In general, child restraints are de-
signed to be installed with a lap belt or
the lap portion of a three-point type
seat belt.
An improperly installed child restraint
could lead to serious injury or death in an
accident.
Child restraints specially designed for in-
fants and small children are offered by
several manufacturers. When selecting any
child restraint, keep the following points in
mind:1) Choose only a restraint with a label cer-
tifying that it complies with Federal Motor
Vehicle Safety Standard 213 or Cana-
dian Motor Vehicle Safety Standard 213.
2) Check the child restraint in your vehicle
to be sure it is compatible with the vehi-
cle's seat belt system.
3) If the child restraint is compatible with
your vehicle, place your child in the child
restraint and check the various adjust-
ments to be sure the child restraint is
compatible with your child. Always follow
all of the recommended procedures.
WARNING
cDo not install a child restraint in the
jump seats (King Cab model). These
seats are not suitable for child re-
straint installation.
cFollow all of the child restraint
manufacturer's instructions for in-
stallation and use. When purchasing
a child restraint, be sure to select
one which will fit your child and
vehicle as it may not be possible to
properly install some types of child
restraints in your vehicle.cImproper use of a child restraint can
result in increased injuries for both
the infant or child and other occu-
pants in the vehicle.
cWhen your child restraint is not in
use, keep it secured with a seat belt
to prevent it from being thrown for-
ward in case of a sudden stop or
accident.
cRemember that a child restraint left
in a closed vehicle can become very
hot. Check the seating surface and
buckles before placing your child in
the child restraint.
cAll U.S. states and provinces of
Canada require that infants and
small children be restrained in an
approved child restraint at all times
while the vehicle is being operated.
c
After attaching the child restraint,
test it before you place the child in it.
Tilt it from side to side. Try to tug it
forward and check to see if the belt
holds the restraint in place. If the
restraint is not secure, tighten the
belt as necessary, or put the restraint
in another seat and test it again.
CHILD RESTRAINTS FOR
INFANTS AND SMALL
CHILDREN
2-22
ZX
Page 48 of 198
cIf the child restraint is not anchored
properly, the risk of a child being
injured in a collision or a sudden
stop greatly increases.
cAdjustable seatbacks should be po-
sitioned to fit the child restraint, but
as upright as possible.
cFor a front facing child restraint,
check to make sure the shoulder belt
does not go in front of the child's
face or neck. If it does, put the shoul-
der belt behind the child restraint.
INSTALLATION ON FRONT
PASSENGER SEAT
(3-point type with retractor)
WARNING
cThe 3-point belt in your vehicle is
equipped with a locking mode re-
tractor which must be used when
installing a child restraint.cFailure to use the retractor's locking
mode will result in the child restraint
not being properly secured. The re-
straint could tip over or otherwise be
unsecured and cause injury to the
child in a sudden stop or collision.
If you choose to install a child restraint,
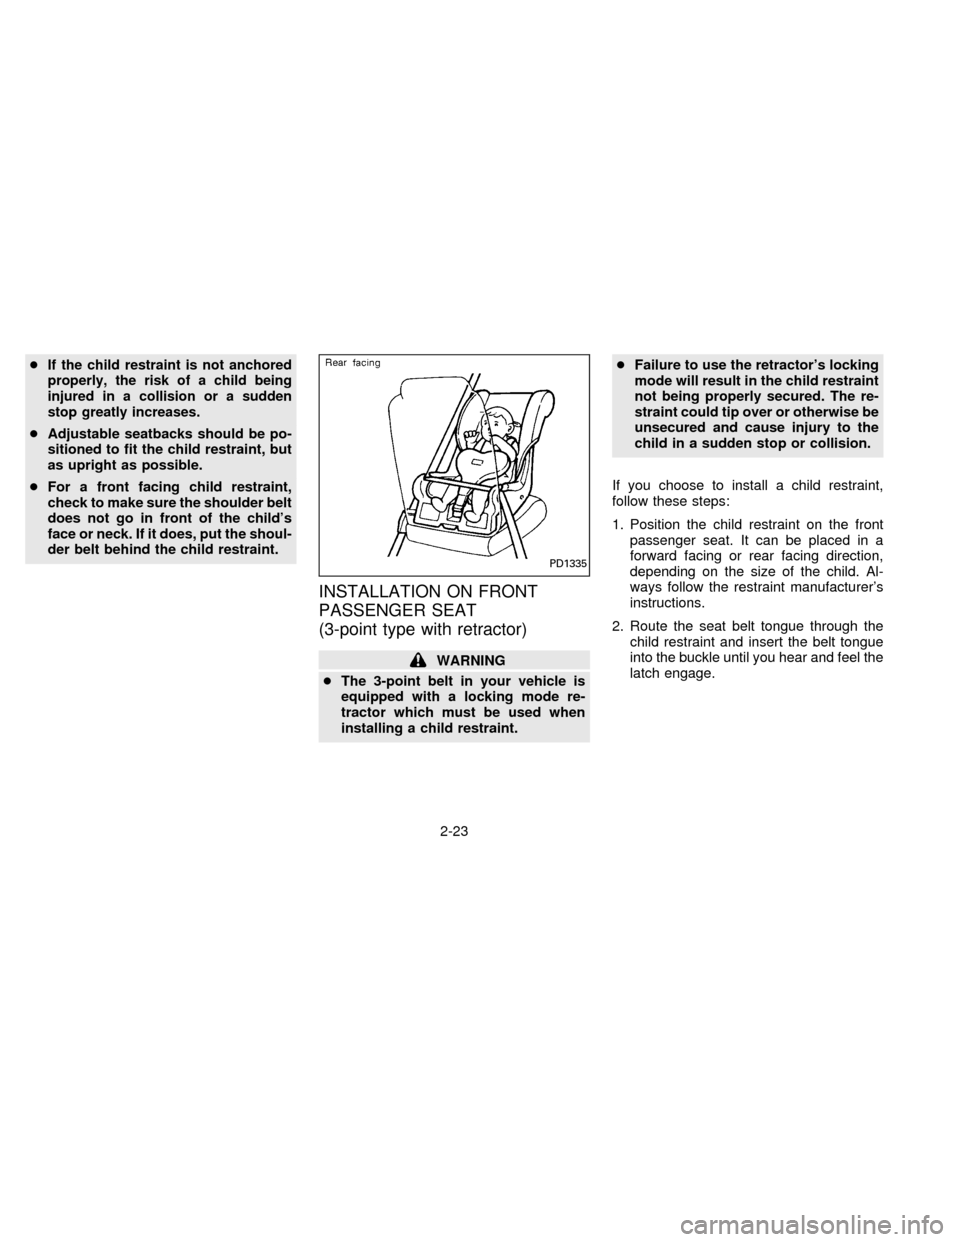
follow these steps:
1. Position the child restraint on the front
passenger seat. It can be placed in a
forward facing or rear facing direction,
depending on the size of the child. Al-
ways follow the restraint manufacturer's
instructions.
2. Route the seat belt tongue through the
child restraint and insert the belt tongue
into the buckle until you hear and feel the
latch engage.
PD1335
2-23
ZX
Page 49 of 198

Be sure to follow the child restraint manu-
facturer's instructions for belt routing.
3. Pull on the shoulder belt until all of the
belt is fully extended and a click is heard.
At this time, the belt retractor is in the
automatic locking mode (child restraint
mode). It reverts back to emergency
locking mode when the belt is fully re-
tracted.
4. Allow the belt to retract. A clicking sound
is heard as the belt retracts. This indi-
cates that the retractor is in the automatic
locking mode. Pull up on the belt to
remove any slack in the belt.5. Before placing the child in the child re-
straint, use force to tilt the child restraint
from side to side, and tug it forward to
make sure it is securely held in place.
6. Ensure the retractor is in the automatic
locking mode by trying to pull more belt
out of the retractor. If you cannot pull any
more belt webbing out of the retractor,
the belt is in the automatic locking mode.
7. Check to make sure the child restraint is
properly secured prior to each use. If the
lap belt is not locked, repeat steps 3
through 6.
After the child restraint is removed and the
seat belt is allowed to wind back into the
retractor, the automatic locking mode (child
restraint mode) is canceled; the emergency
locking retractor may be used as normal
and will only lock during a sudden stop or
impact.TOP STRAP CHILD RESTRAINT
If your child restraint has a top strap, install
the anchor bracket to the provided anchor
point. Secure the child restraint with the
seat belt and latch the top strap hook onto
the appropriate anchor bracket. Make sure
the shoulder belt is placed between the seat
back and child restraint. To install the an-
chor bracket, a metric bolt of the dimensions
listed below must be used.
Bolt diameter: 8.0 mm
Bolt length: more than 1.18 in (30 mm)
Thread pitch: 1.25 mm
PD1336SIC0132
2-24
ZX
Page 50 of 198

The top strap should be secured to the
attaching belt which provides the straightest
installation of the top strap.
Child restraint anchor points are de-
signed to withstand only these loads
imposed by correctly fitted child re-
straints. Under no circumstances are
they to be used for adult seat belts or
harnesses.
Anchor point locations
Anchor points are located under the rear
window. On King Cab models, the back
panel carpet is perforated to allow access to
the anchor points.
Your NISSAN dealer can assist you with the
installation of your child restraint.
APD0707
2-25
ZX
Page 97 of 198
Your NISSAN is designed for both normal
and off-road use. It has a higher ground
clearance and a narrower track to make it
suitable for off-road use. These characteris-
tics give the vehicle a higher center of
gravity than ordinary passenger cars. An
advantage of the higher ground clearance is
a better view of your surroundings, allowing
you to anticipate problems. However, avoid
driving in deep water or mud as your NIS-
SAN is mainly designed for leisure use,
unlike a conventional off-road vehicle.
Please observe the following precautions:
CAUTION
cDrive carefully when off the road and
avoid dangerous areas. Always wear
your seat belts to help keep you and
your passengers in position when
driving over rough terrain.
cDo not drive across steep slopes.
Instead drive either straight up or
straight down the slopes. Off-road
vehicles can tip over sideways much
more easily than they can forward or
backward.cMany hills are too steep for any ve-
hicle. If you drive up them, you may
stall. If you drive down them, you
may not be able to control your
speed. If you drive across them, you
may roll over.
cStay alert when driving to the top of
a hill. At the top there could be a
drop-off or other hazard that could
cause an accident.
cIf your engine stalls or you cannot
make it to the top of a steep hill,
never attempt to turn around. Your
vehicle could tip or roll over. Always
back straight down in reverse gear.
Never back down in neutral (N) or
with the clutch depressed, using
only the brake, as this could cause
loss of control.
c
Heavy braking going down a hill could
cause your brakes to overheat and
fade, resulting in loss of control and
an accident. Apply brakes lightly and
use a low gear to control your speed.
cIf at all possible, avoid sharp turning
maneuvers, particularly at high
speeds. Your NISSAN 4-wheel drive
vehicle has a higher center of gravitythan a 2-wheel drive vehicle and can
tip over more easily. The vehicle is
not designed for cornering at the
same speeds as conventional
2-wheel drive vehicles any more
than low-slung sports cars are de-
signed to perform satisfactorily un-
der off-road conditions. Failure to
operate this vehicle correctly could
result in loss of control and/or a
rollover accident.
cUnsecured cargo can be thrown
around when driving over rough ter-
rain. Properly secure it so that it will
not be thrown forward and cause
injury to you or your passengers.
cAvoid raising the center of gravity by
loading things on the roof or equip-
ping the vehicle with tires larger than
specified in this manual. This could
cause your vehicle to roll over. Put
heavy loads in the cargo area as far
forward and as low as possible.
cDo not grip the inside or spokes of
the steering wheel when driving off-
road. The steering wheel could jerk
and injure your hands. Instead drive
with your fingers and thumbs on the
outside of the rim.
DRIVING YOUR
4-WHEEL DRIVE SAFELY
4-22
ZX
Page 103 of 198

before operating the vehicle. For details,
see ``Changing Engine Coolant'' in the ``Do-
it-yourself operations'' section.
Tire equipment
1. SUMMER tires are of a tread design to
provide superior performance on dry
pavement. However, the performance of
these tires will be substantially reduced
in snowy and icy conditions. If you oper-
ate your vehicle on snowy or icy roads,
NISSAN recommends the use on all four
wheels of MUD & SNOW or ALL SEA-
SON tires. Please consult your NISSAN
dealer for the tire type, size, speed rating
and availability information.
2. For additional traction on icy roads, stud-
ded tires may be used. However, some
provinces and states prohibit their use.
Check local, state and provincial laws
before installing studded tires.
Skid and traction capabilities of studded
snow tires, on wet or dry surfaces, may
be poorer than that of non-studded snow
tires.
3. Tire chains may be used if desired. Use
of tire chains may be prohibited accord-
ing to location. Check the local lawsbefore installing tire chains. When install-
ing tire chains, make sure they are of
proper size for the tires on your vehicle
and are installed according to the chain
manufacturer's suggestions.Use only
SAE Class ``S'' chains.Other types
may damage your vehicle. Use chain
tensioners when recommended by the
tire chain manufacturer to ensure a tight
fit. Loose end links of the tire chain must
be secured or removed to prevent the
possibility of whipping action damage to
the fenders or undercarriage. If possible,
avoid fully loading your vehicle when
using tire chains. In addition, drive at a
reduced speed, otherwise, your vehicle
may be damaged and/or vehicle handling
and performance may be adversely af-
fected. Never install tire chains on a
TEMPORARY USE ONLY spare tire. Do
not use tire chains on dry roads.
Special winter equipment
It is recommended that the following items
be carried in the vehicle during winter:
1. A scraper and stiff-bristled brush to re-
move ice and snow from the windows
and wiper blades.2. A sturdy, flat board to be placed under
the jack to give it firm support.
3. A shovel to dig the vehicle out of snow-
drifts.
4. Extra window washer fluid to refill the
reservoir tank.
Driving on snow or ice
cWet ice (32ÉF, 0ÉC and freezing rain),
very cold snow, or ice can be slick and
very hard to drive on. The vehicle will
have a lot less traction or ``grip'' under
these conditions. Try to avoid driving
on wet ice until the road is salted or
sanded.
cWhatever the condition, drive with
caution and accelerate gently. If accel-
erated too fast, the drive wheels will
spin and will lose even more traction.
cAllow more stopping distance under
these conditions. Braking should be
started sooner than on dry pavement.
cAllow greater following distances on
slippery roads.
cWatch for slippery spots (glare ice).
These may appear on an otherwise
4-28
ZX