1996 NISSAN FRONTIER heater
[x] Cancel search: heaterPage 5 of 198
ContentsInstruments and controls
Pre-driving checks and adjustments
Heater, air conditioner and audio system
Starting and driving
In case of emergency
Appearance and interior care
Do-it-yourself operations
Maintenance schedule
Technical and consumer information
Index
1
2
3
4
5
6
7
8
9
10
Page 54 of 198

3 Heater, air conditioner and audio system
Ventilators ........................................................... 3-2
Heater and air conditioner .................................. 3-3
Air flow charts ..................................................... 3-6
Radio ................................................................ 3-10
AM-FM electronic tuning radio with cassette
player ................................................................ 3-11
AM-FM electronic tuning radio with cassette
player (100 W).................................................... 3-16
Manual antenna ................................................ 3-20
CB radio or car phone ...................................... 3-21
ZX
Page 56 of 198
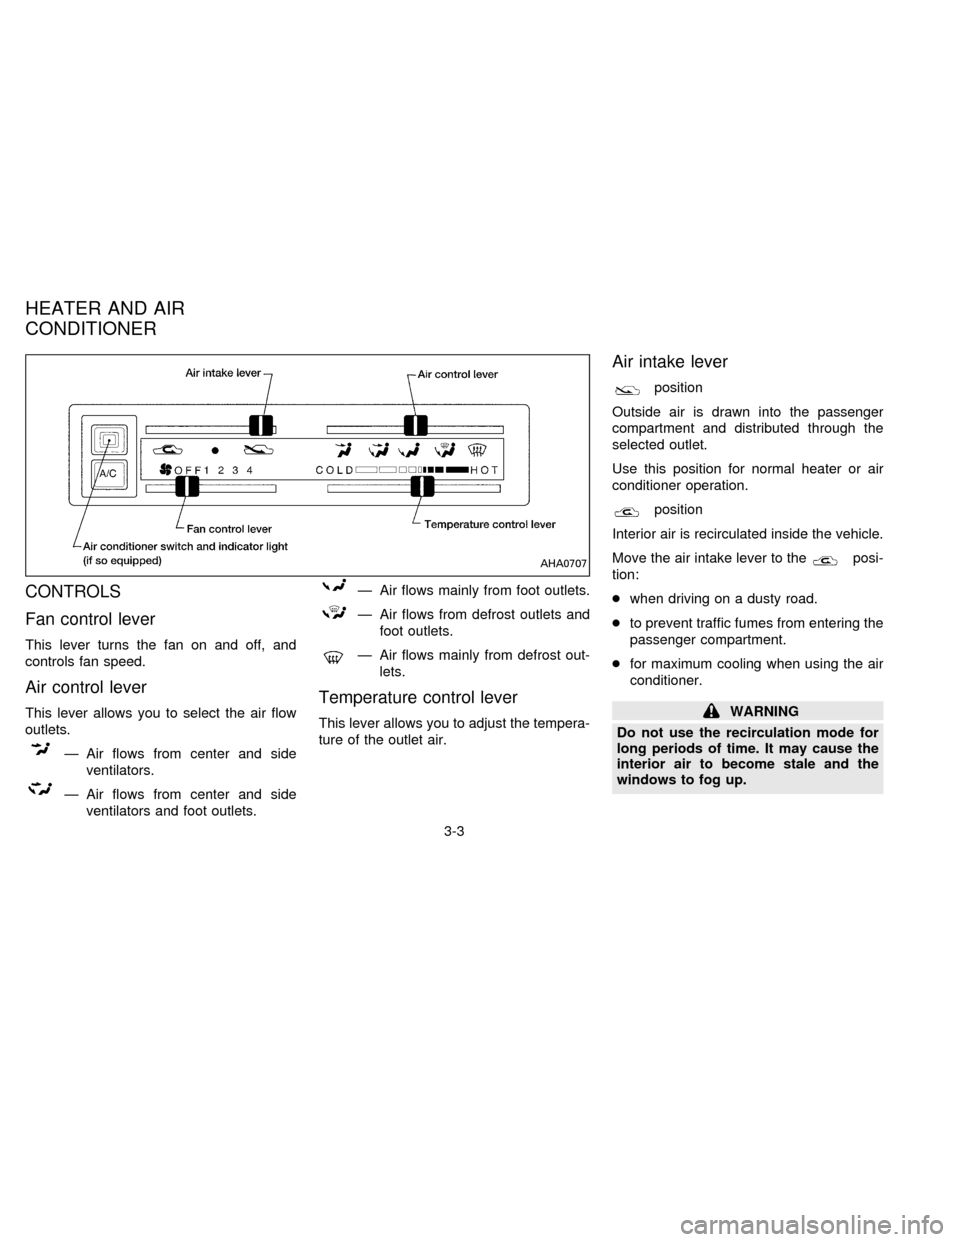
CONTROLS
Fan control lever
This lever turns the fan on and off, and
controls fan speed.
Air control lever
This lever allows you to select the air flow
outlets.
Ð Air flows from center and side
ventilators.
Ð Air flows from center and side
ventilators and foot outlets.
Ð Air flows mainly from foot outlets.
Ð Air flows from defrost outlets and
foot outlets.
Ð Air flows mainly from defrost out-
lets.
Temperature control lever
This lever allows you to adjust the tempera-
ture of the outlet air.
Air intake lever
position
Outside air is drawn into the passenger
compartment and distributed through the
selected outlet.
Use this position for normal heater or air
conditioner operation.
position
Interior air is recirculated inside the vehicle.
Move the air intake lever to the
posi-
tion:
cwhen driving on a dusty road.
cto prevent traffic fumes from entering the
passenger compartment.
cfor maximum cooling when using the air
conditioner.
WARNING
Do not use the recirculation mode for
long periods of time. It may cause the
interior air to become stale and the
windows to fog up.
AHA0707
HEATER AND AIR
CONDITIONER
3-3
ZX
Page 57 of 198

Air conditioner switch
(If so equipped)
This button is provided only for vehicles with
an air conditioner.
Start the engine and push the switch to turn
on the air conditioner. The indicator light
comes on when the air conditioner is on.
HEATER OPERATION
Heating
This mode directs hot air to the foot outlets.
A small amount of air is also directed to the
defrost outlets.
1. Move the air intake lever to the
po-
sition for normal heating.
2. Move the air control lever to the
position.
3. Move the fan control lever to the desired
speed.
4. Move the temperature control lever to the
desired position between the middle and
the HOT position.
Ventilation
This mode directs outside air to the side and
center ventilators.
1. Move the air intake lever to the
po-
sition.
2. Move the air control lever to the
position.
3. Move the fan control lever to the desired
speed.
4. Move the temperature control lever to the
desired position.
Defrosting or defogging
This mode defrosts/defogs the windows.
1. Move the air intake lever to the
po-
sition.
2. Move the air control lever to the
position.
3. Move the fan control lever to the desired
speed.
4. Move the temperature control lever to the
desired position between the middle and
the HOT position.
cIf it is difficult to defog the windshield,turn the air conditioner switch on (if so
equipped).
Bi-level heating
This mode directs cooler air from the side
and center ventilators and warmer air from
the foot outlets.
1. Move the air intake lever to the
po-
sition.
2. Move the air control lever to the
position.
3. Move the fan control lever to the desired
speed.
4. Move the temperature control lever to the
desired position.
Heating and defrosting
This mode heats the interior and defogs the
windshield.
1. Move the air intake lever to the
po-
sition.
2. Move the air control lever to the
position.
3. Move the fan control lever to the desired
speed.
3-4
ZX
Page 58 of 198

4. Move the temperature control lever to the
desired position between the middle and
the HOT position.
Operating tips
Clear snow and ice from the wiper blade
and air inlet in front of the windshield.
This improves heater and defroster op-
eration.
AIR CONDITIONER OPERATION
(If so equipped)
Start the engine, move the fan control lever
to the desired (1 to 4) position, and push in
the air conditioner switch to activate the air
conditioner. When the air conditioner is on,
cooling and dehumidifying functions are
added to the heater operation.
The air conditioner cooling function op-
erates only when the engine is running.
Cooling
This mode cools and dehumidifies.
1. Move the air intake lever to the
po-
sition.
2. Move the air control lever to the
position.3. Move the fan control lever to the desired
position.
4. Push in the air conditioner switch. The
indicator light comes on.
5. Move the temperature control lever to the
desired position.
cFor quick cooling when the outside tem-
perature is high, move the air intake lever
to the
position. Be sure to return
the air intake lever to the
position
for normal cooling.
Dehumidified heating
This mode heats and dehumidifies.
1. Move the air intake lever to the
po-
sition.
2. Move the air control lever to the
position.
3. Move the fan control lever to the desired
position.
4. Push in the air conditioner switch. The
indicator light comes on.
5. Move the temperature control lever to the
desired position.
Dehumidified defrosting
This mode defrosts/defogs the windows and
dehumidifies.
1. Move the air intake lever to the
po-
sition.
2. Move the air control lever to the
position.
3. Move the fan control lever to the desired
position.
4. Push in the air conditioner switch. The
indicator light comes on.
5. Move the temperature control lever to the
desired position.
Operating tips
cKeep windows and sunroof closed while
operating the air conditioner.
cAfter parking in the sun, drive for two or
three minutes with the windows open to
vent hot air from the passenger compart-
ment. Then, close the windows. This
allows the air conditioner to cool the
interior more quickly.
cThe air conditioning system should be
operated for about ten minutes at least
3-5
ZX
Page 77 of 198
WARNING
Do not leave children, unreliable
adults, or pets alone in your vehicle.
They could accidentally injure them-
selves or others through inadvertent
operation of the vehicle. Also, on hot,
sunny days, temperatures in a closed
vehicle could quickly become high
enough to cause severe or possibly
fatal injuries to people or animals.
EXHAUST GAS (Carbon Monoxide)
WARNING
Do not breathe exhaust gases; they
contain colorless and odorless carbon
monoxide. Carbon monoxide is a dan-
gerous gas, and can cause uncon-
sciousness or death.
cIf you suspect that exhaust fumes
are entering the vehicle, drive with
all windows fully open, and have the
vehicle inspected immediately.
cDo not run the engine in closed
spaces such as a garage for any
longer than is absolutely necessary.cDo not park the vehicle with the
engine running for any extended
length of time.
cIf a special body, camper, or other
equipment is added for recreational
or other usage, follow the manufac-
turer's recommendation to prevent
carbon monoxide entry into the ve-
hicle. Do not occupy these areas
while the engine is running even if
the vehicle is parked. (Some recre-
ational vehicle appliances such as
stoves, refrigerator heaters, etc. may
also generate carbon monoxide.)
cThe exhaust system and body
should be inspected by a qualified
mechanic whenever:
a. The vehicle is raised for service.
b. You suspect that exhaust fumes
are entering into the passenger
compartment.
c. You notice a change in the sound
of the exhaust system.d. You have had an accident involv-
ing damage to the exhaust sys-
tem, underbody, or rear of the
vehicle.
THREE-WAY CATALYST
The three-way catalyst is an emission con-
trol device installed in the exhaust system.
Exhaust gases in the converter are burned
at high temperatures to help reduce pollut-
ants.
WARNING
cThe exhaust gas and the exhaust
system are very hot. While the en-
gine is running, keep people or flam-
mable materials away from the ex-
haust pipe.
cDo not stop or park the vehicle over
flammable materials such as dry
grass, waste paper or rags, as they
may burn easily.
To help prevent damage
cDo not use leaded gasoline. Deposits
from leaded gasoline will seriously
PRECAUTIONS WHEN
STARTING AND DRIVING
4-2
ZX
Page 104 of 198
clear road in shaded areas. If a patch
of ice is seen ahead, brake before
reaching it. Try not to brake while
actually on the ice, and avoid any
sudden steering maneuvers.
Engine block heater/Engine heater
(if so equipped)
An engine block heater/engine heater to
assist extreme cold temperature starting is
available through your NISSAN dealer.
WARNING
Do not use your heater with an un-
grounded electrical system or two-
pronged (cheater) adapters. You can be
injured by an electrical shock if you use
an ungrounded connection.
4-29
ZX
Page 113 of 198
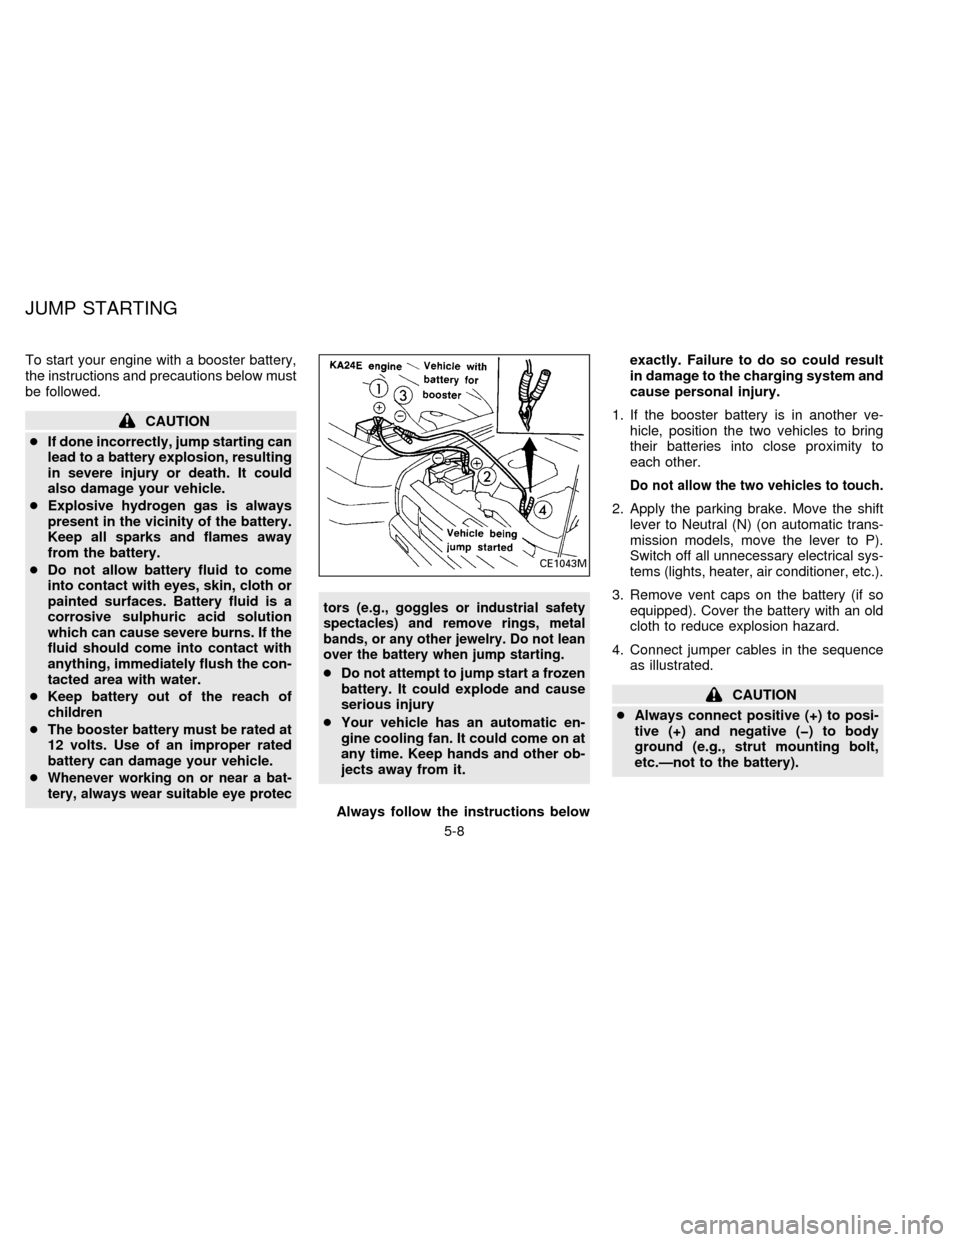
To start your engine with a booster battery,
the instructions and precautions below must
be followed.
CAUTION
cIf done incorrectly, jump starting can
lead to a battery explosion, resulting
in severe injury or death. It could
also damage your vehicle.
cExplosive hydrogen gas is always
present in the vicinity of the battery.
Keep all sparks and flames away
from the battery.
cDo not allow battery fluid to come
into contact with eyes, skin, cloth or
painted surfaces. Battery fluid is a
corrosive sulphuric acid solution
which can cause severe burns. If the
fluid should come into contact with
anything, immediately flush the con-
tacted area with water.
cKeep battery out of the reach of
children
cThe booster battery must be rated at
12 volts. Use of an improper rated
battery can damage your vehicle.
c
Whenever working on or near a bat-
tery, always wear suitable eye protectors (e.g., goggles or industrial safety
spectacles) and remove rings, metal
bands, or any other jewelry. Do not lean
over the battery when jump starting.
cDo not attempt to jump start a frozen
battery. It could explode and cause
serious injury
cYour vehicle has an automatic en-
gine cooling fan. It could come on at
any time. Keep hands and other ob-
jects away from it.
Always follow the instructions belowexactly. Failure to do so could result
in damage to the charging system and
cause personal injury.
1. If the booster battery is in another ve-
hicle, position the two vehicles to bring
their batteries into close proximity to
each other.
Do not allow the two vehicles to touch.
2. Apply the parking brake. Move the shift
lever to Neutral (N) (on automatic trans-
mission models, move the lever to P).
Switch off all unnecessary electrical sys-
tems (lights, heater, air conditioner, etc.).
3. Remove vent caps on the battery (if so
equipped). Cover the battery with an old
cloth to reduce explosion hazard.
4. Connect jumper cables in the sequence
as illustrated.
CAUTION
cAlways connect positive (+) to posi-
tive (+) and negative (þ) to body
ground (e.g., strut mounting bolt,
etc.Ðnot to the battery).
CE1043M
JUMP STARTING
5-8
ZX