1996 NISSAN ALTIMA steering
[x] Cancel search: steeringPage 91 of 183
a) Lightly tap the brake pedal. When the
vehicle attains the desired speed, push
the ``COAST/SET'' switch and release it.
b) Push and hold the ``COAST/SET'' switch.
Release the switch when the vehicle
slows down to the desired speed.
c) Push, then quickly release the
``COAST/SET'' switch. Each time you do
this, the set speed will decrease by about
1 MPH (1.6 km/h).
To resume the preset speed,push and re-
lease the ``RESUME'' switch. The vehicle will
resume the last set cruising speed when the
vehicle speed is over 30 MPH (48 km/h).
Precautions
cIf the cruise control system malfunctions,
it will cancel automatically. The cruise
indicator light in the instrument panel will
then blink to warn the driver.
cWhen the cruise indicator light blinks,
turn the cruise control main switch off
and have the system checked by your
NISSAN dealer.
cThe cruise indicator light may blink when
the cruise control main switch is turned
on while pushing the ªRES/ACCELº,ªCOAST/SETº, or ªCANCELº switch (lo-
cated on the steering wheel). To properly
set the cruise control system perform the
steps above in the order indicated.
Avoid using the cruise control when
driving under the following conditions:
cwhen it is not possible to keep the vehicle
at set speed.
cin heavy traffic or in traffic that varies in
speed.
con winding roads, or hilly roads.
con slippery roads (rain, snow, ice, etc.).
cin very windy areas.
CAUTION
On manual transmission models, do
not shift into neutral without depress-
ing the clutch pedal when the cruise
control is on. Should this occur, de-
press the clutch pedal and turn the
main switch off immediately. Failure to
do so may cause engine damage.During the first 1,000 miles (1,600 km),
follow these recommendations for the future
reliability and economy of your new vehicle.
Failure to follow these recommendations
may result in vehicle damage or shortened
engine life.
cDo not drive over 55 MPH (90 km/h) and
do not run the engine over 4,000 rpm.
Avoid driving for long periods at constant
speed, either fast or slow.
cDo not accelerate at full throttle in any
gear.
cAvoid quick starts.
cAvoid hard braking as much as possible.
cDo not tow a trailer for the first 500 miles
(800 km).
BREAK-IN SCHEDULE
4-12
ZX
Page 94 of 183

cDriving with vacuum assisted brake:
The brake booster aids braking by using
engine vacuum. If the engine stops, you
can stop the vehicle by depressing the
brake pedal. However, greater foot pres-
sure on the brake pedal will be required
to stop the vehicle and the stopping
distance will be longer.
cDriving with power assisted steering:
The power assisted steering is designed
to use a hydraulic pump, driven by the
engine, to assist steering.
If the engine stops or drive belt breaks,
you will still have control of the vehicle.
However, much greater steering effort is
needed, especially in sharp turns or at
low speeds.
cWet brakes:
When the vehicle is washed or driven
through water, the brakes may get wet.
As a result, your braking distance will be
longer and the vehicle may pull to one
side during braking.
To dry brakes, drive the vehicle at a safe
speed while lightly pressing the brake
pedal to heat-up the brakes. Do this untilthe brakes return to normal. Avoid driving
the vehicle at high speeds until the
brakes function correctly.
cAvoid resting your foot on the brake
pedal while driving. This will overheat the
brakes, wear out the brake linings and
pads faster and reduce gas mileage.
cTo help save the brakes and to prevent
the brakes from overheating, reduce
speed and downshift to a lower gear
before going down a slope or long grade.
Overheated brakes may reduce braking
performance and could result in loss of
vehicle control.
cWhile driving on a slippery surface, be
careful when braking, accelerating or
downshifting. Abrupt braking actions or
acceleration could cause the wheels to
skid.The anti-lock brake system installed in
some models controls the brakes at each
wheel so the wheels will not lock when
braking abruptly or when braking on slip-
pery surfaces. The system detects the rota-
tion speed at each wheel and varies the
brake fluid pressure to prevent each wheel
from locking and sliding. By preventing
wheel lockup, the system helps the driver
maintain steering control and helps to mini-
mize swerving and spinning on slippery
surfaces.
Using the System
Depress the brake pedal and hold it down.
It is not necessary to pump the brake
pedal.
Doing so may result in increased stopping
distances.
Normal operation
The anti-lock brake system will not operate
at speeds below 3 to 6 MPH (5 to 10 km/h)
to completely stop the vehicle. (The speeds
will vary according to road conditions.)
When the anti-lock system senses that one
or more wheels are close to locking up, the
actuator (under the hood) rapidly applies
PRECAUTIONS WHEN
DRIVINGANTI-LOCK BRAKE SYSTEM
(ABS) (If so equipped)
4-15
ZX
Page 97 of 183
Special winter equipment
It is recommended that the following items
be carried in the vehicle during winter:
1. A scraper and stiff-bristled brush to re-
move ice and snow from the windows
and wiper blades.
2. A sturdy, flat board to be placed under
the jack to give it firm support.
3. A shovel to dig the vehicle out of snow-
drifts.
4. Extra window washer fluid to refill the
reservoir tank.
Driving on snow or ice
cWet ice (32ÉF, 0ÉC and freezing rain),
very cold snow or ice can be slick and
very hard to drive on. The vehicle will
have a lot less traction or ``grip'' under
these conditions. Try to avoid driving
on wet ice until the road is salted or
sanded.
cWhatever the condition, drive with
caution and accelerate gently. If accel-
erated too fast, the drive wheels will
spin and will lose even more traction.cAllow more stopping distance under
these conditions. Braking should be
started sooner than on dry pavement.
cAllow greater following distances on
slippery roads.
cWatch for slippery spots (glare ice).
These may appear on an otherwise
clear road in shaded areas. If a patch
of ice is seen ahead, brake before
reaching it. Try not to brake while
actually on the ice, and avoid any
sudden steering maneuvers.
Engine block heater
WARNING
Do not use your heater (if so equipped)
with an ungrounded electrical system
or two-pronged (cheater) adapters. You
can be injured by an electrical shock if
you use an ungrounded connection.
4-18
ZX
Page 107 of 183
When towing your vehicle, all State (Provin-
cial in Canada) and local regulations for
towing must be followed. Incorrect towing
equipment could damage your vehicle.
Towing instructions are available from your
NISSAN dealer. Local service operators will
generally be familiar with the applicable
laws and procedures for towing. To assure
proper towing and to prevent accidental
damage to your vehicle, NISSAN recom-
mends that you have a service operator tow
your vehicle. It is advisable to have the
service operator carefully read the following
precautions.
CAUTION
cWhen towing, make sure that the
transmission, axles, steering system
and powertrain are in working con-
dition. If any unit is damaged, dollies
must be used.
cWhen towing with the front wheels
on the ground:Turn the ignition key to the ``OFF''
position and secure the steering
wheel in a straight-ahead position
with a rope or similar device. Never
place the ignition key in the ``LOCK''
position. This will result in damage
to the steering lock mechanism.
Move the gearshift lever to the Neu-
tral (``N'' position).
On automatic transmission models,
to move the shift lever to the Neutral
position, turn the ignition key to the
``ACC'' position. After moving the
shift lever to the Neutral position, be
sure to turn the ignition key to the
``OFF'' position.
c
When towing with the rear wheels on
the ground, release the parking brake.
On automatic transmission models,
to move the shift lever to the Neutral
position, turn the ignition key to the
``ACC'' position. After moving the
shift lever to the Neutral position, be
sure to turn the ignition key to the
``OFF'' position.
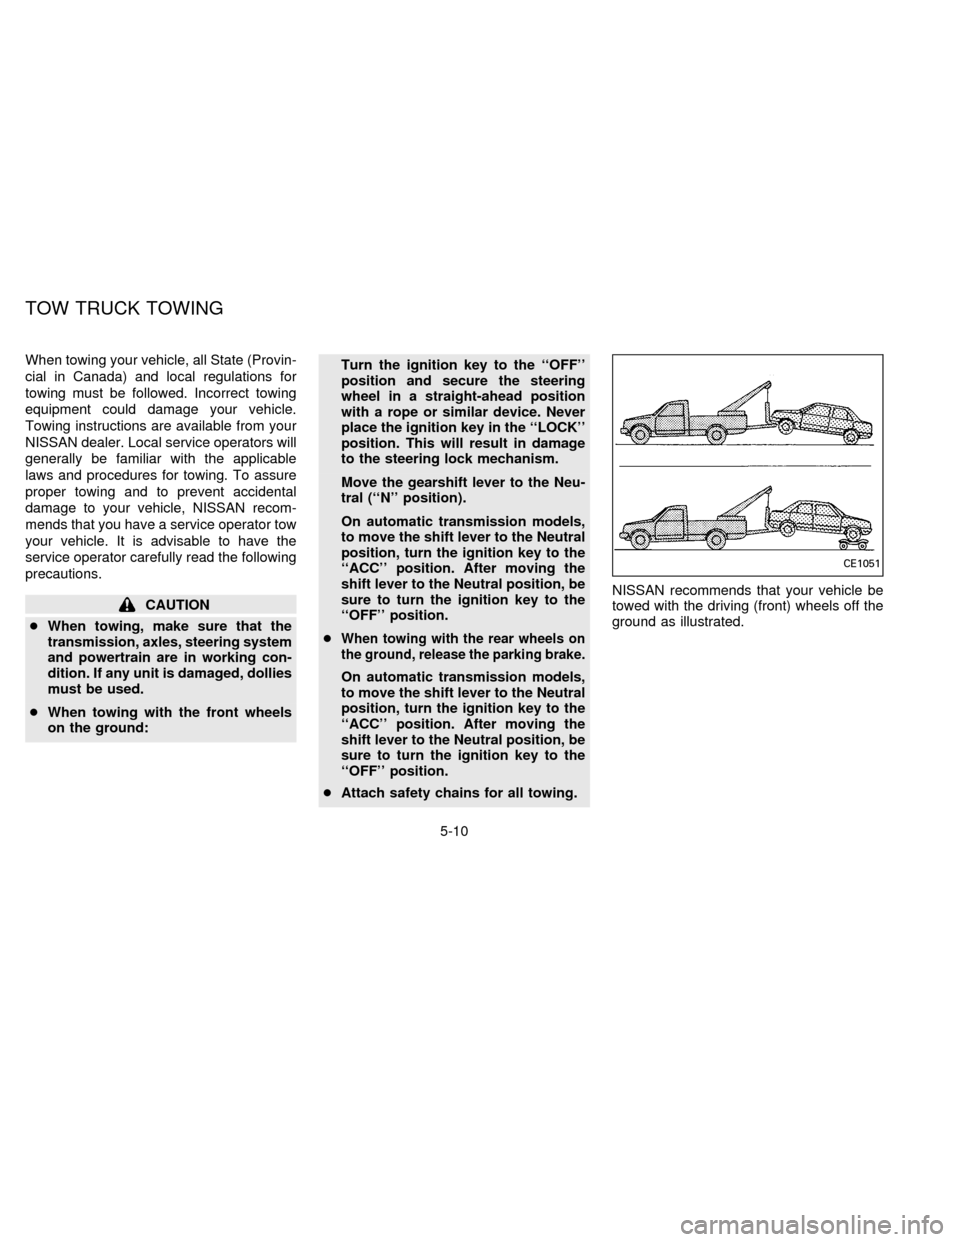
cAttach safety chains for all towing.NISSAN recommends that your vehicle be
towed with the driving (front) wheels off the
ground as illustrated.
CE1051
TOW TRUCK TOWING
5-10
ZX
Page 108 of 183
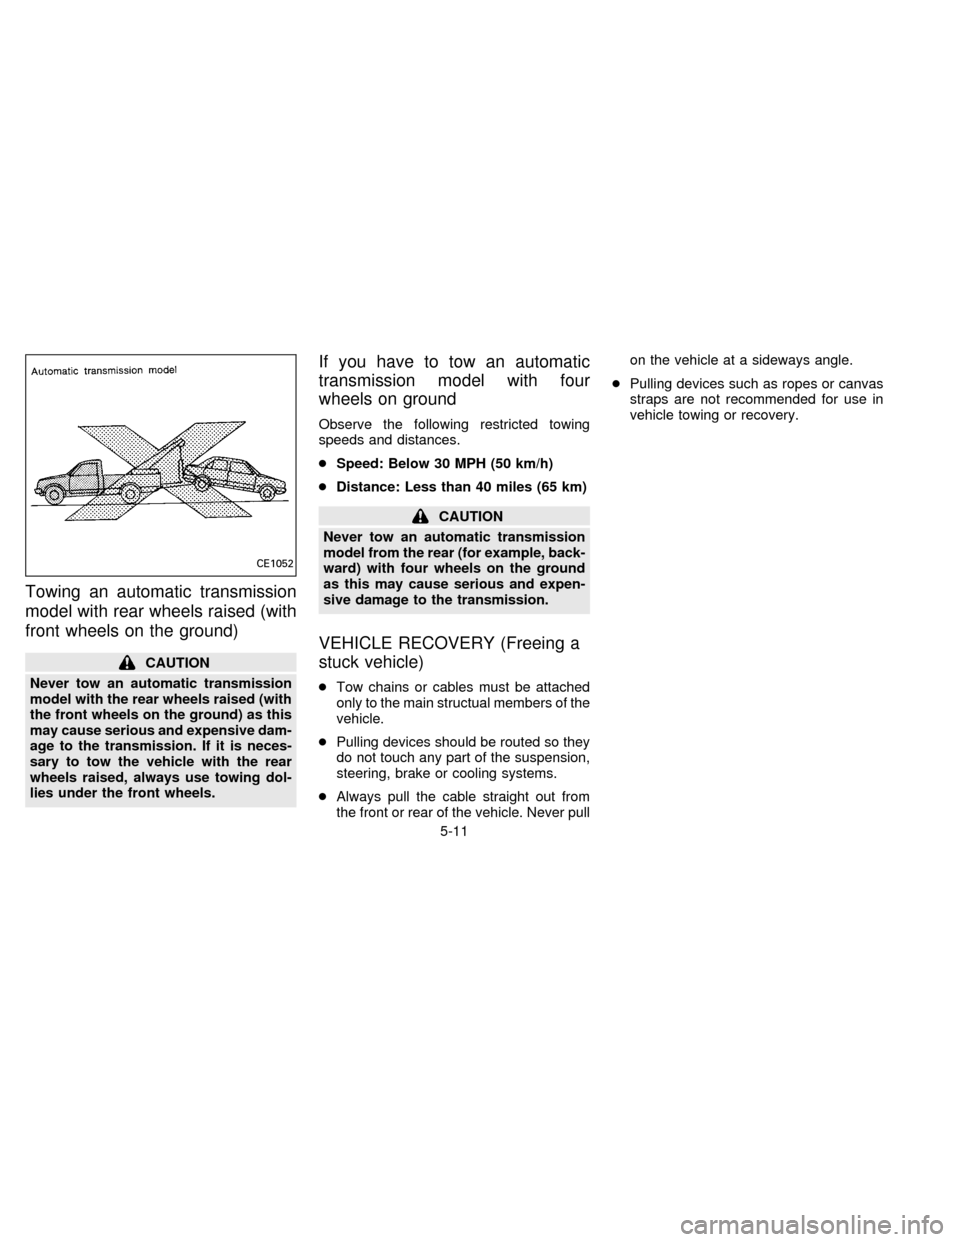
Towing an automatic transmission
model with rear wheels raised (with
front wheels on the ground)
CAUTION
Never tow an automatic transmission
model with the rear wheels raised (with
the front wheels on the ground) as this
may cause serious and expensive dam-
age to the transmission. If it is neces-
sary to tow the vehicle with the rear
wheels raised, always use towing dol-
lies under the front wheels.
If you have to tow an automatic
transmission model with four
wheels on ground
Observe the following restricted towing
speeds and distances.
cSpeed: Below 30 MPH (50 km/h)
cDistance: Less than 40 miles (65 km)
CAUTION
Never tow an automatic transmission
model from the rear (for example, back-
ward) with four wheels on the ground
as this may cause serious and expen-
sive damage to the transmission.
VEHICLE RECOVERY (Freeing a
stuck vehicle)
cTow chains or cables must be attached
only to the main structual members of the
vehicle.
cPulling devices should be routed so they
do not touch any part of the suspension,
steering, brake or cooling systems.
cAlways pull the cable straight out from
the front or rear of the vehicle. Never pullon the vehicle at a sideways angle.
cPulling devices such as ropes or canvas
straps are not recommended for use in
vehicle towing or recovery.
CE1052
5-11
ZX
Page 116 of 183

7 Do-it-yourself operations
Maintenance precautions ..................................... 7-2
Engine compartment check locations ................. 7-3
Engine cooling system ......................................... 7-4
Engine oil.............................................................. 7-7
Automatic transmission fluid (ATF) ...................... 7-9
Power steering fluid............................................ 7-11
Brake and clutch fluid......................................... 7-11
Window washer fluid .......................................... 7-12
Battery ................................................................ 7-13
Drive belts .......................................................... 7-14
Spark plug replacement ..................................... 7-14Air cleaner housing filter .................................... 7-15
Wiper blades ...................................................... 7-16
Parking brake check........................................... 7-17
Brake pedal ........................................................ 7-18
Brake booster ..................................................... 7-19
Clutch pedal ....................................................... 7-19
Fuses .................................................................. 7-19
Fusible links........................................................ 7-21
Light bulbs .......................................................... 7-21
Wheels and tires ................................................ 7-28
ZX
Page 126 of 183
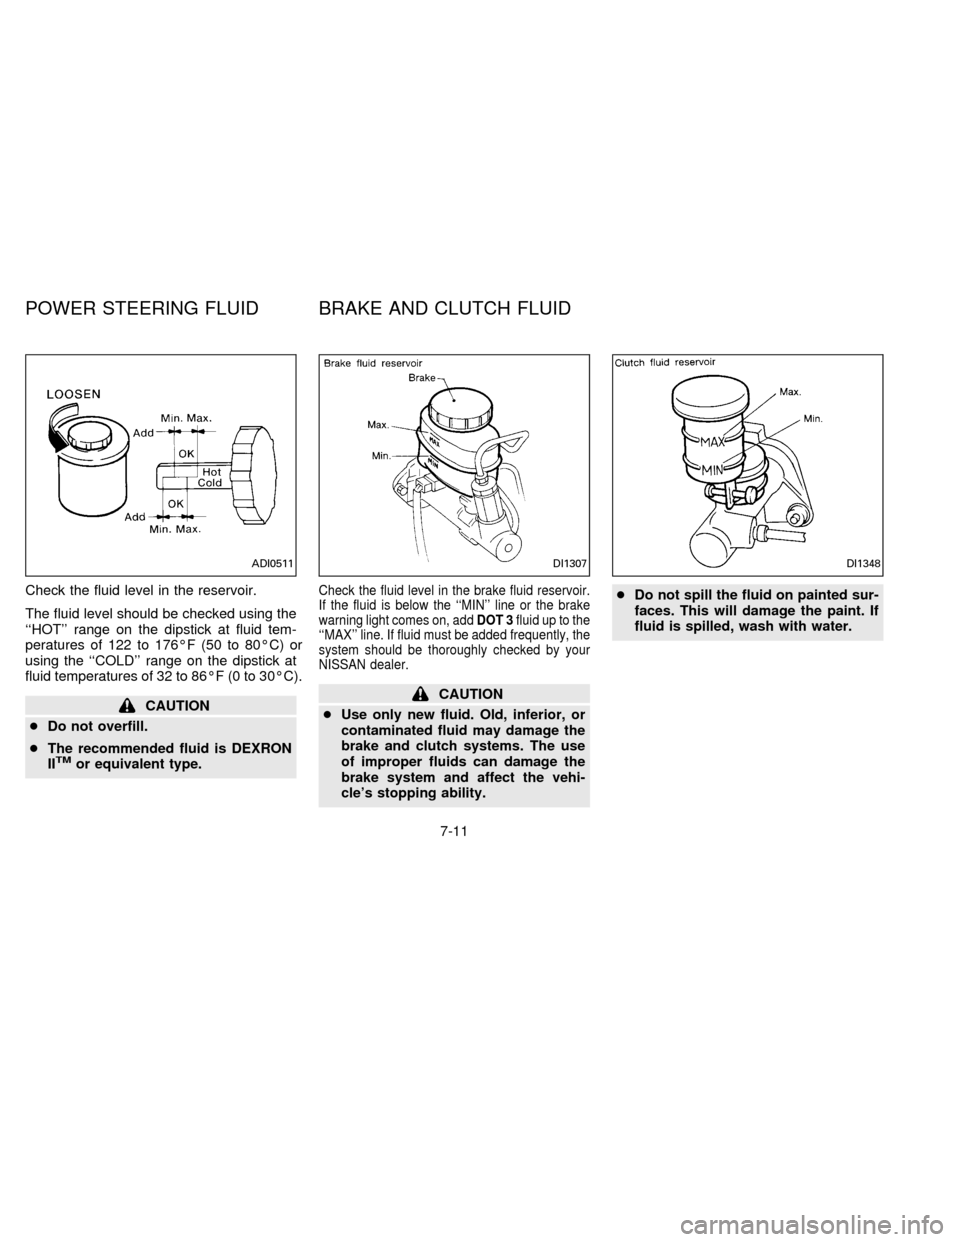
Check the fluid level in the reservoir.
The fluid level should be checked using the
``HOT'' range on the dipstick at fluid tem-
peratures of 122 to 176ÉF (50 to 80ÉC) or
using the ``COLD'' range on the dipstick at
fluid temperatures of 32 to 86ÉF (0 to 30ÉC).
CAUTION
cDo not overfill.
cThe recommended fluid is DEXRON
II
TMor equivalent type.
Check the fluid level in the brake fluid reservoir.
If the fluid is below the ``MIN'' line or the brake
warning light comes on, addDOT 3fluid up to the
``MAX'' line. If fluid must be added frequently, the
system should be thoroughly checked by your
NISSAN dealer.
CAUTION
cUse only new fluid. Old, inferior, or
contaminated fluid may damage the
brake and clutch systems. The use
of improper fluids can damage the
brake system and affect the vehi-
cle's stopping ability.cDo not spill the fluid on painted sur-
faces. This will damage the paint. If
fluid is spilled, wash with water.
ADI0511DI1307DI1348
POWER STEERING FLUID BRAKE AND CLUTCH FLUID
7-11
ZX
Page 150 of 183

Tire rotation*Ð Tires should be rotated
every 7,500 miles (12,000 km).
Wheel alignment and balanceÐIfthe
vehicle should pull to either side while driv-
ing on a straight and level road, or if you
detect uneven or abnormal tire wear, there
may be a need for wheel alignment.
If the steering wheel or seat vibrates at
normal highway speeds, wheel balancing
may be needed.
Windshield wiper blades*Ð Check for
cracks or wear if they do not wipe properly.
Doors and engine hoodÐ Check that all
doors and the engine hood operate prop-
erly. Also ensure all latches lock securely.
Lubricate hinges, latches, rollers and links if
necessary. Make sure that the secondary
latch keeps the hood from opening when
the primary latch is released.
When driving in areas using road salt or
other corrosive materials, check lubrication
frequently.
Lights*Ð Make sure the headlights, stop
lights, tail lights, turn signal lights, and other
lights are all operating properly and installed
securely. Also check headlight aim.INSIDE THE VEHICLE
The maintenance items listed here should
be checked on a regular basis, such as
when performing periodic maintenance,
cleaning the vehicle, etc.
Warning lights and chimesÐ Make sure
that all warning lights and buzzers/chimes
are operating properly.
Windshield wiper and washer*Ð Check
that the wipers and washer operate properly
and that the wipers do not streak.
Windshield defrosterÐ Check that the air
comes out of the defroster outlets properly
and in sufficient quantity when operating the
heater or air conditioner.
Steering wheelÐ Check for changes in
the steering conditions, such as excessive
freeplay, hard steering or strange noises.
SeatsÐ Check seat position controls such
as seat adjusters, seatback recliner, etc. to
ensure they operate smoothly and that all
latches lock securely in every position.
Check that the head restraints move up and
down smoothly and that the locks (if so
equipped) hold securely in all latched posi-
tions.Seat beltsÐ Check that all parts of the seat
belt system (for example, buckles, anchors,
adjusters and retractors) operate properly
and smoothly, and are installed securely.
Check the belt webbing for cuts, fraying,
wear or damage.
Accelerator pedalÐ Check the pedal for
smooth operation and make sure the pedal
does not catch or require uneven effort.
Keep the floor mats away from the pedal.
Clutch pedal*Ð Make sure the pedal
operates smoothly and check that it has the
proper free travel.
BrakesÐ Check that the brakes do not pull
the vehicle to one side when applied.
Brake pedal*Ð Check the pedal for
smooth operation and make sure it has the
proper distance under it when depressed
fully. Check the brake booster function. Be
certain to keep floor mats away from the
pedal.
Parking brake*Ð Check that the lever has
the proper travel and confirm that your
vehicle is held securely on a fairly steep hill
with only the parking brake applied.
8-3
ZX