1996 NISSAN ALTIMA radio
[x] Cancel search: radioPage 58 of 183

3 Heater, air conditioner and audio system
Ventilators............................................................. 3-2
Heater and air conditioner (manual) .................... 3-2
Air flow charts....................................................... 3-6
Heater and air conditioner (automatic)
(If so equipped) .................................................... 3-8
Radio .................................................................. 3-10
Clock-radio ......................................................... 3-10
AM-FM radio with cassette player ..................... 3-11
AM-FM radio with cassette player and
compact disc player ........................................... 3-16
Antenna .............................................................. 3-21
CB radio or car phone........................................ 3-22
ZX
Page 67 of 183

The sensor on the instrument panel helps
maintain a constant temperature; do not put
anything on or around this sensor.
Servicing air conditioning
The air conditioning system in your NISSAN
vehicle is charged with a new refrigerant
designed with the environment in mind.
This new refrigerant will not harm the
earth's ozone layer.
Special charging equipment and lubricant is
required when servicing your NISSAN air
conditioner. Using improper refrigerants or
lubricants will cause severe damage to your
air conditioning system. See ``Air condition-
ing system refrigerant and lubricant recom-
mendations'' in the ``Technical and con-
sumer information'' section of this manual.
Your NISSAN dealer will be able to service
your environmentally conscious air condi-
tioning system.To turn the radio on, turn the ignition key to
``ACC'' or ``ON''. If you listen to the radio with
the engine not running, turn the key to the
``ACC'' position.
Radio reception is affected by station signal
strength, distance from radio transmitter,
buildings, bridges, mountains and other ex-
ternal influences. Intermittent changes in
reception quality normally are caused by
these external influences.
CLOCK-RADIO (If so equipped)
On vehicles equipped with an AM-FM radio
and cassette player, a clock is integrated
into the audio system. For further details,
refer to Clock Operation later in this section.AHA0501
RADIO
3-10
ZX
Page 68 of 183

AM-FM RADIO WITH CASSETTE
PLAYER
Radio operation
Push the ON-OFF/VOL knob to turn the
radio on. Push the ON-OFF/VOL knob once
more to turn the radio off.
Turn the knob to adjust the volume.
Inserting a cassette tape into the cassette
player while the radio is on will turn the radio
off and turn the cassette player on.
Pushing the ON-OFF/VOL knob while the
cassette tape is playing will turn off the
cassette player.
Clock Operation
By pressing the ªCLOCKº button, you can
alternate the clock and the radio/cassette
tape options in the display.
Clock Set
Depressing the ``CLOCK'' and the ``''
buttons together will set hours. Depressing
the ``CLOCK'' and ``
'' buttons together
will set minutes.
AHA0524
3-11
ZX
Page 69 of 183

Clock Priority Mode
In this mode the clock will be shown in the
display. If any radio or cassette tape func-
tions are activated, the radio (or cassette
tape) display will illuminate for ten seconds
then return to the clock mode.
NOTE:
After clock adjustment, the radio is in the
clock priority mode.
Radio/Cassette Tape Priority Mode
In this mode, the radio station will illuminate
in the display during radio operation. During
cassette tape operation, ªTAPEº will illumi-
nate in the display.
Selecting the desired band
Push the band select button (FM/AM) to
change from AM to FM reception.
The stereo indicator will glow during FM
stereo reception. When the stereo broadcast
signal is weak, the radio will automatically
change from stereo to monaural reception.
Tuning
WARNING
The radio should not be tuned while
driving in order that full attention may
be given to the driving operation.
Manual tuning
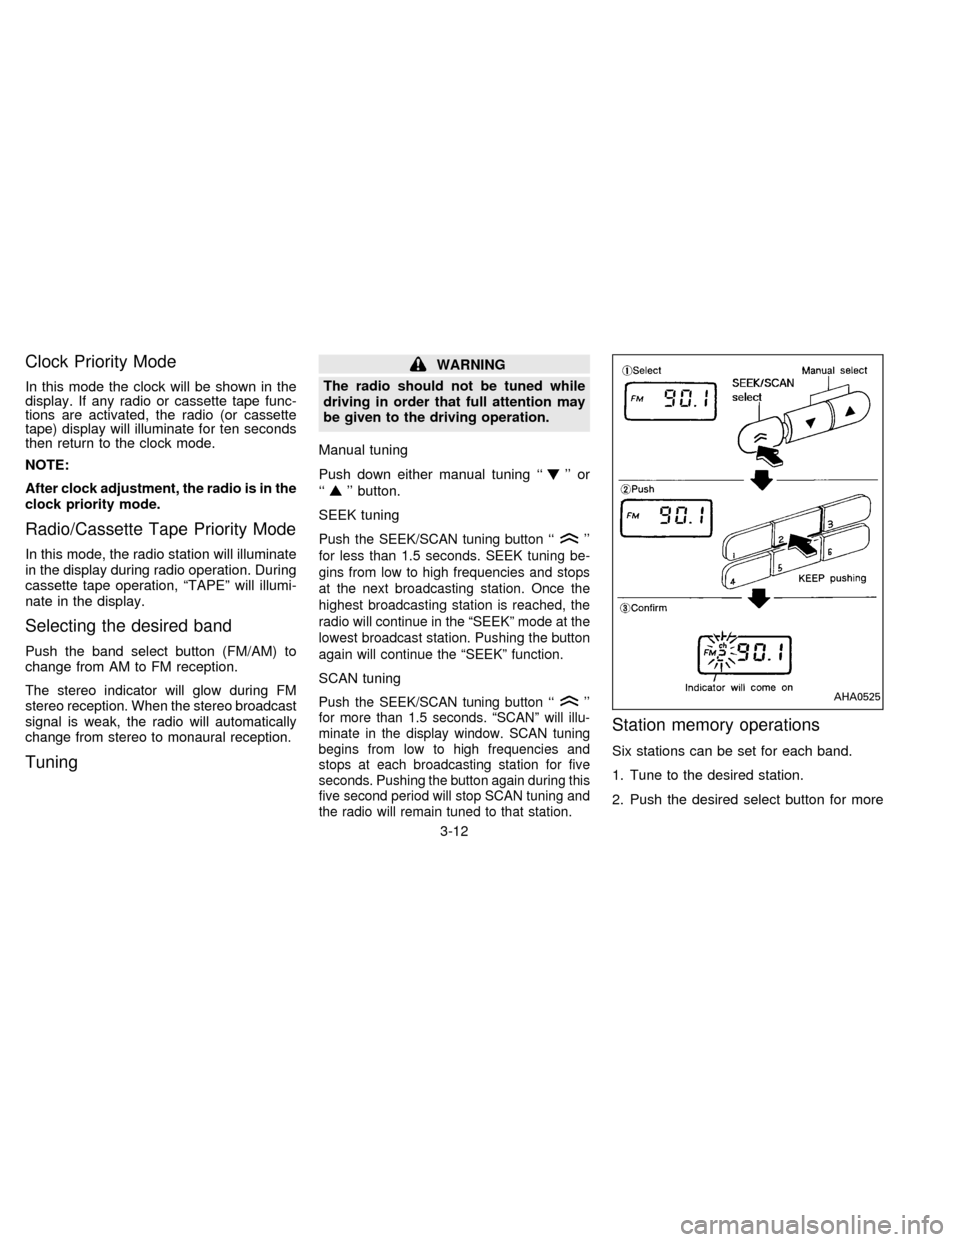
Push down either manual tuning ``
'' or
``
'' button.
SEEK tuning
Push the SEEK/SCAN tuning button ``''
for less than 1.5 seconds. SEEK tuning be-
gins from low to high frequencies and stops
at the next broadcasting station. Once the
highest broadcasting station is reached, the
radio will continue in the ªSEEKº mode at the
lowest broadcast station. Pushing the button
again will continue the ªSEEKº function.
SCAN tuning
Push the SEEK/SCAN tuning button ``''
for more than 1.5 seconds. ªSCANº will illu-
minate in the display window. SCAN tuning
begins from low to high frequencies and
stops at each broadcasting station for five
seconds. Pushing the button again during this
five second period will stop SCAN tuning and
the radio will remain tuned to that station.
Station memory operations
Six stations can be set for each band.
1. Tune to the desired station.
2. Push the desired select button for more
AHA0525
3-12
ZX
Page 70 of 183

than 2 seconds. For example, in the
diagram ch2 is to be memorized. The
radio mutes when the select button is
pushed.
3. The indicator ``ch2'' will then come on
and the sound will resume. Memorizing is
now complete.
4. Other select buttons can be set in the
same manner.
If the battery cable is disconnected, or if the
fuse blows, the radio memory will be can-
celled. In that case, reset the desired sta-
tions.
Adjusting tone quality and speaker
balance
To adjust BASS, TREB (treble), FADER,
and BAL (balance) the control knobs must
be released from their stowed positions.
Pushing the knobs once moves them to the
released position.
In the released position, the knobs control
tone quality. Turn the control knobs to adjust
BASS and TREB to the most pleasing level.
From the released position, the knobs must
be pulled out in order to control FADER and
BAL. FADER adjusts the sound level be-tween the front and rear speakers, and BAL
adjusts the sound level between the right
and left speakers.
Once sound quality is set to the desired
levels, return the control knobs to the
stowed position by pushing them in com-
pletely and releasing.
Cassette tape operation
Turn the ignition key to ``ACC'' or ``ON'', then
carefully insert the cassette tape into the
tape door.
The cassette tape will automatically pull into
the player. The word ªTAPEº and an arrow
AHA0522
3-13
ZX
Page 73 of 183

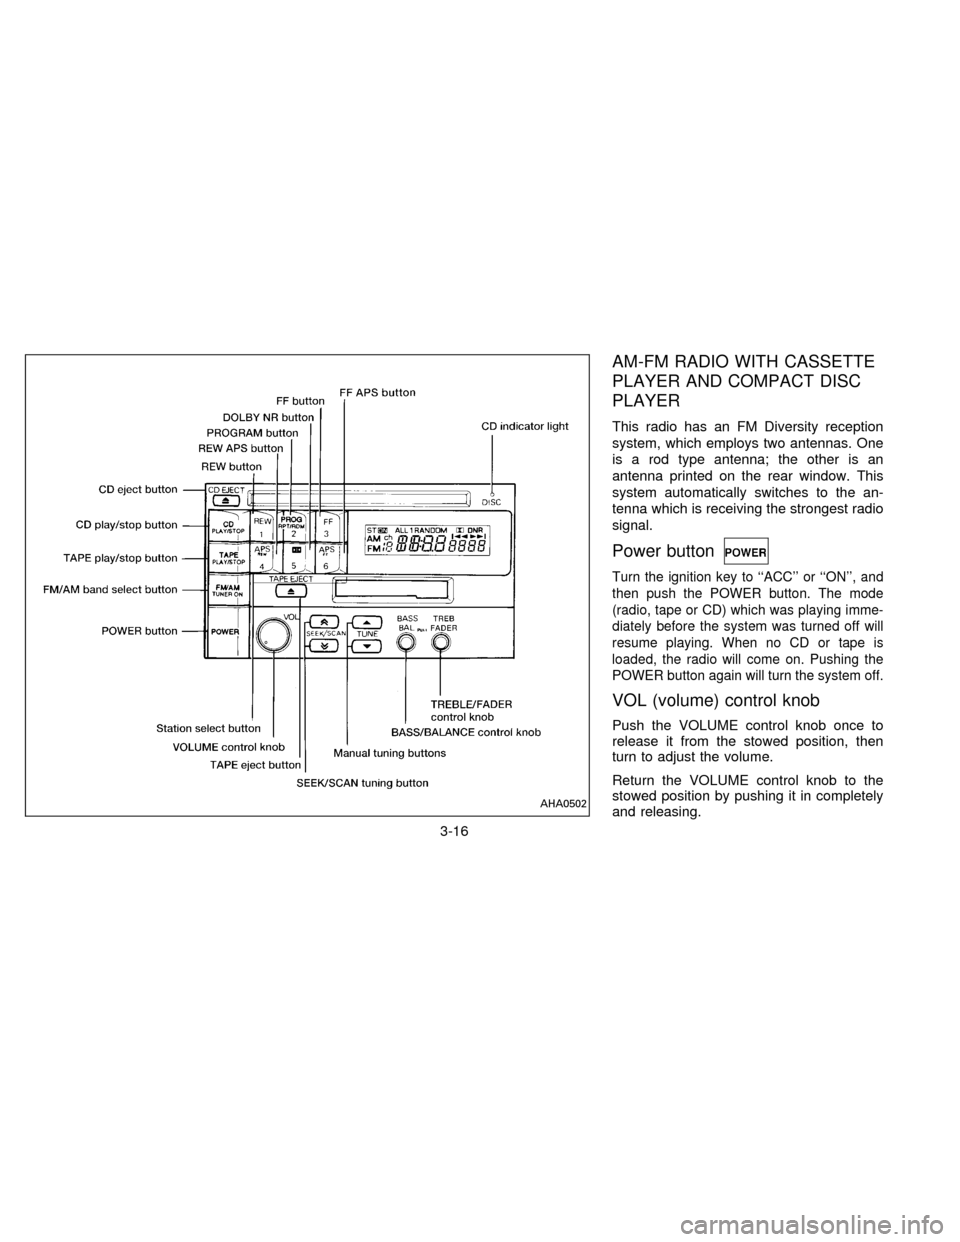
AM-FM RADIO WITH CASSETTE
PLAYER AND COMPACT DISC
PLAYER
This radio has an FM Diversity reception
system, which employs two antennas. One
is a rod type antenna; the other is an
antenna printed on the rear window. This
system automatically switches to the an-
tenna which is receiving the strongest radio
signal.
Power button
Turn the ignition key to ``ACC'' or ``ON'', and
then push the POWER button. The mode
(radio, tape or CD) which was playing imme-
diately before the system was turned off will
resume playing. When no CD or tape is
loaded, the radio will come on. Pushing the
POWER button again will turn the system off.
VOL (volume) control knob
Push the VOLUME control knob once to
release it from the stowed position, then
turn to adjust the volume.
Return the VOLUME control knob to the
stowed position by pushing it in completely
and releasing.
AHA0502
3-16
ZX
Page 74 of 183

Adjusting tone quality and speaker
balance
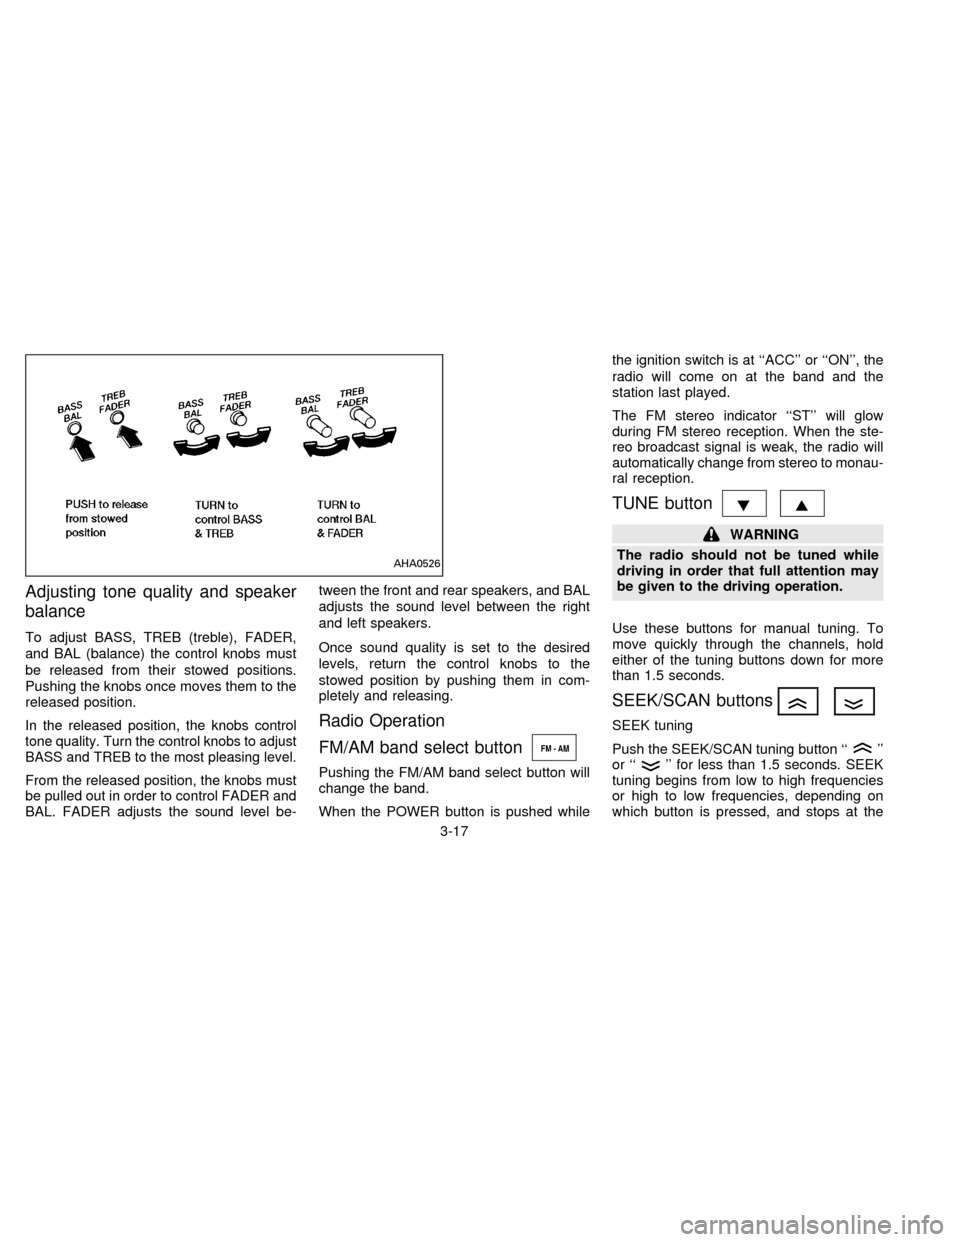
To adjust BASS, TREB (treble), FADER,
and BAL (balance) the control knobs must
be released from their stowed positions.
Pushing the knobs once moves them to the
released position.
In the released position, the knobs control
tone quality. Turn the control knobs to adjust
BASS and TREB to the most pleasing level.
From the released position, the knobs must
be pulled out in order to control FADER and
BAL. FADER adjusts the sound level be-tween the front and rear speakers, and BAL
adjusts the sound level between the right
and left speakers.
Once sound quality is set to the desired
levels, return the control knobs to the
stowed position by pushing them in com-
pletely and releasing.
Radio Operation
FM/AM band select button
Pushing the FM/AM band select button will
change the band.
When the POWER button is pushed whilethe ignition switch is at ``ACC'' or ``ON'', the
radio will come on at the band and the
station last played.
The FM stereo indicator ``ST'' will glow
during FM stereo reception. When the ste-
reo broadcast signal is weak, the radio will
automatically change from stereo to monau-
ral reception.
TUNE button
WARNING
The radio should not be tuned while
driving in order that full attention may
be given to the driving operation.
Use these buttons for manual tuning. To
move quickly through the channels, hold
either of the tuning buttons down for more
than 1.5 seconds.
SEEK/SCAN buttons
SEEK tuning
Push the SEEK/SCAN tuning button ``
''
or ``'' for less than 1.5 seconds. SEEK
tuning begins from low to high frequencies
or high to low frequencies, depending on
which button is pressed, and stops at the
AHA0526
3-17
ZX
Page 75 of 183

next broadcasting station. Once the highest
broadcasting station is reached, the radio
will continue in the ªSEEKº mode at the
lowest broadcasting station. If using the
``
'' button, once the lowest broadcast-
ing station is reached, the radio will continue
in the ``SEEK'' mode at the highest broad-
casting station. Pushing the button again
will continue the ªSEEKº function.
SCAN tuning
Push the SEEK/SCAN tuning button ``
''
or ``'' for more than 1.5 seconds. SCAN
tuning begins from low to high frequencies
or high to low frequencies, depending on
which button is pressed. SCAN tuning stops
at each broadcasting station for five sec-
onds. Pushing the button again during this
five second period will stop SCAN tuning
and the radio will remain tuned to that
station.
Station memory operations
Six stations can be set for each band.
1. Tune to the desired station.
2. Push the desired select button for morethan 3 seconds. (For example, in the
diagram ch2 is to be memorized. The
radio stops playing momentarily when
the select button is pushed.)
3. The indicator ``ch2'' will then illuminate in
the display and the sound will resume.
Memorizing is now complete.
4. Other buttons can be set in the same
manner.
If the battery cable is disconnected, or if the
radio fuse blows, the radio memory will be
cancelled. In that case, reset the desired
stations.
Cassette tape operation
Turn the ignition key to ``ACC'' or ``ON'', and
then lightly insert the cassette tape into the
tape door. The cassette tape will be auto-
matically pulled into the player.
The radio or CD will turn off (if it is on) and
the cassette tape will begin to play.
Do not force the cassette tape into the
tape door.
Pressing strongly could cause player
damage.
If the system is turned off by pushing the
AHA0503
3-18
ZX