1996 NISSAN ALTIMA clock
[x] Cancel search: clockPage 69 of 183
Clock Priority Mode
In this mode the clock will be shown in the
display. If any radio or cassette tape func-
tions are activated, the radio (or cassette
tape) display will illuminate for ten seconds
then return to the clock mode.
NOTE:
After clock adjustment, the radio is in the
clock priority mode.
Radio/Cassette Tape Priority Mode
In this mode, the radio station will illuminate
in the display during radio operation. During
cassette tape operation, ªTAPEº will illumi-
nate in the display.
Selecting the desired band
Push the band select button (FM/AM) to
change from AM to FM reception.
The stereo indicator will glow during FM
stereo reception. When the stereo broadcast
signal is weak, the radio will automatically
change from stereo to monaural reception.
Tuning
WARNING
The radio should not be tuned while
driving in order that full attention may
be given to the driving operation.
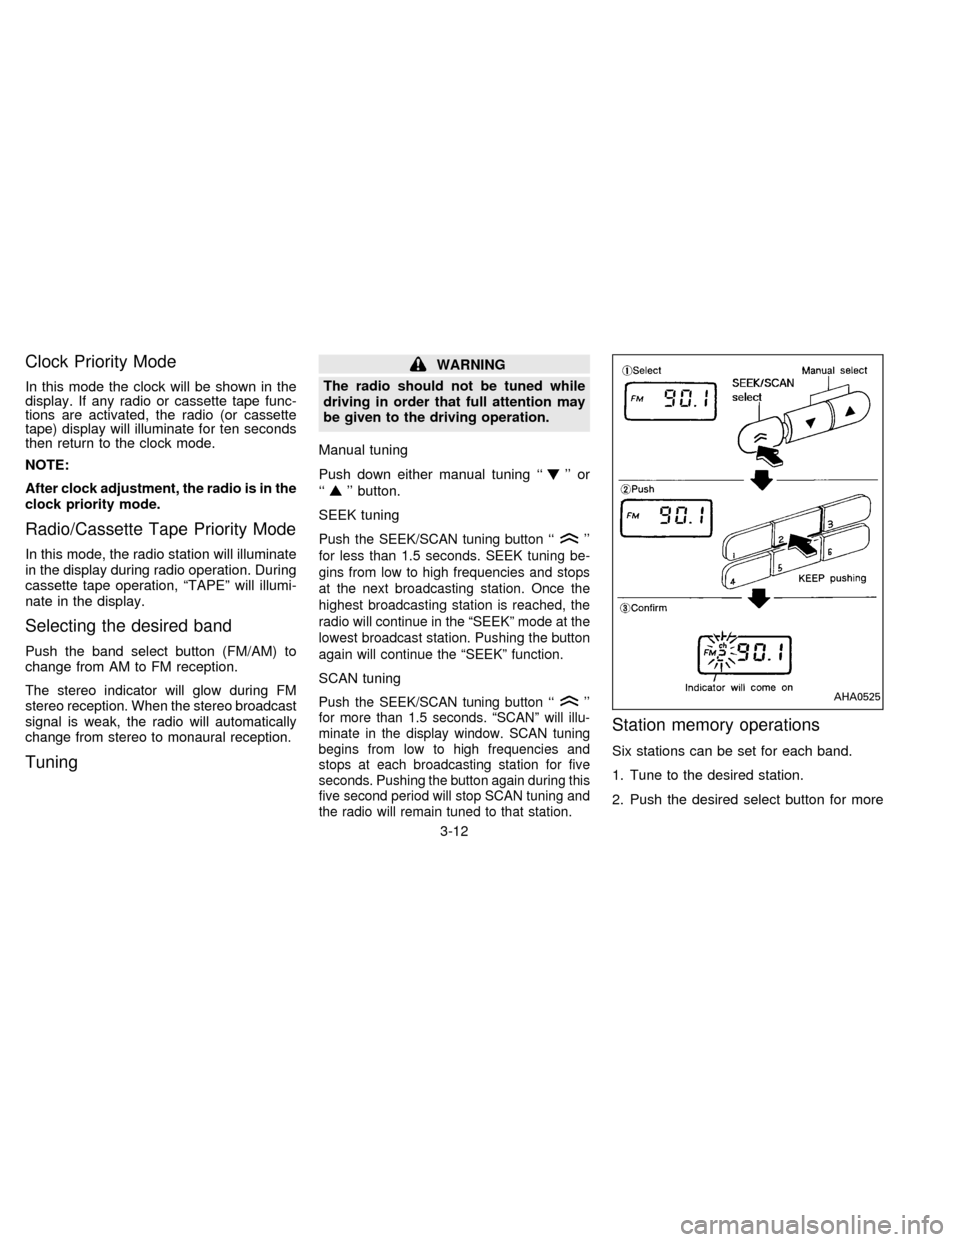
Manual tuning
Push down either manual tuning ``
'' or
``
'' button.
SEEK tuning
Push the SEEK/SCAN tuning button ``''
for less than 1.5 seconds. SEEK tuning be-
gins from low to high frequencies and stops
at the next broadcasting station. Once the
highest broadcasting station is reached, the
radio will continue in the ªSEEKº mode at the
lowest broadcast station. Pushing the button
again will continue the ªSEEKº function.
SCAN tuning
Push the SEEK/SCAN tuning button ``''
for more than 1.5 seconds. ªSCANº will illu-
minate in the display window. SCAN tuning
begins from low to high frequencies and
stops at each broadcasting station for five
seconds. Pushing the button again during this
five second period will stop SCAN tuning and
the radio will remain tuned to that station.
Station memory operations
Six stations can be set for each band.
1. Tune to the desired station.
2. Push the desired select button for more
AHA0525
3-12
ZX
Page 72 of 183

Dolby NR (noise reduction)
Push the``DOLBY NR'' button for
Dolby NR encoded tapes to reduce high
frequency tape noise. The indicator will
come on.
Dolby NR is manufactured under license
from Dolby Laboratories Licensing Corpora-
tion. ``DOLBY NR'' and the double-D symbol
are trademarks of Dolby Laboratories Li-
censing Corporation.
If in the clock priority mode when the
button is pressed,and
ªTAPEº will illuminate in the display window
for about ten seconds. The clock mode will
then return to the display window.
Metal or chrome tape usage
The cassette player will be automatically set
to high performance play when playing a
metal or chrome cassette tape.
Ejecting the cassette tape
Push the eject button.
The cassette tape will automatically come
out.
3-15
ZX
Page 79 of 183
Manual antenna
The manual antenna cannot be shortened
but can be removed. When you need to
remove the antenna, turn its base counter-
clockwise.When installing a CB, ham radio or a car
phone in your NISSAN, be sure to observe
the following cautions, otherwise the new
equipment may adversely affect the MFI
(Multiport Fuel Injection) system and other
electronic parts.
CAUTION
cKeep the antenna as far as possible
away from the Engine Control
Module.
cAlso keep the antenna wire more
than 8 inches (20 cm) away from the
MFI harness. Do not route the an-
tenna wire next to any harness.
cAdjust the antenna standing-wave
ratio as recommended by the
manufacturer.
cConnect the ground wire from the
CB radio chassis to the body.
cFor details, consult a NISSAN dealer.
CB RADIO OR CAR PHONE
3-22
ZX
Page 83 of 183

Manual transmission
The switch includes an anti-theft steering
lock device.
``LOCK'' Normal parking position (0)
The key can only be removed when the
ignition switch is in this position.
On manual transmission models, to turn the
ignition key to ``LOCK'' from ``ACC'' or ``ON'',
turn the key to ``OFF'' and press in the key
release button, then turn the key to ``LOCK''.In order for the steering wheel to be locked,
it must be turned about 1/8 of a turn coun-
terclockwise from the straight up position.
Automatic transmission
On automatic transmission models the igni-
tion lock is designed so the key cannot be
turned to ``LOCK'' and removed until the
shift lever is moved to the ``P'' (Park) posi-
tion.
When removing the key from the ignition,
make sure the shift lever is in the ``P'' (Park)
position.
When the key cannot be turned to the
``LOCK'' position, proceed as follows to re-
move the key:
ASD0022ASD0023
IGNITION SWITCH
4-4
ZX
Page 84 of 183
1) Move the shift lever into the ``P'' (Park)
position.
2) Turn the ignition key slightly in the ``ON''
direction.
3) Turn the key toward the ``LOCK'' posi-
tion.
4) Remove the key.
If the key is removed from the ignition
switch, the shift lever cannot be moved from
``P'' (Park).The shift lever can be moved if
the ignition switch is in the ``ACC'' posi-
tion. The shift lever can also be moved if
the ignition switch is in the ``ON'' posi-
tion and the foot brake pedal is de-
pressed.
There is an ``OFF'' position in between
``LOCK'' and ``ACC'', although it does not
show on the key cylinder. When the ignition
is in ``OFF'' the steering wheel is not locked.
In order for the steering wheel to be locked,
it must be turned about 1/8 of a turn coun-
terclockwise from the straight up position,
and the key must be removed from the
ignition.WARNING
To lock the steering wheel, remove the
key. To unlock the steering wheel, in-
sert the key and turn it gently while
rotating the steering wheel slightly
right and left.
Never remove the key while driving. If
the key is removed, the steering wheel
will lock. This may cause the driver to
lose control of the vehicle and could
result in serious vehicle damage or
personal injury.
``OFF'' (Manual transmission model) (1)
The engine can be turned off without locking
the steering wheel.
``ACC'' (Accessories) (2)
This position activates electrical accesso-
ries such as the radio when the engine is
not running.
``ON'' Normal operating position (3)
This position turns on the ignition system
and the electrical accessories.``START'' (4)
This position activates the starter motor,
which starts the engine.
cMake sure the area around the vehicle is
clear.
cMaintenance items listed here should be
checked periodically, for example, each
time you check engine oil.
cCheck that all windows and lights are
clean.
cVisually inspect tires for their appearance
and condition. Also check tires for proper
inflation.
cLock all doors.
cPosition seat and adjust head restraints.
cAdjust inside and outside mirrors.
cFasten seat belts and ask all passengers
to do likewise.
cCheck the operation of warning lights
when key is turned to the ``ON'' (3) posi-
tion.
BEFORE STARTING THE
ENGINE
4-5
ZX
Page 86 of 183

Push the button to shift into ``P'', ``R'' or from
``D'' to ``2''. All other positions can be se-
lected without pushing the button.
``P'' (Park):
Use this position when the vehicle is parked
or when starting the engine. Always be sure
the vehicle is at a complete stop. For maxi-
mum safety, depress the brake pedal, then
push in the select lever button and move the
shift lever to the ``P'' position. Apply the
parking brake. When parking on a hill, apply
the parking brake first, then move the shift
lever into the ``P'' position.
Shifting from ``P'' (Park)
If the ignition switch is in the ``ON'' position
and the foot brake pedal is depressed, but
the shift lever still cannot be moved out of
``P'' (Park), follow these instructions:
1. Shut the engine off and remove the key.
2. Apply the parking brake.
3. Reinsert the ignition key and turn it clock-
wise to the ``ACC'' position.
4. Depress the brake pedal, move the gear-
shift lever to ``N'' (Neutral) and start the
engine.These instructions for starting the vehicle in
``N'' (Neutral) position should only be used
until service can be obtained.
``R'' (Reverse):
Use this position to back up. Always be sure
the vehicle is completely stopped. With the
brake pedal depressed, push in the select
lever button and move the shift lever to the
``R'' position.
``N'' (Neutral):
In Neutral, neither forward nor reverse gear
is engaged. The engine can be started in
this position. You may shift to ``N'' and
restart a stalled engine while the vehicle is
moving.
``D'' (Drive):
Use this position for all normal forward
driving.
``2'' (Second gear):
Use for hill climbing or engine braking on
downhill grades.
Do not shift into the ``2'' position at speeds
over 74 MPH (119 Km/h). Do not exceed 74
MPH (119 Km/h) in the ``2'' position.``1'' (Low gear):
Use this position when climbing steep hills
slowly or driving slowly through deep snow,
sand or mud, or for maximum engine brak-
ing on steep downhill grades.
Do not shift into the ``1'' position at speeds
over 74 MPH (119 km/h). Do not exceed 41
MPH (66 km/h) in the ``1'' position.
Accelerator downshift
Ð In ``D'' position Ð
For rapid passing or hill climbing, fully de-
press the accelerator pedal to the floor. This
shifts the transmission down into 2 (Sec-
ond) gear or 1 (Low) gear, depending on the
vehicle speed.
4-7
ZX
Page 99 of 183
If you have a flat tire, follow the instructions
below.
Stopping the vehicle
1. Safely move the vehicle off the road
away from traffic.
2. Turn on the hazard warning flashers.
3. Park on a level surface and apply the
parking brake. Shift the manual transmis-
sion into reverse (automatic transmission
in ``P'').
4. Turn off the engine.
WARNING
cMake sure that the parking brake is
securely applied and the manual
transmission is shifted into reverse
(automatic transmission in ``P'').
cNever change tires when the vehicle
is on a slope, ice or slippery areas.
This is dangerous.
cNever change tires if oncoming traf-
fic is close to your vehicle. Wait for
professional road assistance.cRaise the hood to warn other traffic,
and to signal professional road as-
sistance personnel that you need
assistance.
cHave all passengers get out of the
vehicle and stand in a safe place,
away from traffic and clear of the
vehicle.Getting the spare tire and tools
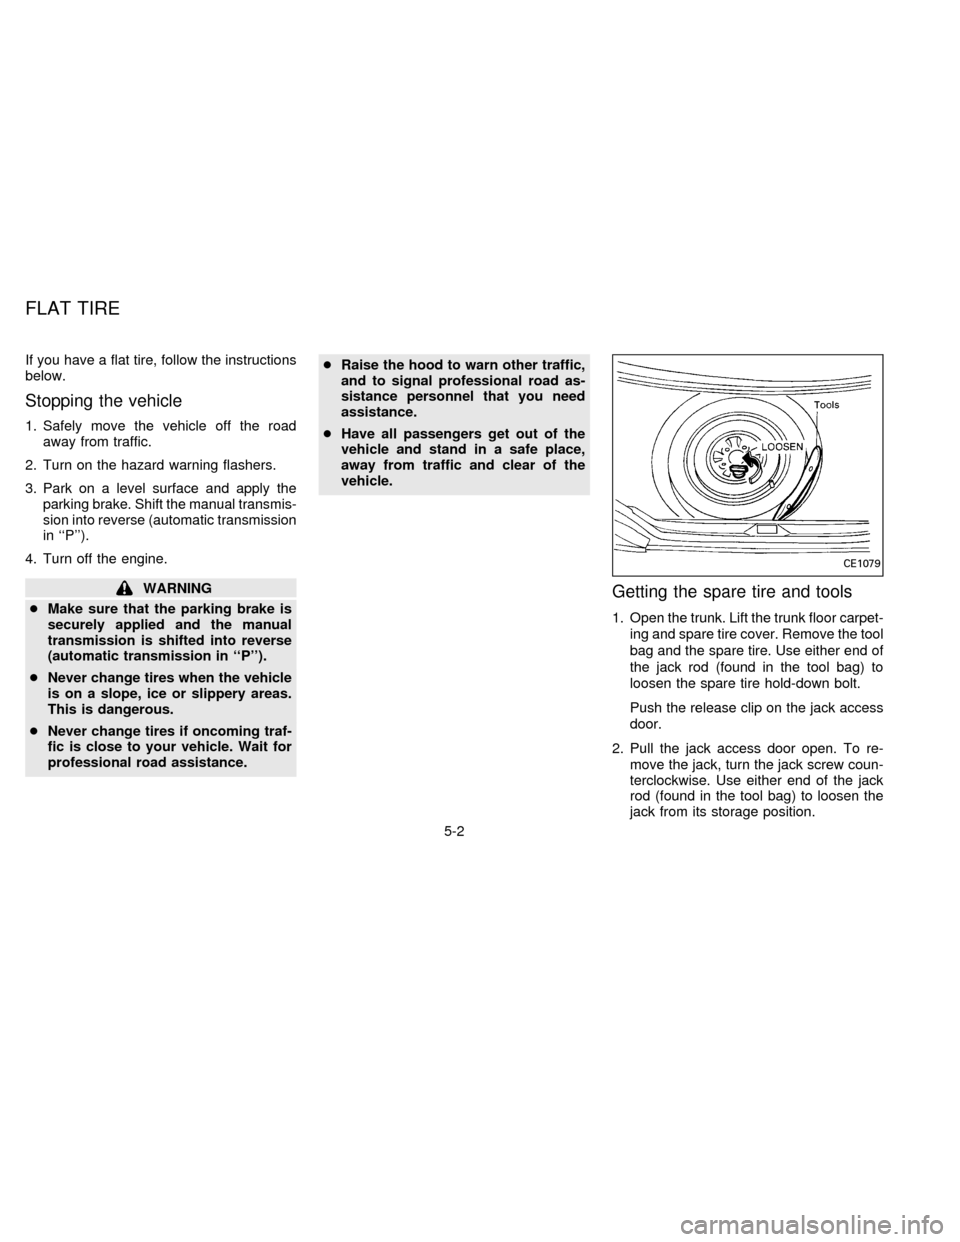
1. Open the trunk. Lift the trunk floor carpet-
ing and spare tire cover. Remove the tool
bag and the spare tire. Use either end of
the jack rod (found in the tool bag) to
loosen the spare tire hold-down bolt.
Push the release clip on the jack access
door.
2. Pull the jack access door open. To re-
move the jack, turn the jack screw coun-
terclockwise. Use either end of the jack
rod (found in the tool bag) to loosen the
jack from its storage position.
CE1079
FLAT TIRE
5-2
ZX
Page 102 of 183
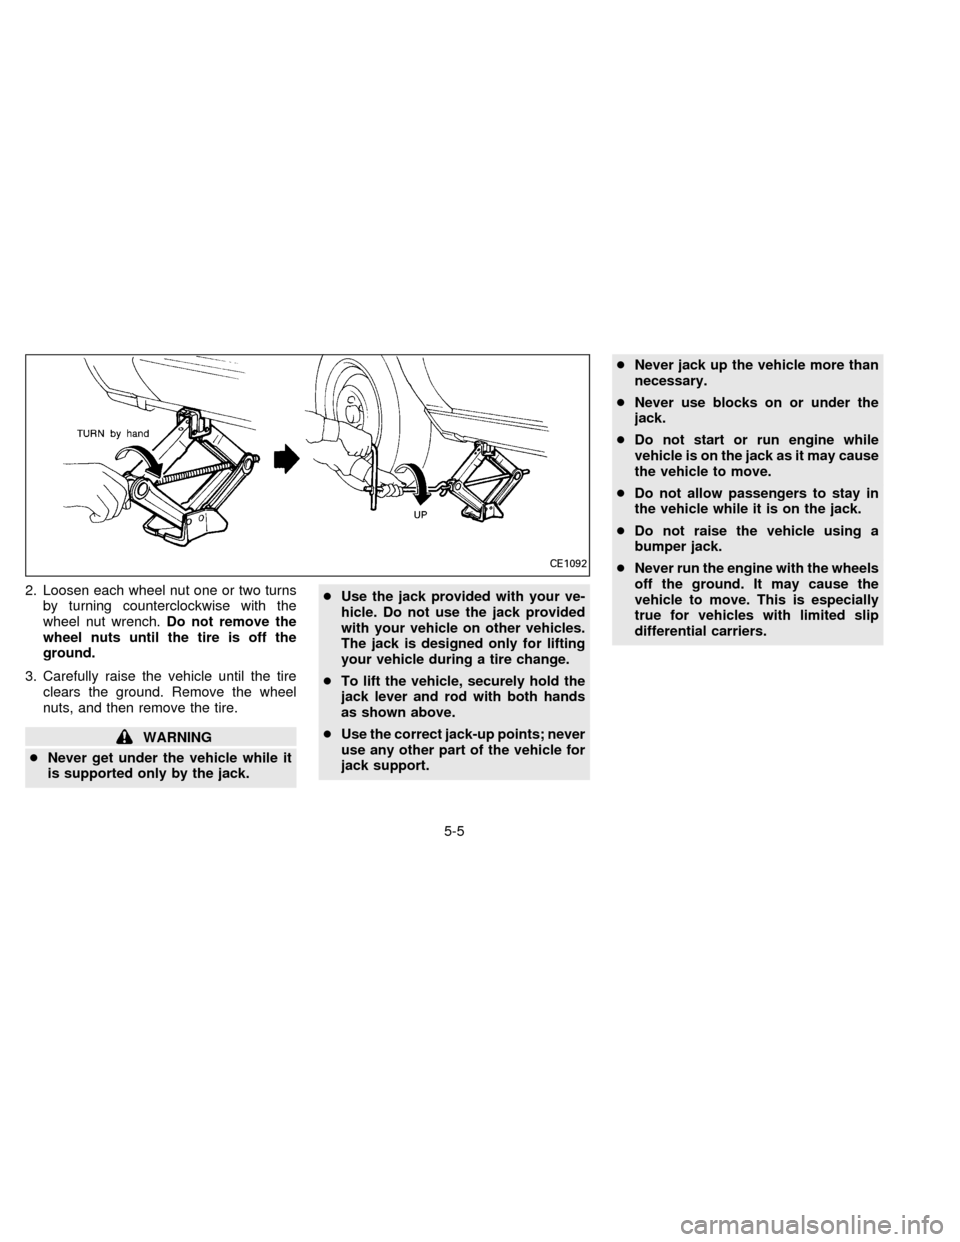
2. Loosen each wheel nut one or two turns
by turning counterclockwise with the
wheel nut wrench.Do not remove the
wheel nuts until the tire is off the
ground.
3. Carefully raise the vehicle until the tire
clears the ground. Remove the wheel
nuts, and then remove the tire.
WARNING
cNever get under the vehicle while it
is supported only by the jack.cUse the jack provided with your ve-
hicle. Do not use the jack provided
with your vehicle on other vehicles.
The jack is designed only for lifting
your vehicle during a tire change.
cTo lift the vehicle, securely hold the
jack lever and rod with both hands
as shown above.
cUse the correct jack-up points; never
use any other part of the vehicle for
jack support.cNever jack up the vehicle more than
necessary.
cNever use blocks on or under the
jack.
cDo not start or run engine while
vehicle is on the jack as it may cause
the vehicle to move.
cDo not allow passengers to stay in
the vehicle while it is on the jack.
cDo not raise the vehicle using a
bumper jack.
cNever run the engine with the wheels
off the ground. It may cause the
vehicle to move. This is especially
true for vehicles with limited slip
differential carriers.
CE1092
5-5
ZX