1996 MITSUBISHI PAJERO Rev
[x] Cancel search: RevPage 4 of 302

Downloaded from www.Manualslib.com manuals search engine YlEISESTI ' GENERAL INFORMATION
Lisavarusteiden asentaminen HB24A A
Kun haluat asentaa autoosi lisiilaitteita ja -varusteita, ota yhteys valtuutettuun M ITSU B I SH 1-huoltoliikkeeseen.
(1) Varu sta autosi vain lain sallim ilia lisiilaitteilla ja -varusteilla, jotka tayttiivat ominaisuuksilta an auton mukana tulleiss a virallis issa papereissa eritellyt tarkastukset, varoitukset ym .
K iiyta ainoastaan valtuutetun MIITSUBISHI-huoltoliikkeen h yviiksymiii lisiilaitte ita ja -
v a ru steita .
(2) Siihkoosi en a siantuntemato n asennus saa ttaa a iheuttaa tulipalon. (3) Rad io nvas taanottimen/lii h ettimen asennuksen yhteydessii
o n huolehditta v a s iitii, etteiviit laitte is ta liihtevat radi oaa llot hiiiritse ta i a ih euta toimintah aili oita autoss ia ol eva lle tieto
konee lle ta i mikroprosess orie n ohj aamille to iminno ille. (4) Al a kaytii pyoriii W i renkaita, jobka eivat tiiyta niille asetet
t uj a vaatimuksia. Pyora-ja re ngaskokoja koskevat tiedot loydiit "Tekniset tiedot" -osas ta.
Muutokset sahko-tai polttoainejar-
jestelmiin Id',1
MITSUBISHI on ain a (valmistanut)turv a Ili sia ja korkealaat uis ia ajon euvoja. Niiid en omina is uuksien yllii pitii miseksi o n tarkeiiii, etta varusteet ta i m uutokset. joilla on yhteyttii sii hko tai polttoainejiirjestelmiin, suoritetaan M ITS U B ISH I o hj eid en ml.lkaan . Neuvottele ain a va ltuutetun MITSU B ISH I ed ustajan kanssa
ka ikista tiillaisista laitteista tai muutoksi sta. koska viiiirii siihko
t ai rnlttoainejiirjestelman osien asennus saattaa aiheuttaa tulipalon
8
Installation of accessories EB24A·A
Consult an authorized MITSUBISHI dealer when installing accessories.
(1) The installation of accessories . optional parts. etc., should only be done within the limits prescribed by law in your area and in accordance with the various inspections. cautions. etc . . as described in the official documents accompanying the vehicle. Take care to use accessories approved b y an authorized MITSUBISHI d ealer . (2) Improper installation of el ec trica l p art s could ca use fire. (3) Whe n installing a r adio tran sceive r in the vehicle. ta ke
measures to prevent it from interfering with the built-in compute r or engine and other compute r-controlled equipment malfuncti ons ma y o ccur.
(4) T yres an d w hee ls whic h d o no t m eet specif ications m ust not b e used.
Re fe r t o the "S pec if ica tions" sec tion for information re
garding w heel an d tyre sizes .
i\l1odificatioi1 / alterations to the electri
calor fuel systems ,11111\;'.
MITSUBiS HI has always offered safe. high quality vehi cles. In order to main ta in this safety and quality, it is important that an y accessory that may be fitted. or modifications that may be
carr ied out which involve the e lectrical or fuel systems, shoul d
be carr ied out i n accordance w ith .fV1ITSUBISHI guidelines.
Please consul t an authorized MITSUB!SHI dealer concerning any su c h fitment or modification, as improper i nsta llation of
electrica l o r fuel relat ed parts could ca use a fire.
Page 6 of 302

Downloaded from www.Manualslib.com manuals search engine YLEISESTI , ,.,'. .' .,.... GEN~~At li\fFORMi,XTIOI\f
10
Asbestos safety instructions EB07A·Ac
For England "Certain parts fitted to this vehicle contain Asbestos . Please follow the Garage Workers Asbestos Code' listed below when handling such components."
1.
DON'T blow dust with an air line .
2 . DON'T grind or drill , unless the machine has exhaust
ventilation or a ventilated booth to work in.
3 . DON'T use a brush to sweep up the dust.
4 . DON 'T take protective clothing home. It should be cleaned
by your employer .
5 . DON 'T use equipment if it is not maintained and checked .
If in doubt. ask to see the examination reports.
6 . DO use properly designed equipment which prevents dust escaping , or use clean wet rags . When used, place the used
rags in a plastic waste bag while still wet.
7 . DO use a special (Type H) vacuum cleaner to remove dust if applicable .
8 . DO
wet the dust thoroughly and scrape it up if the above
vacuum cleaner is not available .
9 . DO wear protective clothing, such as overalls that your employer provides.
10. DO dispose of Asbestos waste in accordance with the
regulations.
The
complete Garage Workers Asbestos Code can be
obtained free of charge from The Environmental Health
Department of your local authority or The Health and
Safety Executive.
PLEASE NOTE
"THIS MODEL USES
ASBESTOS FREE BRAKE AND CLUTCH PARTS."
Page 15 of 302

Downloaded from www.Manualslib.com manuals search engine LUKITSEMIENEN J'A AVAAMINEN '. ",' . LOCKING AND'.UI\{U)CKIN~~ '1 • ' ~ - • ., • • ~," , ,,;..; ~ ,,,,-
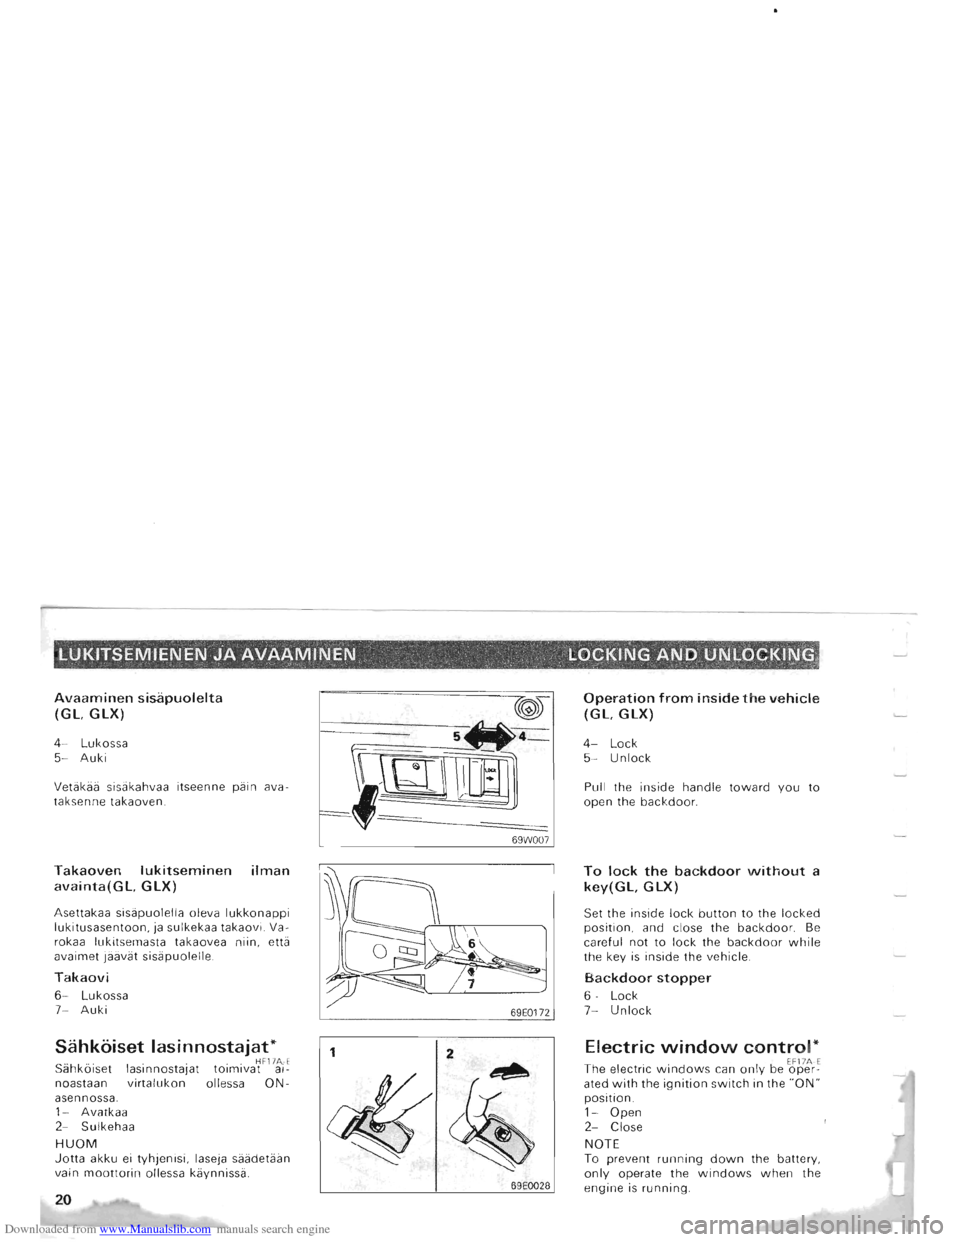
Avaaminen sisapuolelta
(GL,
GLX)
4 -Lukossa 5 -Auki
Vetakaa sisakahvaa itseenne pain ava
taksenne takaoven.
Takaoven lukitseminen ilman
avainta(GL, GLX)
Asettakaa sisapuolella oleva lukkonappi lukitusasentoon, ja sulkekaa takaovi. Va
rokaa lukitsemasta takaovea niin, etta
avaimet jaavat sisapuolelle.
Takaovi
6-Lukossa 7-Auki
Sahkoiset lasinnostajat* . . .. HF17A. E Sahk6iset laslnnostaJat tOlmlvat al-
noastaan virtalukon ollessa ON
asennossa. 1 - Avatkaa
2-Sulkehaa
HUOM Jotta akku ei tyhjenisi , laseja saadetaan
vain moottorin ollessa kaynnissa.
20
69W007
69E0172 69E0028
Operation from inside the vehicle
(GL, GLX)
4-Lock 5 -Unlock
Pull the inside handle toward you to
open the backdoor.
To lock the backdoor without a
key(GL, GLX)
Set the inside lock button to the locked position, and close the backdoor. Be
careful not to lock the backdoor while the key is inside the vehicle.
Backdoor stopper
6-Lock 7 -Unlock
Electric window control* EF17A·E The electric windows can only be oper-ated with the ignition switch in the "ON"
position.
1 -Open 2-Close
NOTE
To prevent
running down the battery , only operate the windows when the engine is running.
Page 26 of 302

Downloaded from www.Manualslib.com manuals search engine LUKITSEMIENEN JA AVAAMINEN LOCKING AND UNLOCKING '" (¥ " •
Korkealuokkainen lavara-
peite HFOliH-.'"
Korkealuokkainen lavarapeite, joka ei ai
noastaan ole helpompi kayttaa vaan
myos kestavampi_ Tisavarusteena on
saatavil
la myos elektronisaatoinen etuo
san tavarapeite _
& VAROITUS Kun ulkolampotila on alhainen (aile 5 astetta), valttakaa tavarapeitteen avaamista ja sulkemista, koska kudos saattaa siita siita vaurioitua.
Sailyttaminen
1. Myrskyn tai rankan sateen aikana tai silloin kun ajoneuvo jatetaan seisomaan pitkaksi aikaa, laittetaa nsen paalle korinsuojus seka estamaan vesivaurioila etta suojaamaan
lavarapeitetta ja ajoneuvon korin maalia. 2. Pitkina sailytysaikoina tavarapeite pidetaan kiinni. J os ta
varapeite laitetaan talteen taitettuna , se saattaa rypistya.
69EO041
Canvas top EF04HA
The canvas top designed rear canvas top that will not only be much easier to fold down, but much more durable as well.
An electronically controlled front canvas sunroof also is optionally available _
& CAUTION When the ambient temperature is low (approximately 5·C or less), avoid opening and closing the canvas, as there is danger of damage to the texture.
To store
1 _ During a storm or heavy rain or when leaving the vehicle
for a long period, place a body cover to both prevent water entry and protect the canvas and vehicle body paint. 2_ For long storage periods, keep the canvas closed. If the
canvas is folded and left stored , it may wrinkle.
31
Page 31 of 302

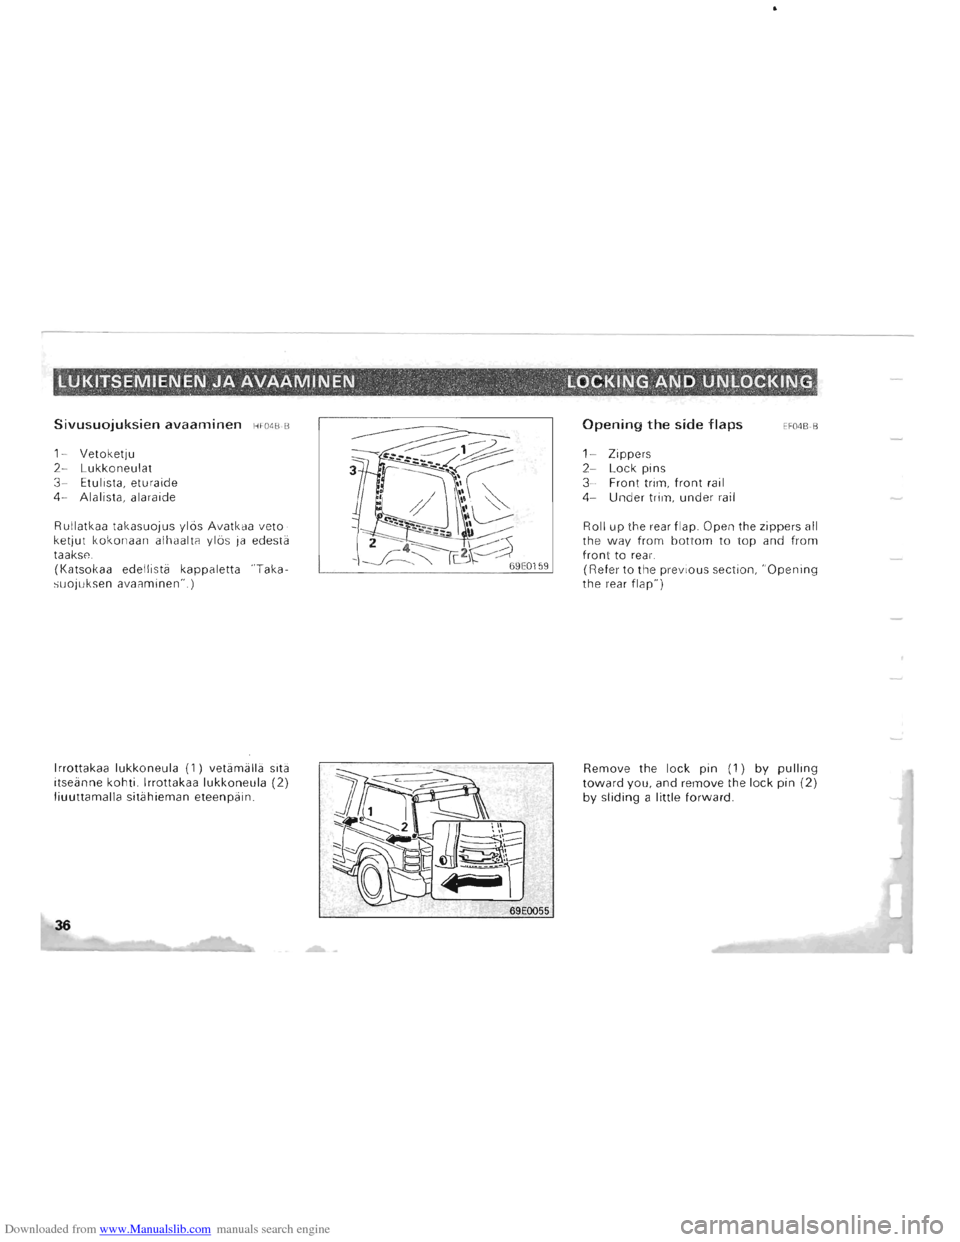
Downloaded from www.Manualslib.com manuals search engine Sivusuojuksien avaaminen HF04BB
1-Vetoketju 2-Lukkoneulat 3 -Etulista , eturaide 4-Alalista, alaraide
Rullatkaa takasuojus
ylas Avatkaa vetoketjut kokonaan alhaalta ylas ja edesta
taakse. (Ka tsokaa edellista kappaletta "Taka
suo juksen avaaminen" .)
Irrottakaa
lukkoneula (1) vetamal la sita
itseanne kohti. Irrottakaa lukkoneula (2) liuuttamalla sitahieman eteenpain.
36
Opening the side flaps
1-Zippers 2-Lock pins 3-Front trim, front rail 4-Under trim, under rail
EF04B -B
Roll up the rear flap. Open the zippers all
the way from bottom to top and from front to rear. (Refe r to the previous section, "Opening the rear flap")
Remove the lock pin (1) by pulling toward you, and remove the lock pin (2) by sliding a little forward.
Page 33 of 302

Downloaded from www.Manualslib.com manuals search engine Rullatkaa takasuojus ylbs Ja irrottakaa
sivusuojukset. (Katsokaa edellisia kappaleita "Takasuo
juksen avaaminen" ja "Sivusuojuksien
avaaminen".) Painakaa avausnappulaa,
jolloin lukko vapautuu ja lukkonappulat
avautuvat lukosta.
Lukitkaa lukkonappulat uudelleen .
Nostakaa peitteen etuosaa ja taittakaa
se ta aks epain .
Siirtakaa suojuskehyksen keskella olevat
lukkovivut lukosta avaus-puolelle . Toisella kadella kehysta tukien painakaa lukkovipua eteenpain ja taittakaa suo
juksen ylakehys hitaasti.
38
69E0056
Roll up the rear flap and remove the side
flaps. (Refer
to the previous sections "Opening the rear flap" and "Opening the sideflaps.")
Press the open button to release the lock and unbuckle the lock knobs.
Relock the lock knobs.
Lift the front of the canvas top and fold
it rearward .
Maneuver the lock levers at the centre of the canvas top frame towards the unlock side. Supporting the frame with one hand, press the lock lever box forward with the other, and slowly fold the canvas top frame.
Page 35 of 302

Downloaded from www.Manualslib.com manuals search engine LUKITSEMIENEN JA AVAAMINEN " , --, LOCKING,AND UN'LOCKII\IG' . . '. . ~ " ~
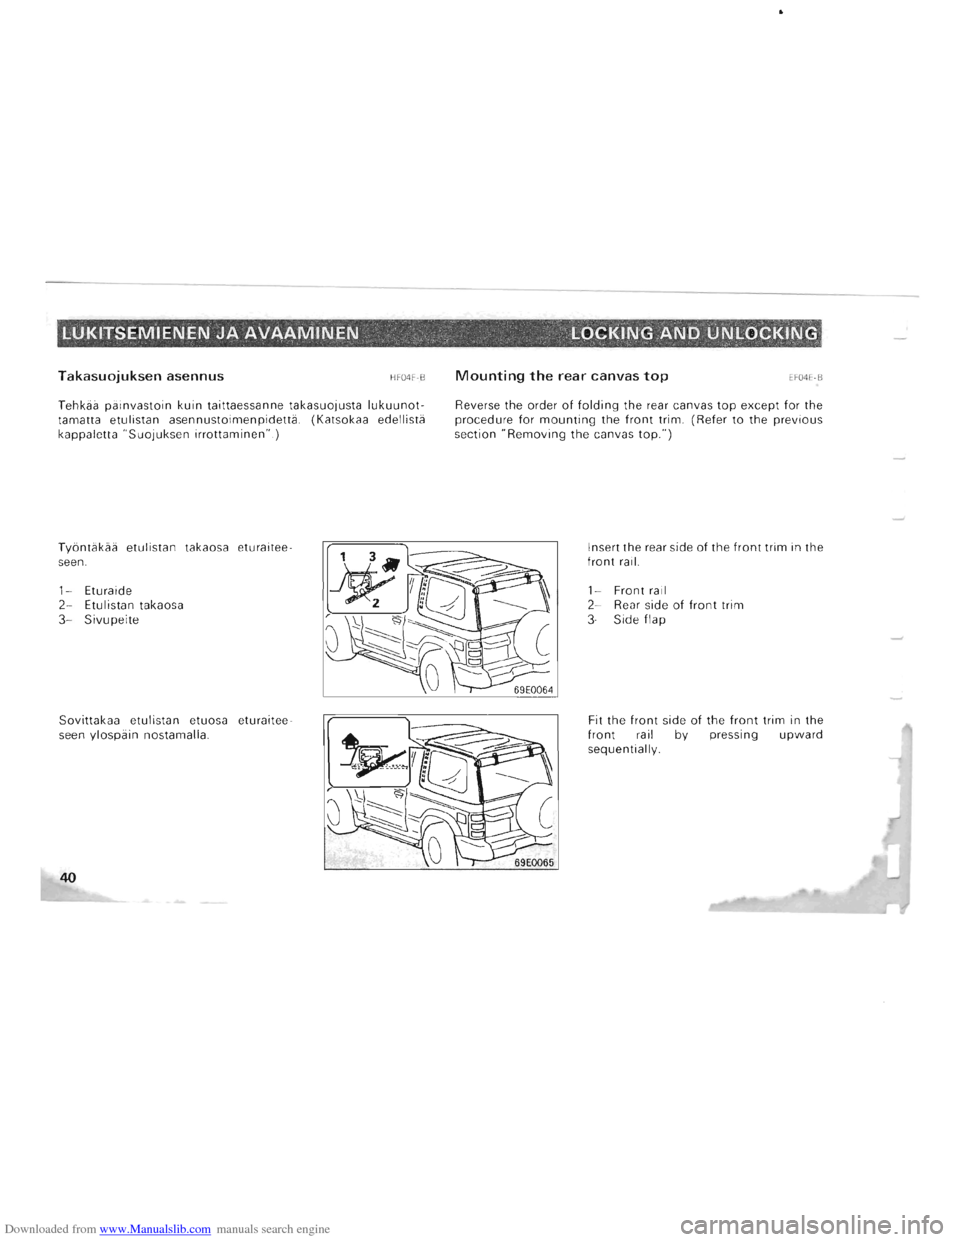
Takasuojuksen asennus HF04F-B
Tehkiia piiinvastoin kuin taittaessanne takasuojusta lukuunottamatta etulistan asennustoimenpidettii, (Katsokaa edellistii
kapp aletta "Suojuksen irrottaminen",)
Tyontiikiiii etu listan takaosa eturaitee
seen ,
1-Eturaide 2-Etulistan takaosa
3-Sivupeite
Sovittakaa etulistan etuosa eturaitee
seen
ylospiiin nostamalla ,
40
Mounting the rear canvas top EF04E-B
Reverse the order of folding the rear canvas top except for the
procedure for mounting the front trim, (Refer to the previous
section "Removing the canvas top,")
Insert the rear side of the front trim in the front rai L
1-Front rail 2-R ear side of front trim 3-Side flap
Fit the
front side of the front trim in the front rail by pressing upward sequentially,
Page 40 of 302

Downloaded from www.Manualslib.com manuals search engine IS'TOiMET'~'A TURVAVv6i".· " ,'. ,', '.' ' .,' ,-,' SEAT'AND SEAT BELTS' " '.
1-Korkeuden ja joustavuuden saata
Kaanna saatanuppia (1) sopivan jousi-tiukkuuden saamiseksi. Talla nu-pilla saadetaan seka korkeus etta joustavuus.
HUOM Haluttaessa lisata istuimen kimmoi
suutta, nuppi on asetettava asentoon "SOFT"; haluttaessa vahentaa sita, nuppi tulee asettaa asentoon "HARD".
2-Korkeuden saata
Taalla vivulla (2) voidaan saataa
myas korkeus. Korkeusvaihtoehtoja
on kolme.
HUOM (1) Keskiasentoon saadettaessa on hel-pompi saada vipu oikeaan kohtaan pu-dottamalla ensin istuin ala-asento onsa,
ja sitten siita ylas.
(2) Ajettaessa normaalilla paallystetylla tiella talee vipu lukita , jotta istuin ei kallistuisi kaannasta tehdessa.
69E0101
NOTE
1-Height and bounce adjustment
Turn the adjusting knob (1) to get the desired spring tension. The height and bounce of the seat can
be adjusted by using this knob_
NOTE To make it softer, set to "SOFT"; to make
it harder, set to" HAR D".
2-Height adjustment If seat bounce is desired, the height can still be adjusted by using the
lev er (2) . Anyone of three different
heights can be selected.
(1) If the middle or bottom height leve l is desired , it will be easier to make the adjustment if the seat adjusting knob is first set to low indication. (2) When driving along general paved roads, lock the lever to
prevent the seat from swaying when making a turn.
45