1996 MITSUBISHI PAJERO clock
[x] Cancel search: clockPage 192 of 302

Downloaded from www.Manualslib.com manuals search engine MUKAVUUTTA MATKANTEKOON FOR PLEASANT DRIVING
Ylimaarainen pistorasia HG38A-B Accessory socket EG38A -A
The accessory socket can be used while the ignition switch is at either the "ON" or "ACC" position.
Ylimaaraista
pistorasiaa voidaan kayttaa virtalukon asennoissa "ON" ja "ACe. Pistorasia loytyy avaamalla ohjausp
yoran vasemmalla alhaalla oleva kansi.
Liittakaa sahkolaitteet tahan pistora
siaan .
~Q
£!IQj
, 69E0073
Open the lid to the lower left of the
steering wheel to uncover the socket .
Use it to plug in an electrical device.
& VAROITUS Kun liitatte sahkolaitteen, varmistakaa etta sen jannite on 12V ja etta son sahkoteho ei ylita 120W. Muistakaa etta akku saattaa tyhjeta, jos sahkolaitetta
kaytetaan kauan moottorin ollessa sammuksissa.
Digitaalikello HG 15B·D
Kello nayttaa aikaa virta-avaimen ollessa "ON" - tai "ACC" -ase nnossa.
Saiitiikiia aika painamalla eri nappuloita
alia kuvatulla tavalla. (Kiiyttiikiiii esim. kyniin teraa nappuloiden 1 ja 2 siiiifami
seen .)
216
& CAUTION When you connect an electrical device, make sure it is rated at 12V and its electrical capacity does not exceed 120W. Remember that prolonged use of an electrical
device with the engine off could run the batteries down.
Digital clock EG 15B·D
The digital clock indicates the time while the ignition switch is in either the "ON" or "ACe position .
Set the time by pressing the various buttons as described below. (Use the tip of a pencil or the like to set buttons 1
and 2.)
Page 193 of 302

Downloaded from www.Manualslib.com manuals search engine MUKAvuurrA MATKANTEKOON ;.' FOR PLEASANT DRIVING \' .... ~ ~,. " ,
1-Siiiitiiii tunnit 2-Siiiitiiii minuutit 3-Palauttaa minuutit nollille (sekunnit palaavat myos nollille)
Esimerkki
10:30 -11 :29 ..... stii tulee 11 :00 11 :30 -12:29 ..... stii tulee 12:00
HUOM Jos akun johdot irrotetaan korjauksen tai muun syyn vuoksi,
siiiitiikiiii kello taas oikea an aikaan, kun virta on jiilleen yh
distetty .
1-To adjust the hour 2-To adjust the minutes 3-To reset the minutes to zero (The seconds will also be reset to zero .) Example 10:30 -11 :29 ..... Changes to 11 :00 11 :30 -12:29 ..... Changes to 12:00
NOTE
If the battery cables are disconnected during repairs or for any
other reason, reset the clock to the correct time after the cables are reconnected.
217
Page 231 of 302

Downloaded from www.Manualslib.com manuals search engine HATATOIMENPITEITA .... FOR EMERGENCIES
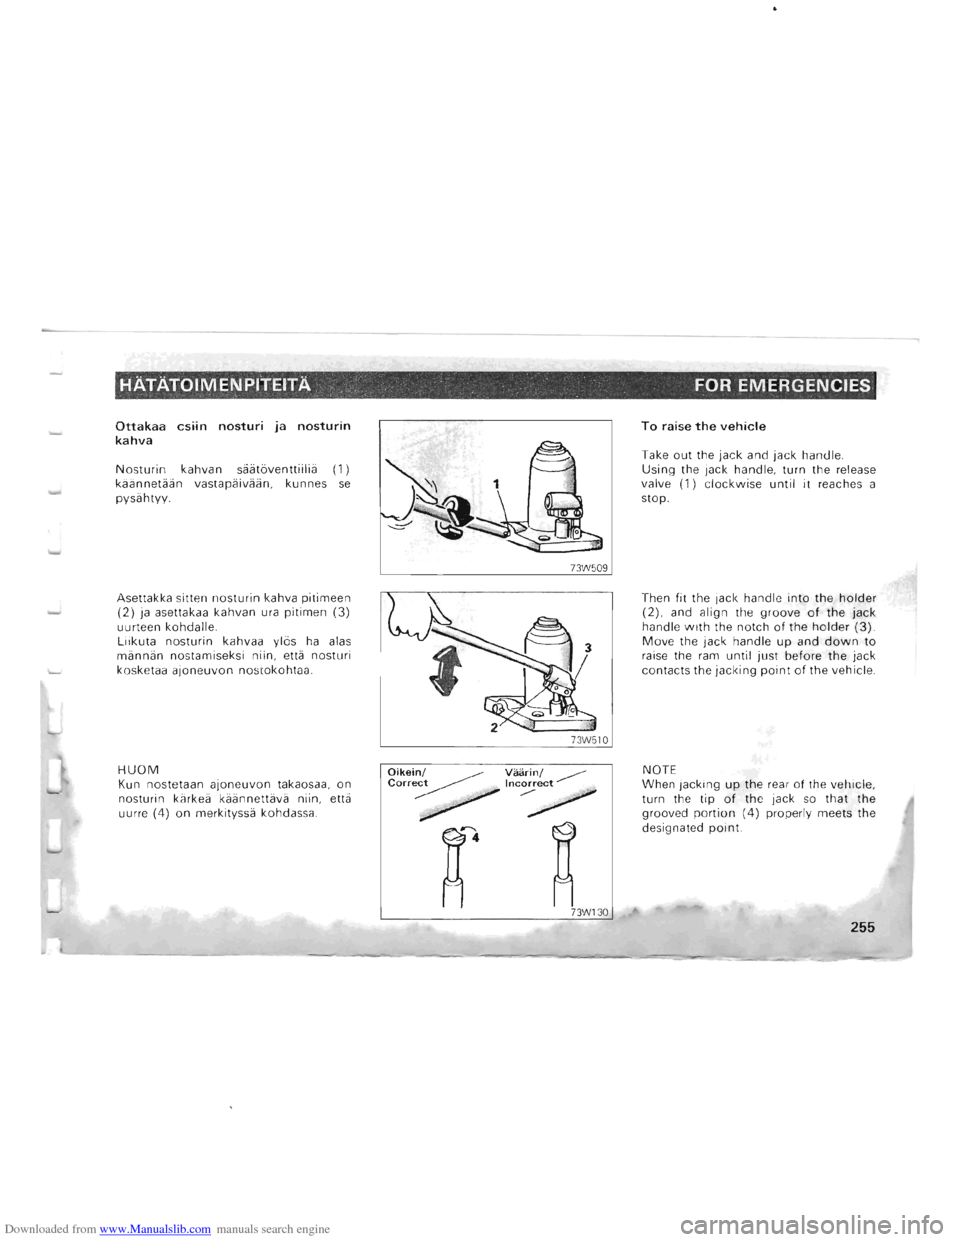
Ottakaa csiin nosturi ja nosturin kahva
Nosturin kahvan siiiitaventtiiliii (1) kiiiinnetiiiin vastapiiiviiiin , kunnes se pysiihtyy.
Asettakka sitten
nosturin kahva pitimeen (2) ja asettakaa kahvan ura pitimen (3)
uurteen kohdalle.
Liikuta nosturin kahvaa ylas ha alas miinniin nostamiseksi niin, etta nosturi
kosk etaa a
joneuvon nostokohtaa .
HUOM Kun nostetaan ajoneuvon takaosaa, on
nosturin kiirkeii kaannettiivii niin, ettii
uurr e (4)
on merkityssii kohdassa.
Oikei~/ Vaarin/ ~ Correct Incorrect
~ .. ~ . .......-~ ~ ~ ~.
~4 ~
73W130
To raise the vehicle
Take out the jack and jack handle .
Using the jack hand le, turn the release
valve (1) clockwise until it reaches a
stop.
Then
fit th e jack handle into the holder (2), and align the groove of the jack handle with the notch of the holder (3). Move the jack handle up and down to raise the ram until just before the jack
contacts the jacki ng point of the vehicle .
NOTE
When jacking
up the rear of the vehicle,
turn the tip of the jack so that the
grooved portion (4) properly meets the
designated
point.
255
Page 232 of 302

Downloaded from www.Manualslib.com manuals search engine HATATOIMENPITEITA " . "', '.... FOR'EMERGENCIES '
Nostakaa manta liikuttamalla nousturin kahvaa ylas ja alas.
Ajoneuvon laskeminen
Kaantakaa vapautusventtiilia vasta·
paivaan nosturin kahvalla hitaasti
mannan laskemiseksi ja ottakaa nosturi
sitten pois.
& VAROITOS Jos vapautusventtijli loysennetaan kaantamalta sita 2 tai useamman kerran vastapaivaan, nosturin oijy vuotaa eika sita voida kayttaa.
HUOM (1) Jaskus kun nostetaan ajoneuvon etuosaa, merkityn kohdan uurrettu osa ei irtoa. Jos nain kay, laskekaa manta alas
heiluttamalla ajoneuvoa.
(2)
Jos nostunia on vaikea irrottaa kasin, asettakaa nostunin kahva pitimeen ja asettakaa nosturin kahvan uurre pitimen
uurteen kanssa sarnalle kohdalle kinnitaenkahvan siihen.
Vetakaa sitten nosturin kahva ja irrottakaa nostun.
256
Moving the jack handle up and down,
raise the position .
To lower the vehicle
Using the jack handle , turn the release
valve anticlockwise slowly to lower the
ram , and then take out the jack .
& CAUTION If the release valve is loosened by turning it 2 or more times in the anticlockwise direction, the jack's oil will leak and the jack cannot be used .
NOTE (1) Occasionally when the front part of the vehicle is jacked
up, the grooved portion of the designated point will not
come off. When this happens, rock the vehicle to lower the ram. (2) When the jack is difficult to remove by hand, insert the jack handle into the holder and catch the jack handle notch onto the holder notch and secure it there. Then pull the jack handle and remove the jack.
Page 233 of 302

Downloaded from www.Manualslib.com manuals search engine HATATOIMEN PITEITA FOR EMERGENCIES
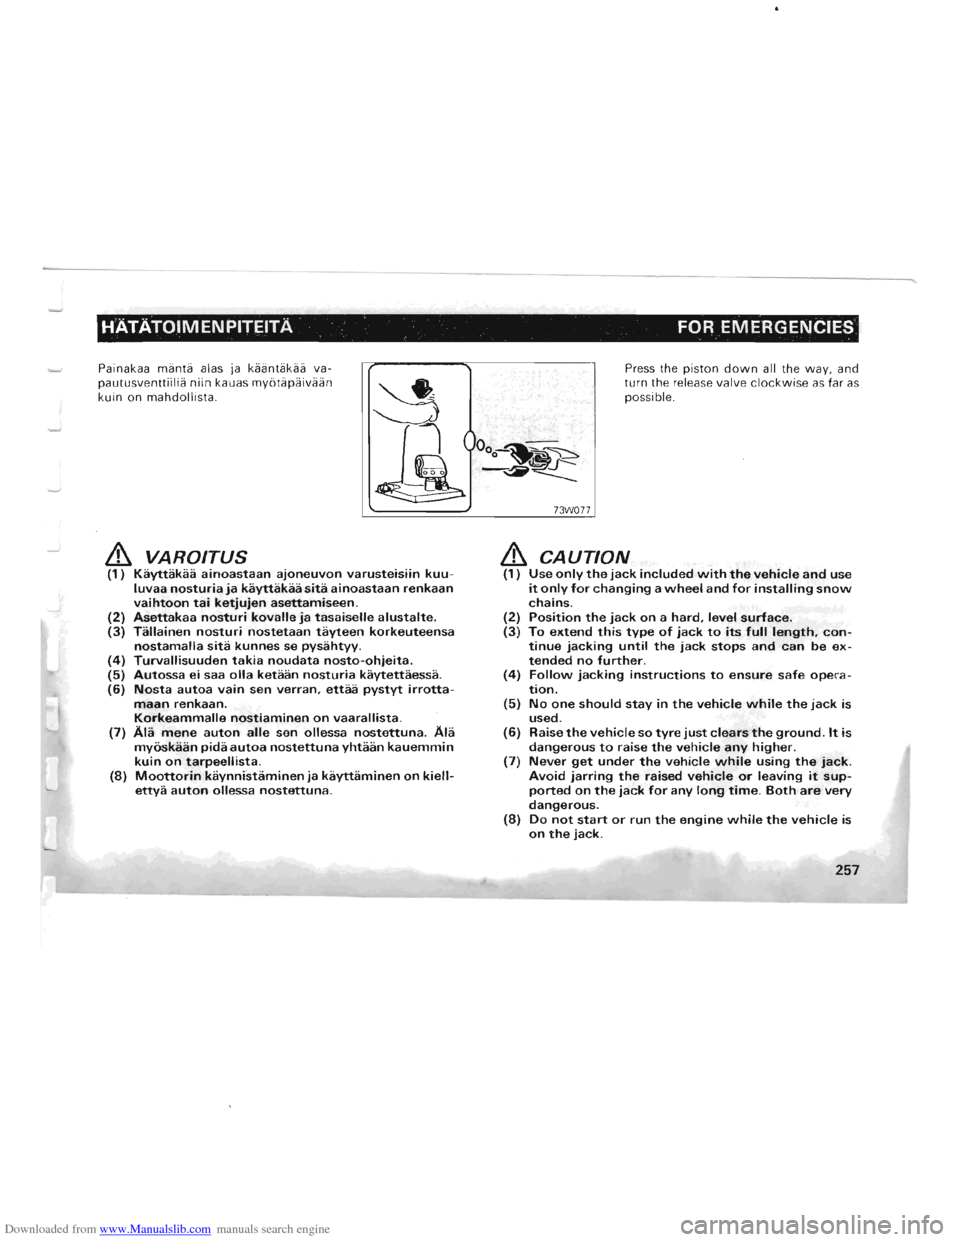
Painakaa manta alas ja kaijntakaa va
pautusventtiilia niin kauas mybtapaivaan
kuin on mahdollista .
& VAROITUS (1) Kayttakaa ainoastaan ajoneuvon varusteisiin kuuluvaa nosturia ja kayttakaa sita ainoastaan renkaan vaihtoon tai ketjujen asettamiseen. (2) Asettakaa nosturi kovalle ja tasaiselle alustalte. (3) Tallainen nosturi nostetaan tayteen korkeuteensa nostamalla sita kunnes se pysahtyy. (4) Turvallisuuden takia noudata nosto-ohjeita. (5) Autossa ei saa olla ketaan nosturia kaytettaessa. (6) Nosta autoa vain sen verran, ettaa pystyt irrotta-maan renkaan. Korkeammalle nostiaminen on vaarallista.
(7) Ala mene auton aile sen ollessa nostettuna. Ala myoskaan pida autoa nostettuna yhtaan kauemmin kuin on tarpeellista. (8) Moottorin kaynnistaminen ja kayttaminen on kiellettya auton ollessa nostettuna.
73W0 77
Press the piston down all the way, and
turn the release valve clockwise as far as
possible.
& CAUTION (1) Use only the jack included with the vehicle and use it only for changing a wheel and for installing snow chains. (2) Position the jack on a hard, level surface. (3) To extend this type of jack to its full length, continue jacking until the jack stops and can be extended no further. (4) Follow jacking instructions to ensure safe operation. (5) No one should stay in the vehicle while the jack is used. (6) Raise the vehicle so tyre just clears the ground. It is dangerous to raise the vehicle any higher. (7) Never get under the vehicle while using the jack. Avoid jarring the raised vehicle or leaving it supported on the jack for any long time. Both are very dangerous. (8) Do not start or run the engine while the vehicle is on the jack.
257
Page 252 of 302

Downloaded from www.Manualslib.com manuals search engine HATATOIMENPITEITA FOR EMERGENCIES '
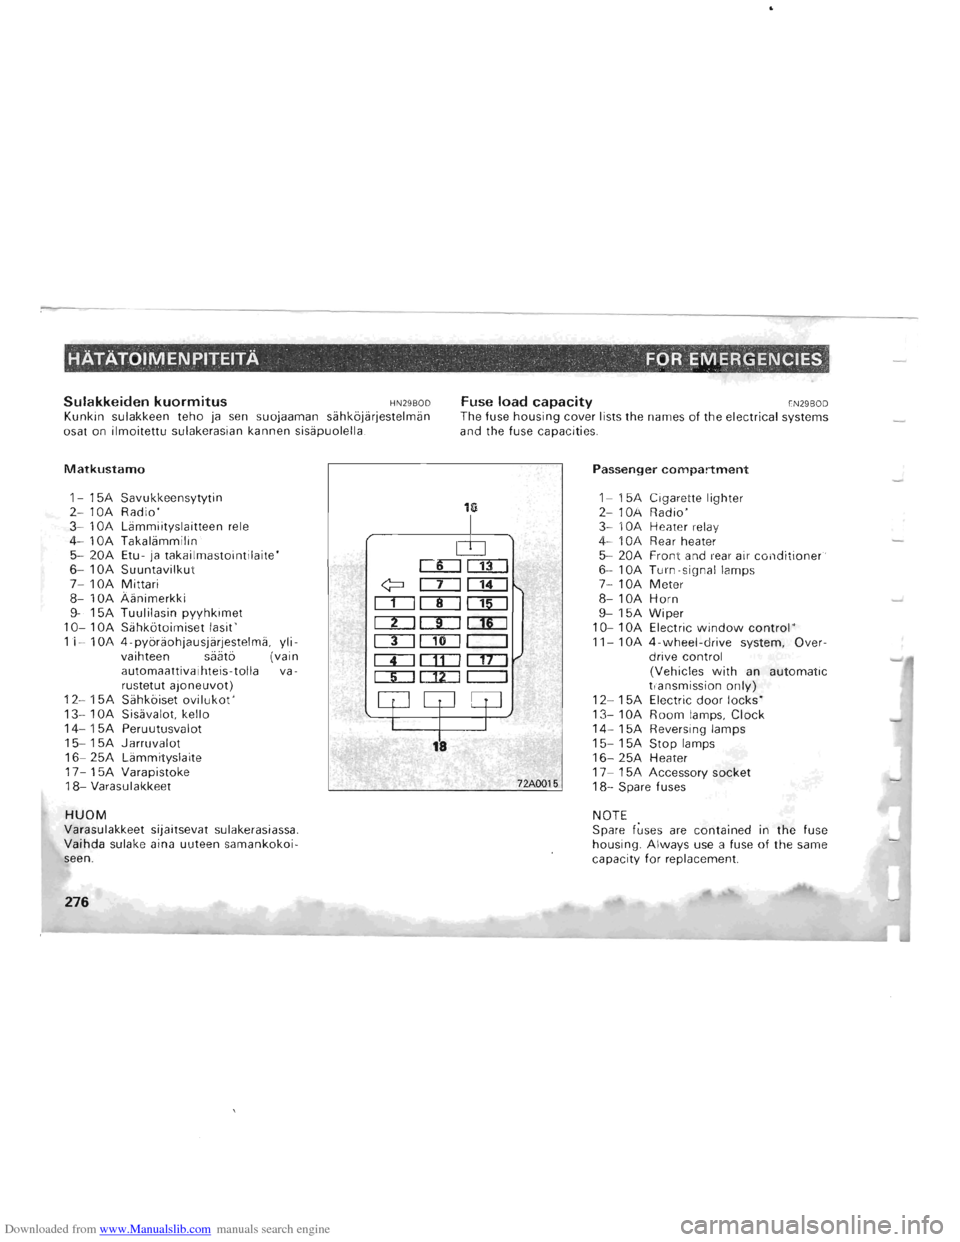
Sulakkeiden kuormitus HN29BOD Kunkin sulakkeen teho ja sen suojaaman siihkojiirjestelmiin
osat on ilmoitettu sulakerasian kannen sisiipuolella .
Fuse load capacity EN29BOD The fuse housing cover lists the names of the electrical systems
and the fuse capacities .
Matkustamo
1-15A Savukkeensytytin
2 -10A Radio "
3 -10A Liimmiityslaitte en rele
4 -10A Takaliimmilin "
5 -20A Etu- ja takailmastointilaite" 6-10A Suuntavilkut
7 -10A Mittari 8-10A Aiinimerkki 9-15A Tuulilasin pyyhkimet 10-10A Siihkotoimiset lasit ' 11-10A 4-pyoriiohjausjiirjestelmii , yli -
vaihteen siiiito (vain automaattivaihteis-tolla va-
rustetut ajoneuvot) 12-15A Siihkois et ovilukot" 13-10A Sisiivalo t. kello 14-15A Peruutu svalo t 15-15A Jarruvalot 16-25A Liimmityslait e 17-15A Varapistoke 18-Varasulakkeet
HUOM Varasulakkeet sijaitsevat sulakerasiassa . Vaihda sulake aina uuteen samankokoi
seen.
276
18
CIJClL]
[I] o:::J m::J
o::J CLJ C1£J
CIJmJc:::J
CI:J CID oz:J
CI:J DLJ c::J
72AOO15
Passenger compartment
1 -15A Cigarette lighter 2 -10A Radio "
3 -10A H eater relay
4 - 10A Rear heater "
5 -20A Front and rear air conditioner"
6 -10A Turn-signa l lam ps
7 -10A Meter 8-10A Horn 9-15A Wiper 10-10A Electric window control " 11-10A 4-wheel-drive system, Over
drive control
(Vehicles with an automatic transmission only) 12- 15A Electric door locks' 13-10A Room lamps, Clock 14-15A Reversing lamps
1 5 -15A Stop lamps 16-25A Heater
1 7 -1 5A Accessory socket 18-Spare fuses
NOTE
Spare fuses
are contained in the fuse housing. Always use a fuse of the same
capacity for replacement.
Page 258 of 302

Downloaded from www.Manualslib.com manuals search engine HATATOIMENPITEITA '" .. FOR EMERGENCIE~:
~a ~~sl!a~:T~~o lamppua
paljain kasin tai likaisin kasinein tms. Jos lasin pinta on likainen, puhdistakaa se alkoholilla, tinnerilla jne., ja asentakaa se kuivauksen jiilkeen takaisin paikoilleen.
Etuyhdistelmavalot HN10WB
Irrota moottoritilan sisalla oleva koukku,
joka pitaa kiinni polttimoyksik-koa.
Sijrra Iyhtya eteenpain ja irrota se.
Kaanna Iyhtya vastapaivaan ja veda se ulos.
Liikuttakaa Iyhtya eteenpain ja irrottakaa
se. Kun vaihdatte etusuuntavalojen polt
timoa, kiertakaa lampunpidiketta vasta
pajvaan ja vetakaa se ulos. Irrott akaa
sitten polttimo. Pysaytysvalon ' polttimo irrotetaan
pidikkeestaan .
Lyhty asennetaan laittama lla Iyhdyn tappi yhteen korin reian kanssa .
282
Oikein/ Correct Viiiirin/ Incorrect
16W965
& CAUTION Never hold the halogen lamp bulb with a bare hand, dirty glove, etc. If the glass surface is dirty, it must
be cleaned with alcohol. paint thinner. etc., and install it after drying it thoroughly.
Front combination lamps ENIOWB
When replace the lamp bulb at the left
side , take out the engi ne coolant reser
voir . Remove the lens
mounting bolt.
Remove the hook inside the engine compartment which secures the lamp
unit.
Slide
the lamp unit forward to remove it. When replacing the front turn signal lamp , turn the lamp socket anticlockwise and pullout it and remove the
lamp bulb. When replacing the position lamp, re
move the bulb from the lamp holder. When mounting th e lamp unit. align the
pin on the lamp unit with the hole in the body.
Page 259 of 302

Downloaded from www.Manualslib.com manuals search engine HATATOIME~PITEITA" . . . .' FOR EMERGENCIES , ~ .,
Sivusuuntavilkut HN IOE-E
Irrota lasin asennusruuvit. lasi ja sen jiilkeen polttimo pidikkeestiiiin.
Takavalot HNI OI-N
Ota lasi
irti irrottamalla
sen
asennusruuvit. Kukin
polttimo voidaan irrottaa kiiiintii
miillii sitii vastapiiiviiiin samalla
sisiiiinpain painaen.
1-Peruutusvalo 2-Takavilkkuvalo 3 -Takasuuntavilkut 4 -Jarruvalo ja takavalo
~
~rI-~·
~\~~
73E0051
72E0052
73E0054
Side turn-signal lamps E NlOE-E
Remove the lens mounting screws, remove the lens, and then remove the bulb from the lamp holder.
Rear combination lamps ENIOI-N
Remove the len s mounting screws, re
move the lens .
Each bulb can be removed by turning it anti-clockwise while pressing it inward.
1-Reversing lamp 2-Rear fog lamp 3-Rear turn -signal lamp 4-Stop and tail lamp
283