Page 78 of 240
Heating and Cooling
To Cool with A/C
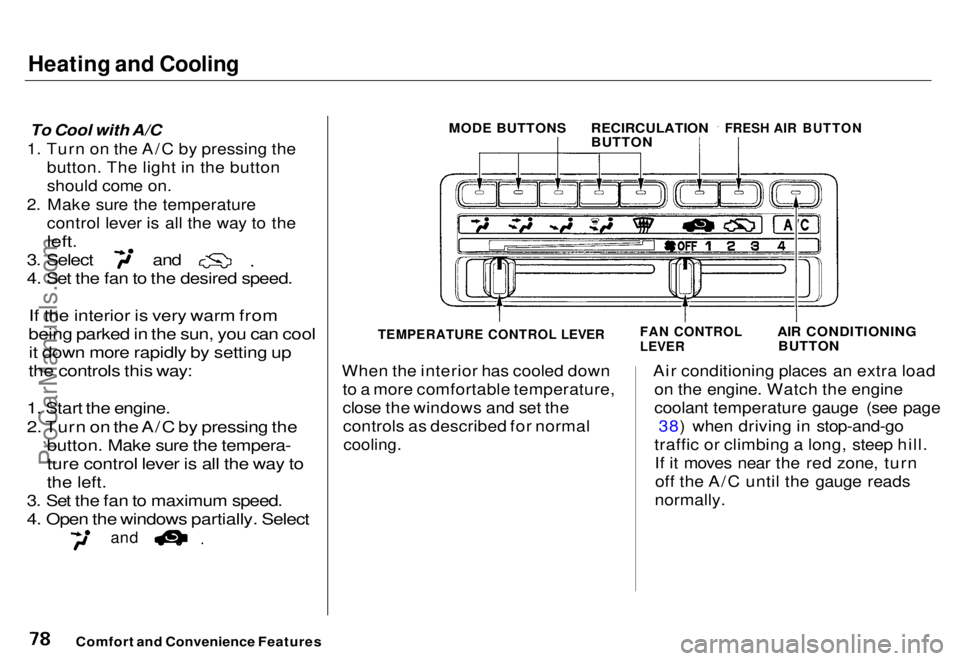
1. Turn on the A/C by pressing the button. The light in the button
should come on.
2. Make sure the temperature control lever is all the way to the
left.
3. Select and
4. Set the fan to the desired speed.
If the interior is very warm from
being parked in the sun, you can cool
it down more rapidly by setting up
the controls this way:
1. Start the engine.
2. Turn on the A/C by pressing the
button. Make sure the tempera-
ture control lever is all the way to
the left.
3. Set the fan to maximum speed.
4. Open the windows partially. Select
and
When the interior has cooled down
to a more comfortable temperature,
close the windows and set thecontrols as described for normal
cooling.
Air conditioning places an extra load
on the engine. Watch the engine
coolant temperature gauge (see page 38) when driving in stop-and-go
traffic or climbing a long, steep hill. If it moves near the red zone, turnoff the A/C until the gauge reads
normally.
Comfort and Convenience Features
MODE BUTTONS
RECIRCULATION
BUTTON
FRESH AIR BUTTON
AIR CONDITIONINGBUTTON
FAN CONTROL
LEVER
TEMPERATURE CONTROL LEVERProCarManuals.comMain Menu s t Table of Contents
Page 79 of 240
Heating and Cooling
To Heat
To warm the interior:
1. Start the engine. 2. Select and
3. Set the fan to the desired speed.
4. Adjust the warmth of the air with
the temperature control lever.
To Heat and Dehumidify with Air
Conditioning
Air conditioning, as it cools, removes moisture from the air. When used in
combination with the heater, itmakes the interior warm and dry.
1. Switch the fan on.
2. Turn on the air conditioning. 3. Select and
4. Adjust the temperature control
lever so the mixture of heated and
cooled air feels comfortable.
This setting is suitable for all driving conditions whenever the outside
temperature is above 32°F (0°C).
To Defog and Defrost
To remove fog from the inside of the windows:
1. Switch the fan on.
2. Turn on the air conditioning. 3. Select and
4. Adjust the temperature control
lever so the airflow from the
defroster vents feels warm.
5. Turn on the rear window defogger to help clear the rear window.
CONTINUED
Comfort and Convenience FeaturesProCarManuals.comMain Menu s t Table of Contents
Page 80 of 240
Heating and Cooling
To remove exterior frost or ice from the windshield and side windowsafter the car has been sitting out in
cold weather:
1. Start the engine.
2. Select
and
3. Switch the fan and temperature
controls to maximum.
To rapidly remove exterior frost or ice from the windshield (on very cold days), first select Once the
windshield is clear, select to
avoid fogging the windows.
TEMPERATURE CONTROL LEVER
Comfort and Convenience Features MODE BUTTONS
RECIRCULATION
BUTTON
FRESH AIR BUTTON
FAN CONTROL
LEVER
AIR CONDITIONING
SWITCHProCarManuals.comMain Menu s t Table of Contents
Page 81 of 240
Heating and Cooling
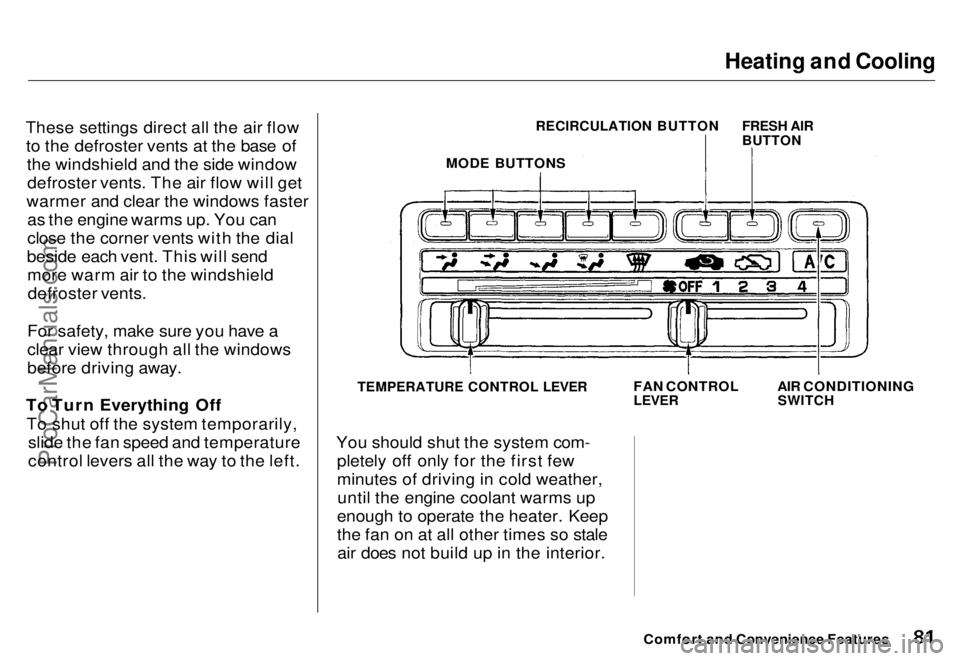
These settings direct all the air flow to the defroster vents at the base of the windshield and the side windowdefroster vents. The air flow will get
warmer and clear the windows faster as the engine warms up. You can
close the corner vents with the dial
beside each vent. This will send more warm air to the windshielddefroster vents.
For safety, make sure you have a
clear view through all the windows
before driving away.
To Turn Everything Off To shut off the system temporarily, slide the fan speed and temperature
control levers all the way to the left.
TEMPERATURE CONTROL LEVER
You should shut the system com- pletely off only for the first few
minutes of driving in cold weather,until the engine coolant warms up
enough to operate the heater. Keep
the fan on at all other times so stale air does not build up in the interior.
Comfort and Convenience Features
FAN CONTROL
LEVER
AIR CONDITIONING
SWITCH
RECIRCULATION BUTTON
FRESH AIR
BUTTON
MODE BUTTONSProCarManuals.comMain Menu s t Table of Contents
Page 108 of 240
Break-in Period, Gasoline
Break-in Period
Help assure your car's future
reliability and performance by payingextra attention to how you drive
during the first 1,000 km (600 miles).
During this period:
Avoid full-throttle starts and rapid
acceleration.
If you need to add oil, use the
engine oil recommended in this
owner's manual.
Avoid hard braking. New brakes need to be broken-in by moderate
use for the first 300 km (200
miles).
You should follow these same re- commendations with an overhauled
or exchanged engine, or when the
brakes are relined.
Gasoline
Your Honda operates most effec- tively on unleaded gasoline with a
pump octane number of 86 or higher.
Use of a lower octane gasoline can
cause a persistent, heavy metallicrapping noise in the engine that can
lead to mechanical damage.
We recommend gasolines containing detergent additives that help prevent
fuel system and engine deposits.
Using gasoline containing lead will
damage your car's emission controls.
This contributes to air pollution and can void certain parts of your
warranty. Oxygenated Fuels
Some conventional gasolines are
being blended with alcohol or an
ether compound. These gasolines
are collectively referred to as
oxygenated fuels. To meet clean air standards, some areas of the United
States and Canada use oxygenated
fuels to help reduce emissions.
If you use an oxygenated fuel, besure it is unleaded and meets the
minimum octane rating requiremen
Before using an oxygenated fuel,
to confirm the fuel's contents. Some states/provinces require this
information to be posted on the
pump.
Before DrivingProCarManuals.comMain Menu s t Table of Contents
Page 110 of 240
Service Station Procedures
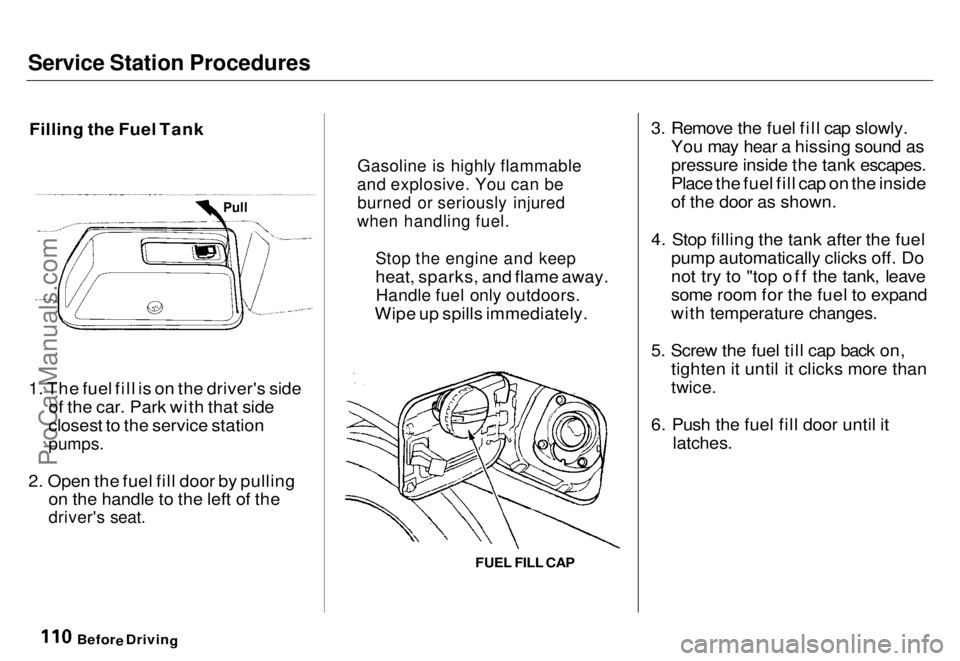
Filling the Fuel Tank
1. The fuel fill is on the driver's side of the car. Park with that side
closest to the service station
pumps.
2. Open the fuel fill door by pulling on the handle to the left of the
driver's seat.
3. Remove the fuel fill cap slowly.
You may hear a hissing sound as
pressure inside the tank escapes.
Place the fuel fill cap on the inside
of the door as shown.
4. Stop filling the tank after the fuel pump automatically clicks off. Do
not try to "top off the tank, leave
some room for the fuel to expand
with temperature changes.
5. Screw the fuel till cap back on, tighten it until it clicks more than
twice.
6. Push the fuel fill door until it
latches.
Befor
e
Drivin
g
Gasoline i
s highly flammable
and explosive. You can be
burned or seriously injured
when handling fuel.
Stop the engine and keep
heat, sparks, and flame away.
Handle fuel only outdoors.
Wipe up spills immediately.
Pull
FUEL FILL CAPProCarManuals.comMain Menu s t Table of Contents
Page 112 of 240
Service Station Procedures
Oil Check
Check the engine oil level every time
you fill the car with fuel. Wait at least two minutes after turning the engineoff before you check the oil.
1. Remove the dipstick (orange handle). 2. Wipe the dipstick with a clean
cloth or paper towel. 3. Insert it all the way back in its tube.
Before Driving
DIPSTICKProCarManuals.comMain Menu s t Table of Contents
Page 113 of 240
Service Station Procedures
4. Remove it again and check the level. It should be between the
upper and lower marks.
If it is near or below the lower mark,
see Adding Oil on page 146 .
Engine Coolant Check
Look at the coolant level in the
radiator reserve tank. Make sure it is
between the MAX and MIN lines. If it is below the MIN line, see Adding
Engine Coolant on page 151 for
information on adding the proper
coolant.
Refer to Periodic Checks on page
144 for information on checking
other items in your Honda.
Before Driving
UPPER MARK
LOWER MARK
RESERVE TANK
MAX
MINProCarManuals.comMain Menu s t Table of Contents