1996 HONDA ODYSSEY display
[x] Cancel search: displayPage 32 of 240
Instruments and Controls
This section gives information about the controls and displays thatcontribute to the daily operation of
your Honda. All the essential controls are within easy reach.
Control Locations............................ 32
Indicator Lights................................ 33
Gauges.............................................. 37
Speedometer................................ 37
Trip Meter.................................... 37
Odometer......................................
37
Temperature Gauge................... .
38
Fuel Gauge.................................. 38
Maintenanc
e Required
Indicator...................................
38
Controls Nea r
the Steering
Wheel........................................ 39
Headlights.................................... 40
Daytime Running Lights............. 40
Instrument Panel Brightness..... 41
Turn Signals................................. 41
Windshield Wipers...................... 42
Windshield Washers................... 42 Rear Window Wiper and Washer...................................... 43
Hazard Warning........................... 43
Rear Window Defogger.............. 43
Steering Wheel Adjustment....... 44
Steering Wheel Controls................ 46 Cruise Control.............................. 46
Keys and Locks................................ 49
Keys............................................... 49
Ignition Switch............................. 49
Power Door Locks....................... 50
Remote Transmitter.................... 51Childproof Door Locks............... 52
Tailgate......................................... 52
Glove Box..................................... 53
Seats.................................................. 54
Passenger Seating....................... 54
Seat Adjustments......................... 54
Driver's Seat Power Height Adjustment............................... 55
Head Restraints........................... 56 Third Seat Access........................ 56
Removing the Second Seats in the Six-Passenger Model.... 57
Folding the Second Seats in the Seven-Passenger
Model....................................
58
Reclining th e
Second Seat.......... 59
Folding the Third Seat
in All Models............................ 60
Power Windows............................... 62
Sunroof.............................................. 63
Mirrors.............................................. 64
Adjusting the Power Mirrors..... 64
Parking Brake..................................
65
Digital Clock.................................... .
66
Beverage Holder.............................. 66
Dashboard Compartment............... 68 Center Pocket.................................. 68
Vanity Mirror................................... 68 Cigarette Lighter............................. 69
Ashtrays............................................ 69 Interior Lights.................................. 70
Ceiling Lights............................... 70
Spotlights...................................... 70
Tailgate Light............................... 71 Courtesy Lights........................... 71
Instruments and ControlsProCarManuals.comMain Menu s t
Page 36 of 240

Indicator Lights
U.S.
Anti-lock Brake System
(ABS) Indicator
Canada
Only on cars equipped with ABS (see
page 125)
This light normally comes on when you turn the ignition ON (II) andgoes off after the engine starts. If itcomes on at any other time, there is
a problem in the ABS. If this happens,
take the car to your dealer to have it checked. With the light on, your car
still has normal braking ability but no
anti-lock.
Turn Signal and
Hazard WarningIndicators
The left or right turn signal light
blinks when you signal a lane change
or turn. If the light does not blink or
blinks rapidly, it usually means one
of the turn signal bulbs is burned out (see page 178). Replace the bulb as
soon as possible, since other drivers
cannot see that you are signalling.
When you turn on the Hazard
Warning switch, both turn signal lights blink. All turn signals on theoutside of the car should flash. Door and Brake Lamp Monitor
The appropriate light comes on in this display if the tailgate or any dooris not closed tightly. If a brake lightdoes not work, the BRAKE LAMP
indicator comes on when you push
the brake pedal with the ignition switch ON (II).
A burned out brake light is a hazard when drivers behind you cannot tell
you are braking. Have your brake lights repaired right away.
All the lights in the monitor display come on for a few seconds when you
turn the ignition switch ON (II).
Instruments and Controls
ABSProCarManuals.comMain Menu s t Table of Contents
Page 67 of 240
Digital Clock, Beverage Holder
Digital Clock
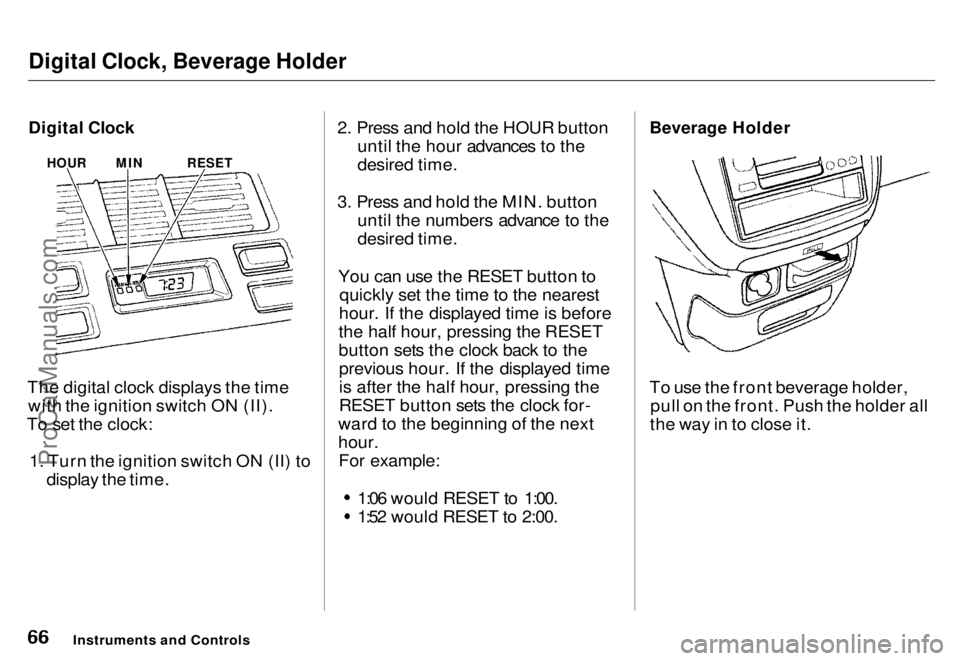
The digital clock displays the time with the ignition switch ON (II).
To set the clock:
1. Turn the ignition switch ON (II) to display the time. 2. Press and hold the HOUR button
until the hour advances to the
desired time.
3. Press and hold the MIN. button until the numbers advance to the
desired time.
You can use the RESET button to quickly set the time to the nearest
hour. If the displayed time is before
the half hour, pressing the RESET
button sets the clock back to the previous hour. If the displayed time
is after the half hour, pressing the
RESET button sets the clock for-
ward to the beginning of the next
hour. For example: 1:06 would RESET to 1:00.
1:52 would RESET to 2:00.
Beverage Holder
To use the front beverage holder,
pull on the front. Push the holder all
the way in to close it.
Instruments and Controls
HOUR
MIN
RESETProCarManuals.coms t Main Menu Table of Contents
Page 84 of 240
Audio System
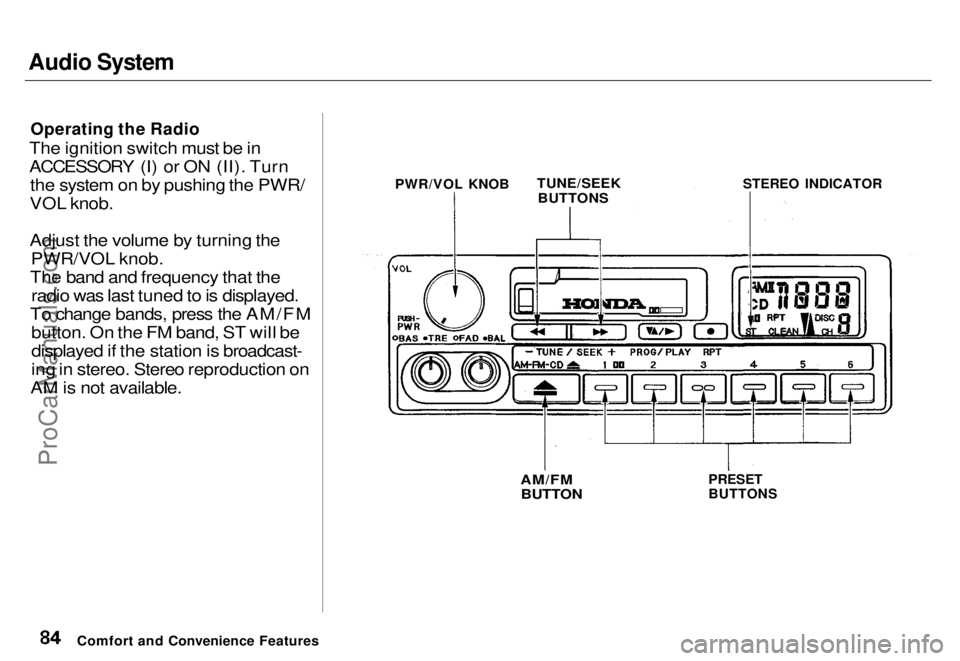
Operating the Radio
The ignition switch must be in
ACCESSORY (I) or ON (II). Turn the system on by pushing the PWR/
VOL knob.
Adjust the volume by turning the PWR/VOL knob.
The band and frequency that the radio was last tuned to is displayed.
To change bands, press the AM/FM button. On the FM band, ST will be
displayed if the station is broadcast-
ing in stereo. Stereo reproduction on
AM is not available.
Comfort and Convenience Features
TUNE/SEEK
BUTTONS
STEREO INDICATOR
PRESET
BUTTONS
AM/FM
BUTTON
PWR/VOL KNOBProCarManuals.comMain Menu s t Table of Contents
Page 85 of 240
Audio System
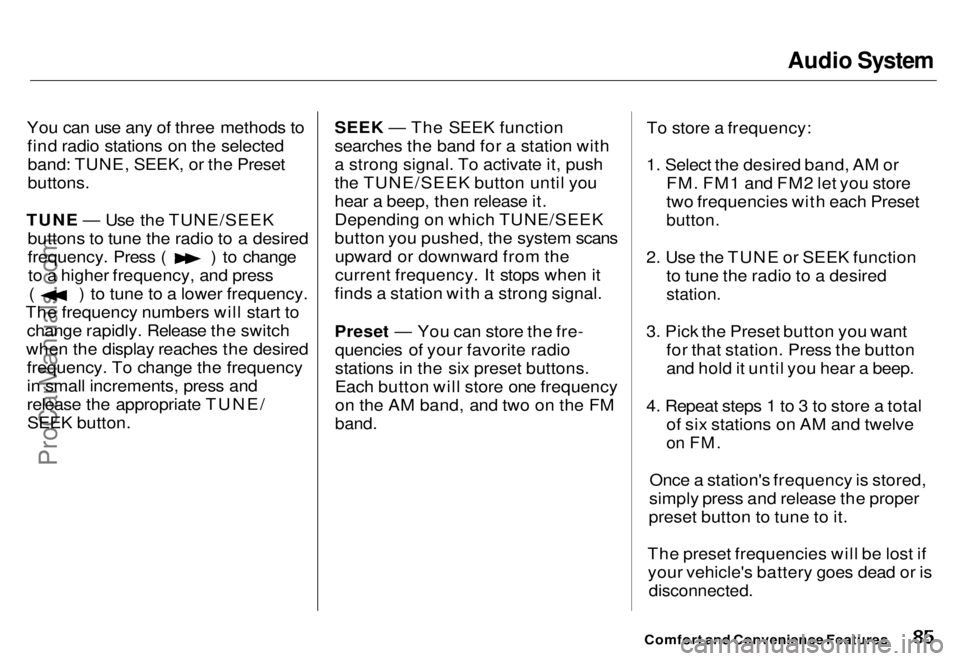
You can use any of three methods to find radio stations on the selectedband: TUNE, SEEK, or the Preset
buttons.
TUNE — Use the TUNE/SEEK buttons to tune the radio to a desired frequency. Press ( ) to change
to a higher frequency, and press ( ) to tune to a lower frequency.
The frequency numbers will start to change rapidly. Release the switch
when the display reaches the desired frequency. To change the frequency
in small increments, press and
release the appropriate TUNE/SEEK button. SEEK — The SEEK function
searches the band for a station with
a strong signal. To activate it, push
the TUNE/SEEK button until you
hear a beep, then release it.
Depending on which TUNE/SEEK
button you pushed, the system scans
upward or downward from the
current frequency. It stops when it
finds a station with a strong signal.
Preset — You can store the fre- quencies of your favorite radio
stations in the six preset buttons.
Each button will store one frequency
on the AM band, and two on the FM
band.
To store a frequency:
1. Select the desired band, AM or FM. FM1 and FM2 let you store
two frequencies with each Preset
button.
2. Use the TUNE or SEEK function to tune the radio to a desired
station.
3. Pick the Preset button you want for that station. Press the button
and hold it until you hear a beep.
4. Repeat steps 1 to 3 to store a total of six stations on AM and twelve
on FM.
Once a station's frequency is stored,
simply press and release the proper
preset button to tune to it.
The preset frequencies will be lost if your vehicle's battery goes dead or is
disconnected.
Comfort and Convenience FeaturesProCarManuals.comMain Menu s t Table of Contents
Page 88 of 240
Audio System
Tape Search Functions
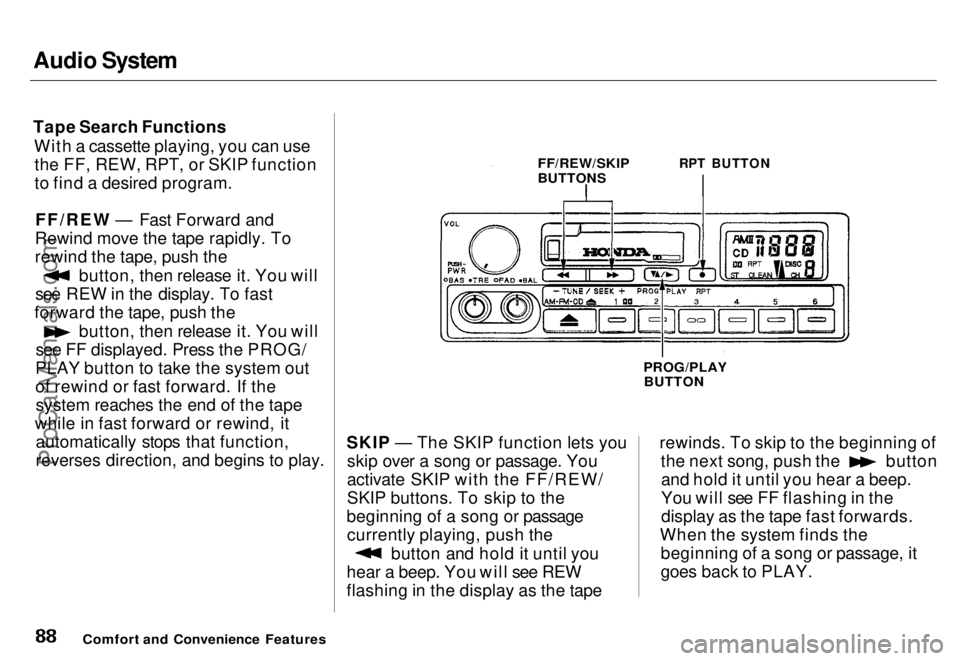
With a cassette playing, you can usethe FF, REW, RPT, or SKIP function
to find a desired program.
FF/REW — Fast Forward and
Rewind move the tape rapidly. To
rewind the tape, push the button, then release it. You will
see REW in the display. To fast
forward the tape, push the button, then release it. You will
see FF displayed. Press the PROG/
PLAY button to take the system out
of rewind or fast forward. If the system reaches the end of the tape
while in fast forward or rewind, it automatically stops that function,
reverses direction, and begins to play. SKIP — The SKIP function lets you
skip over a song or passage. You
activate SKIP with the FF/REW/
SKIP buttons. To skip to the
beginning of a song or passage currently playing, push the button and hold it until you
hear a beep. You will see REW
flashing in the display as the tape rewinds. To skip to the beginning of the next song, push the button
and hold it until you hear a beep.
You will see FF flashing in the
display as the tape fast forwards.
When the system finds the beginning of a song or passage, it
goes back to PLAY.
Comfort and Convenience Features FF/REW/SKIP
BUTTONS
RPT BUTTON
PROG/PLAY BUTTONProCarManuals.comMain Menu s t Table of Contents
Page 89 of 240
Audio System
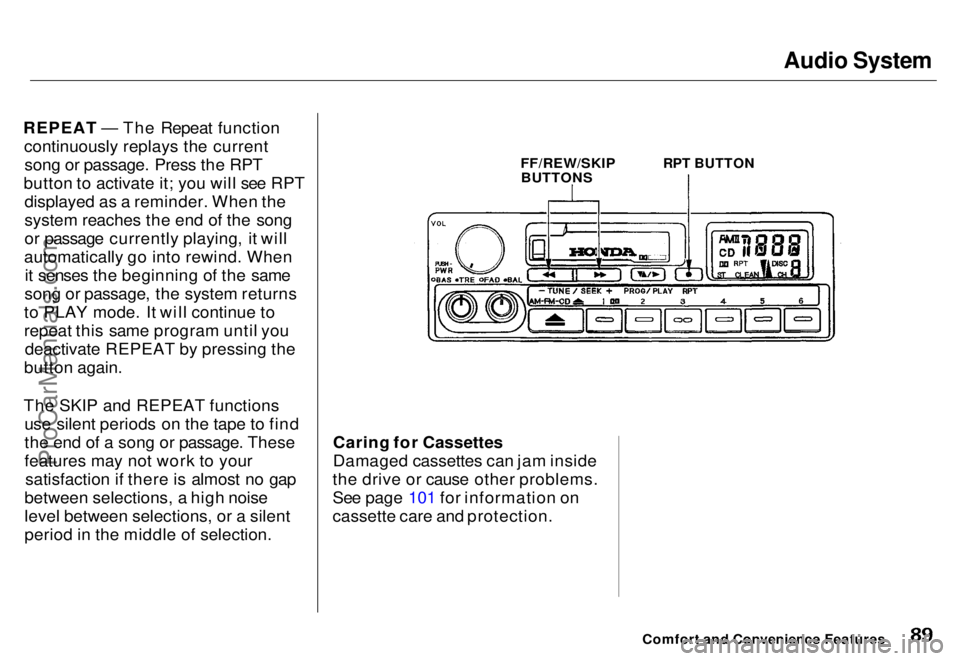
REPEAT — The Repeat function continuously replays the currentsong or passage. Press the RPT
button to activate it; you will see RPT displayed as a reminder. When the
system reaches the end of the song
or passage currently playing, it will
automatically go into rewind. When it senses the beginning of the same
song or passage, the system returns
to PLAY mode. It will continue to
repeat this same program until you deactivate REPEAT by pressing the
button again.
The SKIP and REPEAT functions use silent periods on the tape to find
the end of a song or passage. These
features may not work to yoursatisfaction if there is almost no gap
between selections, a high noise
level between selections, or a silent
period in the middle of selection.
FF/REW/SKIP
BUTTONS
RPT BUTTON
Caring for Cassettes
Damaged cassettes can jam inside
the drive or cause other problems.
See page 101 for information on
cassette care and protection.
Comfort and Convenience FeaturesProCarManuals.comMain Menu s t Table of Contents
Page 90 of 240
Audio System
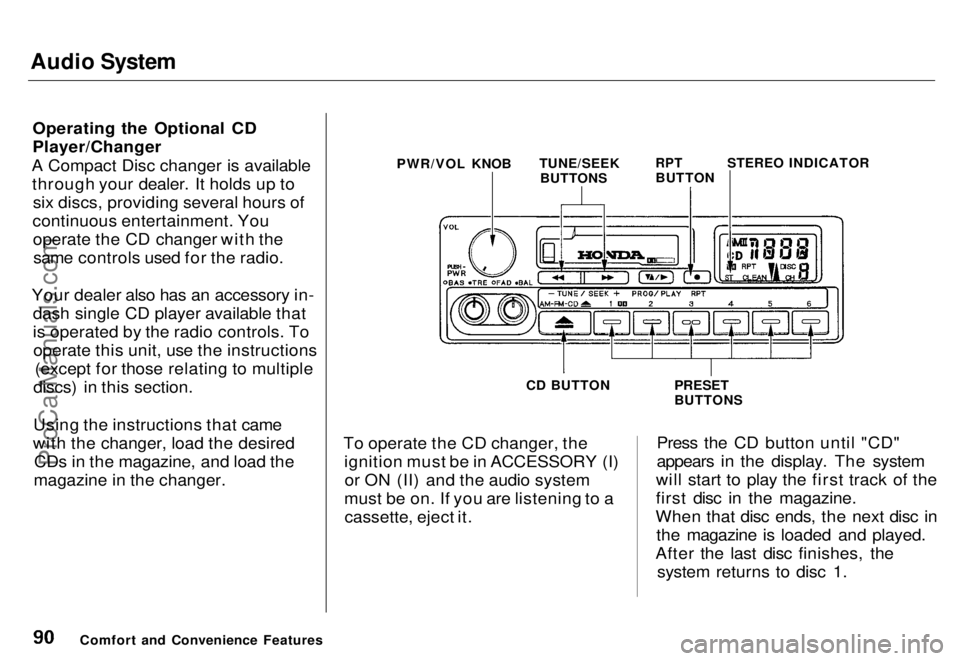
Operating the Optional CD
Player/Changer
A Compact Disc changer is available through your dealer. It holds up to six discs, providing several hours of
continuous entertainment. You operate the CD changer with thesame controls used for the radio.
Your dealer also has an accessory in- dash single CD player available that
is operated by the radio controls. Tooperate this unit, use the instructions (except for those relating to multiple
discs) in this section.
Using the instructions that came
with the changer, load the desired CDs in the magazine, and load the
magazine in the changer. To operate the CD changer, the
ignition must be in ACCESSORY (I)or ON (II) and the audio system
must be on. If you are listening to a cassette, eject it. Press the CD button until "CD"
appears in the display. The system
will start to play the first track of the
first disc in the magazine.
When that disc ends, the next disc in the magazine is loaded and played.
After the last disc finishes, the system returns to disc 1.
Comfort and Convenience Features PWR/VOL KNOB
TUNE/SEEK
BUTTONS
RPT
BUTTON
STEREO INDICATOR
PRESET
BUTTONS
CD BUTTONProCarManuals.comMain Menu s t Table of Contents