1996 CHRYSLER VOYAGER ECU
[x] Cancel search: ECUPage 1236 of 1938
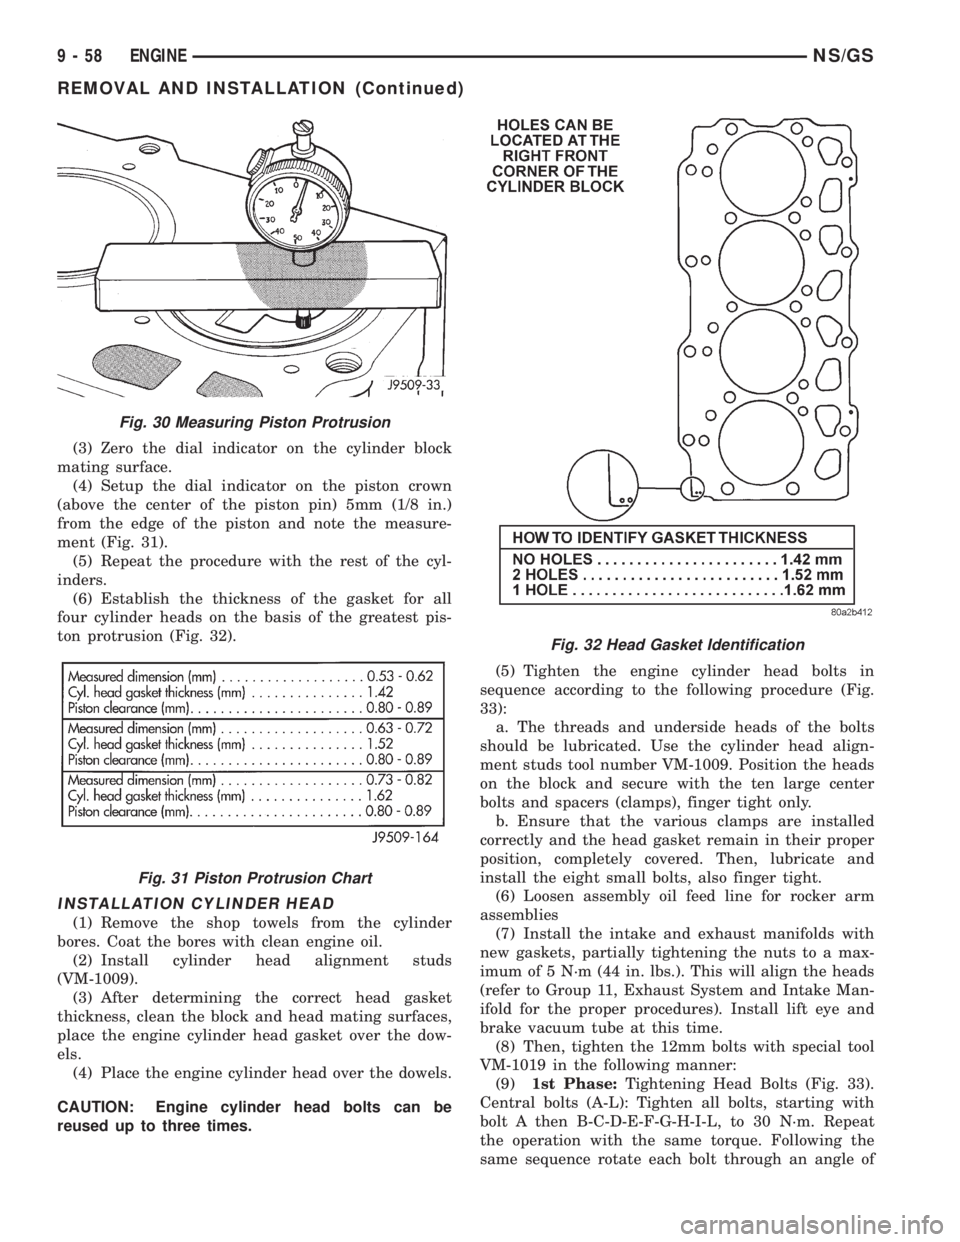
(3) Zero the dial indicator on the cylinder block
mating surface.
(4) Setup the dial indicator on the piston crown
(above the center of the piston pin) 5mm (1/8 in.)
from the edge of the piston and note the measure-
ment (Fig. 31).
(5) Repeat the procedure with the rest of the cyl-
inders.
(6) Establish the thickness of the gasket for all
four cylinder heads on the basis of the greatest pis-
ton protrusion (Fig. 32).
INSTALLATION CYLINDER HEAD
(1) Remove the shop towels from the cylinder
bores. Coat the bores with clean engine oil.
(2) Install cylinder head alignment studs
(VM-1009).
(3) After determining the correct head gasket
thickness, clean the block and head mating surfaces,
place the engine cylinder head gasket over the dow-
els.
(4) Place the engine cylinder head over the dowels.
CAUTION: Engine cylinder head bolts can be
reused up to three times.(5) Tighten the engine cylinder head bolts in
sequence according to the following procedure (Fig.
33):
a. The threads and underside heads of the bolts
should be lubricated. Use the cylinder head align-
ment studs tool number VM-1009. Position the heads
on the block and secure with the ten large center
bolts and spacers (clamps), finger tight only.
b. Ensure that the various clamps are installed
correctly and the head gasket remain in their proper
position, completely covered. Then, lubricate and
install the eight small bolts, also finger tight.
(6) Loosen assembly oil feed line for rocker arm
assemblies
(7) Install the intake and exhaust manifolds with
new gaskets, partially tightening the nuts to a max-
imum of 5 N´m (44 in. lbs.). This will align the heads
(refer to Group 11, Exhaust System and Intake Man-
ifold for the proper procedures). Install lift eye and
brake vacuum tube at this time.
(8) Then, tighten the 12mm bolts with special tool
VM-1019 in the following manner:
(9)1st Phase:Tightening Head Bolts (Fig. 33).
Central bolts (A-L): Tighten all bolts, starting with
bolt A then B-C-D-E-F-G-H-I-L, to 30 N´m. Repeat
the operation with the same torque. Following the
same sequence rotate each bolt through an angle of
Fig. 30 Measuring Piston Protrusion
Fig. 31 Piston Protrusion Chart
Fig. 32 Head Gasket Identification
9 - 58 ENGINENS/GS
REMOVAL AND INSTALLATION (Continued)
Page 1242 of 1938
(13) Remove pistons and connecting rods from
block.
(14) Remove vibration damper. Refer to procedure
in this section.
(15) Remove front cover. Refer to procedure in this
section.
(16) Remove oil pump drive gear.
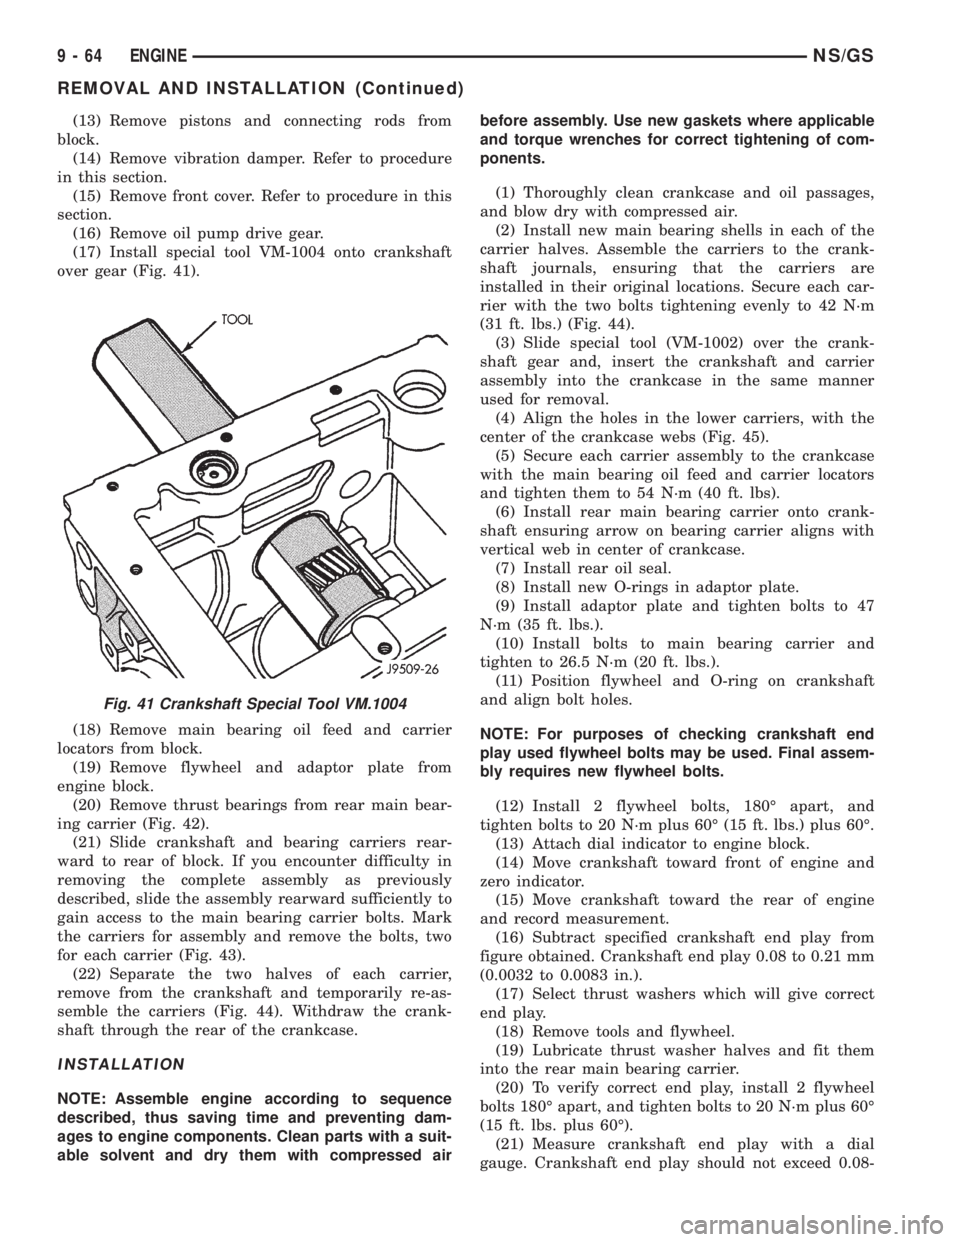
(17) Install special tool VM-1004 onto crankshaft
over gear (Fig. 41).
(18) Remove main bearing oil feed and carrier
locators from block.
(19) Remove flywheel and adaptor plate from
engine block.
(20) Remove thrust bearings from rear main bear-
ing carrier (Fig. 42).
(21) Slide crankshaft and bearing carriers rear-
ward to rear of block. If you encounter difficulty in
removing the complete assembly as previously
described, slide the assembly rearward sufficiently to
gain access to the main bearing carrier bolts. Mark
the carriers for assembly and remove the bolts, two
for each carrier (Fig. 43).
(22) Separate the two halves of each carrier,
remove from the crankshaft and temporarily re-as-
semble the carriers (Fig. 44). Withdraw the crank-
shaft through the rear of the crankcase.
INSTALLATION
NOTE: Assemble engine according to sequence
described, thus saving time and preventing dam-
ages to engine components. Clean parts with a suit-
able solvent and dry them with compressed airbefore assembly. Use new gaskets where applicable
and torque wrenches for correct tightening of com-
ponents.
(1) Thoroughly clean crankcase and oil passages,
and blow dry with compressed air.
(2) Install new main bearing shells in each of the
carrier halves. Assemble the carriers to the crank-
shaft journals, ensuring that the carriers are
installed in their original locations. Secure each car-
rier with the two bolts tightening evenly to 42 N´m
(31 ft. lbs.) (Fig. 44).
(3) Slide special tool (VM-1002) over the crank-
shaft gear and, insert the crankshaft and carrier
assembly into the crankcase in the same manner
used for removal.
(4) Align the holes in the lower carriers, with the
center of the crankcase webs (Fig. 45).
(5) Secure each carrier assembly to the crankcase
with the main bearing oil feed and carrier locators
and tighten them to 54 N´m (40 ft. lbs).
(6) Install rear main bearing carrier onto crank-
shaft ensuring arrow on bearing carrier aligns with
vertical web in center of crankcase.
(7) Install rear oil seal.
(8) Install new O-rings in adaptor plate.
(9) Install adaptor plate and tighten bolts to 47
N´m (35 ft. lbs.).
(10) Install bolts to main bearing carrier and
tighten to 26.5 N´m (20 ft. lbs.).
(11) Position flywheel and O-ring on crankshaft
and align bolt holes.
NOTE: For purposes of checking crankshaft end
play used flywheel bolts may be used. Final assem-
bly requires new flywheel bolts.
(12) Install 2 flywheel bolts, 180É apart, and
tighten bolts to 20 N´m plus 60É (15 ft. lbs.) plus 60É.
(13) Attach dial indicator to engine block.
(14) Move crankshaft toward front of engine and
zero indicator.
(15) Move crankshaft toward the rear of engine
and record measurement.
(16) Subtract specified crankshaft end play from
figure obtained. Crankshaft end play 0.08 to 0.21 mm
(0.0032 to 0.0083 in.).
(17) Select thrust washers which will give correct
end play.
(18) Remove tools and flywheel.
(19) Lubricate thrust washer halves and fit them
into the rear main bearing carrier.
(20) To verify correct end play, install 2 flywheel
bolts 180É apart, and tighten bolts to 20 N´m plus 60É
(15 ft. lbs. plus 60É).
(21) Measure crankshaft end play with a dial
gauge. Crankshaft end play should not exceed 0.08-
Fig. 41 Crankshaft Special Tool VM.1004
9 - 64 ENGINENS/GS
REMOVAL AND INSTALLATION (Continued)
Page 1247 of 1938
covered during this operation. Mark piston with
matching cylinder number.
(6) Pistons and connecting rods must be removed
from top of cylinder block. Rotate crankshaft so that
each connecting rod is centered in cylinder bore.
(7) Remove connecting rod cap. Push each piston
and rod assembly out of cylinder bore.
CAUTION: During piston and rod removal. DO NOT
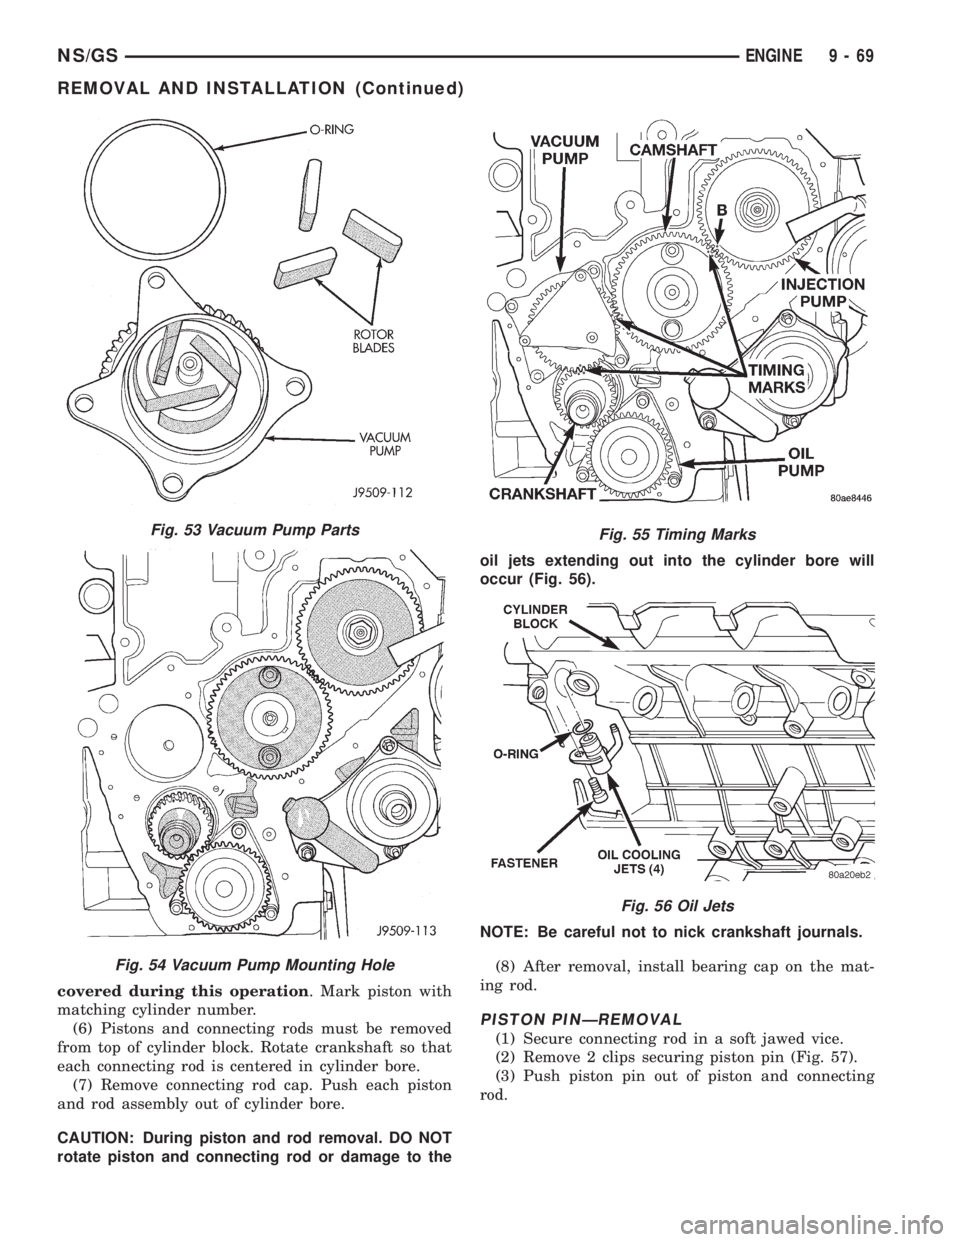
rotate piston and connecting rod or damage to theoil jets extending out into the cylinder bore will
occur (Fig. 56).
NOTE: Be careful not to nick crankshaft journals.
(8) After removal, install bearing cap on the mat-
ing rod.
PISTON PINÐREMOVAL
(1) Secure connecting rod in a soft jawed vice.
(2) Remove 2 clips securing piston pin (Fig. 57).
(3) Push piston pin out of piston and connecting
rod.
Fig. 53 Vacuum Pump Parts
Fig. 54 Vacuum Pump Mounting Hole
Fig. 55 Timing Marks
Fig. 56 Oil Jets
NS/GSENGINE 9 - 69
REMOVAL AND INSTALLATION (Continued)
Page 1249 of 1938
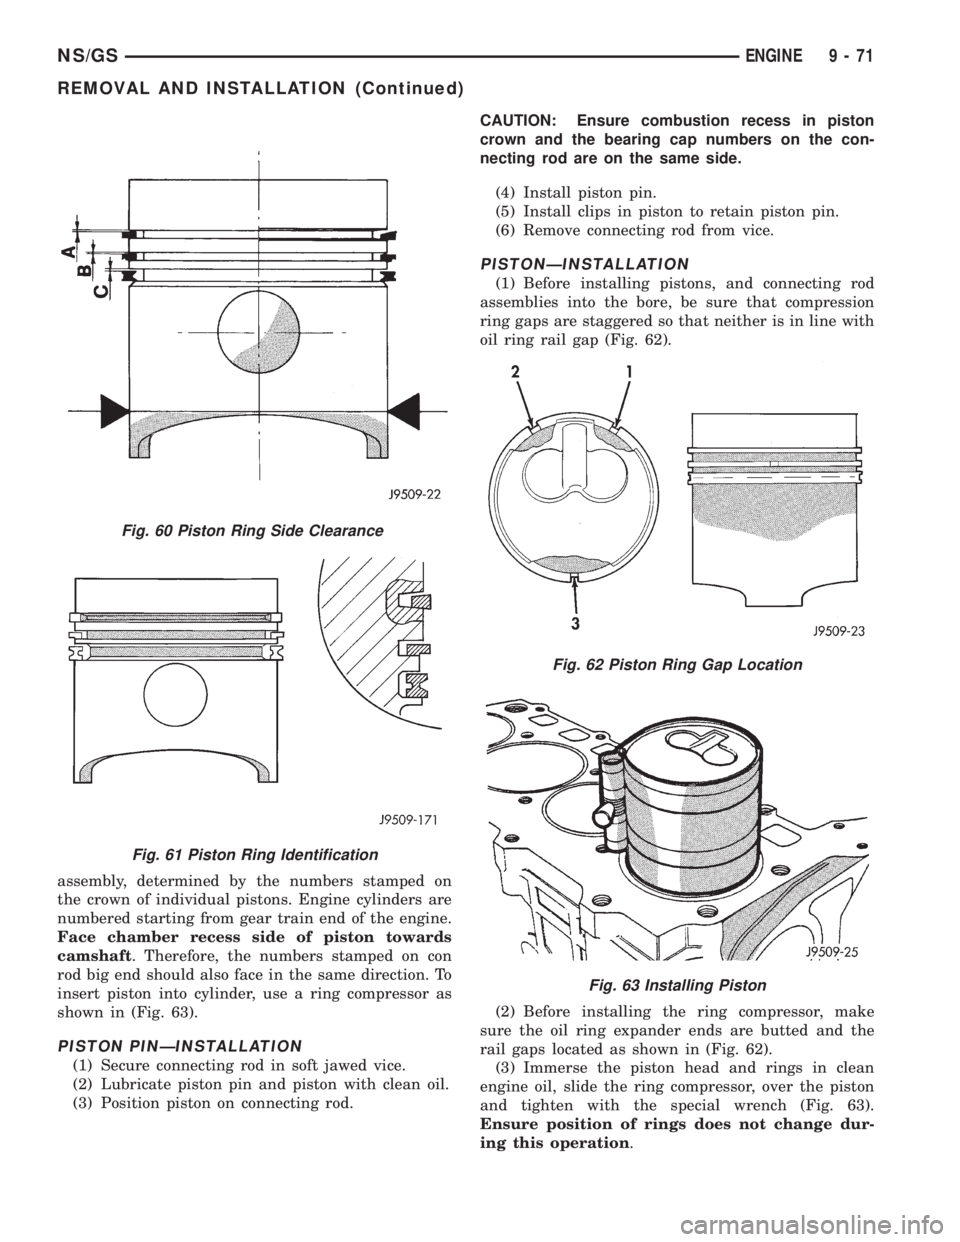
assembly, determined by the numbers stamped on
the crown of individual pistons. Engine cylinders are
numbered starting from gear train end of the engine.
Face chamber recess side of piston towards
camshaft. Therefore, the numbers stamped on con
rod big end should also face in the same direction. To
insert piston into cylinder, use a ring compressor as
shown in (Fig. 63).
PISTON PINÐINSTALLATION
(1) Secure connecting rod in soft jawed vice.
(2) Lubricate piston pin and piston with clean oil.
(3) Position piston on connecting rod.CAUTION: Ensure combustion recess in piston
crown and the bearing cap numbers on the con-
necting rod are on the same side.
(4) Install piston pin.
(5) Install clips in piston to retain piston pin.
(6) Remove connecting rod from vice.
PISTONÐINSTALLATION
(1) Before installing pistons, and connecting rod
assemblies into the bore, be sure that compression
ring gaps are staggered so that neither is in line with
oil ring rail gap (Fig. 62).
(2) Before installing the ring compressor, make
sure the oil ring expander ends are butted and the
rail gaps located as shown in (Fig. 62).
(3) Immerse the piston head and rings in clean
engine oil, slide the ring compressor, over the piston
and tighten with the special wrench (Fig. 63).
Ensure position of rings does not change dur-
ing this operation.
Fig. 60 Piston Ring Side Clearance
Fig. 61 Piston Ring Identification
Fig. 62 Piston Ring Gap Location
Fig. 63 Installing Piston
NS/GSENGINE 9 - 71
REMOVAL AND INSTALLATION (Continued)
Page 1255 of 1938
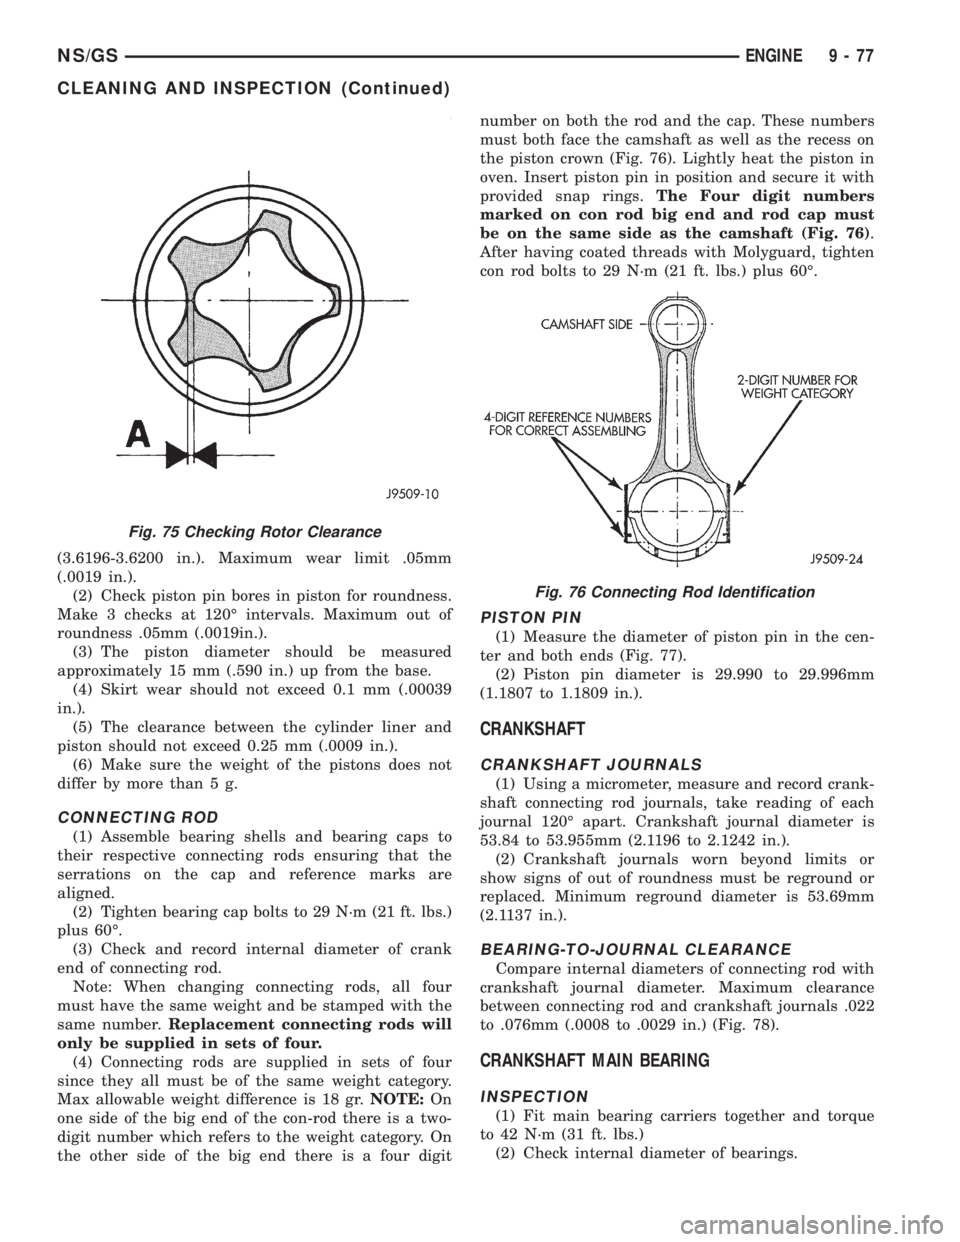
(3.6196-3.6200 in.). Maximum wear limit .05mm
(.0019 in.).
(2) Check piston pin bores in piston for roundness.
Make 3 checks at 120É intervals. Maximum out of
roundness .05mm (.0019in.).
(3) The piston diameter should be measured
approximately 15 mm (.590 in.) up from the base.
(4) Skirt wear should not exceed 0.1 mm (.00039
in.).
(5) The clearance between the cylinder liner and
piston should not exceed 0.25 mm (.0009 in.).
(6) Make sure the weight of the pistons does not
differ by more than 5 g.
CONNECTING ROD
(1) Assemble bearing shells and bearing caps to
their respective connecting rods ensuring that the
serrations on the cap and reference marks are
aligned.
(2) Tighten bearing cap bolts to 29 N´m (21 ft. lbs.)
plus 60É.
(3) Check and record internal diameter of crank
end of connecting rod.
Note: When changing connecting rods, all four
must have the same weight and be stamped with the
same number.Replacement connecting rods will
only be supplied in sets of four.
(4) Connecting rods are supplied in sets of four
since they all must be of the same weight category.
Max allowable weight difference is 18 gr.NOTE:On
one side of the big end of the con-rod there is a two-
digit number which refers to the weight category. On
the other side of the big end there is a four digitnumber on both the rod and the cap. These numbers
must both face the camshaft as well as the recess on
the piston crown (Fig. 76). Lightly heat the piston in
oven. Insert piston pin in position and secure it with
provided snap rings.The Four digit numbers
marked on con rod big end and rod cap must
be on the same side as the camshaft (Fig. 76).
After having coated threads with Molyguard, tighten
con rod bolts to 29 N´m (21 ft. lbs.) plus 60É.
PISTON PIN
(1) Measure the diameter of piston pin in the cen-
ter and both ends (Fig. 77).
(2) Piston pin diameter is 29.990 to 29.996mm
(1.1807 to 1.1809 in.).
CRANKSHAFT
CRANKSHAFT JOURNALS
(1) Using a micrometer, measure and record crank-
shaft connecting rod journals, take reading of each
journal 120É apart. Crankshaft journal diameter is
53.84 to 53.955mm (2.1196 to 2.1242 in.).
(2) Crankshaft journals worn beyond limits or
show signs of out of roundness must be reground or
replaced. Minimum reground diameter is 53.69mm
(2.1137 in.).
BEARING-TO-JOURNAL CLEARANCE
Compare internal diameters of connecting rod with
crankshaft journal diameter. Maximum clearance
between connecting rod and crankshaft journals .022
to .076mm (.0008 to .0029 in.) (Fig. 78).
CRANKSHAFT MAIN BEARING
INSPECTION
(1) Fit main bearing carriers together and torque
to 42 N´m (31 ft. lbs.)
(2) Check internal diameter of bearings.
Fig. 75 Checking Rotor Clearance
Fig. 76 Connecting Rod Identification
NS/GSENGINE 9 - 77
CLEANING AND INSPECTION (Continued)
Page 1264 of 1938
a catalytic converter. Failure of the catalytic con-
verter can occur due to temperature increases caused
by unburned fuel igniting when passing through the
converter.
The use of the catalysts also involves some non-au-
tomotive problems. Unleaded gasoline must be used
to avoid poisoning the catalyst core. Do not allow
engine to operate at fast idle for extended periods
(over 5 minutes). This condition may result in exces-
sive exhaust system and floor pan temperatures.
EXHAUST GAS RECIRCULATION (EGR)
To assist in the control of oxides of nitrogen (NOx)
in engine exhaust, all engines are equipped with an
exhaust gas recirculation system. The use of exhaust
gas to dilute incoming air/fuel mixtures lowers peak
flame temperatures during combustion, thus limiting
the formation of NOx.
Exhaust gases are taken from opening in the
exhaust manifold passage to the intake manifold.
REFER TO SECTION 25 FOR A COMPLETE
DESCRIPTION, DIAGNOSIS AND SERVICE PRO-
CEDURES ON THE EXHAUST GAS RECIRCULA-
TION SYSTEM AND COMPONENTS.
HEAT SHIELDS
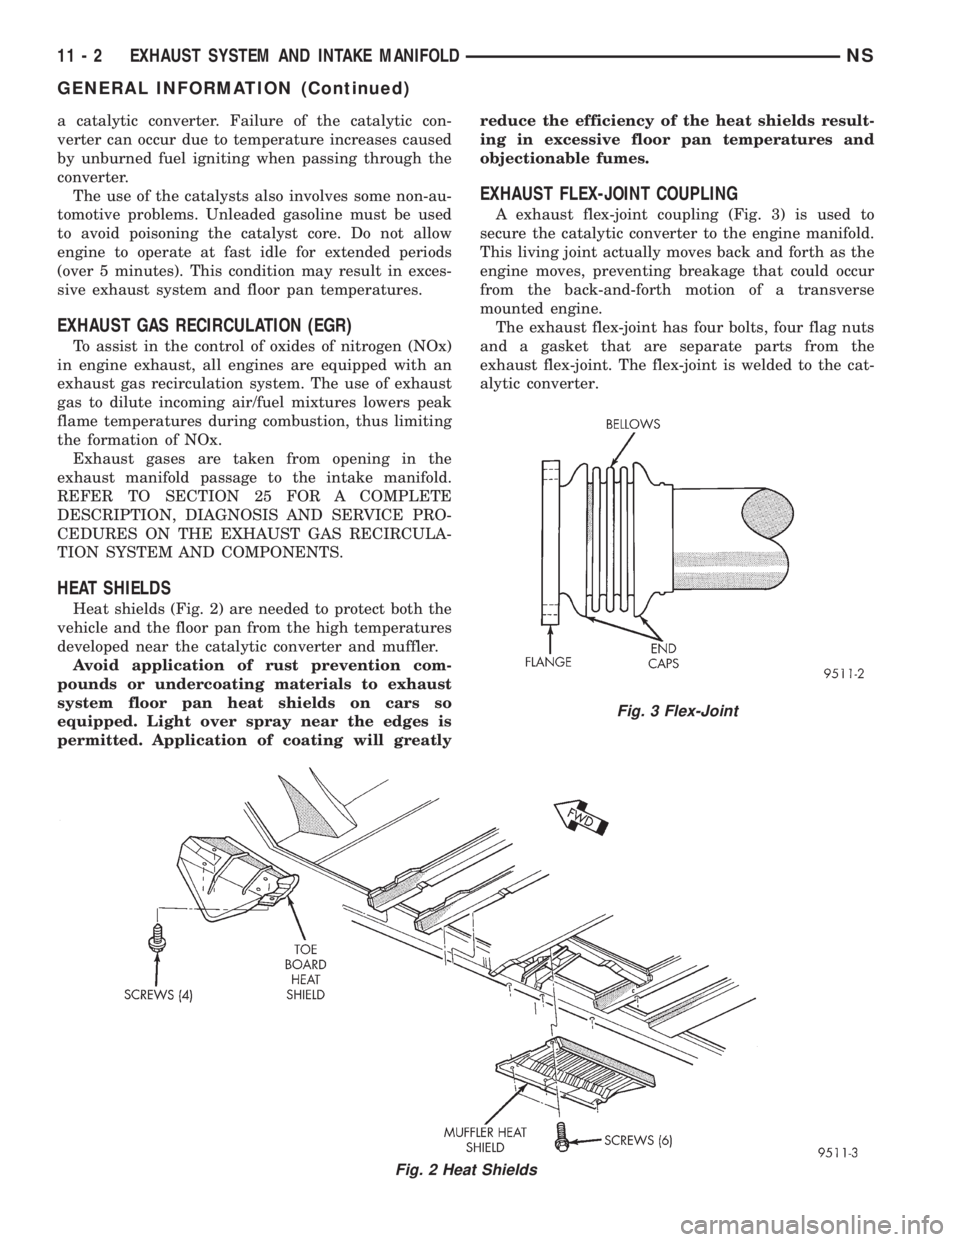
Heat shields (Fig. 2) are needed to protect both the
vehicle and the floor pan from the high temperatures
developed near the catalytic converter and muffler.
Avoid application of rust prevention com-
pounds or undercoating materials to exhaust
system floor pan heat shields on cars so
equipped. Light over spray near the edges is
permitted. Application of coating will greatlyreduce the efficiency of the heat shields result-
ing in excessive floor pan temperatures and
objectionable fumes.
EXHAUST FLEX-JOINT COUPLING
A exhaust flex-joint coupling (Fig. 3) is used to
secure the catalytic converter to the engine manifold.
This living joint actually moves back and forth as the
engine moves, preventing breakage that could occur
from the back-and-forth motion of a transverse
mounted engine.
The exhaust flex-joint has four bolts, four flag nuts
and a gasket that are separate parts from the
exhaust flex-joint. The flex-joint is welded to the cat-
alytic converter.
Fig. 2 Heat Shields
Fig. 3 Flex-Joint
11 - 2 EXHAUST SYSTEM AND INTAKE MANIFOLDNS
GENERAL INFORMATION (Continued)
Page 1306 of 1938
(9) Momentarily touch the other end of this
jumper wire to the negative terminal of the battery
for no more than 4 seconds.
(10) Place a rag or towel below the fuel line at the
quick connect to the rail.
(11) Disconnect the quick connect fitting to the
rail. Refer to Quick-Connect Fittings in this section.
(12) Return the fuel pump relay to the PDC.
(13) One or more Diagnostic Trouble Codes (DTC's)
may have been stored in the PCM memory due to the
fuel pump relay removal. The DRB scan tool must be
used to erase a DTC. Refer to group 25, On-Board
Diagnostics.
HOSES AND CLAMPS
Inspect all hose connections (clamps and quick con-
nect fittings) for completeness and leaks. Replace
cracked, scuffed, or swelled hoses. Replace hoses that
rub against other vehicle components or show sign of
wear.
Fuel injected vehicles use specially constructed
hoses. When replacing hoses, only use hoses marked
EFM/EFI.
When installing hoses, ensure that they are routed
away from contact with other vehicle components
that could rub against them and cause failure. Avoid
contact with clamps or other components that cause
abrasions or scuffing. Ensure that rubber hoses are
properly routed and avoid heat sources.
The hose clamps have rolled edges to prevent the
clamp from cutting into the hose. Only use clamps
that are original equipment or equivalent. Other
types of clamps may cut into the hoses and cause
high pressure fuel leaks. Tighten hose clamps to 1
N´m (10 in. lbs.) torque.
QUICK-CONNECT FITTINGS
REMOVAL
When disconnecting a quick-connect fitting, the
retainer will remain on the fuel tube nipple.
WARNING: RELEASE FUEL SYSTEM PRESSURE
BEFORE DISCONNECTING A QUICK-CONNECT FIT-
TINGS. REFER TO THE FUEL PRESSURE RELEASE
PROCEDURE.
(1) Disconnect negative cable from battery.
(2) Perform Fuel Pressure Release Procedure.
Refer to the Fuel Pressure Release Procedure in this
section.
(3) Squeeze retainer tabs together and pull fuel
tube/quick-connect fitting assembly off of fuel tube
nipple. The retainer will remain on fuel tube.
INSTALLATION
CAUTION: Never install a quick-connect fitting
without the retainer being either on the fuel tube or
already in the quick-connect fitting. In either case,
ensure the retainer locks securely into the quick-
connect fitting by firmly pulling on fuel tube and fit-
ting to ensure it is secured.
(1) Using a clean lint free cloth, clean the fuel tube
nipple and retainer.
(2) Prior to connecting the fitting to the fuel tube,
coat the fuel tube nipple with clean 30 weight engine
oil.
(3) Push the quick-connect fitting over the fuel
tube until theretainer seats and a click is heard.
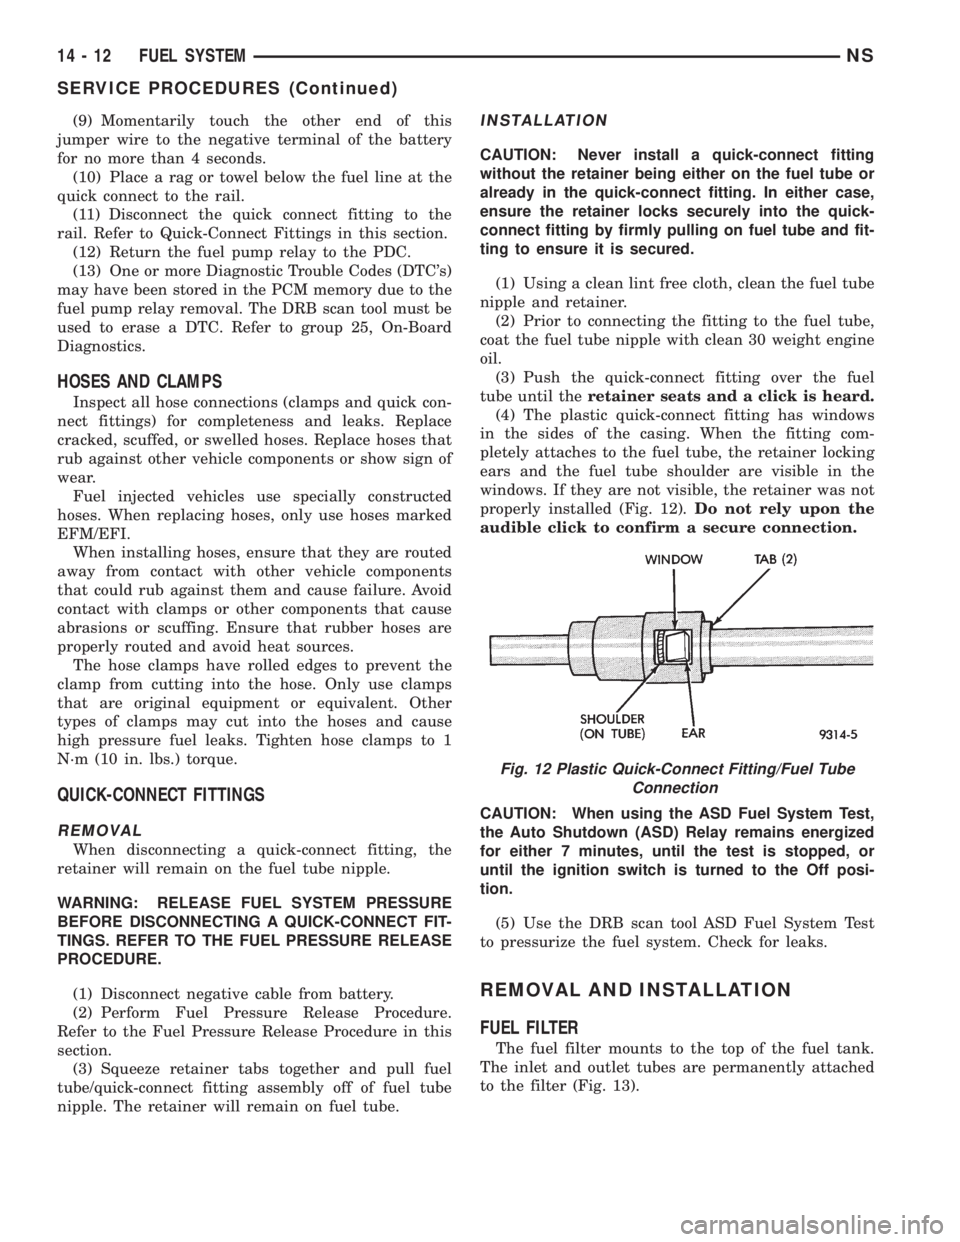
(4) The plastic quick-connect fitting has windows
in the sides of the casing. When the fitting com-
pletely attaches to the fuel tube, the retainer locking
ears and the fuel tube shoulder are visible in the
windows. If they are not visible, the retainer was not
properly installed (Fig. 12).Do not rely upon the
audible click to confirm a secure connection.
CAUTION: When using the ASD Fuel System Test,
the Auto Shutdown (ASD) Relay remains energized
for either 7 minutes, until the test is stopped, or
until the ignition switch is turned to the Off posi-
tion.
(5) Use the DRB scan tool ASD Fuel System Test
to pressurize the fuel system. Check for leaks.
REMOVAL AND INSTALLATION
FUEL FILTER
The fuel filter mounts to the top of the fuel tank.
The inlet and outlet tubes are permanently attached
to the filter (Fig. 13).
Fig. 12 Plastic Quick-Connect Fitting/Fuel Tube
Connection
14 - 12 FUEL SYSTEMNS
SERVICE PROCEDURES (Continued)
Page 1343 of 1938
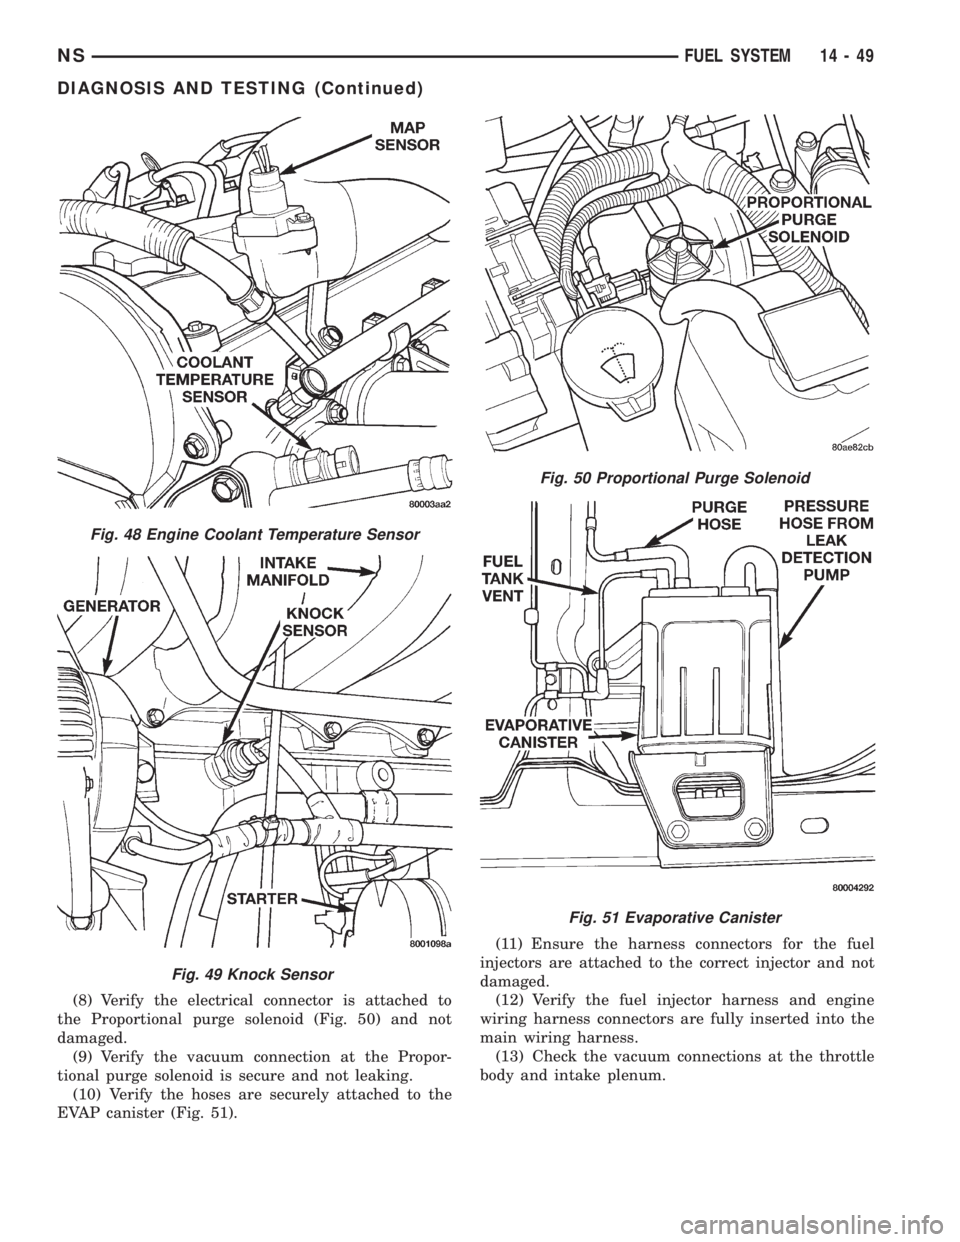
(8) Verify the electrical connector is attached to
the Proportional purge solenoid (Fig. 50) and not
damaged.
(9) Verify the vacuum connection at the Propor-
tional purge solenoid is secure and not leaking.
(10) Verify the hoses are securely attached to the
EVAP canister (Fig. 51).(11) Ensure the harness connectors for the fuel
injectors are attached to the correct injector and not
damaged.
(12) Verify the fuel injector harness and engine
wiring harness connectors are fully inserted into the
main wiring harness.
(13) Check the vacuum connections at the throttle
body and intake plenum.
Fig. 48 Engine Coolant Temperature Sensor
Fig. 49 Knock Sensor
Fig. 50 Proportional Purge Solenoid
Fig. 51 Evaporative Canister
NSFUEL SYSTEM 14 - 49
DIAGNOSIS AND TESTING (Continued)