1996 CHRYSLER VOYAGER mirror
[x] Cancel search: mirrorPage 535 of 1938

CIRCUIT DESCRIPTION
Power to both driver and passenger seats, as well
as power door locks, rear blower, and front fog lamps
(if so equipped), is provided by the A3 circuit through
a 40 amp MAXI-fuse in the Power Distribution Cen-
ter (PDC) under the hood. If all of these devices are
nonfunctional, replace the MAXI-fuse. If the new
MAXI-fuse blows immediately, correct the wiring
short to Ground that could be on any of those afore-
mentioned loads before proceeding further.
Once the power is back ON, if the power seats still
do not work, check the 30 amp circuit breaker that is
located in the driver's seat wiring harness approxi-
mately 10 inches from the 4-way connector. The
power feed circuit to the 30 amp circuit breaker is 14
ga. A3 RD/WT.
Following the 30 amp circuit breaker is a 14 ga.
wire designated as F35 RD that provides power into
the Memory Seat/Mirror Module and is double
crimped with a 14 ga. F35A RD that provides power
to the passenger seat through the 4-way connector.If the power door locks, rear blower, and front fog
lamps (if so equipped) are functional and the seats
are both nonfunctional, repair/replace the open wir-
ing and/or circuit breaker in the driver's seat harness
to correct the condition.
Ensure that the 12 ga. ground wire Z1 BK from
the electrical distribution wiring ground splice into
the 4-way connector is providing ground. The Z1 BK
is double crimped at the seat harness side of the
4-way connector taking a 14 ga. Z1 BK into the
10-way connector (cavity 7) 14 ga. This double crimp
carries a 20 ga. Z1A BK to cavity 3 of the power seat
switch 10-way. If the passenger power seat is func-
tional, and the driver's seat is nonfunctional examine
the circuit F35 RD from the double crimped circuit
breaker connector into the 10-way connector cavity 8
of the control module for continuity. Repair or replace
as necessary. If the driver's seat is still nonfunc-
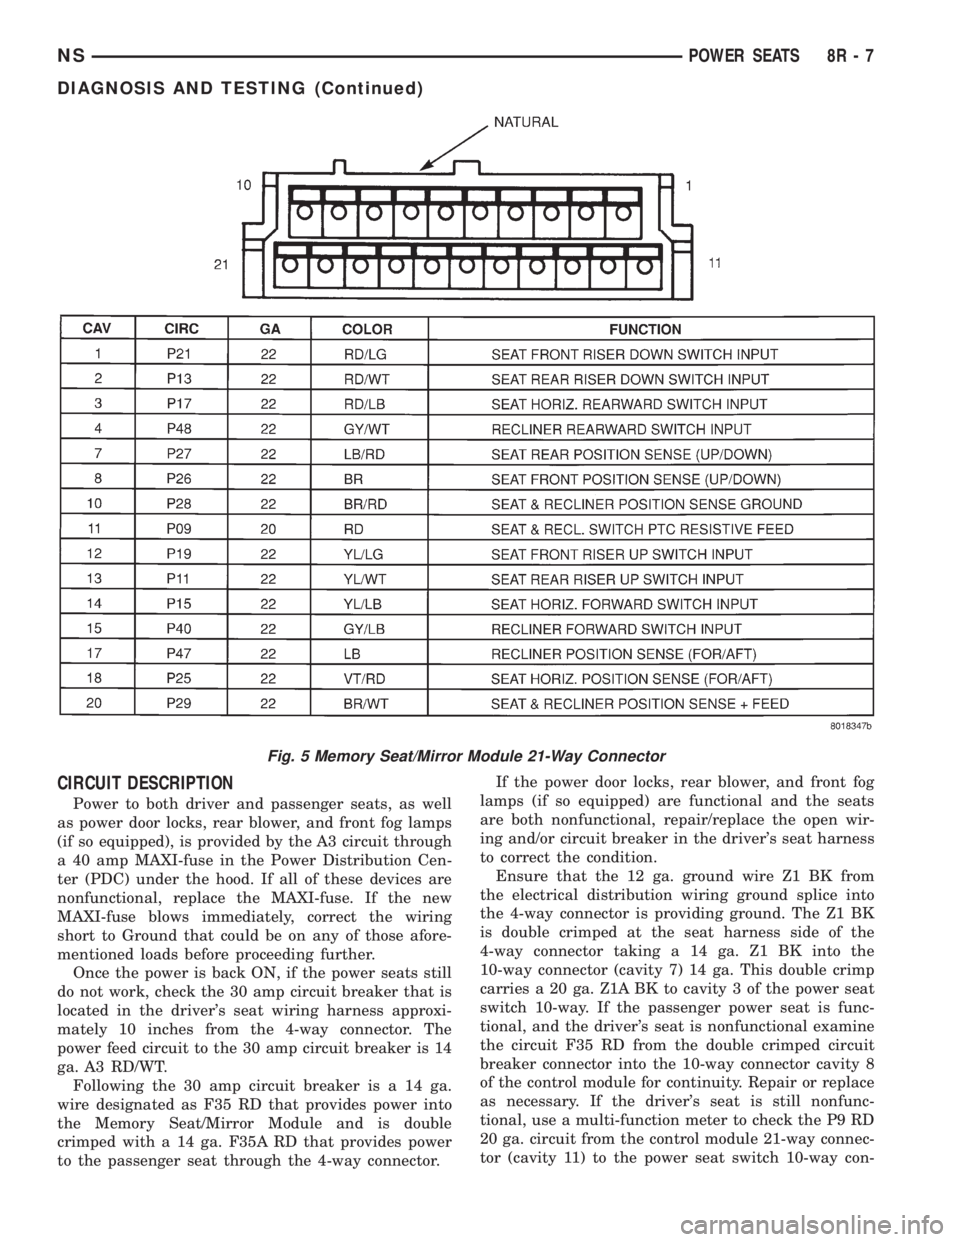
tional, use a multi-function meter to check the P9 RD
20 ga. circuit from the control module 21-way connec-
tor (cavity 11) to the power seat switch 10-way con-
Fig. 5 Memory Seat/Mirror Module 21-Way Connector
NSPOWER SEATS 8R - 7
DIAGNOSIS AND TESTING (Continued)
Page 536 of 1938

nector (cavity 5)This is a low current battery
feed from the control module that will not illu-
minate a test lamp.
During shipping of the vehicle, an M1 circuit 10
amp fuse (labeled IOD) is temporarily removed from
the PDC in the engine compartment to eliminate
unnecessary battery depletion. However, this fused
circuit being open (that feeds through the electrical
distribution wiring to cavity 16 of the 25-way connec-
tor) will not stop manual seat actuations from taking
place (only recall mode requests) during shipping.
(1) If the memory seat/mirror module does not
respond with a relay click to any seat switch input
(as well as the desired motion) when actuated, pro-
ceed with the following analysis:²Verify power ON F35 and ground Z1 into the
system as indicated above.
²Verify all connectors are mated with the memory
seat/mirror module.
²Place the vehicle gear shift lever in any position
except PARK (causes the Memory Seat/Mirror Mod-
ule to wake-up and provide a position sense voltage
to the seat motor potentiometers and the mirror
rheostat(s). This voltage can be checked at the appro-
priate cavities of the 21 and 25-way connectors.
²Verify the switch connector is mated with the
seat switch on the inside of the outboard side-shield.
²Verify battery voltage at the P9 circuit refer-
enced to the Z1A ground reference (cavity 1) of the
seat switch. If P9 low current battery is not available
Fig. 6 Memory Seat/Mirror Module 25-Way Connector
8R - 8 POWER SEATSNS
DIAGNOSIS AND TESTING (Continued)
Page 537 of 1938

coming from the module, replace the Memory Seat/
Mirror Module.
²If P9 low current battery is present at (cavity 5)
referenced to ground Z1 (cavity 1) of the seat switch,
verify the presence of the P9 voltage at the switch
outputs. If there is no output voltage from the
switch, replace the switch.
²If P9 voltage is present at the output of the
switch, but there is no reaction from the memory
seat/mirror module, verify that the P9 voltage is
present at the appropriate 21-way connector pins
into the module. If the P9 voltage is not present at
the 21-way connector, repair or replace the seat wir-
ing harness. If the verification check of the seat wir-
ing harness is correct, replace the control module.
(2) If the control module does not respond with a
relay click to a specific seat switch when actuated,
verify the continuity of the particular circuit between
the seat switch and the Memory Seat/Mirror Module.
If the P9 voltage is present at the correct input of the
21-way connector of the module when the switch is
actuated, but there is no response by the module,
replace the Memory Seat/Mirror Module.
(3) If the Memory Seat/Mirror Module responds
with a relay click when a seat switch is actuated for
a given direction, but there is no reaction from a seat
or recliner motor relating to that switch input, dis-
connect the 10-way connector from the control mod-
ule. Jumper the battery and ground from cavities 8
and 7 of the seat harness 10-way connector to the
proper cavities for the seat or recliner motor in ques-
tion and direction of travel desired. If the motor oper-
ates, replace the control module. If the motor does
not operate, verify continuity of the wiring into the
motor 2-way connector. Repair or replace the wiring
as necessary. If the wiring has continuity, and the
motor will not operate when fed directly, replace the
track assembly, since the motor/transmission combi-
nations are not designed to be serviced on an individ-
ual basis.
SEAT AND RECLINER POSITION SENSING
Seat and recliner position sense ground reference
circuit P28 BR/RD feed is from the memory seat/mir-
ror module (cavity 10) 21-way connector to each of
the position sense connectors.
Seat and recliner position sense +5 volt feed circuit
P29 BR/WT feed is from the memory seat/mirror
module (cavity 20) 21-way connector to each of the
position sense connectors.
To test for the presence of a sense voltage, a volt
meter must be used as follows:
²Connect the negative probe to the P28 circuit
(cavity 10) of the 21-way connector.
²Connect the positive probe to the P29 circuit
(cavity 20) of the 21-way connector and verify a volt-age reading between 3.5 and 5 volts when a seat or
recliner switch is activated.An internal timer in
the Memory Seat/Mirror Module (MSM Module)
regulates the length of time this voltage stays
active i.e., 3 seconds from the time that the
switch was activated, unless the switch is held
or while the transmission is out of PARK.If the
voltage is less than 3.5, there is a fault in the system
that is drawing it down. To troubleshoot this circuit,
disconnect the 25-way connector from the MSM Mod-
ule (this removes all of the vehicle mirror circuitry).
If the voltage is still less than 3.5, disconnect each of
the position sense connectors from each of the
motors. If the voltage remains less than 3.5, replace
the MSM Module. If the voltage increases when a
motor is disconnected from the system, determine if
the fault is in the wiring or the motor assembly.
Repair or replace the wire harness assembly as
needed. If the fault is in the motor position sensing
potentiometer, replace the track assembly.
²The potentiometers built onto the motor end-bell
provide voltages to the MSM Module through the
21-way connector, which change as follows, corre-
sponding to the given seat actuations. Refer to Seat
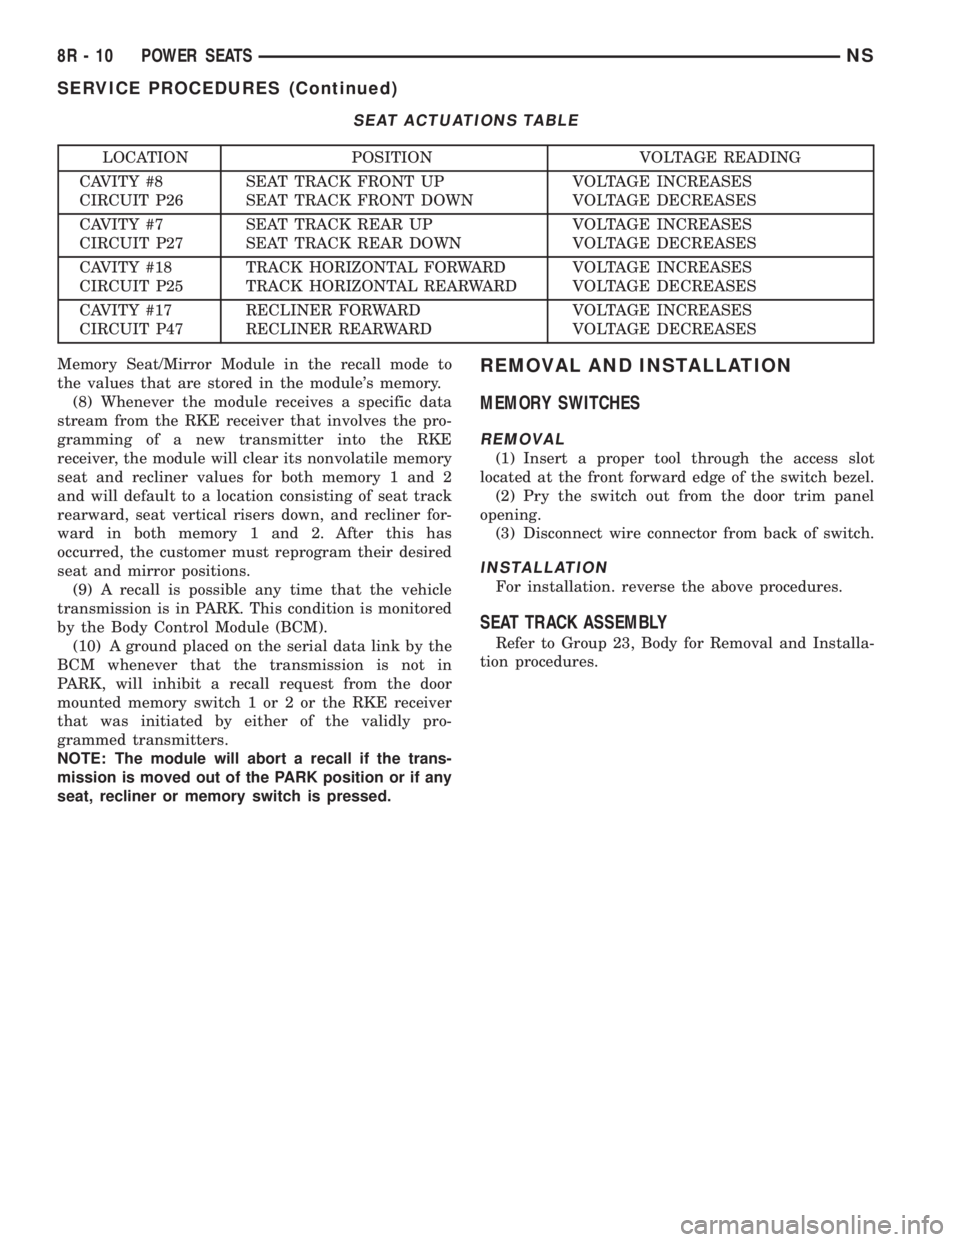
Actuations Table.
SERVICE PROCEDURES
REMOTE KEYLESS ENTRY (RKE) DATA LINK
The memory seat/mirror module interfaces with
the RKE via a serial data link (single wire). The pro-
gramming sequence to relate an RKE transmitter to
the chosen seat, recliner and side view mirror posi-
tions consists of the following steps:
(1) Adjust the seat, recliner and side view mirrors
to the desired position.
(2) Press momentarily and release memory switch
S.
(3) Press momentarily and release memory switch
1or2.
(4) Press momentarily and release a LOCK button
on an RKE transmitter.
(5) To program the second driver's position, follow
the previous sequence with a second transmitter.
(6) To recall either of the programmed positions
with an RKE transmitter, press momentarily and
release an UNLOCK button on one of the pro-
grammed RKE transmitters.An unprogrammed
RKE transmitter will have no effect on the sys-
tem.
(7) The RKE receiver uses the serial data link to
notify the module of a request from a programmed
transmitter, that an UNLOCK button has been
pressed. This UNLOCK request (from a transmitter
associated with either switch 1 or 2) will activate the
NSPOWER SEATS 8R - 9
DIAGNOSIS AND TESTING (Continued)
Page 538 of 1938

Memory Seat/Mirror Module in the recall mode to
the values that are stored in the module's memory.
(8) Whenever the module receives a specific data
stream from the RKE receiver that involves the pro-
gramming of a new transmitter into the RKE
receiver, the module will clear its nonvolatile memory
seat and recliner values for both memory 1 and 2
and will default to a location consisting of seat track
rearward, seat vertical risers down, and recliner for-
ward in both memory 1 and 2. After this has
occurred, the customer must reprogram their desired
seat and mirror positions.
(9) A recall is possible any time that the vehicle
transmission is in PARK. This condition is monitored
by the Body Control Module (BCM).
(10) A ground placed on the serial data link by the
BCM whenever that the transmission is not in
PARK, will inhibit a recall request from the door
mounted memory switch 1 or 2 or the RKE receiver
that was initiated by either of the validly pro-
grammed transmitters.
NOTE: The module will abort a recall if the trans-
mission is moved out of the PARK position or if any
seat, recliner or memory switch is pressed.REMOVAL AND INSTALLATION
MEMORY SWITCHES
REMOVAL
(1) Insert a proper tool through the access slot
located at the front forward edge of the switch bezel.
(2) Pry the switch out from the door trim panel
opening.
(3) Disconnect wire connector from back of switch.
INSTALLATION
For installation. reverse the above procedures.
SEAT TRACK ASSEMBLY
Refer to Group 23, Body for Removal and Installa-
tion procedures.
SEAT ACTUATIONS TABLE
LOCATION POSITION VOLTAGE READING
CAVITY #8
CIRCUIT P26SEAT TRACK FRONT UP
SEAT TRACK FRONT DOWNVOLTAGE INCREASES
VOLTAGE DECREASES
CAVITY #7
CIRCUIT P27SEAT TRACK REAR UP
SEAT TRACK REAR DOWNVOLTAGE INCREASES
VOLTAGE DECREASES
CAVITY #18
CIRCUIT P25TRACK HORIZONTAL FORWARD
TRACK HORIZONTAL REARWARDVOLTAGE INCREASES
VOLTAGE DECREASES
CAVITY #17
CIRCUIT P47RECLINER FORWARD
RECLINER REARWARDVOLTAGE INCREASES
VOLTAGE DECREASES
8R - 10 POWER SEATSNS
SERVICE PROCEDURES (Continued)
Page 539 of 1938

POWER MIRRORS
CONTENTS
page page
GENERAL INFORMATION
HEATED MIRROR........................ 1
INTRODUCTION......................... 1
MEMORY MIRRORS...................... 1
DIAGNOSIS AND TESTING
HEATED MIRROR TEST................... 1MIRROR MOTOR TEST................... 1
MIRROR SWITCH TEST................... 1
REMOVAL AND INSTALLATION
POWER MIRROR SWITCH................. 3
POWER MIRROR........................ 3
GENERAL INFORMATION
INTRODUCTION
Electrically-operated remote control mirrors are
controlled by a switch assembly located on the head-
lamp switch bezel in the instrument panel.
The vehicle uses a rocker switch for right or left
side mirror selection and a single platform button for
mirror UP, DOWN, RIGHT, or LEFT movement.
The motors which operate the mirrors are part of
the mirror assembly and cannot be serviced sepa-
rately.
HEATED MIRROR
Heated mirrors are available on models with
Power Mirrors and Rear Window Defogger only. The
heated mirror is controlled by the rear window defog-
ger switch. The heated mirror is ON when the rear
window defogger is ON.
MEMORY MIRRORS
For memory mirrors refer to Group 8R, Power
Seats section Memory Seat/Mirror system.
DIAGNOSIS AND TESTING
MIRROR MOTOR TEST
(1) Remove headlamp switch bezel. Refer to Group
8E, Instrument Panel and Gauges.
(2) Disconnect wiring harness connector to the
power mirror switch and headlamp switch.
(3) Using two jumper wires:
²Connect one to a 12-volt source
²Connect the other to a good body ground
²Refer to the Mirror Test Chart for wire hookups
at the switch connector (Fig. 1).(4) If results shown in chart are not obtained,
check for broken or shorted circuit, or replace mirror
assembly as necessary.
MIRROR SWITCH TEST
(1) Remove power mirror switch from mounting
position.
(2) Disconnect wiring harness at switch connector.
(3) Using a ohmmeter, test for continuity between
the terminals of the switch as shown in the Mirror
Switch Continuity Chart (Fig. 2).
(4) If results shown in the chart are not obtained,
replace the switch.
HEATED MIRROR TEST
Heated mirrors are available on models with
Power Mirrors and Rear Window Defogger only. The
heated mirror is controlled by the rear window defog-
ger switch. The heated mirror is ON when the rear
window defogger is ON.
TEST PROCEDURE
(1) The mirror should be warm to the touch.
(2) If not, check the 10 amp fuse (12) in the junc-
tion block behind the instrument panel to the left of
the steering column.
(3) Test voltage at rear window defogger switch.
²If no voltage repair wire.
²Apply voltage to one wire and ground the other,
refer to (Fig. 1) for pin numbers. Mirror should
become warm to the touch.
²If not remove mirror glass and test the wires for
continuity. If no continuity repair wires.
²If wires are OK, replace mirror glass.
²To test defogger switch refer to Group 8N, Elec-
trically Heated Systems.
NSPOWER MIRRORS 8T - 1
Page 540 of 1938

Fig. 1 Power Mirror Test
Fig. 2 Mirror Switch Test
8T - 2 POWER MIRRORSNS
DIAGNOSIS AND TESTING (Continued)
Page 541 of 1938

REMOVAL AND INSTALLATION
POWER MIRROR
REMOVAL
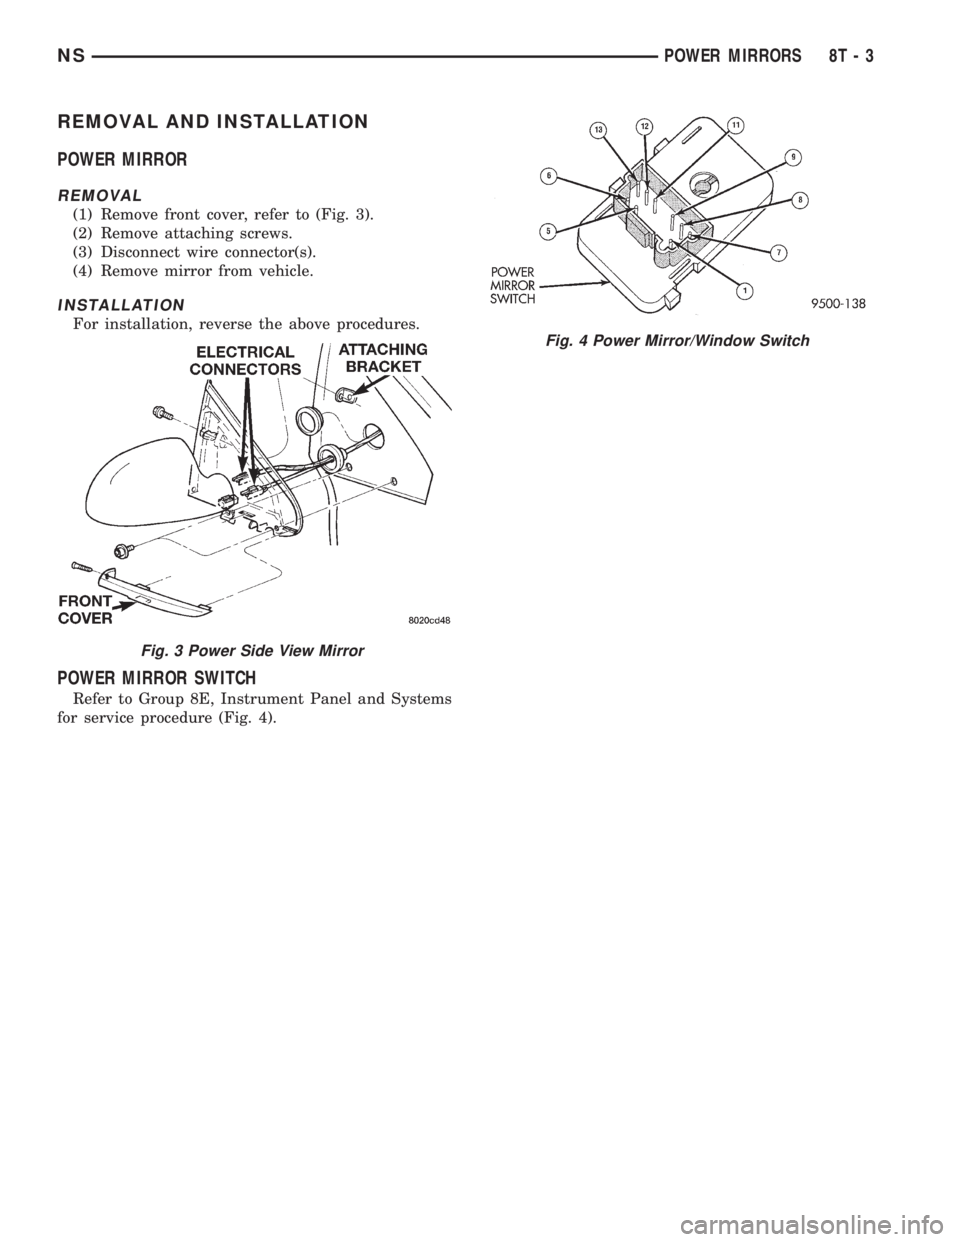
(1) Remove front cover, refer to (Fig. 3).
(2) Remove attaching screws.
(3) Disconnect wire connector(s).
(4) Remove mirror from vehicle.
INSTALLATION
For installation, reverse the above procedures.
POWER MIRROR SWITCH
Refer to Group 8E, Instrument Panel and Systems
for service procedure (Fig. 4).
Fig. 3 Power Side View Mirror
Fig. 4 Power Mirror/Window Switch
NSPOWER MIRRORS 8T - 3
Page 561 of 1938

WIRING DIAGRAMS
CONTENTS
page page
AIR CONDITIONING-HEATER.......... 8W-42-1
AIRBAG SYSTEM................... 8W-43-1
ANTI-LOCK BRAKES................. 8W-35-1
AUDIO SYSTEM.................... 8W-47-1
BODY CONTROL MODULE............ 8W-45-1
CHARGING SYSTEM................. 8W-20-1
COMPONENT INDEX................. 8W-02-1
CONNECTOR/GROUND LOCATIONS..... 8W-90-1
CONNECTOR PIN-OUTS.............. 8W-80-1
FRONT LIGHTING................... 8W-50-1
FUEL/IGNITION SYSTEM............. 8W-30-1
GENERAL INFORMATION............. 8W-01-1
GROUND DISTRIBUTION............. 8W-15-1
HORN/CIGAR LIGHTER/POWER OUTLET . 8W-41-1
INSTRUMENT CLUSTER.............. 8W-40-1
INTERIOR LIGHTING................. 8W-44-1
JUNCTION BLOCK................... 8W-12-1
MESSAGE CENTER.................. 8W-46-1OVERHEAD CONSOLE................ 8W-49-1
POWER DISTRIBUTION.............. 8W-10-1
POWER DOOR LOCKS............... 8W-61-1
POWER MIRRORS.................. 8W-62-1
POWER SEAT...................... 8W-63-1
POWER WINDOWS.................. 8W-60-1
REAR LIGHTING.................... 8W-51-1
SPLICE INFORMATION............... 8W-70-1
SPLICE LOCATIONS................. 8W-95-1
STARTING SYSTEM................. 8W-21-1
TRAILER TOW...................... 8W-54-1
TRANSMISSION CONTROL SYSTEM.... 8W-31-1
TURN SIGNALS..................... 8W-52-1
VEHICLE SPEED CONTROL........... 8W-33-1
VEHICLE THEFT SECURITY SYSTEM.... 8W-39-1
WINDOW DEFOGGERS............... 8W-48-1
WIPERS........................... 8W-53-1
NS/GSWIRING DIAGRAMS 8W - 1