1996 CHRYSLER VOYAGER engine oil
[x] Cancel search: engine oilPage 1170 of 1938
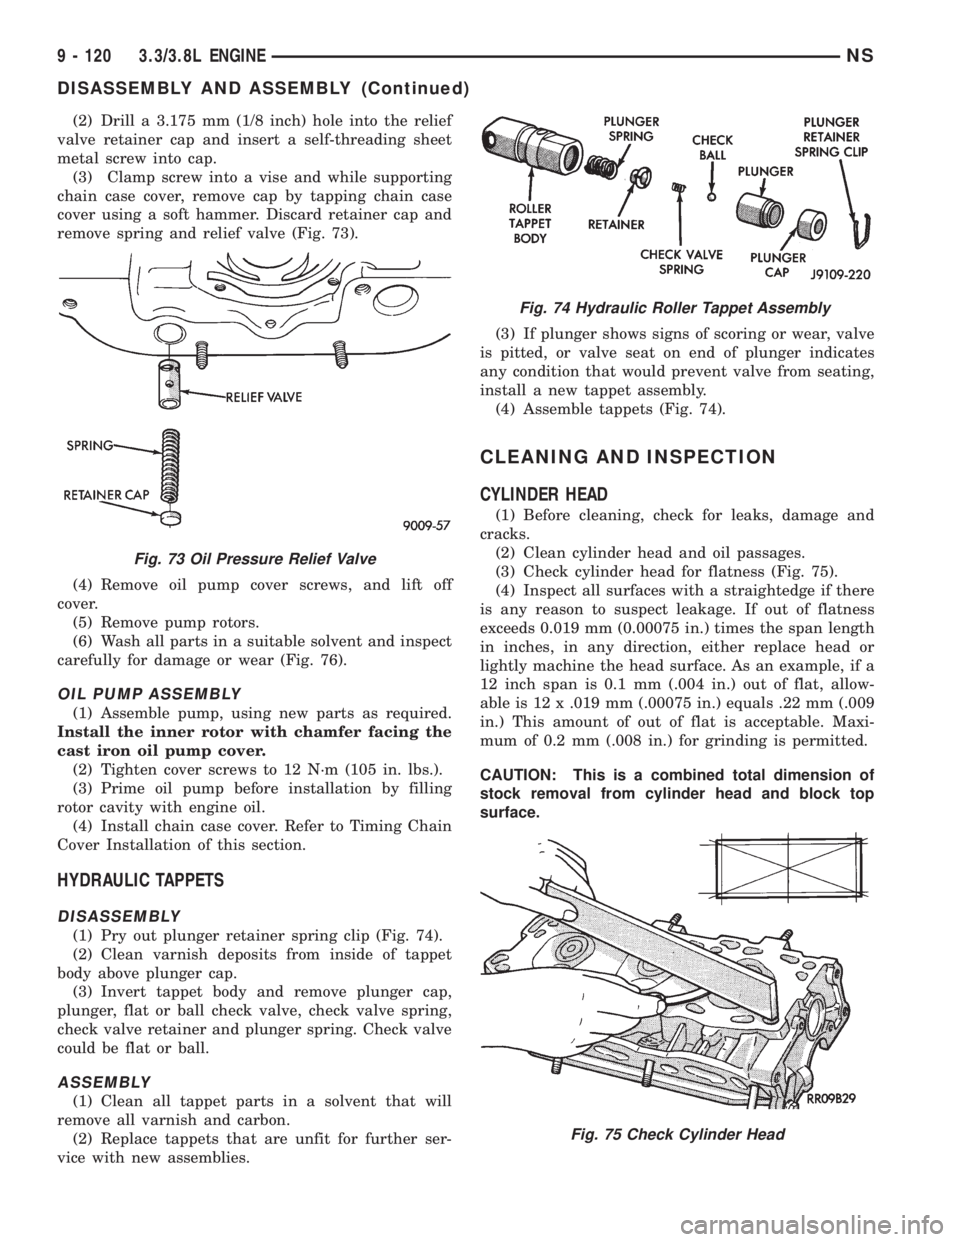
(2) Drill a 3.175 mm (1/8 inch) hole into the relief
valve retainer cap and insert a self-threading sheet
metal screw into cap.
(3) Clamp screw into a vise and while supporting
chain case cover, remove cap by tapping chain case
cover using a soft hammer. Discard retainer cap and
remove spring and relief valve (Fig. 73).
(4) Remove oil pump cover screws, and lift off
cover.
(5) Remove pump rotors.
(6) Wash all parts in a suitable solvent and inspect
carefully for damage or wear (Fig. 76).
OIL PUMP ASSEMBLY
(1) Assemble pump, using new parts as required.
Install the inner rotor with chamfer facing the
cast iron oil pump cover.
(2) Tighten cover screws to 12 N´m (105 in. lbs.).
(3) Prime oil pump before installation by filling
rotor cavity with engine oil.
(4) Install chain case cover. Refer to Timing Chain
Cover Installation of this section.
HYDRAULIC TAPPETS
DISASSEMBLY
(1) Pry out plunger retainer spring clip (Fig. 74).
(2) Clean varnish deposits from inside of tappet
body above plunger cap.
(3) Invert tappet body and remove plunger cap,
plunger, flat or ball check valve, check valve spring,
check valve retainer and plunger spring. Check valve
could be flat or ball.
ASSEMBLY
(1) Clean all tappet parts in a solvent that will
remove all varnish and carbon.
(2) Replace tappets that are unfit for further ser-
vice with new assemblies.(3) If plunger shows signs of scoring or wear, valve
is pitted, or valve seat on end of plunger indicates
any condition that would prevent valve from seating,
install a new tappet assembly.
(4) Assemble tappets (Fig. 74).
CLEANING AND INSPECTION
CYLINDER HEAD
(1) Before cleaning, check for leaks, damage and
cracks.
(2) Clean cylinder head and oil passages.
(3) Check cylinder head for flatness (Fig. 75).
(4) Inspect all surfaces with a straightedge if there
is any reason to suspect leakage. If out of flatness
exceeds 0.019 mm (0.00075 in.) times the span length
in inches, in any direction, either replace head or
lightly machine the head surface. As an example, if a
12 inch span is 0.1 mm (.004 in.) out of flat, allow-
able is 12 x .019 mm (.00075 in.) equals .22 mm (.009
in.) This amount of out of flat is acceptable. Maxi-
mum of 0.2 mm (.008 in.) for grinding is permitted.
CAUTION: This is a combined total dimension of
stock removal from cylinder head and block top
surface.
Fig. 73 Oil Pressure Relief Valve
Fig. 74 Hydraulic Roller Tappet Assembly
Fig. 75 Check Cylinder Head
9 - 120 3.3/3.8L ENGINENS
DISASSEMBLY AND ASSEMBLY (Continued)
Page 1171 of 1938
OIL PAN
(1) Clean oil pan in solvent and wipe dry with a
clean cloth. Clean all gasket material from mounting
surfaces of pan and block.
(2) Inspect oil drain plug and plug hole for
stripped or damaged threads and repair as necessary.
Install a new drain plug gasket. Tighten to 27 N´m
(20 ft. lbs.).
(3) Inspect oil pan mounting flange for bends or
distortion. Straighten flange if necessary.
(4) Clean oil screen and pipe in clean solvent.
Inspect condition of screen.
OIL PUMP
INSPECTION AND REPAIR
(1) Clean all parts thoroughly. Mating surface of
the chain case cover should be smooth. Replace pump
cover if scratched or grooved.
(2) Lay a straightedge across the pump cover sur-
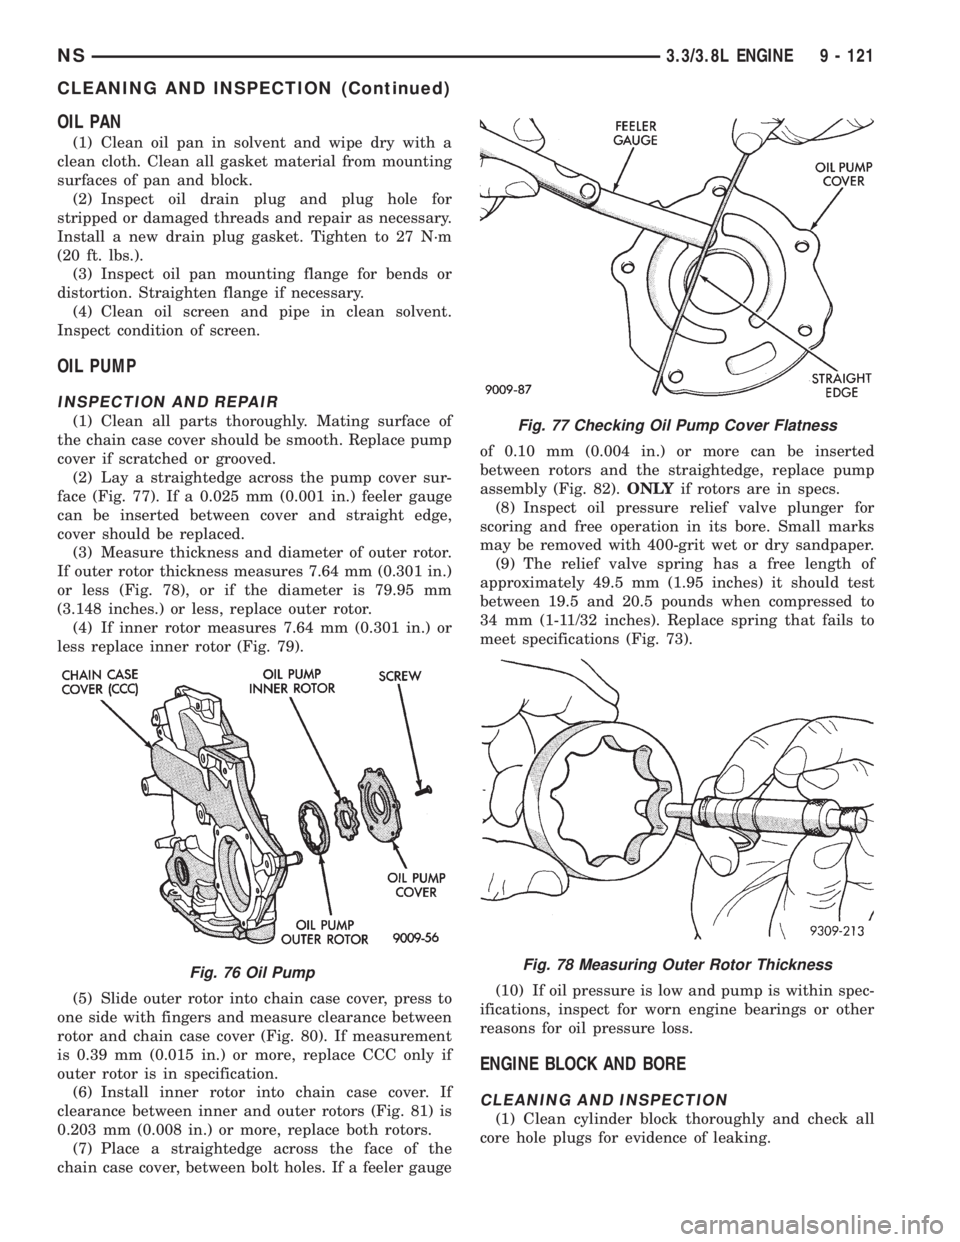
face (Fig. 77). If a 0.025 mm (0.001 in.) feeler gauge
can be inserted between cover and straight edge,
cover should be replaced.
(3) Measure thickness and diameter of outer rotor.
If outer rotor thickness measures 7.64 mm (0.301 in.)
or less (Fig. 78), or if the diameter is 79.95 mm
(3.148 inches.) or less, replace outer rotor.
(4) If inner rotor measures 7.64 mm (0.301 in.) or
less replace inner rotor (Fig. 79).
(5) Slide outer rotor into chain case cover, press to
one side with fingers and measure clearance between
rotor and chain case cover (Fig. 80). If measurement
is 0.39 mm (0.015 in.) or more, replace CCC only if
outer rotor is in specification.
(6) Install inner rotor into chain case cover. If
clearance between inner and outer rotors (Fig. 81) is
0.203 mm (0.008 in.) or more, replace both rotors.
(7) Place a straightedge across the face of the
chain case cover, between bolt holes. If a feeler gaugeof 0.10 mm (0.004 in.) or more can be inserted
between rotors and the straightedge, replace pump
assembly (Fig. 82).ONLYif rotors are in specs.
(8) Inspect oil pressure relief valve plunger for
scoring and free operation in its bore. Small marks
may be removed with 400-grit wet or dry sandpaper.
(9) The relief valve spring has a free length of
approximately 49.5 mm (1.95 inches) it should test
between 19.5 and 20.5 pounds when compressed to
34 mm (1-11/32 inches). Replace spring that fails to
meet specifications (Fig. 73).
(10) If oil pressure is low and pump is within spec-
ifications, inspect for worn engine bearings or other
reasons for oil pressure loss.
ENGINE BLOCK AND BORE
CLEANING AND INSPECTION
(1) Clean cylinder block thoroughly and check all
core hole plugs for evidence of leaking.
Fig. 76 Oil Pump
Fig. 77 Checking Oil Pump Cover Flatness
Fig. 78 Measuring Outer Rotor Thickness
NS3.3/3.8L ENGINE 9 - 121
CLEANING AND INSPECTION (Continued)
Page 1172 of 1938
(2) If new core plugs are installed, see Engine Core
Oil and Cam Plugs.
(3) Examine block for cracks or fractures.
CYLINDER BORE INSPECTION
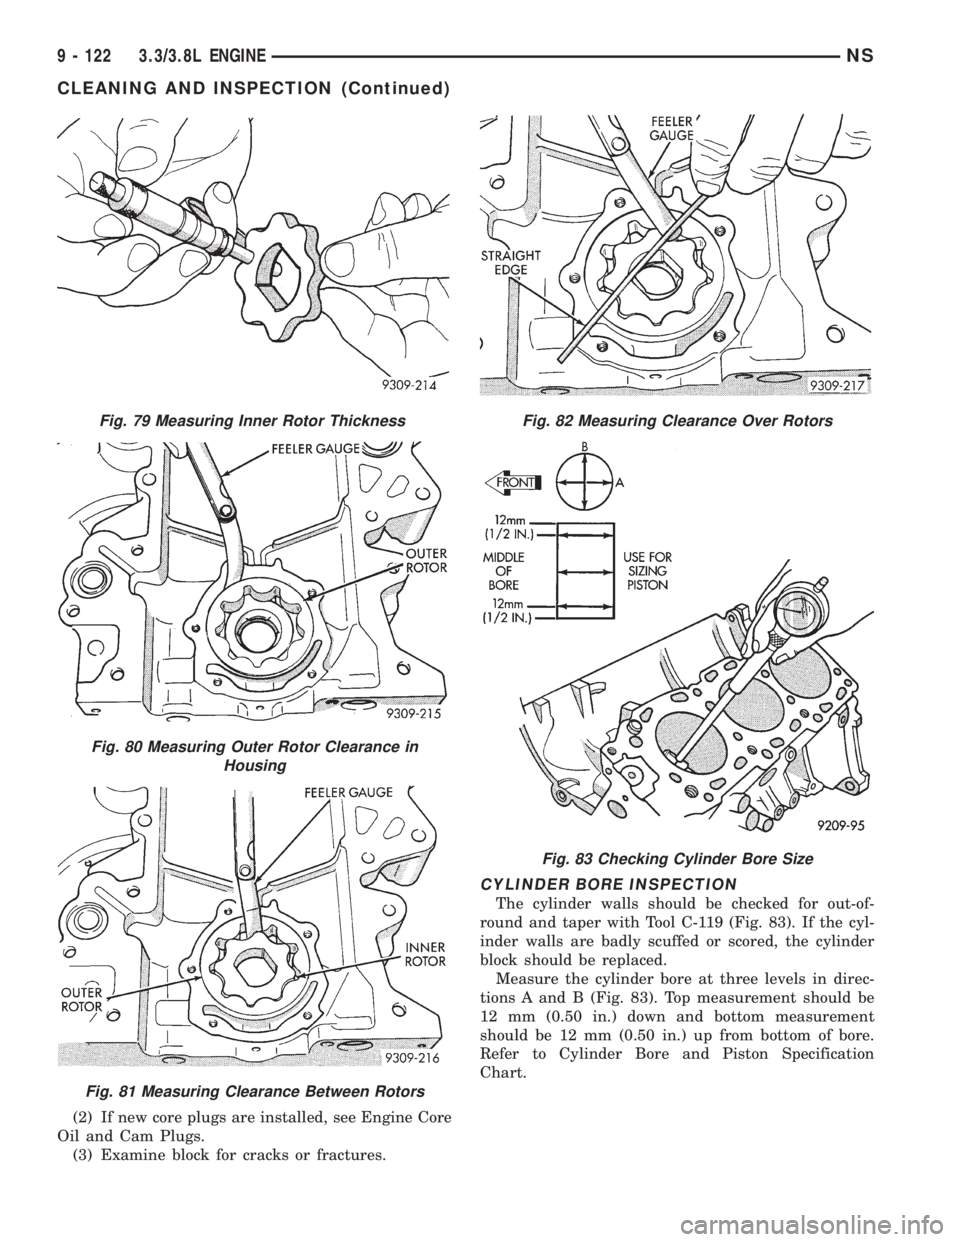
The cylinder walls should be checked for out-of-
round and taper with Tool C-119 (Fig. 83). If the cyl-
inder walls are badly scuffed or scored, the cylinder
block should be replaced.
Measure the cylinder bore at three levels in direc-
tions A and B (Fig. 83). Top measurement should be
12 mm (0.50 in.) down and bottom measurement
should be 12 mm (0.50 in.) up from bottom of bore.
Refer to Cylinder Bore and Piston Specification
Chart.
Fig. 79 Measuring Inner Rotor Thickness
Fig. 80 Measuring Outer Rotor Clearance in
Housing
Fig. 81 Measuring Clearance Between Rotors
Fig. 82 Measuring Clearance Over Rotors
Fig. 83 Checking Cylinder Bore Size
9 - 122 3.3/3.8L ENGINENS
CLEANING AND INSPECTION (Continued)
Page 1174 of 1938
Piston Rings
Number of Rings..........................3
Compression.............................2
Oil Control..............................1
Oil Ring Type . . .3±Piece, Steel Rail, Chrome Face
Piston Ring Gap
Top & 2nd Compression ing.......0.30 - 0.55 mm
(0.0118 - 0.0217 in.)
Oil Control (Steel Rails).........0.25 - 1.00 mm
(0.0098 - 0.0394 in.)
Service Rings
Ring Gap±Compression........0.300 - 0.550 mm
(0.0118 - 0.0217 in.)
Ring Gap±Oil Control..........0.250 - 1.00 mm
(0.0098 - 0.0394 in.)
Piston Ring Side Clearance
Top & 2nd Compression Rings . . .0.030 - 0.095 mm
(0.0012 - 0.0037 in.)
Oil Ring (Steel Rails)..........0.014 - 0.226 mm
(0.0005 - 0.0089 in.)
Piston Ring Width
Compression Rings.............1.46 - 1.50 mm
(0.0575 - 0.0591 in.)
Oil Ring (Steel Rails)................0.510 mm
(0.0201 in.)
Connecting Rods
Bearing Type.........Aluminum Lead (Bimetal)
Bearing Clearance............0.019 - 0.065 mm
(0.00075 - 0.0026 in.)
Max. Allowable..........0.076 mm (0.003 in.)
Side Clearance..............0.127 - 0.381 mm
(0.005 - 0.015 in.)
Crankshaft
Type......................Cast Nodular Iron
Bearing Type.........Aluminum Lead (Bimetal)
Thrust Location.................No. 2 Bearing
Connecting Rod
Journal Diameter..........53.950 - 53.975 mm
(2.124 - 2.125 in.)
Main Bearing Diametrical
Clearance No. 1- 4............0.011 - 0.059 mm
(0.0043 - 0.0023 in.)
Max. Allowable..........0.102 mm (0.004 in.)
End Play.....0.09 - 0.24 mm (0.0036 - 0.0095 in.)
Max. Allowable..........0.381 mm (0.015 in.)
Main Bearing Journals
Diameter.................64.013 - 63.993 mm
(2.5202 - 2.5195 in.)
Out-of-Round (Max.)........0.025 mm (0.001 in.)
Taper (Max.)..............0.025 mm (0.001 in.)
Connecting Rod Journals
Diameter.................58.005 - 57.979 mm
(2.2837 - 2.2827 in.)
Out-of-Round (Max.)........0.025 mm (0.001 in.)
Taper (Max.)..............0.025 mm (0.001 in.)Camshaft
Drive...............................Chain
Bearings.................Steel Backed Babbitt
Number.................................4
Diametrical Clearance.........0.025 - 0.101 mm
(0.001 - 0.004 in.)
Max. Allowable..........0.127 mm (0.005 in.)
Thrust Taken By.................Thrust Plate
End Play...................0.127 - 0.304 mm
(0.005 - 0.012 in.)
Max. Allowable..........0.304 mm (0.012 in.)
Camshaft Journals
Bearing Journal
Diameter No. 1............50.724 - 50.775 mm
(1.997 - 1.999 in.)
Bearing Journal
Diameter No. 2............50.317 - 50.368 mm
(1.9809 - 1.9829 in.)
Bearing Journal
Diameter No. 3............49.936 - 49.987 mm
(1.9659 - 1.9679 in.)
Bearing Journal
Diameter No. 4............49.530 - 49.581 mm
(1.9499 - 1.9520 in.)
Camshaft Bearings
Diameter No. 1.............50.825 - 50.800 mm
(2.0009 - 1.9999 in.)
Diameter No. 2.............50.419 - 50.393 mm
(1.9849 - 1.9839 in.)
Diameter No. 3.............50.038 - 50.013 mm
(1.9699 - 1.9690 in.)
Diameter No. 4.............49.632 - 49.606 mm
(1.954 - 1.9529 in.)
Oil Clearance..............0.0254 - 0.0762 mm
(0.001 - 0.003 in.)
Valve Timing Exhaust Valve
Closes (ATC)...........................12É
Opens (BBC)...........................48É
Duration.............................240É
Valve Timing Intake Valve
Closes (BTDC)..........................58É
Opens.................................2É
Duration.............................240É
Valve Overlap..........................14É
Timing Chain
Number of Links.........................64
Pitch............................0.375 inch
Width...........................0.750 inch
Hydraulic Tappets
Type .......................Roller Hydraulic
Body Diameter...............22.95 - 22.96 mm
(0.9035 - 0.9040 in.)
Clearance in Block..............0.02 - 0.06 mm
(0.0007 - 0.0024 in.)
9 - 124 3.3/3.8L ENGINENS
SPECIFICATIONS (Continued)
Page 1175 of 1938
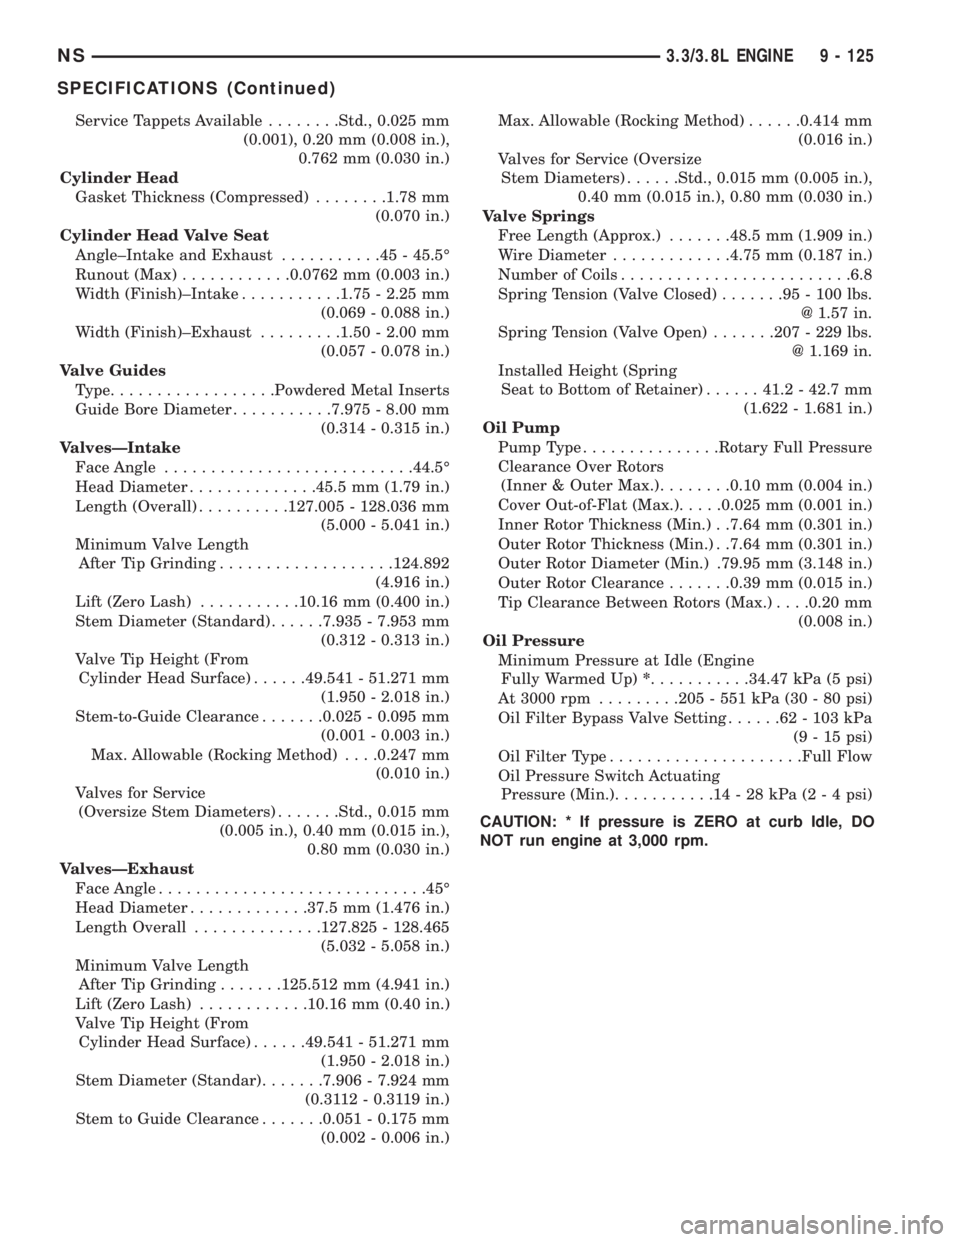
Service Tappets Available........Std., 0.025 mm
(0.001), 0.20 mm (0.008 in.),
0.762 mm (0.030 in.)
Cylinder Head
Gasket Thickness (Compressed)........1.78 mm
(0.070 in.)
Cylinder Head Valve Seat
Angle±Intake and Exhaust...........45-45.5É
Runout (Max)............0.0762 mm (0.003 in.)
Width (Finish)±Intake...........1.75 - 2.25 mm
(0.069 - 0.088 in.)
Width (Finish)±Exhaust.........1.50 - 2.00 mm
(0.057 - 0.078 in.)
Valve Guides
Type..................Powdered Metal Inserts
Guide Bore Diameter...........7.975 - 8.00 mm
(0.314 - 0.315 in.)
ValvesÐIntake
Face Angle...........................44.5É
Head Diameter..............45.5 mm (1.79 in.)
Length (Overall)..........127.005 - 128.036 mm
(5.000 - 5.041 in.)
Minimum Valve Length
After Tip Grinding...................124.892
(4.916 in.)
Lift (Zero Lash)...........10.16 mm (0.400 in.)
Stem Diameter (Standard)......7.935 - 7.953 mm
(0.312 - 0.313 in.)
Valve Tip Height (From
Cylinder Head Surface)......49.541 - 51.271 mm
(1.950 - 2.018 in.)
Stem-to-Guide Clearance.......0.025 - 0.095 mm
(0.001 - 0.003 in.)
Max. Allowable (Rocking Method). . . .0.247 mm
(0.010 in.)
Valves for Service
(Oversize Stem Diameters).......Std., 0.015 mm
(0.005 in.), 0.40 mm (0.015 in.),
0.80 mm (0.030 in.)
ValvesÐExhaust
Face Angle.............................45É
Head Diameter.............37.5 mm (1.476 in.)
Length Overall..............127.825 - 128.465
(5.032 - 5.058 in.)
Minimum Valve Length
After Tip Grinding.......125.512 mm (4.941 in.)
Lift (Zero Lash)............10.16 mm (0.40 in.)
Valve Tip Height (From
Cylinder Head Surface)......49.541 - 51.271 mm
(1.950 - 2.018 in.)
Stem Diameter (Standar).......7.906 - 7.924 mm
(0.3112 - 0.3119 in.)
Stem to Guide Clearance.......0.051 - 0.175 mm
(0.002 - 0.006 in.)Max. Allowable (Rocking Method)......0.414 mm
(0.016 in.)
Valves for Service (Oversize
Stem Diameters)......Std., 0.015 mm (0.005 in.),
0.40 mm (0.015 in.), 0.80 mm (0.030 in.)
Valve Springs
Free Length (Approx.).......48.5 mm (1.909 in.)
Wire Diameter.............4.75 mm (0.187 in.)
Number of Coils.........................6.8
Spring Tension (Valve Closed).......95-100lbs.
@ 1.57 in.
Spring Tension (Valve Open).......207 - 229 lbs.
@ 1.169 in.
Installed Height (Spring
Seat to Bottom of Retainer)......41.2 - 42.7 mm
(1.622 - 1.681 in.)
Oil Pump
Pump Type...............Rotary Full Pressure
Clearance Over Rotors
(Inner & Outer Max.)........0.10 mm (0.004 in.)
Cover Out-of-Flat (Max.).....0.025 mm (0.001 in.)
Inner Rotor Thickness (Min.) . .7.64 mm (0.301 in.)
Outer Rotor Thickness (Min.) . .7.64 mm (0.301 in.)
Outer Rotor Diameter (Min.) .79.95 mm (3.148 in.)
Outer Rotor Clearance.......0.39 mm (0.015 in.)
Tip Clearance Between Rotors (Max.). . . .0.20 mm
(0.008 in.)
Oil Pressure
Minimum Pressure at Idle (Engine
Fully Warmed Up)*...........34.47 kPa (5 psi)
At 3000 rpm.........205 - 551 kPa (30 - 80 psi)
Oil Filter Bypass Valve Setting......62-103kPa
(9 - 15 psi)
Oil Filter Type.....................Full Flow
Oil Pressure Switch Actuating
Pressure (Min.)...........14-28kPa(2 - 4 psi)
CAUTION: * If pressure is ZERO at curb Idle, DO
NOT run engine at 3,000 rpm.
NS3.3/3.8L ENGINE 9 - 125
SPECIFICATIONS (Continued)
Page 1176 of 1938
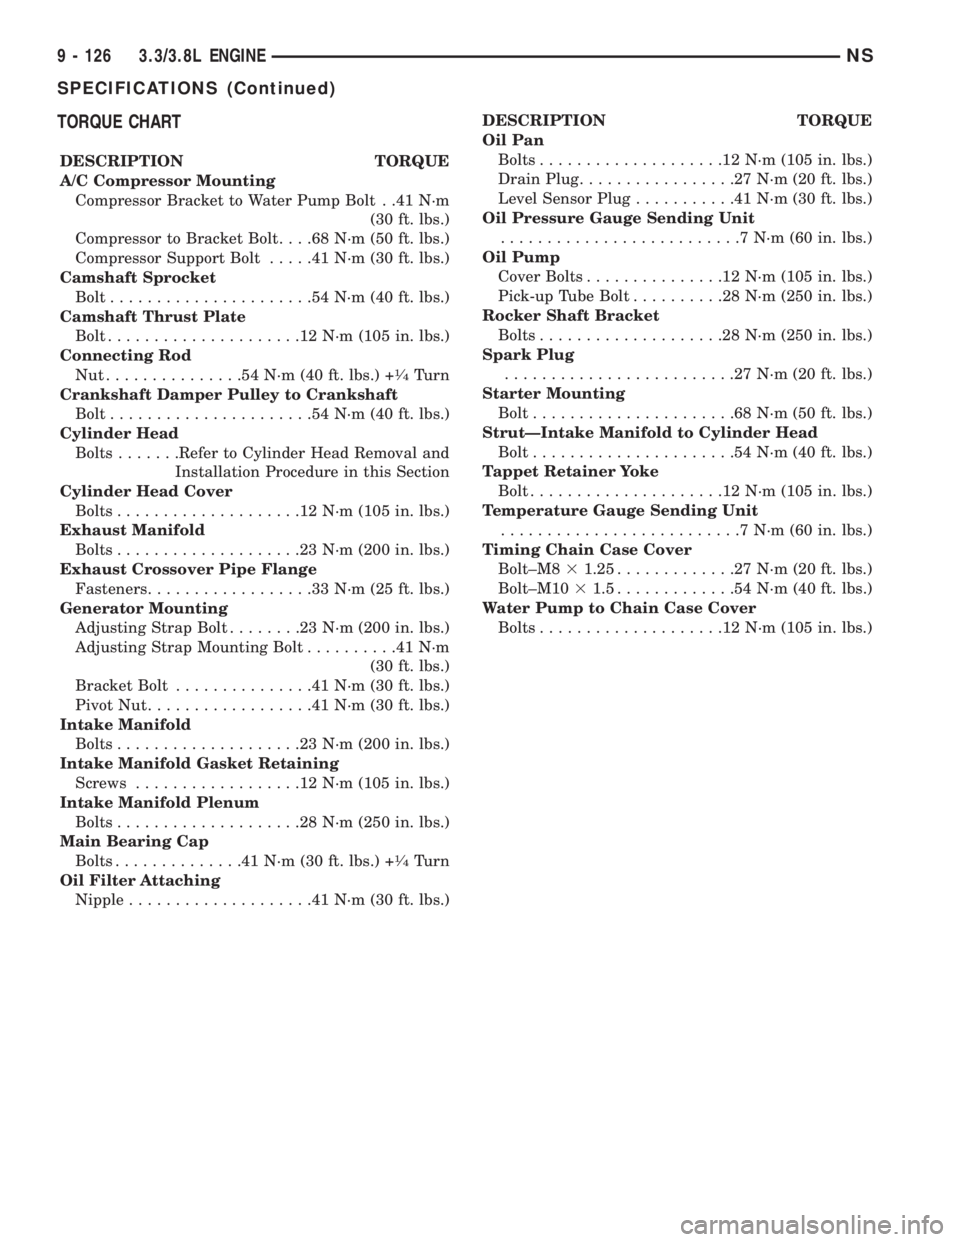
TORQUE CHART
DESCRIPTION TORQUE
A/C Compressor Mounting
Compressor Bracket to Water Pump Bolt . .41 N´m
(30 ft. lbs.)
Compressor to Bracket Bolt. . . .68 N´m (50 ft. lbs.)
Compressor Support Bolt.....41N´m(30ft.lbs.)
Camshaft Sprocket
Bolt......................54N´m(40ft.lbs.)
Camshaft Thrust Plate
Bolt.....................12N´m(105 in. lbs.)
Connecting Rod
Nut...............54N´m(40ft.lbs.) +
1¤4Turn
Crankshaft Damper Pulley to Crankshaft
Bolt......................54N´m(40ft.lbs.)
Cylinder Head
Bolts.......Refer to Cylinder Head Removal and
Installation Procedure in this Section
Cylinder Head Cover
Bolts....................12N´m(105 in. lbs.)
Exhaust Manifold
Bolts....................23N´m(200 in. lbs.)
Exhaust Crossover Pipe Flange
Fasteners..................33N´m(25ft.lbs.)
Generator Mounting
Adjusting Strap Bolt........23N´m(200 in. lbs.)
Adjusting Strap Mounting Bolt..........41N´m
(30 ft. lbs.)
Bracket Bolt...............41N´m(30ft.lbs.)
Pivot Nut..................41N´m(30ft.lbs.)
Intake Manifold
Bolts....................23N´m(200 in. lbs.)
Intake Manifold Gasket Retaining
Screws..................12N´m(105 in. lbs.)
Intake Manifold Plenum
Bolts....................28N´m(250 in. lbs.)
Main Bearing Cap
Bolts..............41N´m(30ft.lbs.) +
1¤4Turn
Oil Filter Attaching
Nipple....................41N´m(30ft.lbs.)DESCRIPTION TORQUE
Oil Pan
Bolts....................12N´m(105 in. lbs.)
Drain Plug.................27N´m(20ft.lbs.)
Level Sensor Plug...........41N´m(30ft.lbs.)
Oil Pressure Gauge Sending Unit
..........................7N´m(60in.lbs.)
Oil Pump
Cover Bolts...............12N´m(105 in. lbs.)
Pick-up Tube Bolt..........28N´m(250 in. lbs.)
Rocker Shaft Bracket
Bolts....................28N´m(250 in. lbs.)
Spark Plug
.........................27N´m(20ft.lbs.)
Starter Mounting
Bolt......................68N´m(50ft.lbs.)
StrutÐIntake Manifold to Cylinder Head
Bolt......................54N´m(40ft.lbs.)
Tappet Retainer Yoke
Bolt.....................12N´m(105 in. lbs.)
Temperature Gauge Sending Unit
..........................7N´m(60in.lbs.)
Timing Chain Case Cover
Bolt±M831.25.............27N´m(20ft.lbs.)
Bolt±M1031.5.............54N´m(40ft.lbs.)
Water Pump to Chain Case Cover
Bolts....................12N´m(105 in. lbs.)
9 - 126 3.3/3.8L ENGINENS
SPECIFICATIONS (Continued)
Page 1178 of 1938
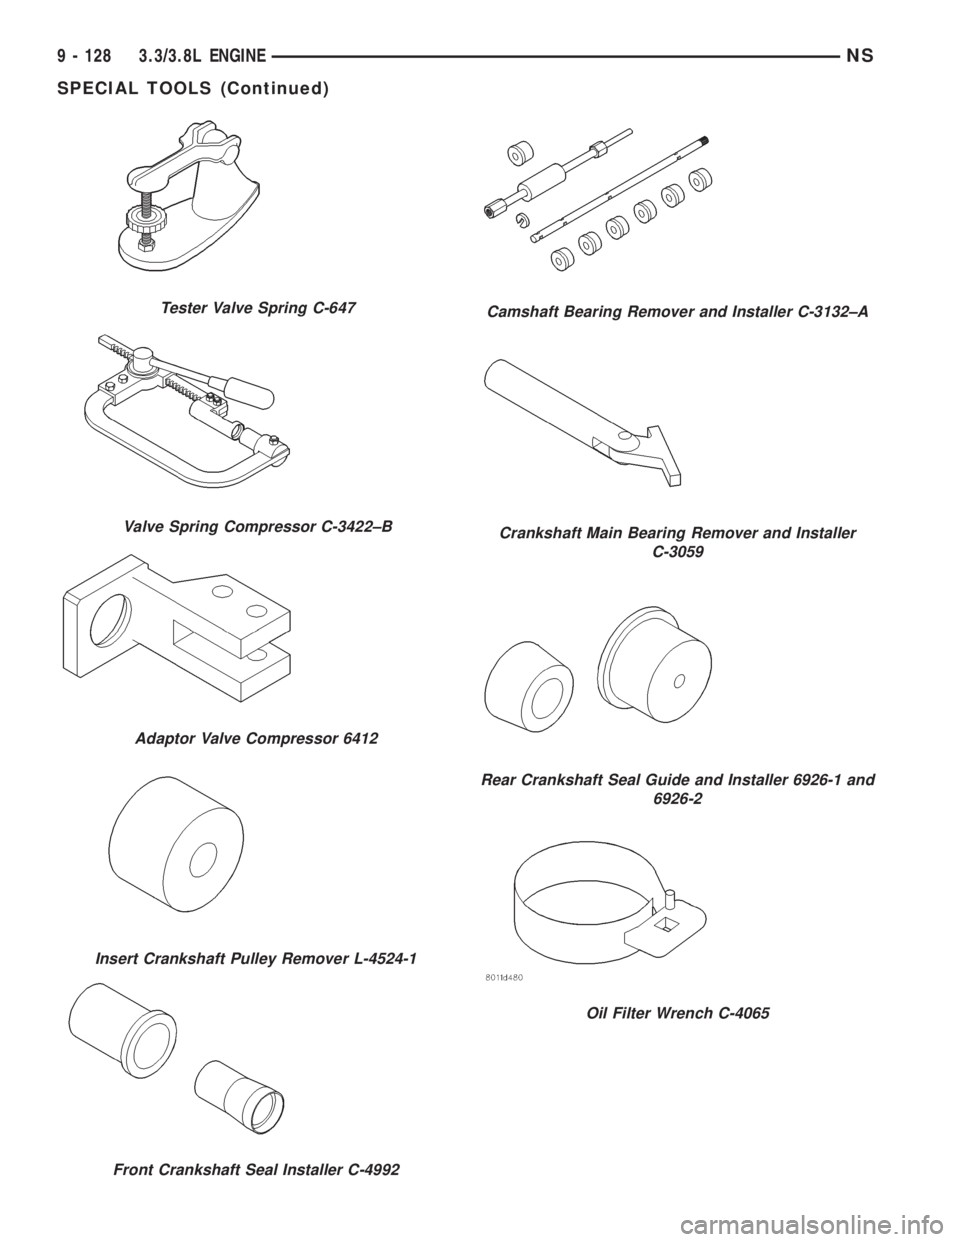
Tester Valve Spring C-647
Valve Spring Compressor C-3422±B
Adaptor Valve Compressor 6412
Insert Crankshaft Pulley Remover L-4524-1
Front Crankshaft Seal Installer C-4992
Camshaft Bearing Remover and Installer C-3132±A
Crankshaft Main Bearing Remover and Installer
C-3059
Rear Crankshaft Seal Guide and Installer 6926-1 and
6926-2
Oil Filter Wrench C-4065
9 - 128 3.3/3.8L ENGINENS
SPECIAL TOOLS (Continued)
Page 1179 of 1938
ENGINE
CONTENTS
page page
2.0L SOHC ENGINE...................... 12.5L VM DIESEL....................... 40
2.0L SOHC ENGINE
INDEX
page page
DESCRIPTION AND OPERATION
ENGINE COMPONENTS.................. 3
ENGINE IDENTIFICATION................. 1
ENGINE LUBRICATION SYSTEM............ 2
GENERAL SPECIFICATION................ 2
DIAGNOSIS AND TESTING
CHECKING ENGINE OIL PRESSURE........ 3
SERVICE PROCEDURES
CRANKSHAFT END PLAY................. 6
CYLINDER BORE AND PISTON SIZING....... 4
FITTING CONNECTING RODS.............. 5
FITTING CRANKSHAFT BEARINGS.......... 6
FITTING PISTON RINGS.................. 4
REMOVAL AND INSTALLATION
CAMSHAFT OIL SEAL................... 12
CAMSHAFT............................ 7
CRANKSHAFT OIL SEALÐREAR........... 20
CRANKSHAFT......................... 21
CYLINDER HEAD COVER................. 6
CYLINDER HEAD....................... 10
FRONT CRANKSHAFT OIL SEAL........... 18
OILFILTER ........................... 24
OIL FILTER ADAPTER................... 24OILPAN .............................. 17
OIL PUMP............................ 25
PISTON AND CONNECTING ROD.......... 25
ROCKER ARM/HYDRAULIC LASH ADJUSTER . . 8
SPARK PLUG TUBE...................... 7
TIMING BELT COVER................... 11
TIMING BELT SYSTEM.................. 13
VALVE SEALS AND SPRINGS IN VEHICLE . . . 10
VIBRATION DAMPER.................... 28
DISASSEMBLY AND ASSEMBLY
OIL PUMP............................ 29
VALVE SERVICE WITH THE CYLINDER HEAD
REMOVED.......................... 29
CLEANING AND INSPECTION
CYLINDER BLOCK AND BORE............ 34
CYLINDER HEAD AND CAMSHAFT
JOURNALS.......................... 32
OIL PUMP............................ 32
SPECIFICATIONS
ENGINE 2.0L SOHC..................... 34
TORQUE CHART 2.0L SOHC.............. 36
SPECIAL TOOLS
ENGINE 2.0L SOHC..................... 36
DESCRIPTION AND OPERATION
ENGINE IDENTIFICATION
The engine identification number is located on the
left rear of the cylinder block behind starter (Fig. 1).
Fig. 1 Engine Identification SOHC
NS/GSENGINE 9 - 1