Page 17 of 44
38-17
30 -
Solenoid valve 2 -N89-
Without O-ringRemove and install oil pan to replace
page 38
-19
31 -
Bolt - 6 Nm
32 -
Bracket
For solenoid valves
33 -
Solenoid Valve 6 -N93- With O-ringRemove and install oil pan to replace
page 38
-19
34 -
Solenoid Valve 7 -N94-
With O-ringRemove and install oil pan to replace
page 38
-19
35 -
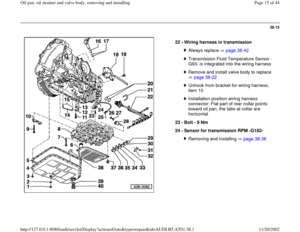
Solenoid valve 5 -N92-
With O-ringRemove and install oil pan to replace
page 38
-19
Pa
ge 17 of 44 Oil
pan, oil strainer and valve bod
y, removin
g and installin
g
11/20/2002 htt
p://127.0.0.1:8080/audi/servlet/Dis
play?action=Goto&t
yp
e=re
pair&id=AUDI.B5.AT01.38.1
Page 18 of 44
38-18
36 -
Solenoid valve 1 -N88-
Without O-ringRemove and install oil pan to replace
page 38
-19
and unbolt guide plate for park
locking mechanism
When installing, do not tighten bolts for
guide plate (23 Nm) in selector lever
position "P".
37 -
Bolt - 6 Nm
38 -
Magnet 4 pieces in the oil pan recesses
39 -
O-ring Always replace
40 -
ATF check plug - 80 Nm 17 mm socket-head bolt
Pa
ge 18 of 44 Oil
pan, oil strainer and valve bod
y, removin
g and installin
g
11/20/2002 htt
p://127.0.0.1:8080/audi/servlet/Dis
play?action=Goto&t
yp
e=re
pair&id=AUDI.B5.AT01.38.1
Page 19 of 44
38-19
Oil pan, removing and installing
Special tools and equipment
Removing
VAG1306 drip tray
- Remove noise insulation panel (arrows).
- Place VAG1306 drip tray under transmission.
Pa
ge 19 of 44 Oil
pan, oil strainer and valve bod
y, removin
g and installin
g
11/20/2002 htt
p://127.0.0.1:8080/audi/servlet/Dis
play?action=Goto&t
yp
e=re
pair&id=AUDI.B5.AT01.38.1
Page 20 of 44
38-20
Installing
Installation is reverse of removal, noting the following:
Note:
Drain plug and oil seal must both be replaced.
Tightening torques - Remove ATF drain plug -1- and drain ATF.
- Loosen bolts of oil pan in diagonal sequence.
- Clean all 4 magnets in oil pan recesses. Ensure full surface contact of
the magnets on the oil pan.
- Replace gaskets.
- Fill up ATF page 37
-140
.
Component
Nm
Drain plug to oil pan 40
Oil pan to transmission housing
(diagonally in sequence)
10
Pa
ge 20 of 44 Oil
pan, oil strainer and valve bod
y, removin
g and installin
g
11/20/2002 htt
p://127.0.0.1:8080/audi/servlet/Dis
play?action=Goto&t
yp
e=re
pair&id=AUDI.B5.AT01.38.1
Page 21 of 44
38-21
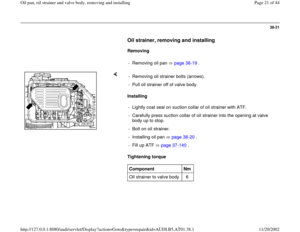
Oil strainer, removing and installing
Removing
- Removing oil pan page 38
-19
.
Installing
Tightening torque - Removing oil strainer bolts (arrows).
- Pull oil strainer off of valve body.
- Lightly coat seal on suction collar of oil strainer with ATF.
- Carefully press suction collar of oil strainer into the opening at valve
body up to stop.
- Bolt on oil strainer.
- Installing oil pan page 38
-20
.
- Fill up ATF page 37
-140
.
Component
Nm
Oil strainer to valve body 6
Pa
ge 21 of 44 Oil
pan, oil strainer and valve bod
y, removin
g and installin
g
11/20/2002 htt
p://127.0.0.1:8080/audi/servlet/Dis
play?action=Goto&t
yp
e=re
pair&id=AUDI.B5.AT01.38.1
Page 22 of 44
38-22
Valve body, removing and installing
Notes:
Always replace a soiled or faulty valve body.
General repair notes page 00
-27
.
Rules of cleanliness for working on automatic
transmissions page 37
-148
.
Removing
- Removing oil pan page 38
-19
.
- Removing oil strainer page 38
-21
.
- Disconnect clip for wiring harness connectors (arrow).
Pa
ge 22 of 44 Oil
pan, oil strainer and valve bod
y, removin
g and installin
g
11/20/2002 htt
p://127.0.0.1:8080/audi/servlet/Dis
play?action=Goto&t
yp
e=re
pair&id=AUDI.B5.AT01.38.1
Page 23 of 44
38-23
Only for Park/Neutral Position (PNP) Switch -
E17-
- Disconnect harness connector from Transmission Vehicle Speed
Sensor (VSS) -G38- (arrow).
Notes: - Loosen mounting bolts (arrows) of valve body and remove valve body
with wiring harness.
Only the marked mounting bolts (arrows) must be loosened.When loosening other bolts, the function of the valve body can be
influenced or the valve body splits up. The bolt (arrow) A is shorter and thinner than the other bolts. Observe
allocation.
Pa
ge 23 of 44 Oil
pan, oil strainer and valve bod
y, removin
g and installin
g
11/20/2002 htt
p://127.0.0.1:8080/audi/servlet/Dis
play?action=Goto&t
yp
e=re
pair&id=AUDI.B5.AT01.38.1
Page 24 of 44
38-24
Only for transmission with hydraulic control
E18/2
- Disconnect harness connector from Transmission Vehicle Speed
Sensor (VSS) -G38- (-A-).
- Disconnect harness connector from Sensor for transmission RPM -
G182- (-B-).
Notes: - Loosen mounting bolts (arrows) of valve body and remove valve body
with wiring harness.
Only the marked mounting bolts (arrows) must be loosened.When loosening other bolts, the function of the valve body can be
influenced or the valve body splits up. The bolt (arrow A) is not installed on transmissions with hydraulic
control E18/2 and can therefore be disregarded.
Pa
ge 24 of 44 Oil
pan, oil strainer and valve bod
y, removin
g and installin
g
11/20/2002 htt
p://127.0.0.1:8080/audi/servlet/Dis
play?action=Goto&t
yp
e=re
pair&id=AUDI.B5.AT01.38.1


.
- Place VAG1306 drip tray under t")

.
- Pull o")

 Switch -
E17-
- Disconnect harness connector from Transmission Vehicle Speed
Sensor (VSS) -G38- (arrow).
Notes: - Loosen mounting bolt")
 -G38- (-A-).
- Disconnect harness connector from")