Page 9 of 32

13-11
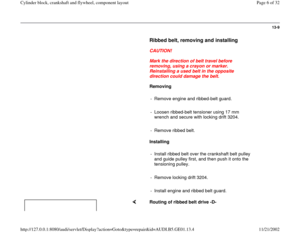
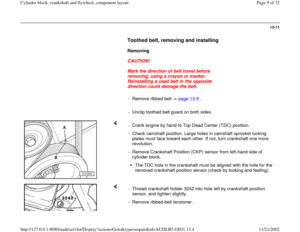
Toothed belt, removing and installing
Removing
CAUTION!
Mark the direction of belt travel before
removing, using a crayon or marker.
Reinstalling a used belt in the opposite
direction could damage the belt.
- Remove ribbed belt page 13
-9 .
- Unclip toothed belt guard on both sides.
- Crank engine by hand to Top Dead Center (TDC) position.
- Check camshaft position. Large holes in camshaft sprocket locking
plates must face toward each other. If not, turn crankshaft one more
revolution.
- Remove Crankshaft Position (CKP) sensor from left-hand side of
cylinder block.
The TDC hole in the crankshaft must be aligned with the hole for the
removed crankshaft position sensor (check by looking and feeling).
- Thread crankshaft holder 3242 into hole left by crankshaft position
sensor, and tighten slightly.
- Remove ribbed-belt tensioner.
Pa
ge 9 of 32 C
ylinder block, crankshaft and fl
ywheel, com
ponent la
yout
11/21/2002 htt
p://127.0.0.1:8080/audi/servlet/Dis
play?action=Goto&t
yp
e=re
pair&id=AUDI.B5.GE01.13.4
Page 10 of 32
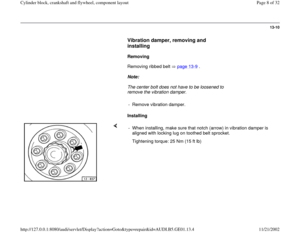
13-12
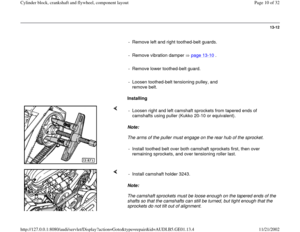
- Remove left and right toothed-belt guards.
- Remove vibration damper page 13
-10
.
- Remove lower toothed-belt guard.
- Loosen toothed-belt tensioning pulley, and
remove belt.
Installing
Note:
The arms of the puller must engage on the rear hub of the sprocket. - Loosen right and left camshaft sprockets from tapered ends of
camshafts using puller (Kukko 20-10 or equivalent).
- Install toothed belt over both camshaft sprockets first, then over
remaining sprockets, and over tensioning roller last.
Note:
The camshaft sprockets must be loose enough on the tapered ends of the
shafts so that the camshafts can still be turned, but tight enough that the
sprockets do not tilt out of alignment. - Install camshaft holder 3243.
Pa
ge 10 of 32 C
ylinder block, crankshaft and fl
ywheel, com
ponent la
yout
11/21/2002 htt
p://127.0.0.1:8080/audi/servlet/Dis
play?action=Goto&t
yp
e=re
pair&id=AUDI.B5.GE01.13.4
Page 11 of 32
- Adjust belt tension page 13
-13
.
Pa
ge 11 of 32 C
ylinder block, crankshaft and fl
ywheel, com
ponent la
yout
11/21/2002 htt
p://127.0.0.1:8080/audi/servlet/Dis
play?action=Goto&t
yp
e=re
pair&id=AUDI.B5.GE01.13.4
Page 12 of 32

13-13
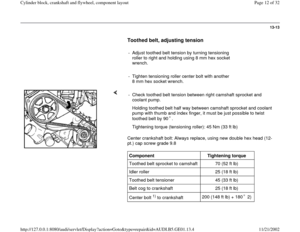
Toothed belt, adjusting tension
- Adjust toothed belt tension by turning tensioning
roller to right and holding using 8 mm hex socket
wrench.
- Tighten tensioning roller center bolt with another
8 mm hex socket wrench.
Center crankshaft bolt: Always replace, using new double hex head (12-
pt.) cap screw grade 9.8 - Check toothed belt tension between right camshaft sprocket and
coolant pump.
Holding toothed belt half way between camshaft sprocket and coolant
pump with thumb and index finger, it must be just possible to twist
toothed belt by 90 . Tightening torque (tensioning roller): 45 Nm (33 ft lb)Component
Tightening torque
Toothed belt sprocket to camshaft 70 (52 ft lb)
Idler roller 25 (18 ft lb)
Toothed belt tensioner 45 (33 ft lb)
Belt cog to crankshaft 25 (18 ft lb)
Center bolt
1) to crankshaft
200 (148 ft lb) + 180 2)
Pa
ge 12 of 32 C
ylinder block, crankshaft and fl
ywheel, com
ponent la
yout
11/21/2002 htt
p://127.0.0.1:8080/audi/servlet/Dis
play?action=Goto&t
yp
e=re
pair&id=AUDI.B5.GE01.13.4
Page 13 of 32
1) Always replace the center bolt. 2) Two turns of 90 are permissible.
Pa
ge 13 of 32 C
ylinder block, crankshaft and fl
ywheel, com
ponent la
yout
11/21/2002 htt
p://127.0.0.1:8080/audi/servlet/Dis
play?action=Goto&t
yp
e=re
pair&id=AUDI.B5.GE01.13.4
Page 14 of 32
13-14
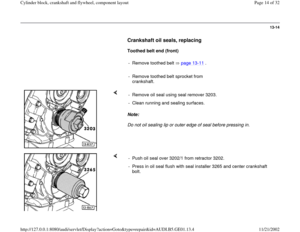
Crankshaft oil seals, replacing
Toothed belt end (front)
- Remove toothed belt page 13
-11
.
- Remove toothed belt sprocket from
crankshaft.
Note:
Do not oil sealing lip or outer edge of seal before pressing in. - Remove oil seal using seal remover 3203.
- Clean running and sealing surfaces.
- Push oil seal over 3202/1 from retractor 3202.
- Press in oil seal flush with seal installer 3265 and center crankshaft
bolt.
Pa
ge 14 of 32 C
ylinder block, crankshaft and fl
ywheel, com
ponent la
yout
11/21/2002 htt
p://127.0.0.1:8080/audi/servlet/Dis
play?action=Goto&t
yp
e=re
pair&id=AUDI.B5.GE01.13.4
Page 15 of 32
13-15
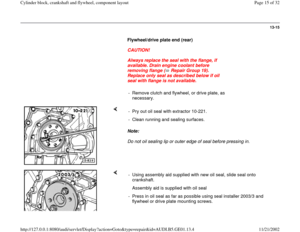
Flywheel/drive plate end (rear)
CAUTION!
Always replace the seal with the flange, if
available. Drain engine coolant before
removing flange ( Repair Group 19).
Replace only seal as described below if oil
seal with flange is not available.
- Remove clutch and flywheel, or drive plate, as
necessary.
Note:
Do not oil sealing lip or outer edge of seal before pressing in. - Pry out oil seal with extractor 10-221.
- Clean running and sealing surfaces.
- Using assembly aid supplied with new oil seal, slide seal onto
crankshaft.
Assembly aid is supplied with oil seal
- Press in oil seal as far as possible using seal installer 2003/3 and
flywheel or drive plate mounting screws.
Pa
ge 15 of 32 C
ylinder block, crankshaft and fl
ywheel, com
ponent la
yout
11/21/2002 htt
p://127.0.0.1:8080/audi/servlet/Dis
play?action=Goto&t
yp
e=re
pair&id=AUDI.B5.GE01.13.4
Page 16 of 32
13-16
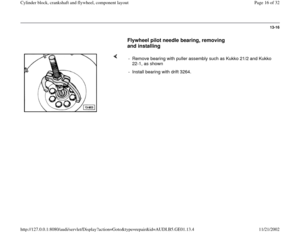
Flywheel pilot needle bearing, removing
and installing
- Remove bearing with puller assembly such as Kukko 21/2 and Kukko
22-1, as shown
- Install bearing with drift 3264.
Pa
ge 16 of 32 C
ylinder block, crankshaft and fl
ywheel, com
ponent la
yout
11/21/2002 htt
p://127.0.0.1:8080/audi/servlet/Dis
play?action=Goto&t
yp
e=re
pair&id=AUDI.B5.GE01.13.4


 Always replace the center bolt. 2) Two turns of 90 are permissible.
Pa
ge 13 of 32 C
ylinder block, crankshaft and fl
ywheel, com
ponent la
yout
11/21/2002 htt
p://127.0.0.1:8080/audi/servlet/D")

- Remove toothed belt page 13
-11
.
- Remove toothed belt sprocket from
crankshaft.
Note:
Do n")

CAUTION!
Always replace the seal with the flange, if
available. Drain engine coolant before
removing flange ( Repair Group 19).
Replace")
