1996 ACURA RL KA9 buttons
[x] Cancel search: buttonsPage 1844 of 1954
Troubleshooting - '9 6 - 9 8 Model s
DTC 4- 5
CAUTION : Wheneve r th e ignitio n switc h is O N (II) , o r ha s
bee n turne d OF F fo r les s tha n 3 minutes , b e carefu l no t
to bum p th e SR S unit ; th e airbag s coul d accidentall y
deploy an d caus e damag e o r injuries .
NOTE: Th e PC M memor y mus t b e rese t afte r reconnec -
ting th e batter y (se e pag e 11-125 ).
Tr y t o reproduc e th e SR S indicato r light :
1 . Eras e th e DT C memor y (se e pag e 24-37 ).
2 . Tur n th e ignitio n switc h O N (II) , an d chec k tha t th e SR S
indicato r ligh t come s o n fo r abou t 6 second s an d the n
goe s off .
Intermitten t failure , syste m is O K a t thi s time . Se eTroubleshootin g Intermitten t Failure s o n pag e 24-37 .
Chec k fo r a shor t t o groun d i n th e passenger' s sea t bel t
tensioner :1. Tur n th e ignitio n switc h OFF . Mak e sur e yo u hav e th e
anti-thef t cod e fo r th e radio , the n writ e dow n th e fre -
quencie s fo r th e radio' s prese t buttons .
2 . Disconnec t th e batter y negativ e cable , the n disconnec t
th e positiv e cable , an d wai t fo r 3 minutes .
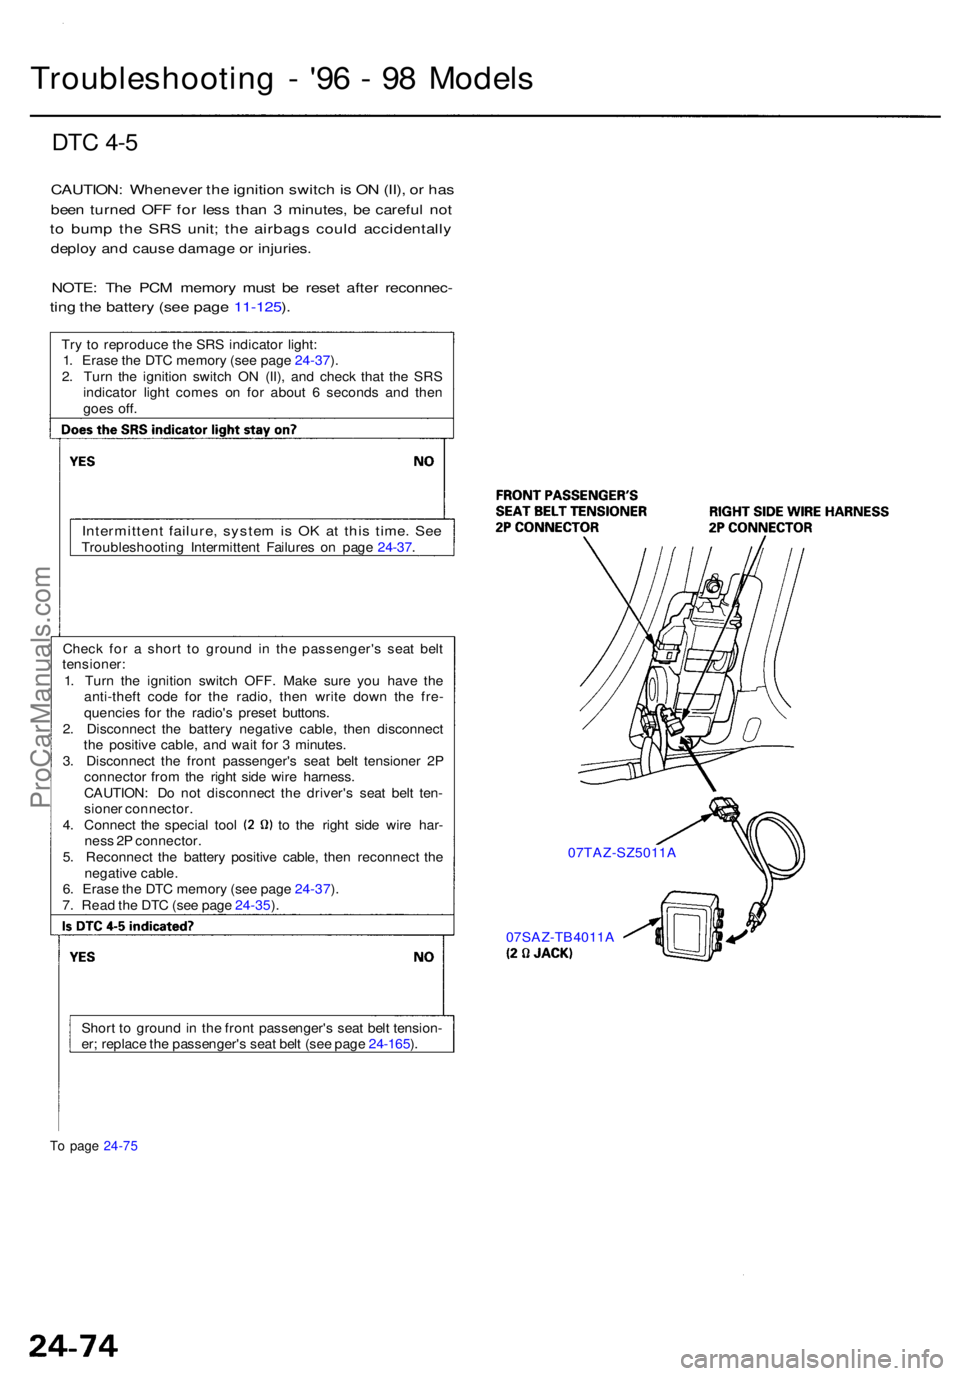
3 . Disconnec t th e fron t passenger' s sea t bel t tensione r 2 P
connecto r fro m th e righ t sid e wir e harness .
CAUTION : D o no t disconnec t th e driver' s sea t bel t ten -
sione r connector .
4. Connec t th e specia l too l t o th e righ t sid e wir e har -
nes s 2 P connector .
5 . Reconnec t th e batter y positiv e cable , the n reconnec t th e
negativ e cable .
6 . Eras e th e DT C memor y (se e pag e 24-37 ).
7 . Rea d th e DT C (se e pag e 24-35 ).
07SAZ-TB4011A
07TAZ-SZ5011
A
To pag e 24-7 5
Shor t t o groun d in th e fron t passenger' s sea t bel t tension -
er ; replac e th e passenger' s sea t bel t (se e pag e 24-165 ).
ProCarManuals.com
Page 1846 of 1954
DTC 9- 1 o r N o Cod e
CAUTION : Wheneve r th e ignitio n switc h is O N (II) , o r ha s
bee n turne d OF F fo r les s tha n 3 minutes , b e carefu l no t
to bum p th e SR S unit ; th e airbag s coul d accidentall y
deploy an d caus e damag e o r injuries .
NOTE: Th e PC M memor y mus t b e rese t afte r reconnect -
ing th e batter y (se e pag e 11-125 ).
Troubleshootin g - '9 6 - 9 8 Model s
Try t o reproduc e th e SR S indicato r light :
1 . Eras e th e DT C memor y (se e pag e 24-37 ).
2 . Tur n th e ignitio n switc h O N (II) , an d chec k tha t th e SR S
indicato r ligh t come s o n fo r abou t 6 second s an d the n
goe s off .
Intermitten t failure , syste m is O K a t thi s time . Se eTroubleshootin g Intermitten t Failure s o n pag e 24-37 .
Chec k th e SR S uni t (1) :
1 . Tur n th e ignitio n switc h OFF .
2. Rea d th e DT C (se e pag e 24-35 ).
T o pag e 24-7 7
Chec k th e SR S uni t (2) :
1 . Mak e sur e yo u hav e th e anti-thef t cod e fo r th e radio ,
the n writ e dow n th e frequencie s fo r th e radio' s prese t
buttons .
2 . Disconnec t th e batter y negativ e cable , the n disconnec t
th e positiv e cable , an d wai t fo r 3 minutes .
3 . Disconnec t th e driver' s an d fron t passenger' s airba g con -
nectors , the n disconnec t th e driver' s an d fron t passen -
ger' s sea t bel t tensione r connector s (se e pag e 24-33 ).
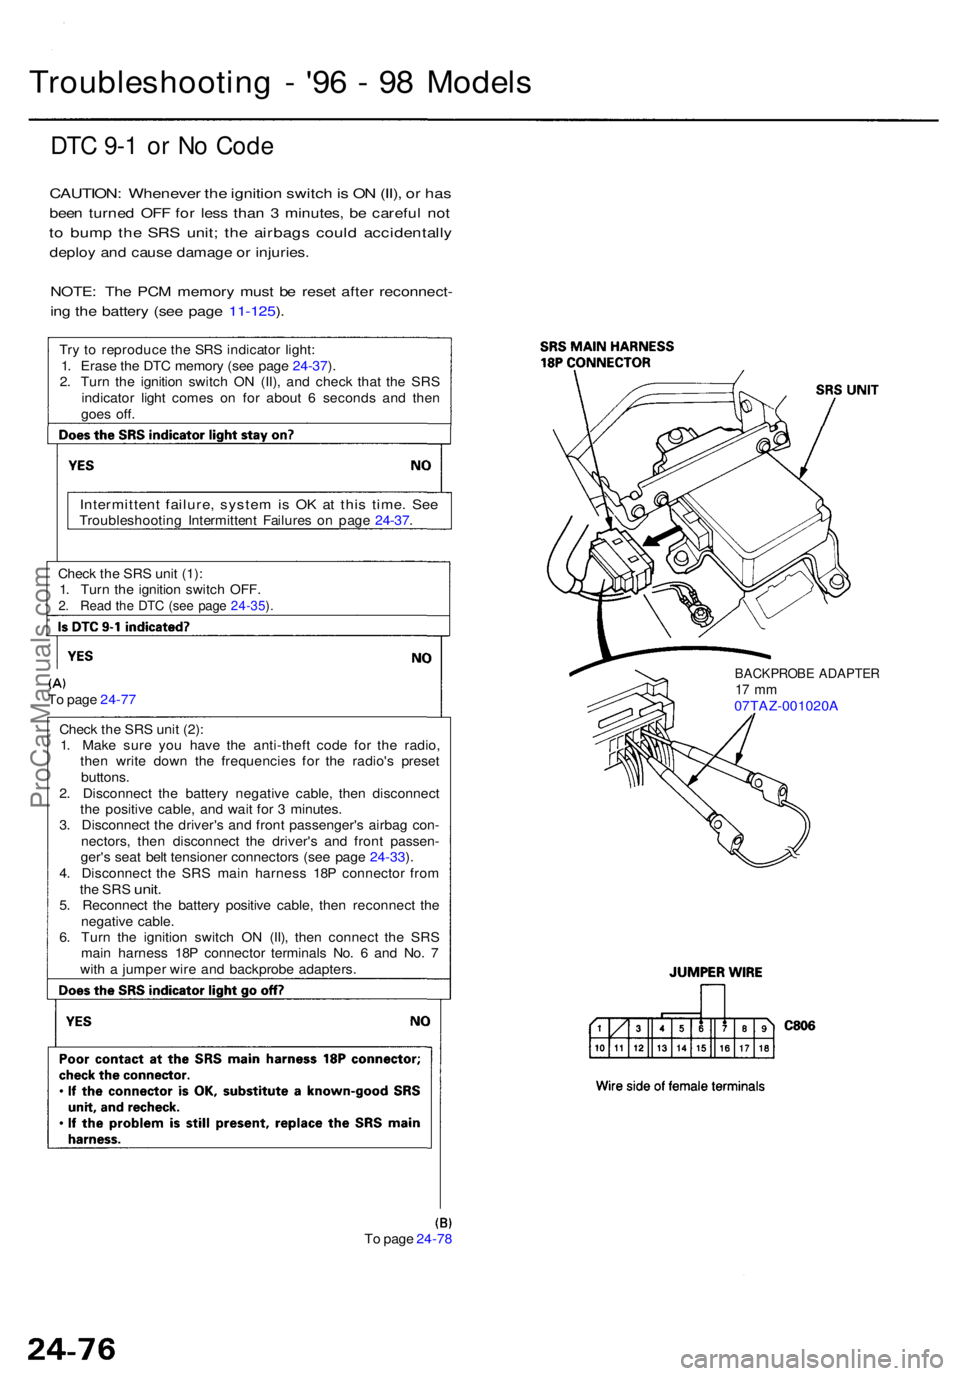
4 . Disconnec t th e SR S mai n harnes s 18 P connecto r fro m
the SR S unit .5. Reconnec t th e batter y positiv e cable , the n reconnec t th e
negativ e cable .
6 . Tur n th e ignitio n switc h O N (II) , the n connec t th e SR S
mai n harnes s 18 P connecto r terminal s No . 6 an d No . 7
wit h a jumpe r wir e an d backprob e adapters .
To pag e 24-7 8
BACKPROB E ADAPTE R17 m m07TAZ-001020 A
ProCarManuals.com
Page 1847 of 1954
From pag e 24-7 6(A)
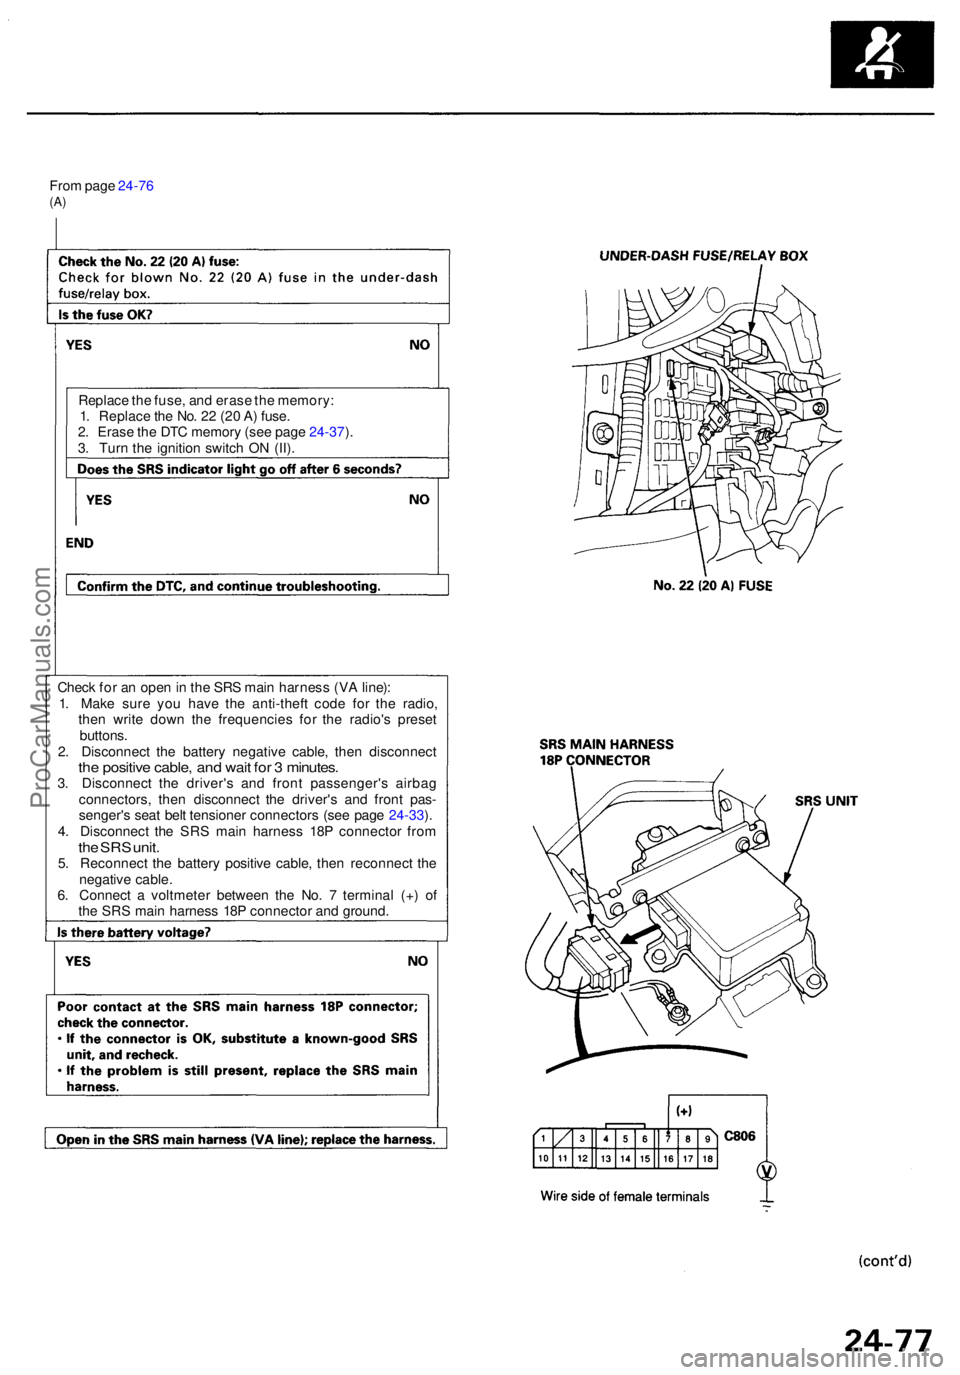
Replac e th e fuse , an d eras e th e memory :
1 . Replac e th e No . 2 2 (2 0 A ) fuse .
2 . Eras e th e DT C memor y (se e pag e 24-37 ).
3 . Tur n th e ignitio n switc h O N (II) .
Chec k fo r a n ope n in th e SR S mai n harnes s (V A line) :
1 . Mak e sur e yo u hav e th e anti-thef t cod e fo r th e radio ,
the n writ e dow n th e frequencie s fo r th e radio' s prese t
buttons .
2 . Disconnec t th e batter y negativ e cable , the n disconnec t
the positiv e cable , an d wai t fo r 3 minutes .3. Disconnec t th e driver' s an d fron t passenger' s airba g
connectors , the n disconnec t th e driver' s an d fron t pas -
senger' s sea t bel t tensione r connector s (se e pag e 24-33 ).
4 . Disconnec t th e SR S mai n harnes s 18 P connecto r fro m
the SR S unit .5. Reconnec t th e batter y positiv e cable , the n reconnec t th e
negativ e cable .
6 . Connec t a voltmete r betwee n th e No . 7 termina l (+ ) o f
th e SR S mai n harnes s 18 P connecto r an d ground .
ProCarManuals.com
Page 1870 of 1954
From pag e 24-9 8 (C )
Check th e wir e harnes s o f th e SR S indicato r circui t (3) :
1 . Tur n th e ignitio n switc h OFF . Mak e sur e yo u hav e th e
antithef t cod e fo r th e radio , the n writ e dow n th e frequen -
cie s fo r th e radio' s prese t buttons .
2 . Disconnec t th e batter y negativ e cable , the n th e positiv e
cable , an d wai t 3 minutes .
3 . Disconnec t th e driver' s an d fron t passenger' s airba g con -
nector s (se e pag e 24-33 ).
4 . Disconnec t th e SR S mai n harnes s 18 P connecto r fro m
the SR S unit .5. Reconnec t th e batter y positiv e cable , the n reconnec t th e
negativ e cable .
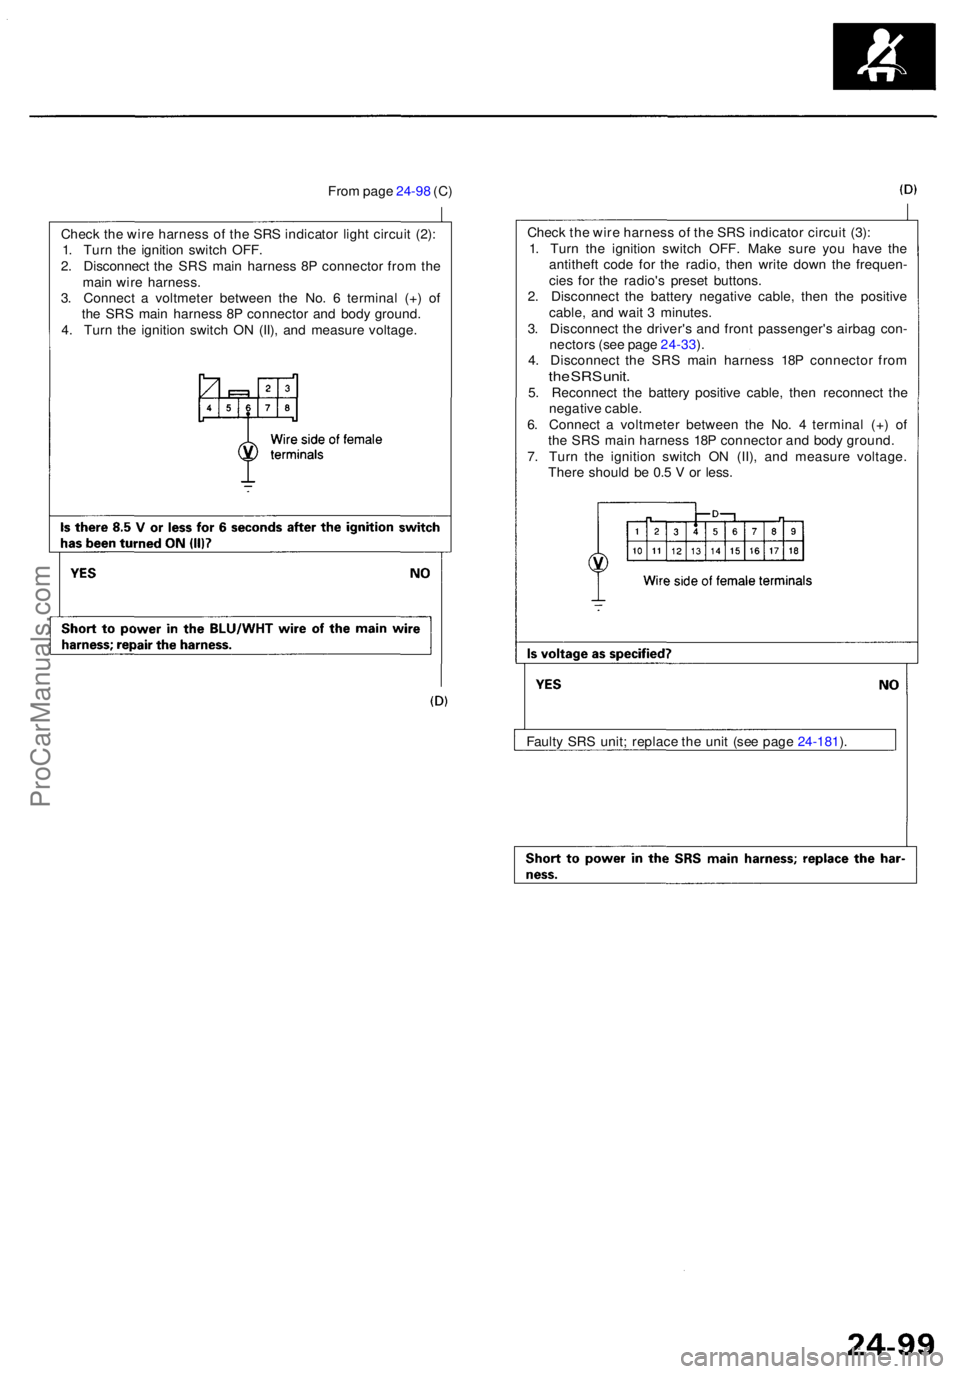
6 . Connec t a voltmete r betwee n th e No . 4 termina l (+ ) o f
th e SR S mai n harnes s 18 P connecto r an d bod y ground .
7 . Tur n th e ignitio n switc h O N (II) , an d measur e voltage .
Ther e shoul d b e 0. 5 V or less .
Fault y SR S unit ; replac e th e uni t (se e pag e 24-181 ).
Chec
k th e wir e harnes s o f th e SR S indicato r ligh t circui t (2) :
1 . Tur n th e ignitio n switc h OFF .
2 . Disconnec t th e SR S mai n harnes s 8 P connecto r fro m th e
mai n wir e harness .
3 . Connec t a voltmete r betwee n th e No . 6 termina l (+ ) o f
th e SR S mai n harnes s 8 P connecto r an d bod y ground .
4 . Tur n th e ignitio n switc h O N (II) , an d measur e voltage .
ProCarManuals.com
Page 1931 of 1954
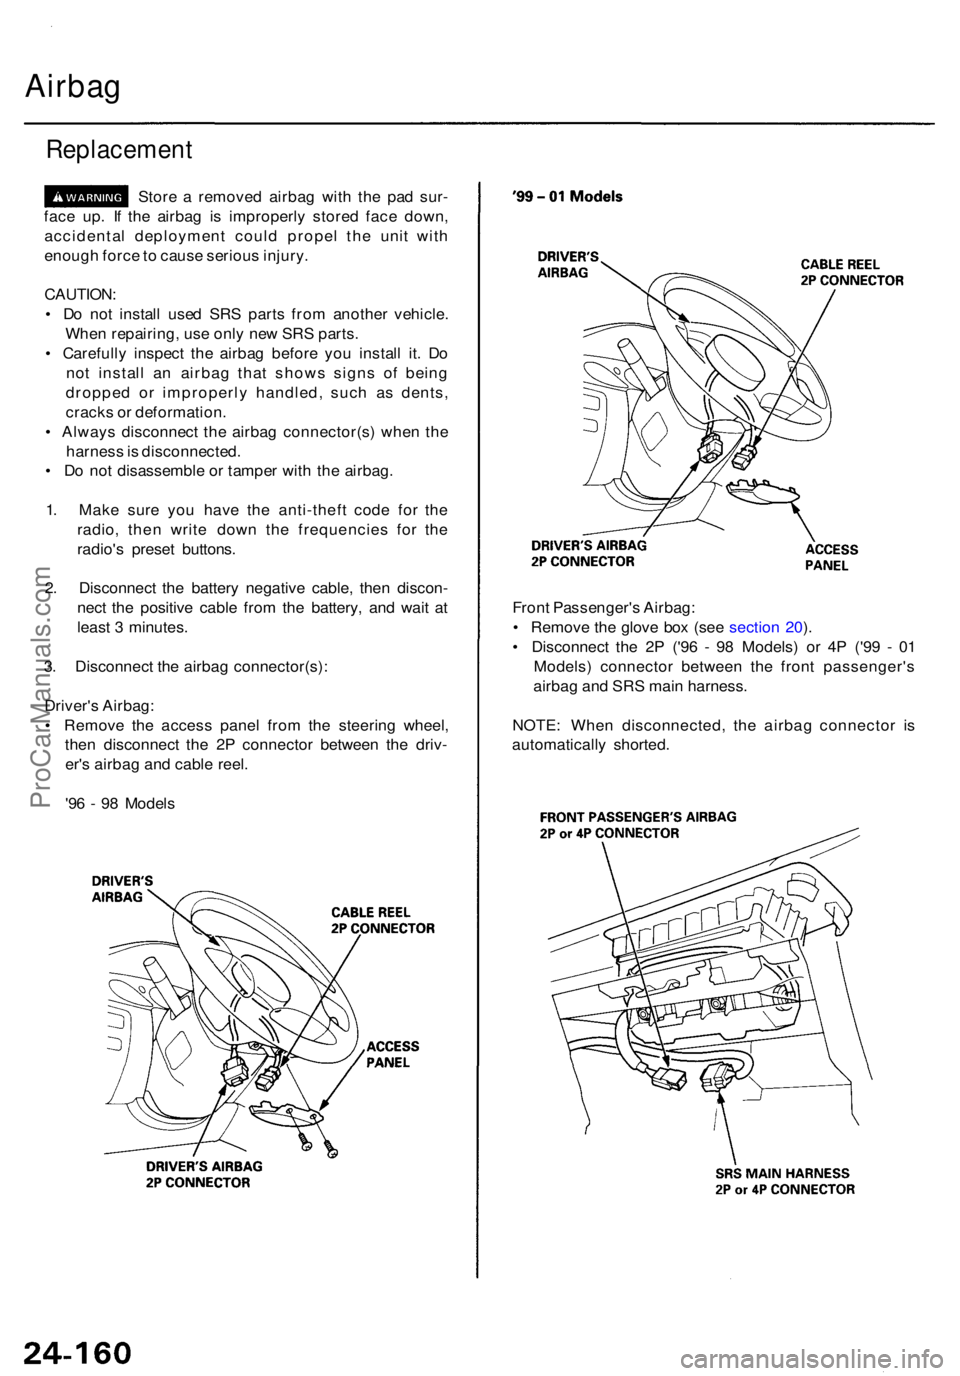
Airbag
Replacemen t
Store a remove d airba g wit h th e pa d sur -
fac e up . I f th e airba g i s improperl y store d fac e down ,
accidenta l deploymen t coul d prope l th e uni t wit h
enoug h forc e to caus e seriou s injury .
CAUTION :
• D o no t instal l use d SR S part s fro m anothe r vehicle .
Whe n repairing , us e onl y ne w SR S parts .
• Carefull y inspec t th e airba g befor e yo u instal l it . D o
no t instal l a n airba g tha t show s sign s o f bein g
droppe d o r improperl y handled , suc h a s dents ,
crack s o r deformation .
• Alway s disconnec t th e airba g connector(s ) whe n th e
harnes s is disconnected .
• D o no t disassembl e o r tampe r wit h th e airbag .
1 . Mak e sur e yo u hav e th e anti-thef t cod e fo r th e
radio , the n writ e dow n th e frequencie s fo r th e
radio' s prese t buttons .
2 . Disconnec t th e batter y negativ e cable , the n discon -
nec t th e positiv e cabl e fro m th e battery , an d wai t a t
leas t 3 minutes .
3 . Disconnec t th e airba g connector(s) :
Driver' s Airbag :
• Remov e th e acces s pane l fro m th e steerin g wheel ,
the n disconnec t th e 2 P connecto r betwee n th e driv -
er' s airba g an d cabl e reel .
'9 6 - 9 8 Model s Fron
t Passenger' s Airbag :
• Remov e th e glov e bo x (se e sectio n 20 ).
• Disconnec t th e 2 P ('9 6 - 9 8 Models ) o r 4 P ('9 9 - 0 1
Models ) connecto r betwee n th e fron t passenger' s
airba g an d SR S mai n harness .
NOTE : Whe n disconnected , th e airba g connecto r i s
automaticall y shorted .
ProCarManuals.com
Page 1935 of 1954
Side Airba g
Replacemen t
Store a remove d airba g wit h th e pa d sur -
face u p an d remove d sid e airba g wit h th e cautio n labe l
surfac e up . I f th e sid e airba g i s improperl y store d fac e
down , accidenta l deploymen t coul d prope l th e uni t wit h
enoug h forc e to caus e seriou s injury .
CAUTION :
• D o no t instal l use d SR S part s fro m anothe r vehicle .
Whe n repairing , us e onl y ne w SR S parts .
• Carefull y inspec t th e sid e airba g befor e yo u instal l it .
D o no t instal l a sid e airba g tha t show s sign s o f bein g
droppe d o r improperl y handled , suc h a s dents ,
crack s o r deformation .
• Alway s disconnec t th e sid e airba g connector(s )
whe n th e harnes s is disconnected .
• D o no t disassembl e o r tampe r wit h th e sid e airbag .
1 . Mak e sur e yo u hav e th e anti-thef t cod e fo r th e
radio , the n writ e dow n th e frequencie s fo r th e
radio' s prese t buttons .
2 . Disconnec t th e batter y negativ e cable , the n discon -
nec t th e positiv e cabl e fro m th e battery , an d wai t a t
leas t 3 minutes .
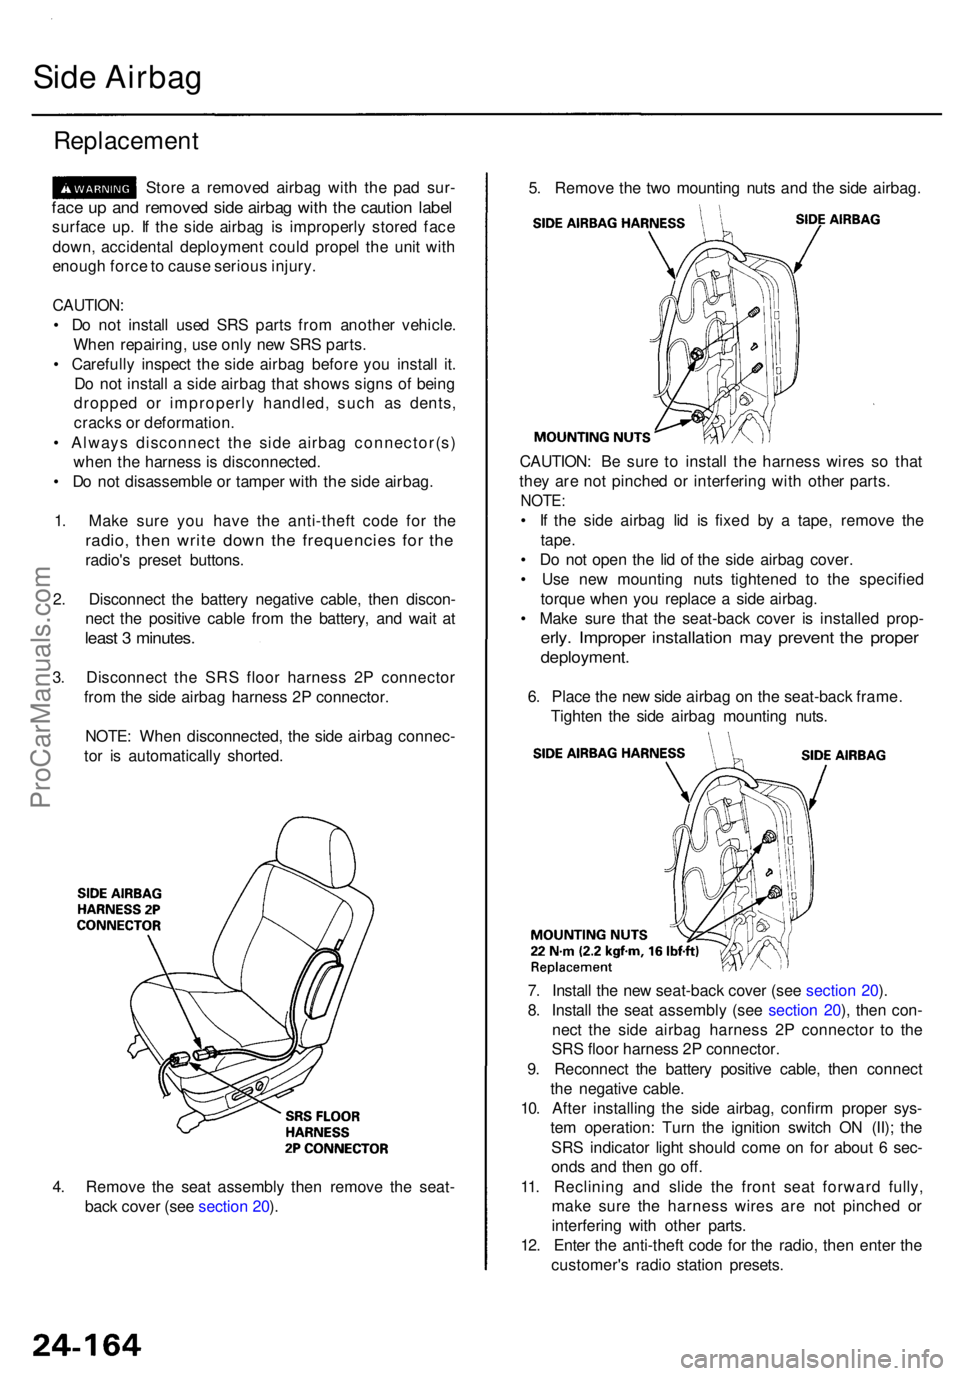
3. Disconnec t th e SR S floo r harnes s 2 P connecto r
fro m th e sid e airba g harnes s 2 P connector .
NOTE : Whe n disconnected , th e sid e airba g connec -
to r i s automaticall y shorted .
4 . Remov e th e sea t assembl y the n remov e th e seat -
bac k cove r (se e sectio n 20 ). 7
. Instal l th e ne w seat-bac k cove r (se e sectio n 20 ).
8 . Instal l th e sea t assembl y (se e sectio n 20 ), the n con -
nec t th e sid e airba g harnes s 2 P connecto r t o th e
SR S floo r harnes s 2 P connector .
9 . Reconnec t th e batter y positiv e cable , the n connec t
th e negativ e cable .
10 . Afte r installin g th e sid e airbag , confir m prope r sys -
te m operation : Tur n th e ignitio n switc h O N (II) ; th e
SR S indicato r ligh t shoul d com e o n fo r abou t 6 sec -
ond s an d the n g o off .
11 . Reclinin g an d slid e th e fron t sea t forwar d fully ,
mak e sur e th e harnes s wire s ar e no t pinche d o r
interfering with othe r parts .
12 . Ente r th e anti-thef t cod e fo r th e radio , the n ente r th e
customer' s radi o statio n presets .
CAUTION
: B e sur e t o instal l th e harnes s wire s s o tha t
the y ar e no t pinche d o r interferin g wit h othe r parts .
NOTE :
• I f th e sid e airba g li d i s fixe d b y a tape , remov e th e
tape .
• D o no t ope n th e li d o f th e sid e airba g cover .
• Us e ne w mountin g nut s tightene d t o th e specifie d
torqu e whe n yo u replac e a sid e airbag .
• Mak e sur e tha t th e seat-bac k cove r i s installe d prop -
erly. Imprope r installatio n ma y preven t th e prope r
deployment .
6. Plac e th e ne w sid e airba g o n th e seat-back frame.
Tighte n th e sid e airba g mountin g nuts .
5
. Remov e th e tw o mountin g nut s an d th e sid e airbag .
ProCarManuals.com
Page 1936 of 1954
Seat Bel t Tensione r
Replacemen t
CAUTION:
• Alway s disconnec t th e sea t bel t tensione r connec -
tor(s ) whe n th e harnes s is disconnected .
• Carefull y inspec t th e sea t bel t tensione r befor e
installin g it . D o no t instal l a tensione r tha t show s
sign s o f bein g droppe d o r improperl y handled , suc h
a s dents , crack s o r deformation .
• Th e shoulde r harnes s ancho r bol t mus t b e remove d
befor e yo u remov e th e tensioner .
1 . Mak e sur e yo u hav e th e anti-thef t cod e fo r th e radio ,
the n writ e dow n th e frequencie s fo r th e radio' s pre -
set buttons .
2. Disconnec t th e batter y negativ e cable , the n discon -
nec t th e positiv e cabl e fro m th e battery , an d wai t a t
leas t 3 minutes .
3 . Remov e th e lef t an d (or ) righ t B-pilla r tri m panel s
(se e sectio n 20 ).
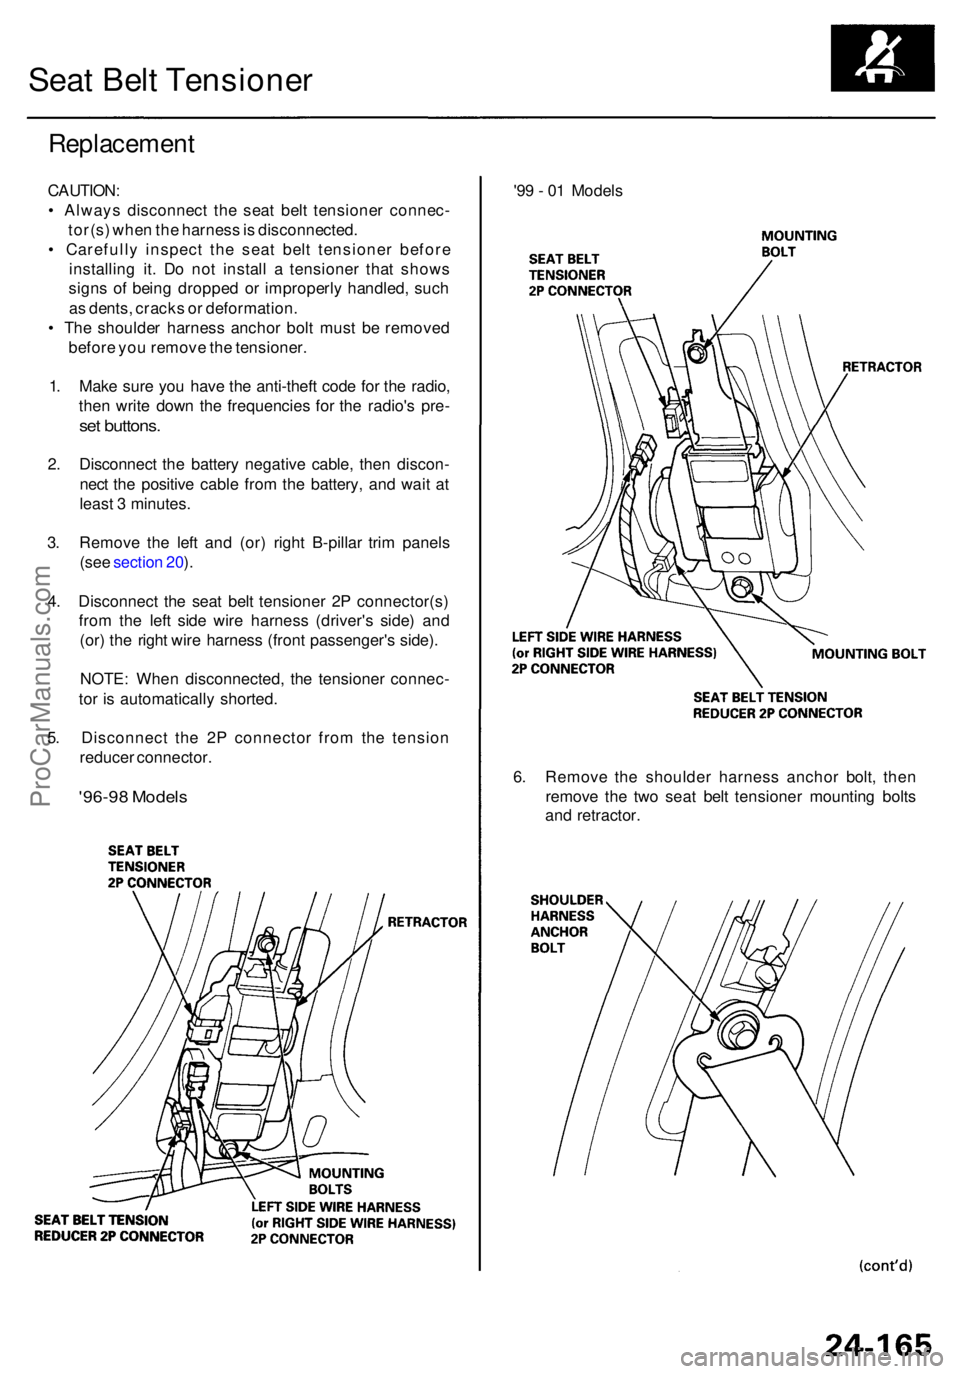
4 . Disconnec t th e sea t bel t tensione r 2 P connector(s )
fro m th e lef t sid e wir e harnes s (driver' s side ) an d
(or ) th e righ t wir e harnes s (fron t passenger' s side) .
NOTE : Whe n disconnected , th e tensione r connec -
to r i s automaticall y shorted .
5 . Disconnec t th e 2 P connecto r fro m th e tensio n
reduce r connector .
'96-98 Model s
'99 - 0 1 Model s
6 . Remov e th e shoulde r harnes s ancho r bolt , the n
remov e th e tw o sea t bel t tensione r mountin g bolt s
an d retractor .
ProCarManuals.com
Page 1947 of 1954
'96-98 Model s
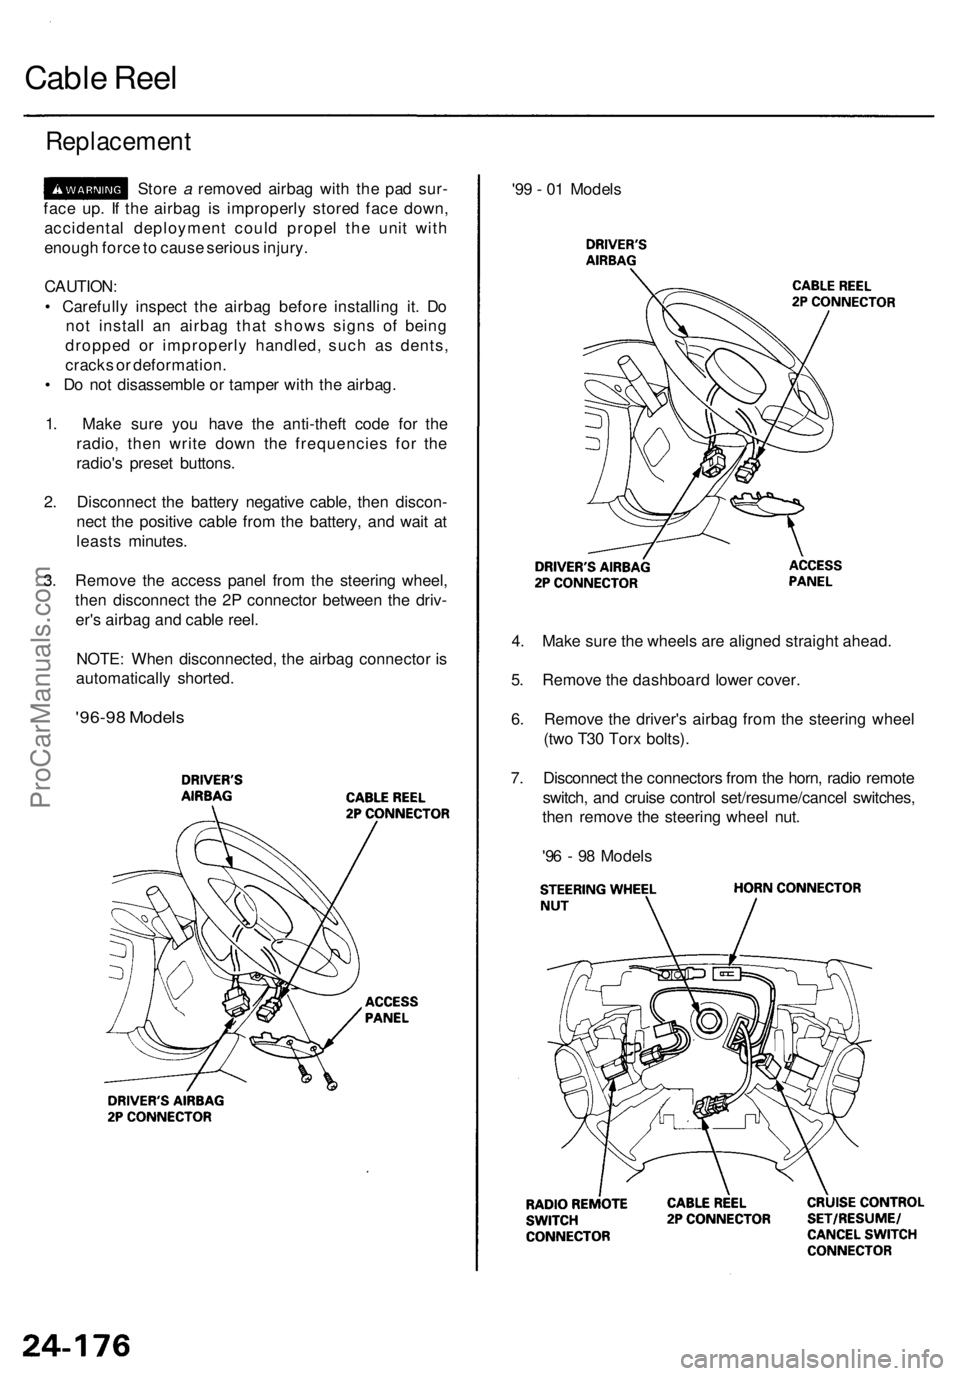
4. Mak e sur e th e wheel s ar e aligne d straigh t ahead .
5 . Remov e th e dashboar d lowe r cover .
6 . Remov e th e driver' s airba g fro m th e steerin g whee l
(tw o T3 0 Tor x bolts) .
7 . Disconnec t th e connector s fro m th e horn , radi o remot e
switch , an d cruis e contro l set/resume/cance l switches ,
the n remov e th e steerin g whee l nut .
'9 6 - 9 8 Model s
Replacemen t
Store a remove d airba g wit h th e pa d sur -
fac e up . I f th e airba g i s improperl y store d fac e down ,
accidenta l deploymen t coul d prope l th e uni t wit h
enoug h forc e to caus e seriou s injury .
CAUTION :
• Carefull y inspec t th e airba g befor e installin g it . D o
no t instal l a n airba g tha t show s sign s o f bein g
droppe d o r improperl y handled , suc h a s dents ,
crack s o r deformation .
• D o no t disassembl e o r tampe r wit h th e airbag .
1 . Mak e sur e yo u hav e th e anti-thef t cod e fo r th e
radio , the n writ e dow n th e frequencie s fo r th e
radio' s prese t buttons .
2 . Disconnec t th e batter y negativ e cable , the n discon -
nec t th e positiv e cabl e fro m th e battery , an d wai t a t
least s minutes .
3 . Remov e th e acces s pane l fro m th e steerin g wheel ,
the n disconnec t th e 2 P connecto r betwee n th e driv -
er' s airba g an d cabl e reel .
NOTE : Whe n disconnected , th e airba g connecto r i s
automaticall y shorted . '9
9 - 0 1 Model s
Cable Ree l
ProCarManuals.com