1996 ACURA RL KA9 sensor
[x] Cancel search: sensorPage 1112 of 1954
Troubleshooting
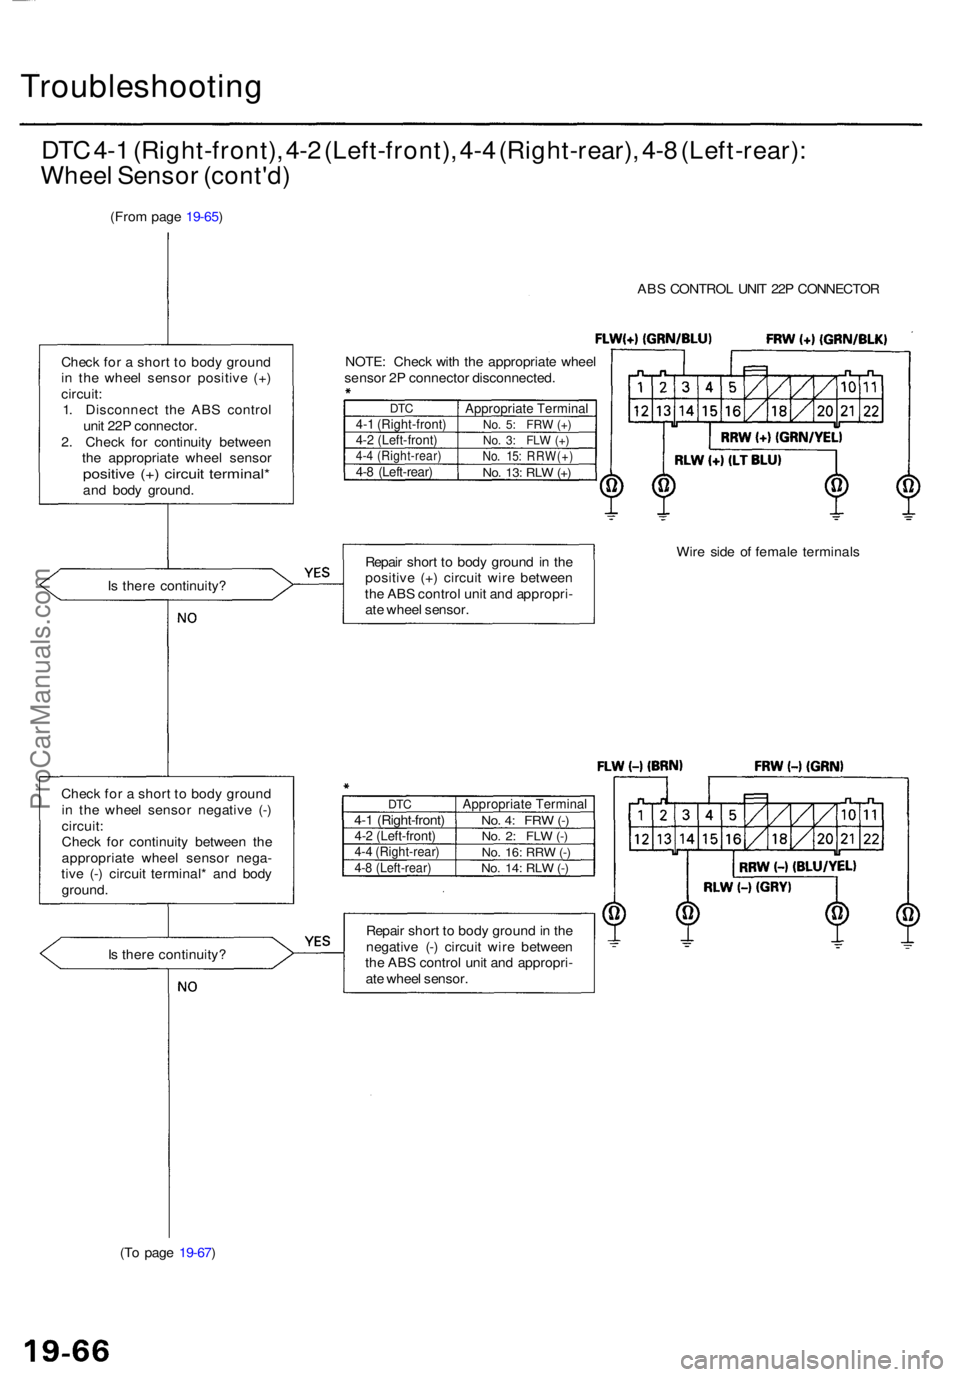
DTC 4- 1 (Right-front) , 4- 2 (Left-front) , 4- 4 (Right-rear) , 4- 8 (Left-rear) :
Whee l Senso r (cont'd )
(From pag e 19-65 )
ABS CONTRO L UNI T 22 P CONNECTO R
Chec k fo r a shor t t o bod y groun d
i n th e whee l senso r positiv e (+ )
circuit :
1 . Disconnec t th e AB S contro l
uni t 22 P connector .
2 . Chec k fo r continuit y betwee n
th e appropriat e whee l senso r
positive (+ ) circui t terminal *and bod y ground . NOTE
: Chec k wit h th e appropriat e whee l
senso r 2 P connecto r disconnected .
DTC4-1 (Right-front )4-2 (Left-front )4-4 (Right-rear )4-8 (Left-rear )
Appropriat e Termina lNo. 5 : FR W (+ )No . 3 : FL W (+ )No . 15 : RRW(+ )No. 13 : RL W (+ )
Is ther e continuity ? Repai
r shor t t o bod y groun d in th e
positiv e (+ ) circui t wir e betwee n
th e AB S contro l uni t an d appropri -
at e whee l sensor . Wir
e sid e o f femal e terminal s
Chec k fo r a shor t t o bod y groun d
i n th e whee l senso r negativ e (- )
circuit :
Chec k fo r continuit y betwee n th e
appropriat e whee l senso r nega -
tiv e (- ) circui t terminal * an d bod y
ground .
DTC4-1 (Right-front )4-2 (Left-front )4-4 (Right-rear )4-8 (Left-rear )
Appropriat e Termina lNo. 4 : FR W (-)No . 2 : FL W (-)No . 16 : RR W (-)No . 14 : RL W (-)
Is ther e continuity ? Repai
r shor t t o bod y groun d in th e
negativ e (- ) circui t wir e betwee n
th e AB S contro l uni t an d appropri -
at e whee l sensor .
(T o pag e 19-67 )
ProCarManuals.com
Page 1113 of 1954
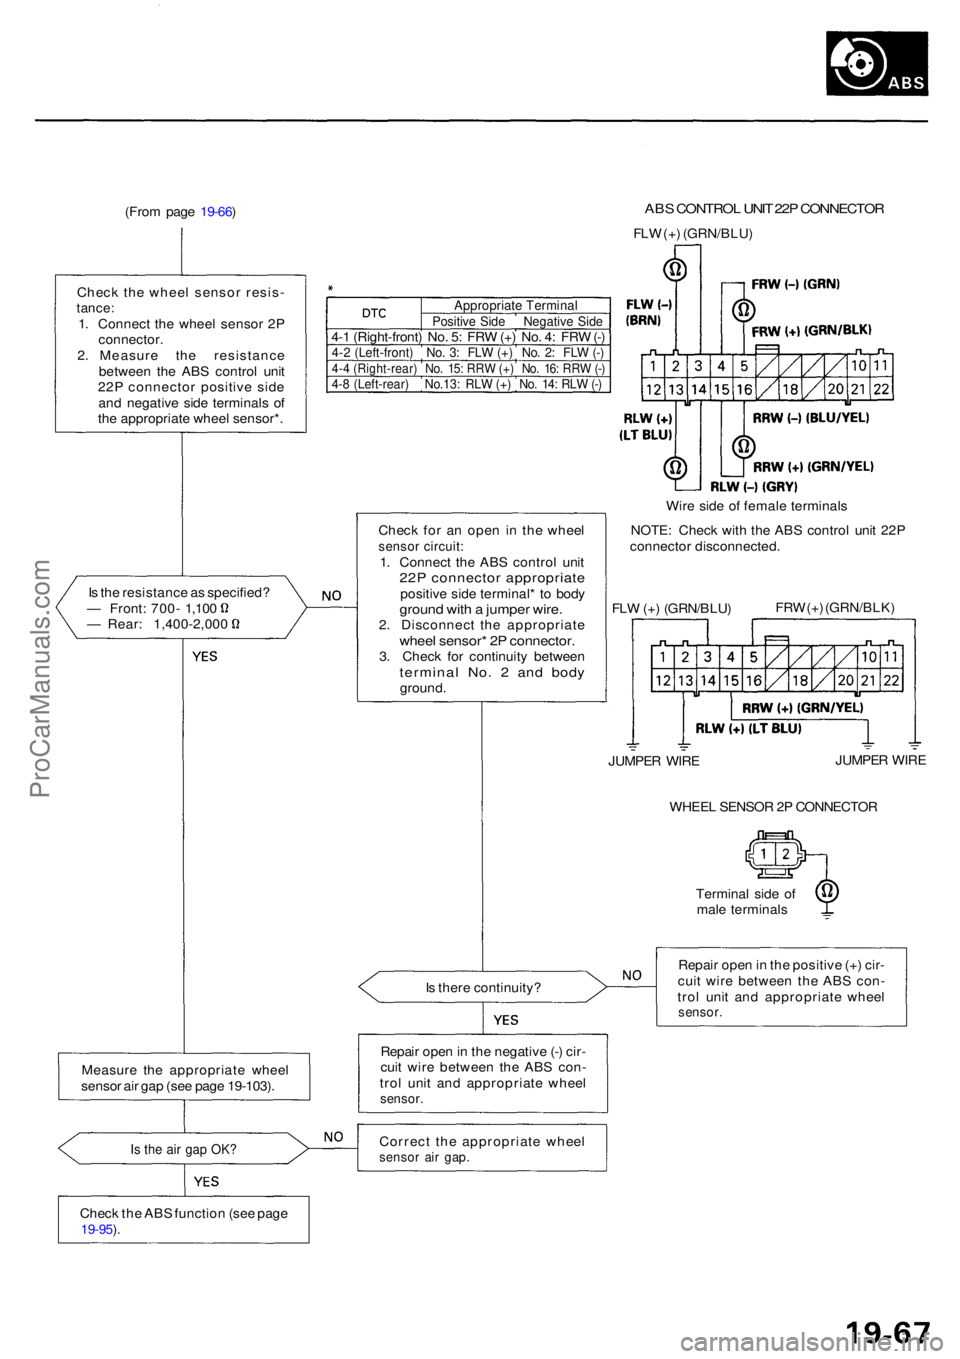
(From pag e 19-66 ) AB S CONTRO L UNI T 22 P CONNECTO R
FLW (+ ) (GRN/BLU )
Chec k th e whee l senso r resis -
tance:1. Connec t th e whee l senso r 2 Pconnector .2. Measur e th e resistanc e
betwee n th e AB S contro l uni t
22 P connecto r positiv e sid e
an d negativ e sid e terminal s o f
th e appropriat e whee l sensor* .
I s th e resistanc e a s specified ?
— Front : 700 - 1,10 0— Rear : 1,400-2,00 0 Chec
k fo r a n ope n i n th e whee l
senso r circuit :1. Connec t th e AB S contro l uni t22P connecto r appropriat epositive sid e terminal * t o bod ygroun d wit h a jumpe r wire .2. Disconnec t th e appropriat ewheel sensor * 2 P connector .3. Chec k fo r continuit y betwee ntermina l No . 2 an d bod yground . Wir
e sid e o f femal e terminal s
NOTE : Chec k wit h th e AB S contro l uni t 22 P
connecto r disconnected .
FL W (+ ) (GRN/BLU )FR
W (+ ) (GRN/BLK )
WHEE L SENSO R 2 P CONNECTO R
Termina l sid e o f
mal e terminal s
I s ther e continuity ? Repai
r ope n in th e positiv e (+ ) cir -
cui t wir e betwee n th e AB S con -
tro l uni t an d appropriat e whee l
sensor .
Repair ope n in th e negativ e (- ) cir -
cui t wir e betwee n th e AB S con -
tro l uni t an d appropriat e whee l
sensor .
Correc t th e appropriat e whee lsensor ai r gap .
Measur e th e appropriat e whee l
senso r ai r ga p (se e pag e 19-103) .
Is th e ai r ga p OK ?
Chec k th e AB S functio n (se e pag e19-95 ).
JUMPE R WIR E JUMPE
R WIR E
Appropriat e Termina lPositive Sid e Negativ e Sid e4-1 (Right-front ) No . 5 : FR W (+ ) No . 4 : FR W (-)4- 2 (Left-front ) No . 3 : FL W (+ ) No . 2 : FL W (-)4- 4 (Right-rear ) No . 15 : RR W (+ ) No . 16 : RR W (-)4- 8 (Left-rear ) No.13 : RL W (+ ) No . 14 : RL W (-)
ProCarManuals.com
Page 1114 of 1954
Troubleshooting
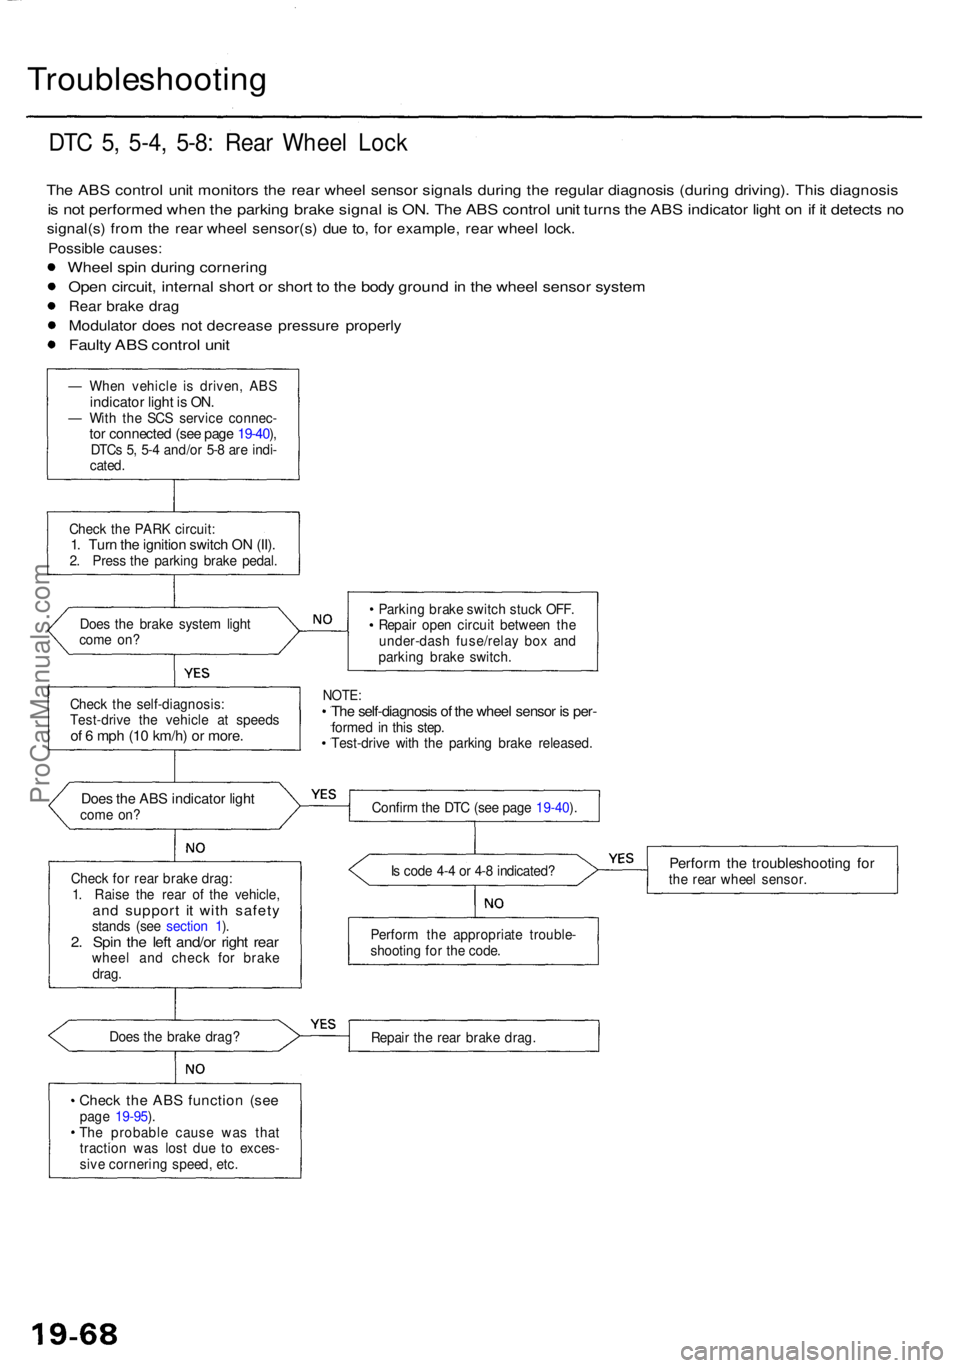
DTC 5 , 5-4 , 5-8 : Rea r Whee l Loc k
The AB S contro l uni t monitor s th e rea r whee l senso r signal s durin g th e regula r diagnosi s (durin g driving) . Thi s diagnosi s
is no t performe d whe n th e parkin g brak e signa l i s ON . Th e AB S contro l uni t turn s th e AB S indicato r ligh t o n if i t detect s n o
signal(s ) fro m th e rea r whee l sensor(s ) du e to , fo r example , rea r whee l lock .
Possibl e causes :
Wheel spi n durin g cornerin g
Open circuit , interna l shor t o r shor t t o th e bod y groun d in th e whee l senso r syste m
Rear brak e dra g
Modulato r doe s no t decreas e pressur e properl y
Faulty AB S contro l uni t
— Whe n vehicl e i s driven , ABSindicato r ligh t i s ON .— Wit h th e SC S servic e connec -tor connecte d (se e pag e 19-40 ),DTC s 5 , 5- 4 and/o r 5- 8 ar e indi -
cated .
Chec k th e PAR K circuit :
1. Tur n th e ignitio n switc h O N (II) .2. Pres s th e parking brake pedal .
Doe s th e brak e syste m ligh t
com e on ? Parkin
g brak e switc h stuc k OFF .
Repai r ope n circui t betwee n th e
under-das h fuse/rela y bo x an d
parkin g brak e switch .
NOTE:The self-diagnosi s o f th e whee l senso r i s per -forme d i n thi s step .
Test-driv e wit h th e parkin g brak e released .
Does th e AB S indicato r ligh tcom e on ?
Chec k fo r rea r brak e drag :
1 . Rais e th e rea r o f th e vehicle ,
and suppor t i t wit h safet ystands (se e sectio n 1 ).2 . Spi n th e lef t and/o r righ t rea rwhee l an d chec k fo r brak e
drag . I
s cod e 4- 4 o r 4- 8 indicated ?
Perform th e troubleshootin g fo rthe rea r whee l sensor .
Perfor m th e appropriat e trouble -
shootin g fo r th e code .
Doe s th e brak e drag ?
Repair th e rea r brak e drag .
Check th e AB S functio n (se epage 19-95 ).
Th e probabl e caus e wa s tha t
tractio n wa s los t du e t o exces -
siv e cornerin g speed , etc .
Chec
k th e self-diagnosis :
Test-driv e th e vehicl e a t speed s
of 6 mp h (1 0 km/h ) o r more .
Confir m th e DT C (se e pag e 19-40 ).
ProCarManuals.com
Page 1142 of 1954
ABS Functio n Tes t (cont'd )
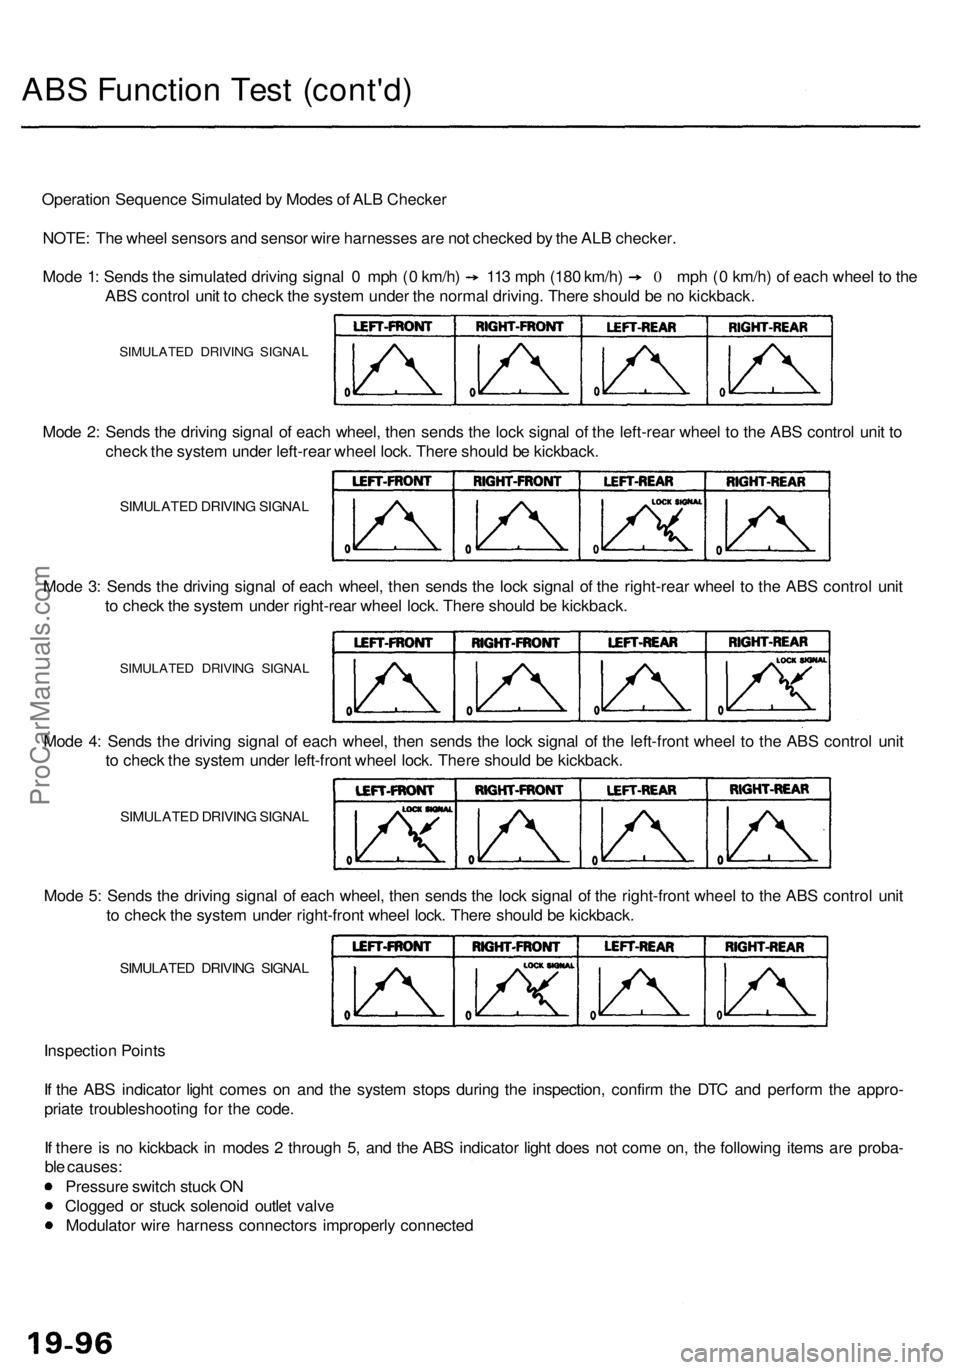
Operatio n Sequenc e Simulate d b y Mode s o f AL B Checke r
NOTE : Th e whee l sensor s an d senso r wir e harnesse s ar e no t checke d b y th e AL B checker .
Mode 1 : Send s th e simulate d drivin g signa l 0 mp h ( 0 km/h ) 11 3 mp h (18 0 km/h ) 0 mph ( 0 km/h ) o f eac h whee l t o th e
AB S contro l uni t t o chec k th e syste m unde r th e norma l driving . Ther e shoul d b e n o kickback .
SIMULATE D DRIVIN G SIGNA L
Mode 2 : Send s th e drivin g signa l o f eac h wheel , the n send s th e loc k signa l o f th e left-rea r whee l t o th e AB S contro l uni t t o
chec k th e syste m unde r left-rea r whee l lock . Ther e shoul d b e kickback .
SIMULATE D DRIVIN G SIGNA L
Mode 3 : Send s th e drivin g signa l o f eac h wheel , the n send s th e loc k signa l o f th e right-rea r whee l t o th e AB S contro l uni t
t o chec k th e syste m unde r right-rea r whee l lock . Ther e shoul d b e kickback .
SIMULATE D DRIVIN G SIGNA L
Inspectio n Point s
I f th e AB S indicato r ligh t come s o n an d th e syste m stop s durin g th e inspection , confir m th e DT C an d perfor m th e appro -
priat e troubleshootin g fo r th e code .
I f ther e is n o kickbac k i n mode s 2 throug h 5 , an d th e AB S indicato r ligh t doe s no t com e on , th e followin g item s ar e proba -
bl e causes :
Pressur e switc h stuc k O N
Clogge d o r stuc k solenoi d outle t valv e
Modulato r wir e harnes s connector s improperl y connecte d
Mod
e 5 : Send s th e drivin g signa l o f eac h wheel , the n send s th e loc k signa l o f th e right-fron t whee l t o th e AB S contro l uni t
t o chec k th e syste m unde r right-fron t whee l lock . Ther e shoul d b e kickback .
SIMULATE D DRIVIN G SIGNA L
Mode 4 : Send s th e drivin g signa l o f eac h wheel , the n send s th e loc k signa l o f th e left-fron t whee l t o th e AB S contro l uni t
t o chec k th e syste m unde r left-fron t whee l lock . Ther e shoul d b e kickback .
SIMULATE D DRIVIN G SIGNA L
ProCarManuals.com
Page 1149 of 1954
Pulsers/Wheel Senso r
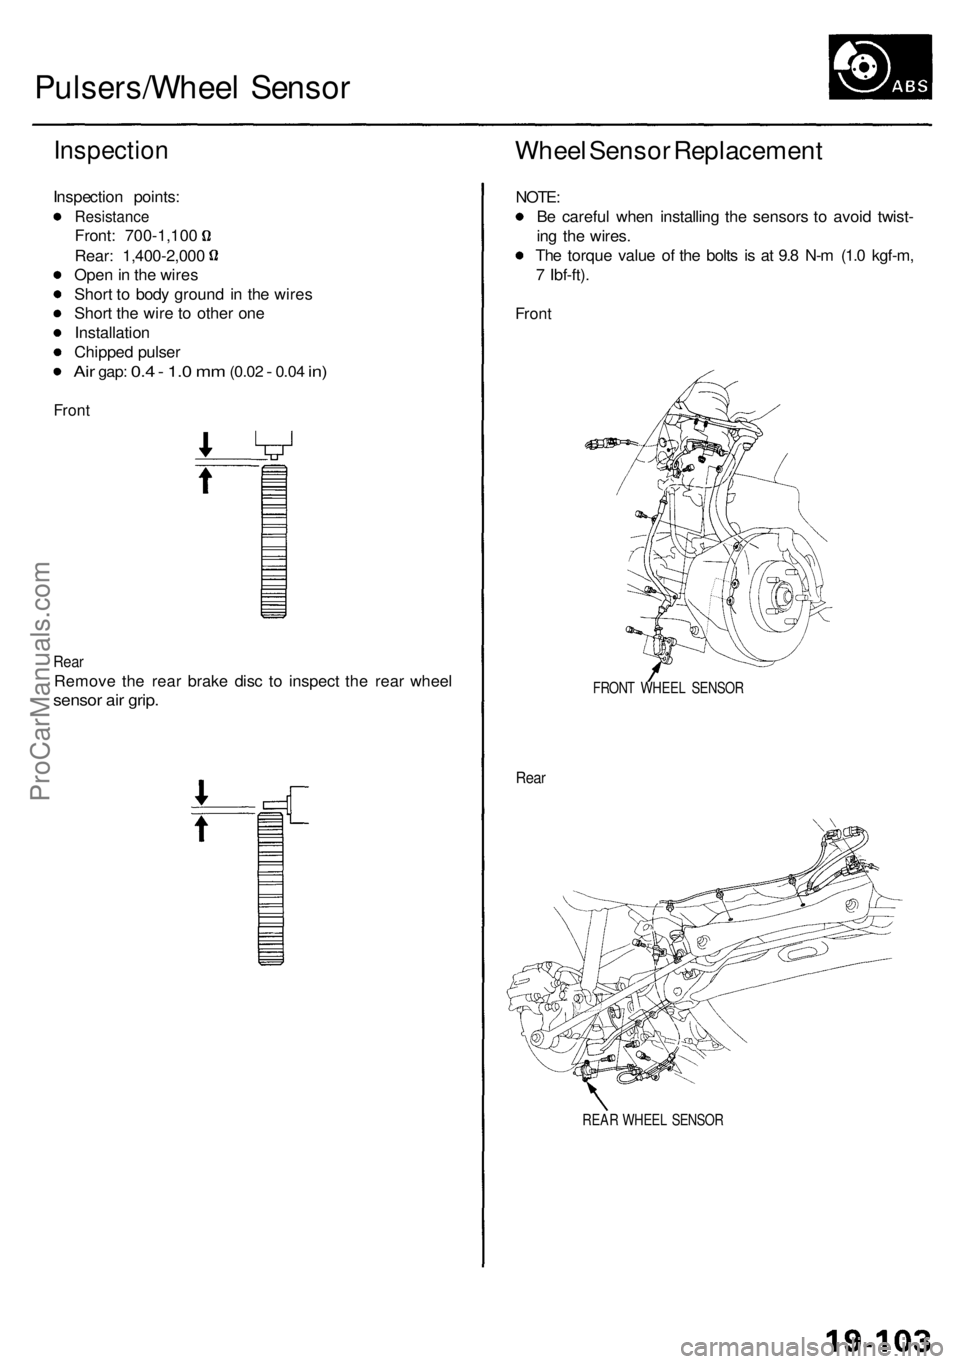
Inspectio n
Inspection points :
Resistanc e
Front: 700-1,10 0
Rear: 1,400-2,00 0
Ope n in th e wire s
Shor t t o bod y groun d i n th e wire s
Shor t th e wir e t o othe r on e
Installatio n
Chippe d pulse r
Air gap : 0.4 - 1. 0 m m (0.0 2 - 0.04 in)
Fron t
Rear
Remov e th e rea r brak e dis c t o inspec t th e rea r whee l
sensor ai r grip .
Whee l Senso r Replacemen t
NOTE:
B e carefu l whe n installin g th e sensor s t o avoi d twist -
in g th e wires .
Th e torqu e valu e o f th e bolt s i s a t 9. 8 N- m (1. 0 kgf-m ,
7 Ibf-ft) .
Front
FRON T WHEE L SENSO R
Rear
REA R WHEE L SENSO R
ProCarManuals.com
Page 1151 of 1954
Component Locations
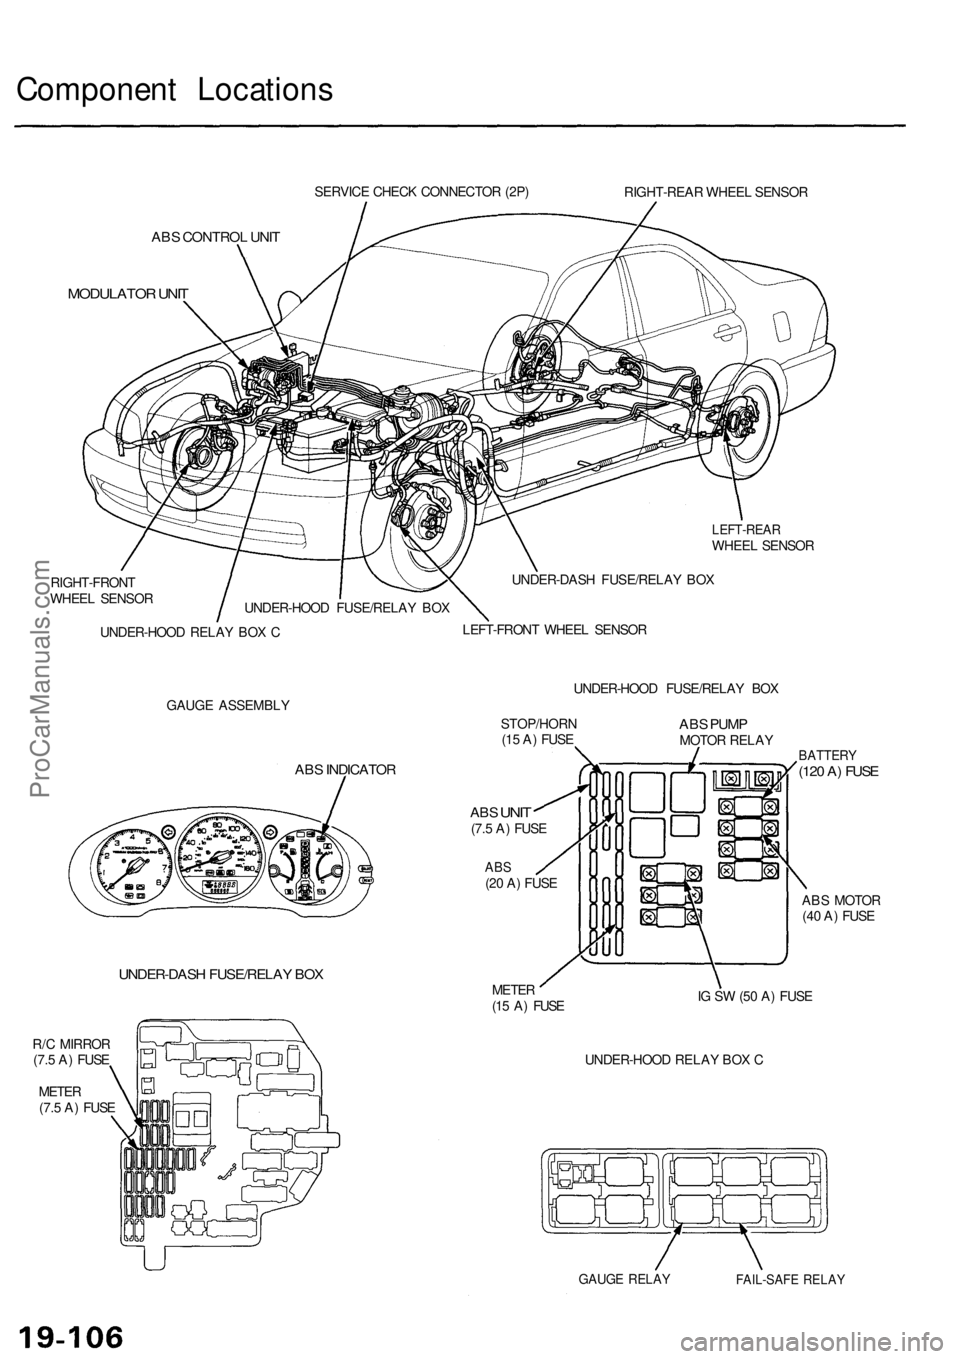
SERVICE CHECK CONNECTOR (2P)
RIGHT-REAR WHEEL SENSOR
ABS CONTROL UNIT
MODULATOR UNIT
LEFT-REAR
WHEEL SENSOR
RIGHT-FRONT
WHEEL SENSOR
UNDER-HOOD RELAY BOX C
UNDER-DASH FUSE/RELAY BOX
LEFT-FRONT WHEEL SENSOR
GAUGE ASSEMBLY
UNDER-HOOD FUSE/RELAY BOX
ABS INDICATOR
UNDER-DASH FUSE/RELAY BOX
R/C MIRROR
(7.5 A) FUSE
METER
(7.5 A) FUSE
STOP/HORN
(15 A) FUSE
ABS
UNIT
(7.5 A) FUSE
ABS
(20 A) FUSE
ABS PUMP
MOTOR RELAY
METER
(15 A) FUSE
BATTERY
(120 A) FUSE
ABS MOTOR
(40 A) FUSE
IG SW (50 A) FUSE
UNDER-HOOD RELAY BOX C
GAUGE RELAY
FAIL-SAFE RELAY
UNDER-HOOD FUSE/RELAY BOXProCarManuals.com
Page 1153 of 1954
Anti-lock Brake System (ABS)
Features/Construction (cont'd)
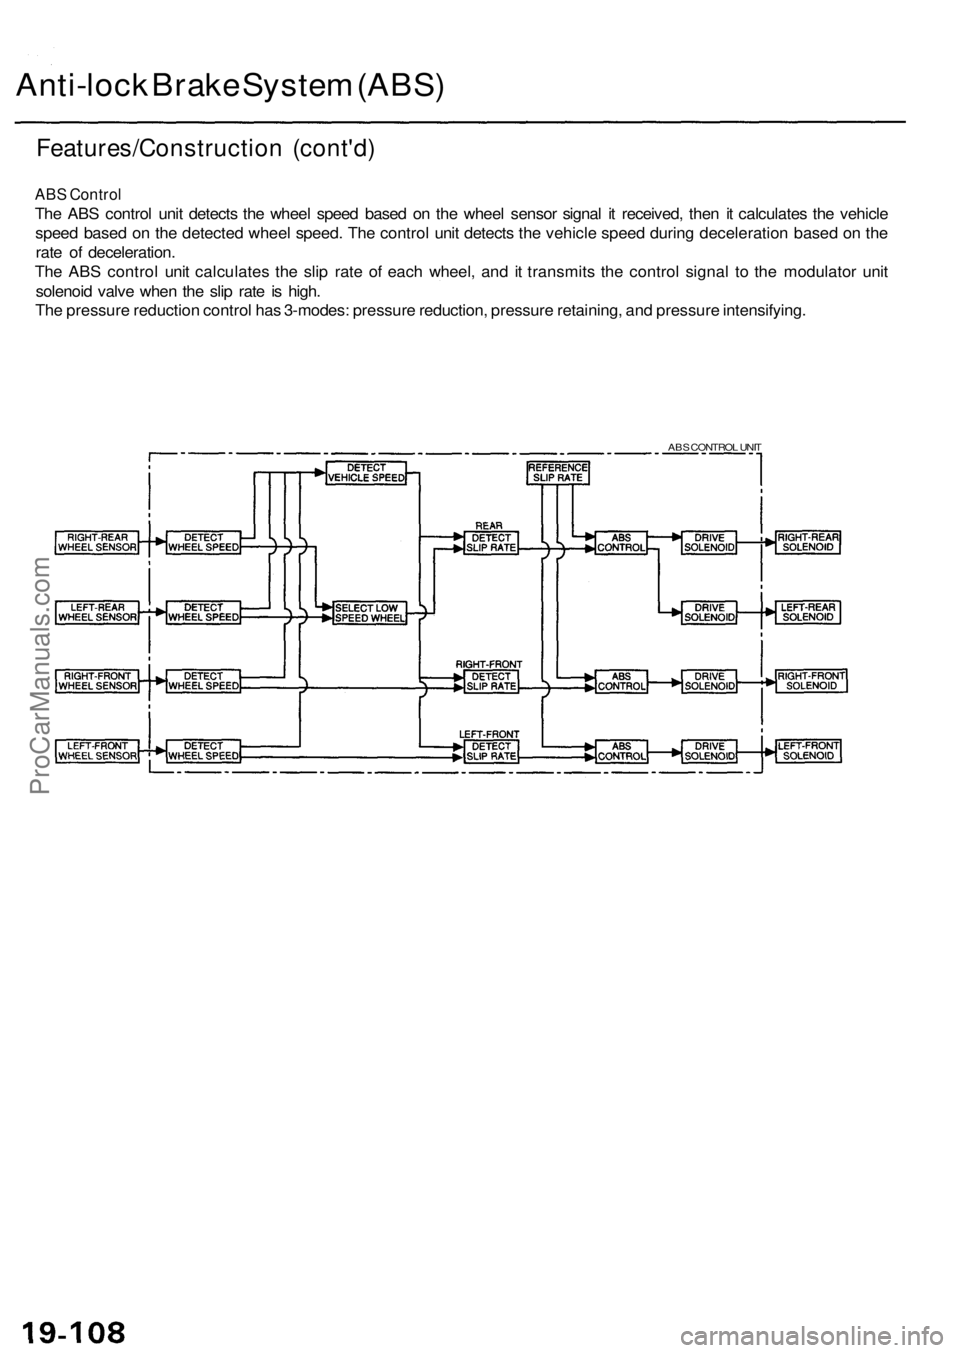
ABS Control
The ABS control unit detects the wheel speed based on the wheel sensor signal it received, then it calculates the vehicle
speed based on the detected wheel speed. The control unit detects the vehicle speed during deceleration based on the
rate of deceleration.
The ABS control unit calculates the slip rate of each wheel, and it transmits the control signal to the modulator unit
solenoid valve when the slip rate is high.
The pressure reduction control has 3-modes: pressure reduction, pressure retaining, and pressure intensifying.
ABS CONTROL UNITProCarManuals.com
Page 1154 of 1954
Self-diagnosis
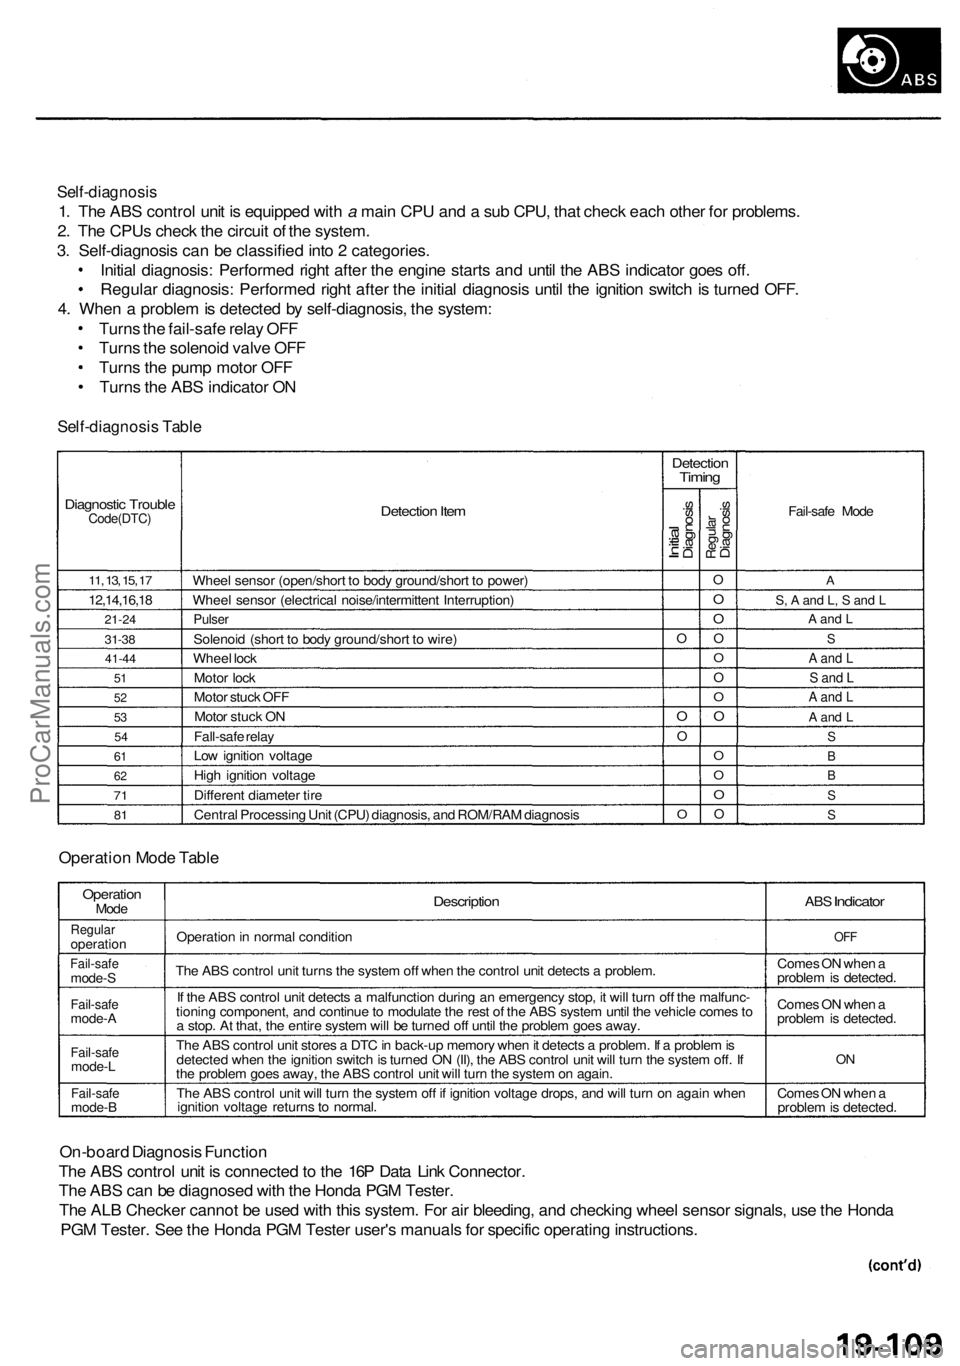
1. The ABS control unit is equipped with a main CPU and a sub CPU, that check each other for problems.
2. The CPUs check the circuit of the system.
3. Self-diagnosis can be classified into 2 categories.
Initial diagnosis: Performed right after the engine starts and until the ABS indicator goes off.
Regular diagnosis: Performed right after the initial diagnosis until the ignition switch is turned OFF.
4. When a problem is detected by self-diagnosis, the system:
Turns the fail-safe relay OFF
Turns the solenoid valve OFF
Turns the pump motor OFF
Turns the ABS indicator ON
Self-diagnosis Table
Diagnostic Trouble
Code(DTC)
11, 13, 15, 17
12,14,16,18
21-24
31-38
41-44
51
52
53
54
61
62
71
81
Detection Item
Wheel sensor (open/short to body ground/short to power)
Wheel sensor (electrical noise/intermittent Interruption)
Pulser
Solenoid (short to body ground/short to wire)
Wheel lock
Motor lock
Motor stuck OFF
Motor stuck ON
Fall-safe relay
Low ignition voltage
High ignition voltage
Different diameter tire
Central Processing Unit (CPU) diagnosis, and ROM/RAM diagnosis
Detection
Timing
Initial
Diagnosis
O
O
O
O
Regular
Diagnosis
O
O
O
O
O
O
O
O
O
O
O
O
Fail-safe Mode
A
S, A and L, S and L
A and L
S
A and L
S and L
A and L
A and L
S
B
B
S
S
Operation Mode Table
Operation
Mode
Regular
operation
Fail-safe
mode-S
Fail-safe
mode-A
Fail-safe
mode-L
Fail-safe
mode-B
Description
Operation in normal condition
The ABS control unit turns the system off when the control unit detects a problem.
If the ABS control unit detects a malfunction during an emergency stop, it will turn off the malfunc-
tioning component, and continue to modulate the rest of the ABS system until the vehicle comes to
a stop. At that, the entire system will be turned off until the problem goes away.
The ABS control unit stores a DTC in back-up memory when it detects a problem. If a problem is
detected when the ignition switch is turned ON (II), the ABS control unit will turn the system off. If
the problem goes away, the ABS control unit will turn the system on again.
The ABS control unit will turn the system off if ignition voltage drops, and will turn on again when
ignition voltage returns to normal.
ABS
Indicator
OFF
Comes ON when a
problem is detected.
Comes ON when a
problem is detected.
ON
Comes ON when a
problem is detected.
On-board Diagnosis Function
The ABS control unit is connected to the 16P Data Link Connector.
The ABS can be diagnosed with the Honda PGM Tester.
The ALB Checker cannot be used with this system. For air bleeding, and checking wheel sensor signals, use the Honda
PGM Tester. See the Honda PGM Tester user's manuals for specific operating instructions.
ProCarManuals.com