1995 JEEP YJ brake
[x] Cancel search: brakePage 1674 of 2158
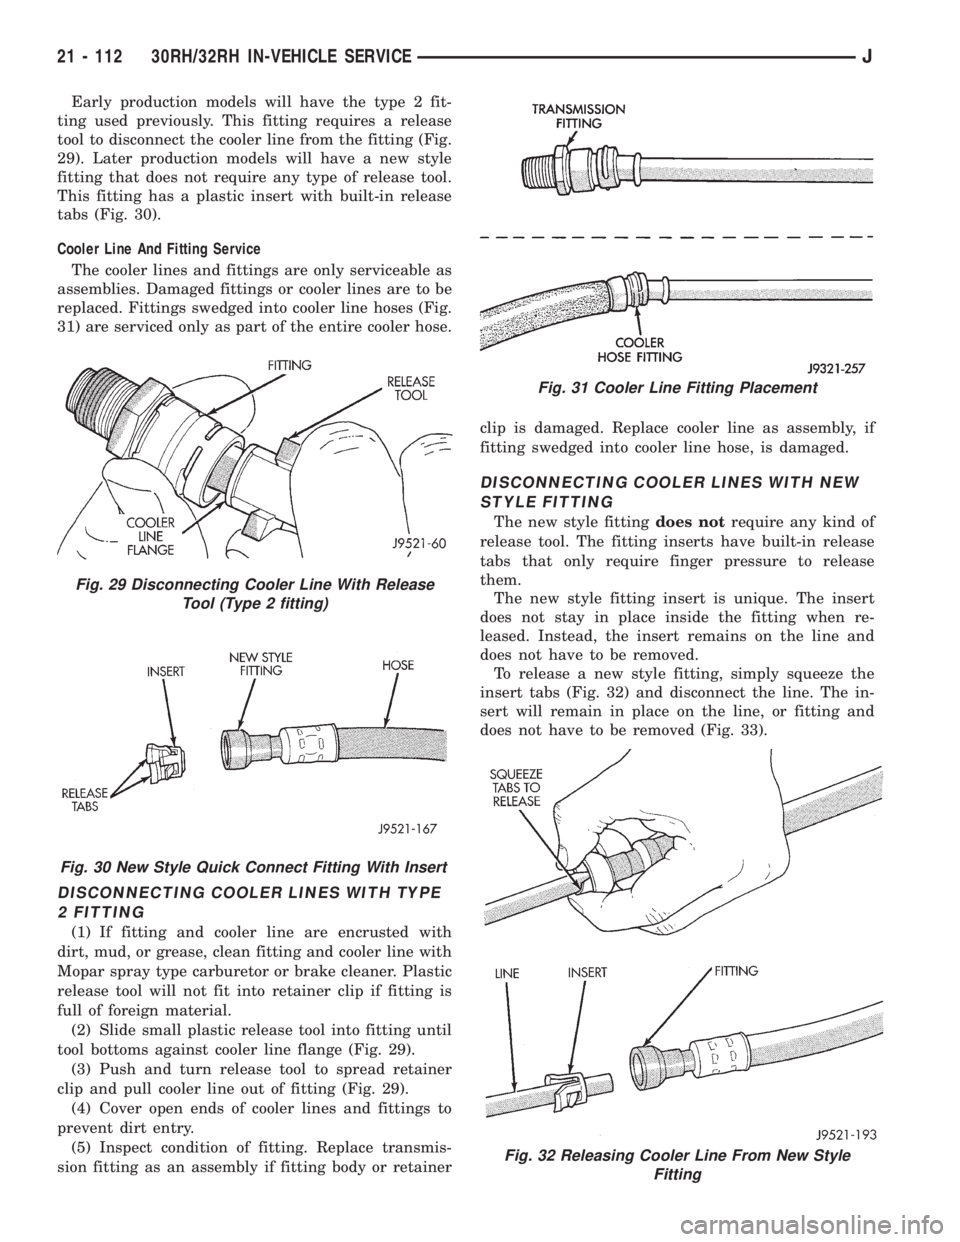
Early production models will have the type 2 fit-
ting used previously. This fitting requires a release
tool to disconnect the cooler line from the fitting (Fig.
29). Later production models will have a new style
fitting that does not require any type of release tool.
This fitting has a plastic insert with built-in release
tabs (Fig. 30).
Cooler Line And Fitting Service
The cooler lines and fittings are only serviceable as
assemblies. Damaged fittings or cooler lines are to be
replaced. Fittings swedged into cooler line hoses (Fig.
31) are serviced only as part of the entire cooler hose.
DISCONNECTING COOLER LINES WITH TYPE
2 FITTING
(1) If fitting and cooler line are encrusted with
dirt, mud, or grease, clean fitting and cooler line with
Mopar spray type carburetor or brake cleaner. Plastic
release tool will not fit into retainer clip if fitting is
full of foreign material.
(2) Slide small plastic release tool into fitting until
tool bottoms against cooler line flange (Fig. 29).
(3) Push and turn release tool to spread retainer
clip and pull cooler line out of fitting (Fig. 29).
(4) Cover open ends of cooler lines and fittings to
prevent dirt entry.
(5) Inspect condition of fitting. Replace transmis-
sion fitting as an assembly if fitting body or retainerclip is damaged. Replace cooler line as assembly, if
fitting swedged into cooler line hose, is damaged.
DISCONNECTING COOLER LINES WITH NEW
STYLE FITTING
The new style fittingdoes notrequire any kind of
release tool. The fitting inserts have built-in release
tabs that only require finger pressure to release
them.
The new style fitting insert is unique. The insert
does not stay in place inside the fitting when re-
leased. Instead, the insert remains on the line and
does not have to be removed.
To release a new style fitting, simply squeeze the
insert tabs (Fig. 32) and disconnect the line. The in-
sert will remain in place on the line, or fitting and
does not have to be removed (Fig. 33).
Fig. 30 New Style Quick Connect Fitting With Insert
Fig. 29 Disconnecting Cooler Line With Release
Tool (Type 2 fitting)
Fig. 31 Cooler Line Fitting Placement
Fig. 32 Releasing Cooler Line From New Style
Fitting
21 - 112 30RH/32RH IN-VEHICLE SERVICEJ
Page 1727 of 2158
AW-4 AUTOMATIC TRANSMISSION
CONTENTS
page page
AW-4 AUTOMATIC TRANSMISSION........ 165
AW-4 IN-VEHICLE SERVICE.............. 182
AW-4 TRANSMISSION DIAGNOSIS......... 176
AW-4 TRANSMISSION OVERHAUL......... 201AW-4 TRANSMISSION REMOVAL AND
INSTALLATION....................... 198
GENERAL INFORMATION................ 165
GENERAL INFORMATION
INDEX
page page
Components and Operation................. 166
Description............................. 165
First/Second/Third/Reverse Components....... 168
Fourth Gear Overdrive Components.......... 167
Geartrain Operation and Application Charts..... 169Hydraulic System........................ 169
Recommended Fluid and Capacity........... 166
Torque Converter........................ 167
Transmission Identification.................. 166
Transmission Ranges and Shift Lever Positions . . 166
DESCRIPTION
AW-4 Transmission Overhaul
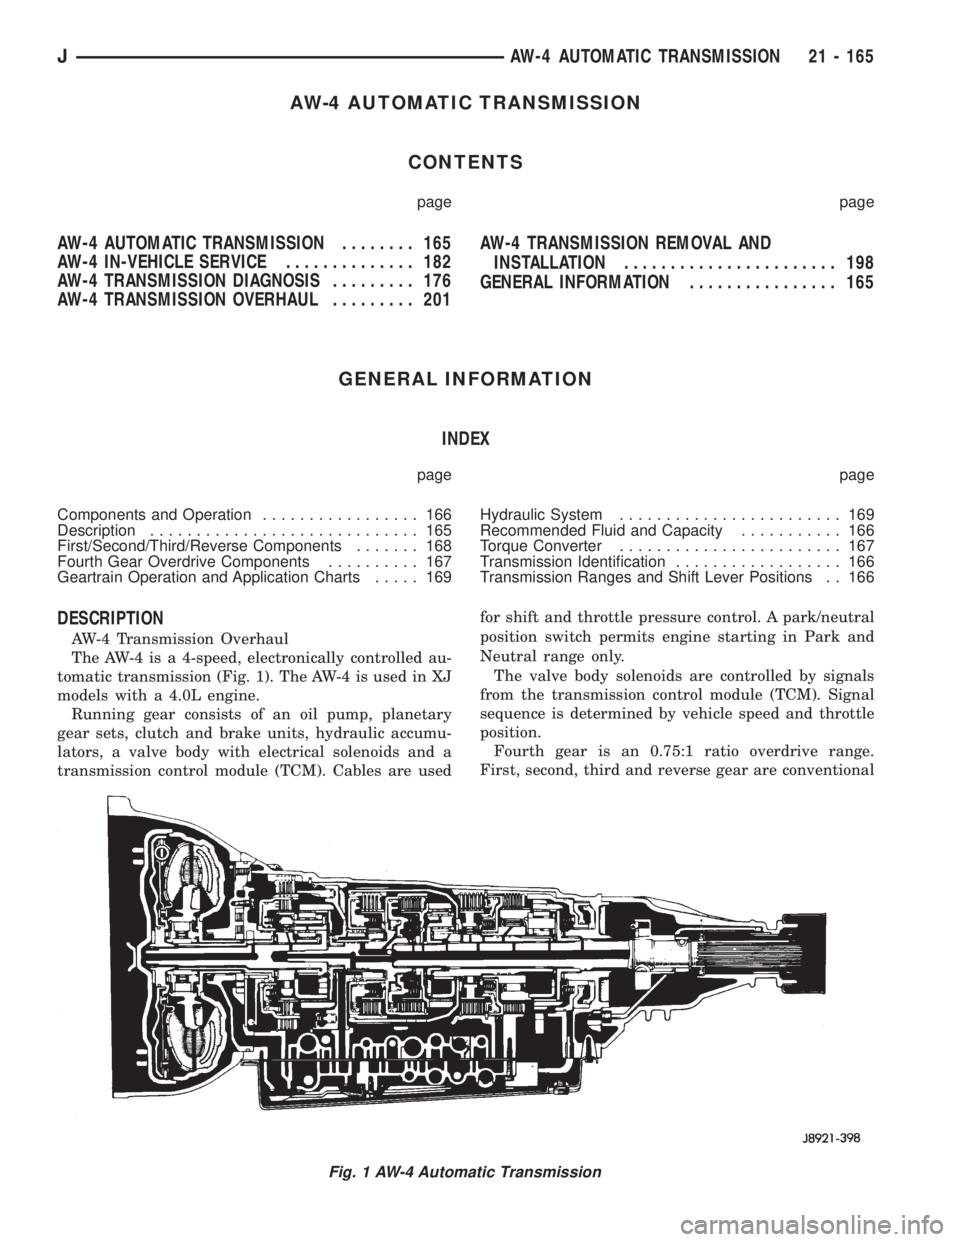
The AW-4 is a 4-speed, electronically controlled au-
tomatic transmission (Fig. 1). The AW-4 is used in XJ
models with a 4.0L engine.
Running gear consists of an oil pump, planetary
gear sets, clutch and brake units, hydraulic accumu-
lators, a valve body with electrical solenoids and a
transmission control module (TCM). Cables are usedfor shift and throttle pressure control. A park/neutral
position switch permits engine starting in Park and
Neutral range only.
The valve body solenoids are controlled by signals
from the transmission control module (TCM). Signal
sequence is determined by vehicle speed and throttle
position.
Fourth gear is an 0.75:1 ratio overdrive range.
First, second, third and reverse gear are conventional
Fig. 1 AW-4 Automatic Transmission
JAW-4 AUTOMATIC TRANSMISSION 21 - 165
Page 1728 of 2158
ranges. Third gear ratio is 1:1. A separate planetary
gear set provides overdrive operation in fourth gear.
TRANSMISSION RANGES AND SHIFT LEVER
POSITIONS
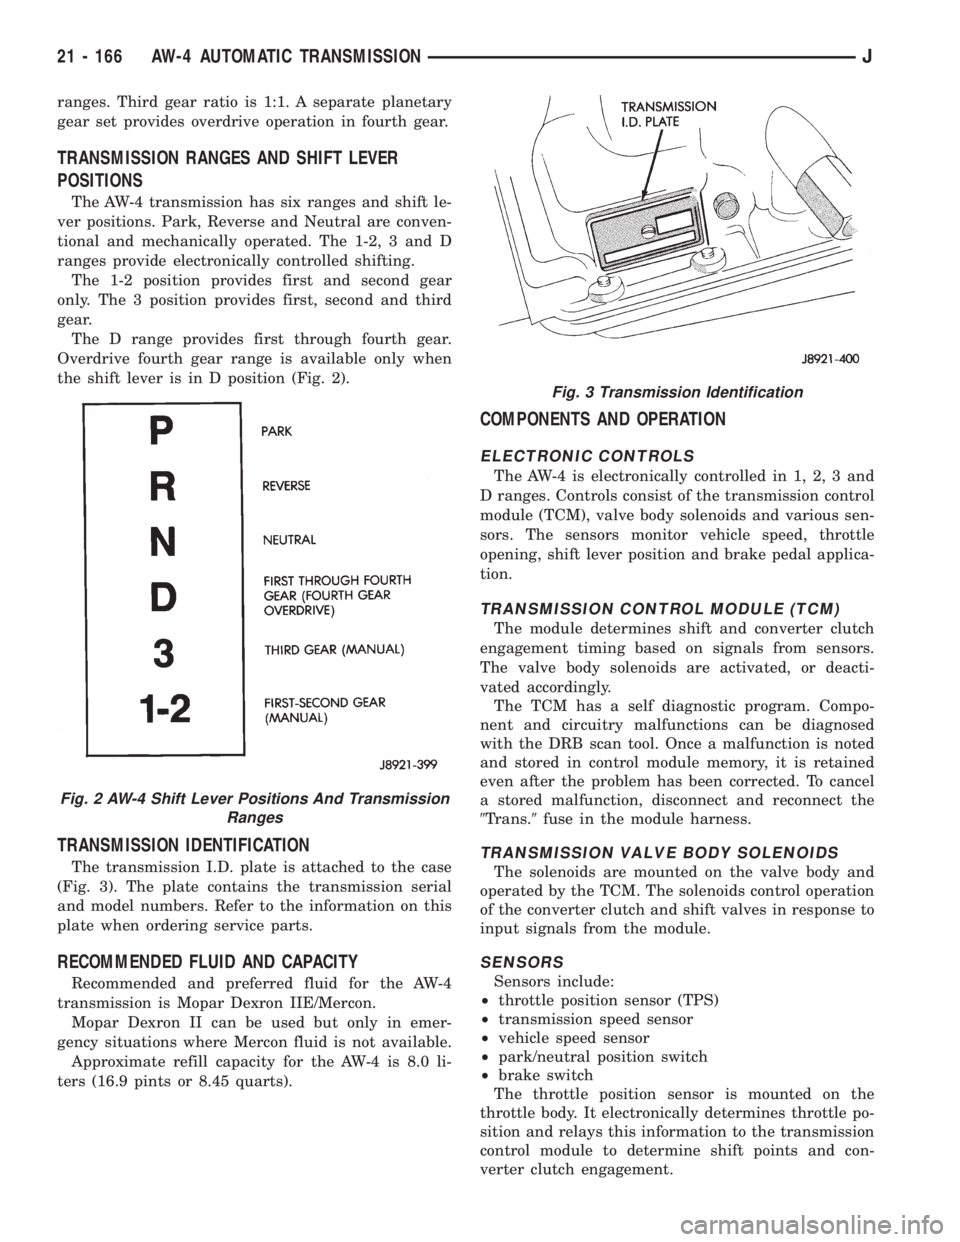
The AW-4 transmission has six ranges and shift le-
ver positions. Park, Reverse and Neutral are conven-
tional and mechanically operated. The 1-2, 3 and D
ranges provide electronically controlled shifting.
The 1-2 position provides first and second gear
only. The 3 position provides first, second and third
gear.
The D range provides first through fourth gear.
Overdrive fourth gear range is available only when
the shift lever is in D position (Fig. 2).
TRANSMISSION IDENTIFICATION
The transmission I.D. plate is attached to the case
(Fig. 3). The plate contains the transmission serial
and model numbers. Refer to the information on this
plate when ordering service parts.
RECOMMENDED FLUID AND CAPACITY
Recommended and preferred fluid for the AW-4
transmission is Mopar Dexron IIE/Mercon.
Mopar Dexron II can be used but only in emer-
gency situations where Mercon fluid is not available.
Approximate refill capacity for the AW-4 is 8.0 li-
ters (16.9 pints or 8.45 quarts).
COMPONENTS AND OPERATION
ELECTRONIC CONTROLS
The AW-4 is electronically controlled in 1, 2, 3 and
D ranges. Controls consist of the transmission control
module (TCM), valve body solenoids and various sen-
sors. The sensors monitor vehicle speed, throttle
opening, shift lever position and brake pedal applica-
tion.
TRANSMISSION CONTROL MODULE (TCM)
The module determines shift and converter clutch
engagement timing based on signals from sensors.
The valve body solenoids are activated, or deacti-
vated accordingly.
The TCM has a self diagnostic program. Compo-
nent and circuitry malfunctions can be diagnosed
with the DRB scan tool. Once a malfunction is noted
and stored in control module memory, it is retained
even after the problem has been corrected. To cancel
a stored malfunction, disconnect and reconnect the
9Trans.9fuse in the module harness.
TRANSMISSION VALVE BODY SOLENOIDS
The solenoids are mounted on the valve body and
operated by the TCM. The solenoids control operation
of the converter clutch and shift valves in response to
input signals from the module.
SENSORS
Sensors include:
²throttle position sensor (TPS)
²transmission speed sensor
²vehicle speed sensor
²park/neutral position switch
²brake switch
The throttle position sensor is mounted on the
throttle body. It electronically determines throttle po-
sition and relays this information to the transmission
control module to determine shift points and con-
verter clutch engagement.
Fig. 2 AW-4 Shift Lever Positions And Transmission
Ranges
Fig. 3 Transmission Identification
21 - 166 AW-4 AUTOMATIC TRANSMISSIONJ
Page 1729 of 2158
The transmission speed sensor consists of a rotor
and magnet on the transmission output shaft and a
switch in the extension housing or adapter. The sen-
sor switch is activated each time the rotor and mag-
net complete one revolution. Sensor signals are sent
to the transmission control module.
The park/neutral position switch is mounted on the
valve body manual shaft. The switch signals shift
linkage and manual valve position to the transmis-
sion control module through an interconnecting har-
ness. The switch prevents engine starting in all gears
other than Park or Neutral.
The brake switch is in circuit with the torque con-
verter clutch solenoid. The switch disengages the
converter clutch whenever the brakes are applied.
The switch is mounted on the brake pedal bracket
and signals the transmission control module when
the pedal is pressed or released.
TORQUE CONVERTER
A three element torque converter is used for all ap-
plications. The converter contains an impeller, stator,
and turbine.
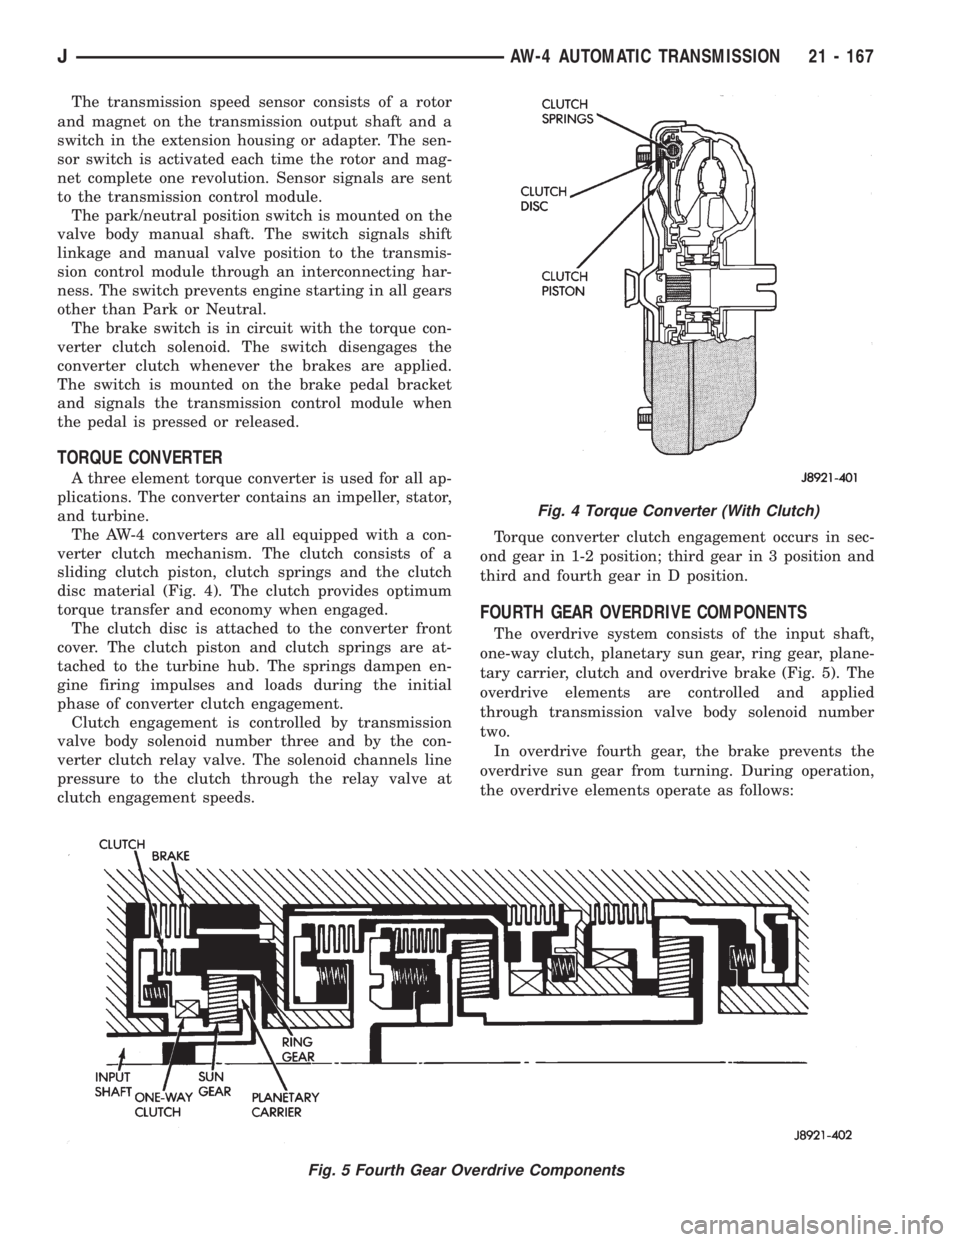
The AW-4 converters are all equipped with a con-
verter clutch mechanism. The clutch consists of a
sliding clutch piston, clutch springs and the clutch
disc material (Fig. 4). The clutch provides optimum
torque transfer and economy when engaged.
The clutch disc is attached to the converter front
cover. The clutch piston and clutch springs are at-
tached to the turbine hub. The springs dampen en-
gine firing impulses and loads during the initial
phase of converter clutch engagement.
Clutch engagement is controlled by transmission
valve body solenoid number three and by the con-
verter clutch relay valve. The solenoid channels line
pressure to the clutch through the relay valve at
clutch engagement speeds.Torque converter clutch engagement occurs in sec-
ond gear in 1-2 position; third gear in 3 position and
third and fourth gear in D position.
FOURTH GEAR OVERDRIVE COMPONENTS
The overdrive system consists of the input shaft,
one-way clutch, planetary sun gear, ring gear, plane-
tary carrier, clutch and overdrive brake (Fig. 5). The
overdrive elements are controlled and applied
through transmission valve body solenoid number
two.
In overdrive fourth gear, the brake prevents the
overdrive sun gear from turning. During operation,
the overdrive elements operate as follows:
Fig. 4 Torque Converter (With Clutch)
Fig. 5 Fourth Gear Overdrive Components
JAW-4 AUTOMATIC TRANSMISSION 21 - 167
Page 1730 of 2158
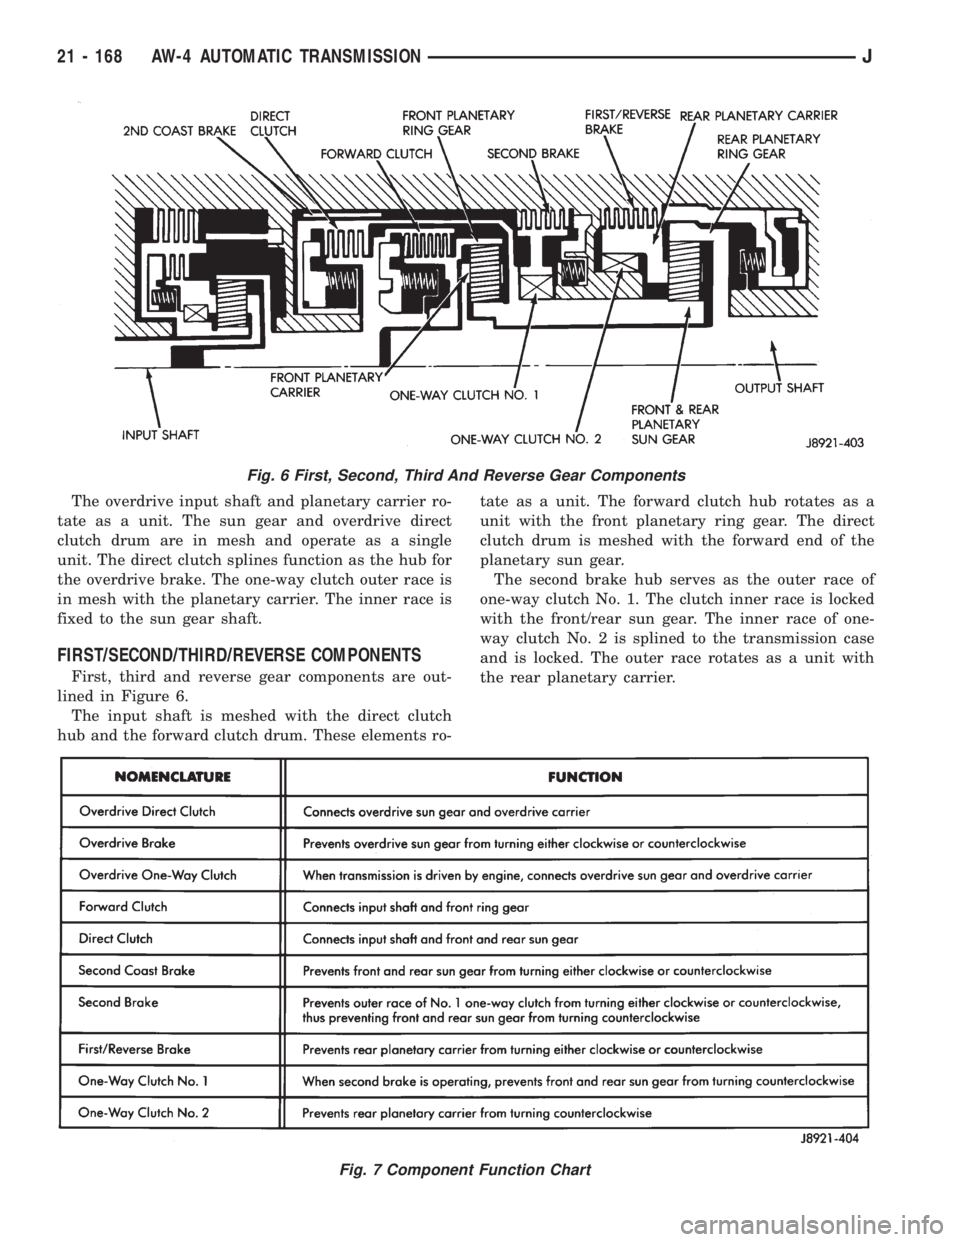
The overdrive input shaft and planetary carrier ro-
tate as a unit. The sun gear and overdrive direct
clutch drum are in mesh and operate as a single
unit. The direct clutch splines function as the hub for
the overdrive brake. The one-way clutch outer race is
in mesh with the planetary carrier. The inner race is
fixed to the sun gear shaft.
FIRST/SECOND/THIRD/REVERSE COMPONENTS
First, third and reverse gear components are out-
lined in Figure 6.
The input shaft is meshed with the direct clutch
hub and the forward clutch drum. These elements ro-tate as a unit. The forward clutch hub rotates as a
unit with the front planetary ring gear. The direct
clutch drum is meshed with the forward end of the
planetary sun gear.
The second brake hub serves as the outer race of
one-way clutch No. 1. The clutch inner race is locked
with the front/rear sun gear. The inner race of one-
way clutch No. 2 is splined to the transmission case
and is locked. The outer race rotates as a unit with
the rear planetary carrier.
Fig. 6 First, Second, Third And Reverse Gear Components
Fig. 7 Component Function Chart
21 - 168 AW-4 AUTOMATIC TRANSMISSIONJ
Page 1731 of 2158
The rear planetary ring gear is splined to the out-
put shaft. The front planetary carrier and rear car-
rier ring gear are meshed and rotate as a unit with
the output shaft.
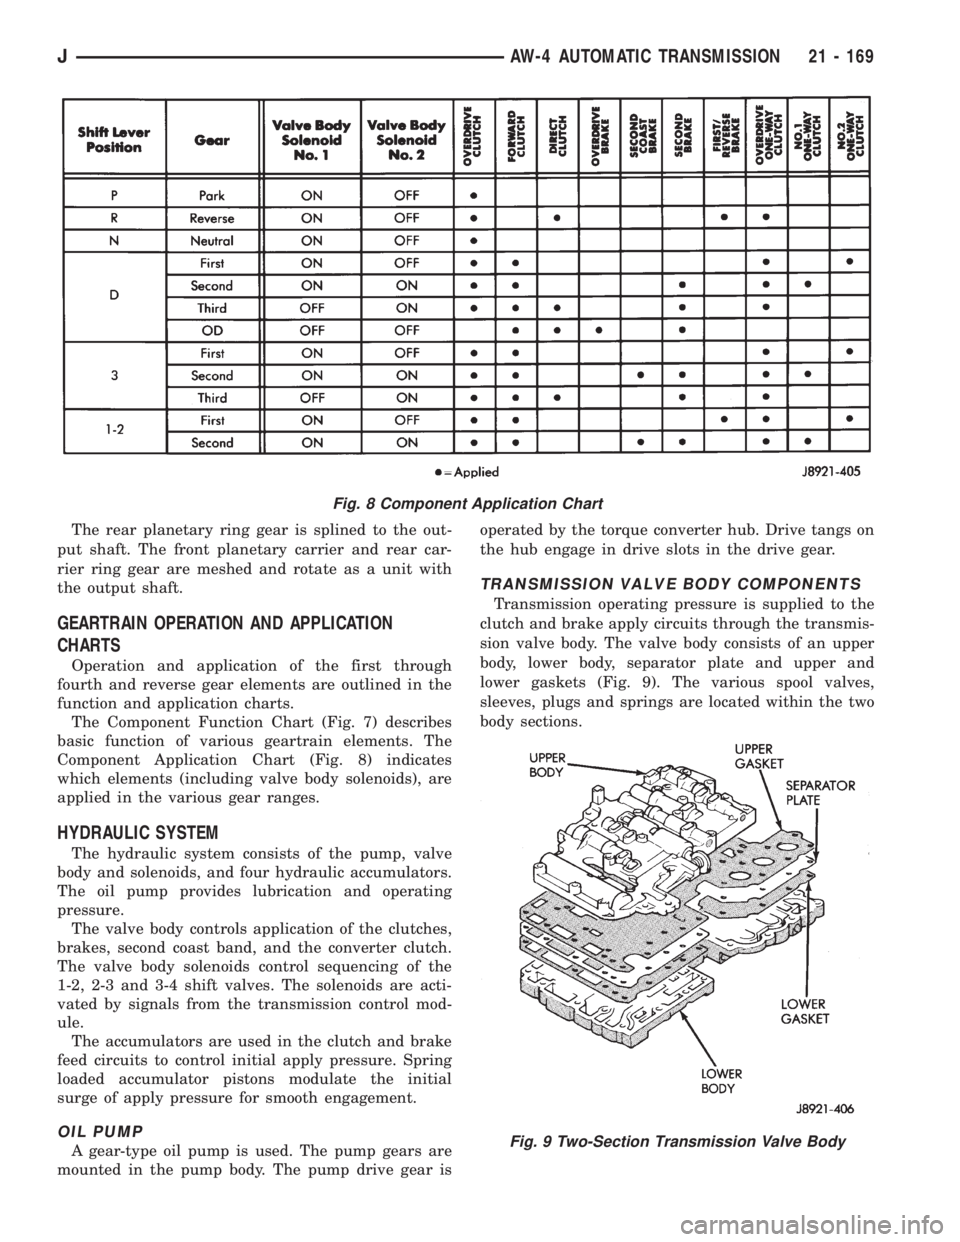
GEARTRAIN OPERATION AND APPLICATION
CHARTS
Operation and application of the first through
fourth and reverse gear elements are outlined in the
function and application charts.
The Component Function Chart (Fig. 7) describes
basic function of various geartrain elements. The
Component Application Chart (Fig. 8) indicates
which elements (including valve body solenoids), are
applied in the various gear ranges.
HYDRAULIC SYSTEM
The hydraulic system consists of the pump, valve
body and solenoids, and four hydraulic accumulators.
The oil pump provides lubrication and operating
pressure.
The valve body controls application of the clutches,
brakes, second coast band, and the converter clutch.
The valve body solenoids control sequencing of the
1-2, 2-3 and 3-4 shift valves. The solenoids are acti-
vated by signals from the transmission control mod-
ule.
The accumulators are used in the clutch and brake
feed circuits to control initial apply pressure. Spring
loaded accumulator pistons modulate the initial
surge of apply pressure for smooth engagement.
OIL PUMP
A gear-type oil pump is used. The pump gears are
mounted in the pump body. The pump drive gear isoperated by the torque converter hub. Drive tangs on
the hub engage in drive slots in the drive gear.
TRANSMISSION VALVE BODY COMPONENTS
Transmission operating pressure is supplied to the
clutch and brake apply circuits through the transmis-
sion valve body. The valve body consists of an upper
body, lower body, separator plate and upper and
lower gaskets (Fig. 9). The various spool valves,
sleeves, plugs and springs are located within the two
body sections.
Fig. 8 Component Application Chart
Fig. 9 Two-Section Transmission Valve Body
JAW-4 AUTOMATIC TRANSMISSION 21 - 169
Page 1732 of 2158

The manual valve, 1-2 shift valve, primary regula-
tor valve, accumulator control valve, check balls, so-
lenoids and oil strainers are located in the lower
body section (Fig. 10). The remaining control and
shift valves plus check balls and one additional oil
strainer are located in the upper body section (Fig.
11).
Manual Valve
The manual valve is operated by the gearshift link-
age. The valve diverts fluid to the apply circuits ac-
cording to shift lever position.Primary Regulator Valve
The primary regulator valve (Fig. 13) modulates
line pressure to the clutches and brakes according to
engine load. The valve is actuated by throttle valve
pressure.
During high load operation, the valve increases line
pressure to maintain positive clutch and brake en-
gagement. At light load, the valve decreases line
pressure just enough to maintain smooth engage-
ment.
Fig. 10 Upper Body Components
Fig. 11 Lower Body Components
21 - 170 AW-4 AUTOMATIC TRANSMISSIONJ
Page 1733 of 2158
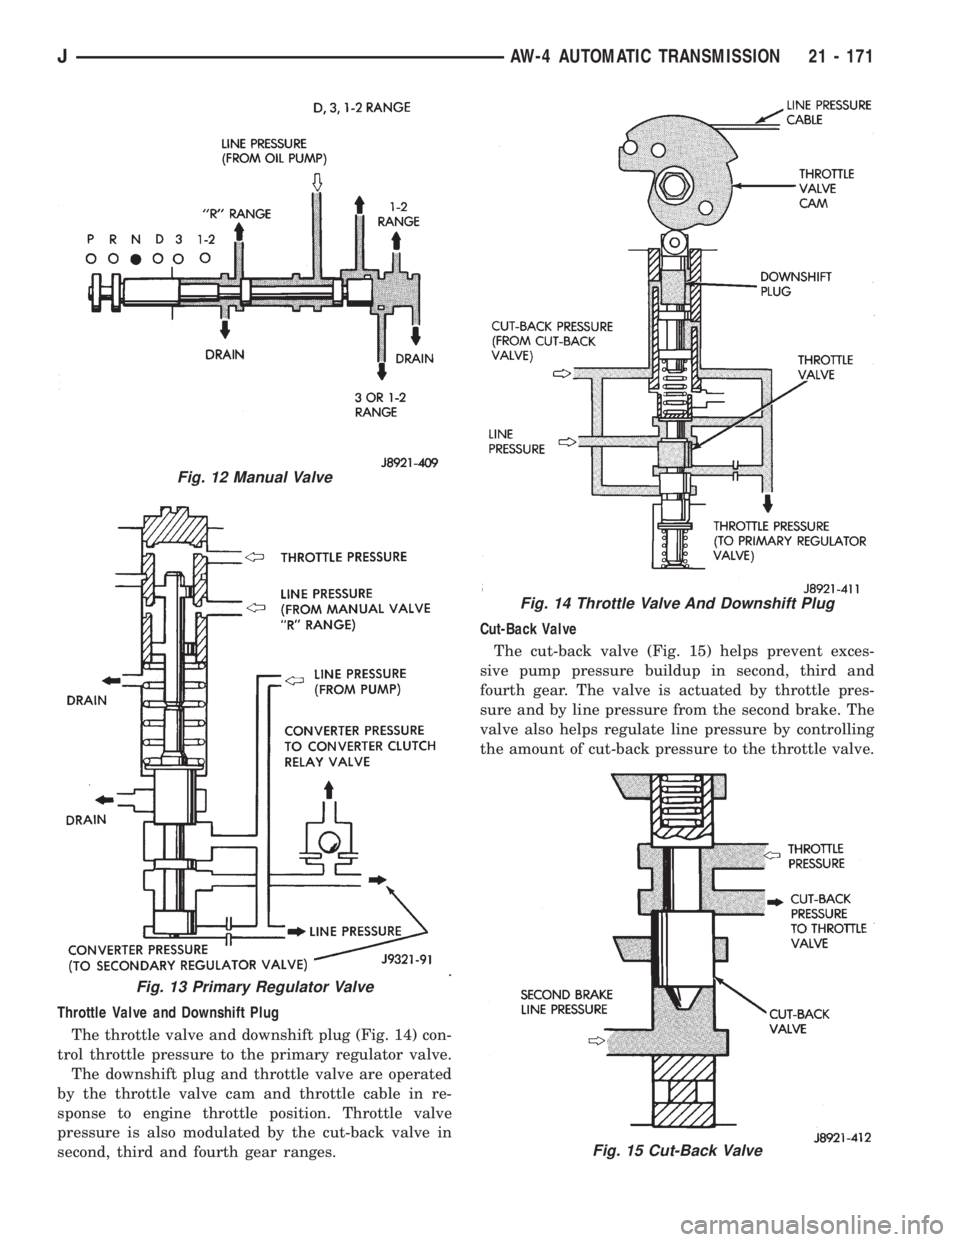
Throttle Valve and Downshift Plug
The throttle valve and downshift plug (Fig. 14) con-
trol throttle pressure to the primary regulator valve.
The downshift plug and throttle valve are operated
by the throttle valve cam and throttle cable in re-
sponse to engine throttle position. Throttle valve
pressure is also modulated by the cut-back valve in
second, third and fourth gear ranges.Cut-Back Valve
The cut-back valve (Fig. 15) helps prevent exces-
sive pump pressure buildup in second, third and
fourth gear. The valve is actuated by throttle pres-
sure and by line pressure from the second brake. The
valve also helps regulate line pressure by controlling
the amount of cut-back pressure to the throttle valve.
Fig. 12 Manual Valve
Fig. 13 Primary Regulator Valve
Fig. 14 Throttle Valve And Downshift Plug
Fig. 15 Cut-Back Valve
JAW-4 AUTOMATIC TRANSMISSION 21 - 171